spring源码系列7——spring启动流程5
前面系列6分析了Bean的实例化过程,本节分析初始化过程。发车!
1、doCreateBean
protected Object doCreateBean(String beanName, RootBeanDefinition mbd, @Nullable Object[] args)
			throws BeanCreationException {


		// Instantiate the bean.
		BeanWrapper instanceWrapper = null;
		if (mbd.isSingleton()) {

			instanceWrapper = this.factoryBeanInstanceCache.remove(beanName);
		}
		if (instanceWrapper == null) {

			//通过反射创建实例
			instanceWrapper = createBeanInstance(beanName, mbd, args);
		}
		Object bean = instanceWrapper.getWrappedInstance();
		Class<?> beanType = instanceWrapper.getWrappedClass();
		if (beanType != NullBean.class) {

			mbd.resolvedTargetType = beanType;
		}

		// Allow post-processors to modify the merged bean definition.
		synchronized (mbd.postProcessingLock) {

			if (!mbd.postProcessed) {

				try {

				//@Autowired、@Resourse等注解通过此处解析出所依赖的bean
			applyMergedBeanDefinitionPostProcessors(mbd, beanType, beanName);//关键步骤1
				}
				catch (Throwable ex) {

				//省略非关键代码
			}
			//标记已经经过MergedBeanDefinitionPostProcessors处理
			mbd.postProcessed = true;
		}

		// Eagerly cache singletons to be able to resolve circular references
		// even when triggered by lifecycle interfaces like BeanFactoryAware.
		//判断当前bean是否需要提前暴露
		boolean earlySingletonExposure = (mbd.isSingleton() && this.allowCircularReferences &&
				isSingletonCurrentlyInCreation(beanName));
		if (earlySingletonExposure) {

			if (logger.isTraceEnabled()) {

				logger.trace("Eagerly caching bean '" + beanName +
						"' to allow for resolving potential circular references");
			}
			//将当前bean加入三级缓存
			addSingletonFactory(beanName, () -> getEarlyBeanReference(beanName, mbd, bean));//关键步骤2
		}

		// Initialize the bean instance.
		Object exposedObject = bean;
		try {

			//填充bean
			populateBean(beanName, mbd, instanceWrapper);//关键步骤3

			//执行实例化方法
			exposedObject = initializeBean(beanName, exposedObject, mbd);//关键步骤4
		}
		catch (Throwable ex) {

		//省略非关键代码
		}

		if (earlySingletonExposure) {

			//省略非关键代码
		}

		// Register bean as disposable.
		try {

             //注册销毁回调
 		registerDisposableBeanIfNecessary(beanName, bean, mbd);
		}
		catch (BeanDefinitionValidationException ex) {

			throw new BeanCreationException(
					mbd.getResourceDescription(), beanName, "Invalid destruction signature", ex);
		}

		return exposedObject;
	}
以上主要流程可以拆解为4步,下面逐一分析:
- 关键步骤1
	protected void applyMergedBeanDefinitionPostProcessors(RootBeanDefinition mbd, Class<?> beanType, String beanName) {

		for (BeanPostProcessor bp : getBeanPostProcessors()) {

			if (bp instanceof MergedBeanDefinitionPostProcessor) {

				MergedBeanDefinitionPostProcessor bdp = (MergedBeanDefinitionPostProcessor) bp;
				bdp.postProcessMergedBeanDefinition(mbd, beanType, beanName);
			}
		}
	}
下面的类都实现MergedBeanDefinitionPostProcessor接口:
@Resource—CommonAnnotationBeanPostProcessor
@PostConstruct—CommonAnnotationBeanPostProcessor
@PreDestroy—CommonAnnotationBeanPostProcessor
@Autowired—AutowiredAnnotationBeanPostProcessor
@value—AutowiredAnnotationBeanPostProcessor
其中CommonAnnotationBeanPostProcessor类有两个作用:
A、处理@PostConstruct和@PreDestroy注解,用LifecycleMetadata表示初始化方法和销毁时的回调方法。
private class LifecycleMetadata {


		private final Class<?> targetClass;

		private final Collection<LifecycleElement> initMethods;

		private final Collection<LifecycleElement> destroyMethods;

		@Nullable   //描绘@PostConstruct所对应方法
		private volatile Set<LifecycleElement> checkedInitMethods;

		@Nullable //描绘@PreDestroy所对应方法
		private volatile Set<LifecycleElement> checkedDestroyMethods;
		省略非关键代码
		}
B、@Resource注解:找出@Resource注解所注入的元素,并用InjectedElement表示所需要注入的元素。
public class InjectionMetadata {


	private static final Log logger = LogFactory.getLog(InjectionMetadata.class);

	private final Class<?> targetClass;

	private final Collection<InjectedElement> injectedElements;
    //注入的元素
	@Nullable
	private volatile Set<InjectedElement> checkedElements;
	//省略非关键代码
	}
AutowiredAnnotationBeanPostProcessor类主要找出@Autowired和@Resource注解所注入的元素并用InjectionMetadata 进行表示,此处不再列举。
- 关键步骤2
boolean earlySingletonExposure = (mbd.isSingleton() && this.allowCircularReferences
&&isSingletonCurrentlyInCreation(beanName));
this.allowCircularReferences 默认为true;
isSingletonCurrentlyInCreation判断当前类是否在创建中;如果都为true,则代表需要提前暴露,则加入三级缓存;
	protected void addSingletonFactory(String beanName, ObjectFactory<?> singletonFactory) {

		synchronized (this.singletonObjects) {

			//单例池不包含当前beanName
			if (!this.singletonObjects.containsKey(beanName)) {

				//放入三级缓存
				this.singletonFactories.put(beanName, singletonFactory);
				this.earlySingletonObjects.remove(beanName);
				this.registeredSingletons.add(beanName);
			}
		}
	}
剩下的关键步骤3和4将在标题2和标题3分析。
2、populateBean
	protected void populateBean(String beanName, RootBeanDefinition mbd, @Nullable BeanWrapper bw) {

	//省略非关键代码
		if (!mbd.isSynthetic() && hasInstantiationAwareBeanPostProcessors()) {

			for (BeanPostProcessor bp : getBeanPostProcessors()) {

				if (bp instanceof InstantiationAwareBeanPostProcessor) {

					//InstantationAwareBeanPostProcessor
					InstantiationAwareBeanPostProcessor ibp = (InstantiationAwareBeanPostProcessor) bp;
					//执行InstantiationAwareBeanPostProcessor的postProcessAfterInstantiation方法
					if (!ibp.postProcessAfterInstantiation(bw.getWrappedInstance(), beanName)) {
     //关键步骤1
						return;
					}
				}
			}
		}
	/**
		 *  int AUTOWIRE_NO = 0;
		 *  目前非xml都是使用这种,需要开发者手动注入,比如用@Autowired。
		 *
		 *  int AUTOWIRE_BY_NAME = 1;
		 *  根据名字注入,需要写set方法。比如setXX(YY yy)方法,spring按set方法名字(XX)去容器查找bean并注入。
		 *
		 *  int AUTOWIRE_BY_TYPE = 2;
		 *  根据类型注入,需要写set方法。比如setXX(YY yy)  spring按set方法里面的参数类型YY去容器中查找bean
		 *
		 * int AUTOWIRE_CONSTRUCTOR = 3;
		 * 构造注入
		 */
		PropertyValues pvs = (mbd.hasPropertyValues() ? mbd.getPropertyValues() : null);

		int resolvedAutowireMode = mbd.getResolvedAutowireMode();
		if (resolvedAutowireMode == AUTOWIRE_BY_NAME || resolvedAutowireMode == AUTOWIRE_BY_TYPE) {
     //关键步骤2
			MutablePropertyValues newPvs = new MutablePropertyValues(pvs);
			if (resolvedAutowireMode == AUTOWIRE_BY_NAME) {

				autowireByName(beanName, mbd, bw, newPvs);
			}
			if (resolvedAutowireMode == AUTOWIRE_BY_TYPE) {

				autowireByType(beanName, mbd, bw, newPvs);
			}
			pvs = newPvs;
		}

		boolean hasInstAwareBpps = hasInstantiationAwareBeanPostProcessors();
		boolean needsDepCheck = (mbd.getDependencyCheck() != AbstractBeanDefinition.DEPENDENCY_CHECK_NONE);

		PropertyDescriptor[] filteredPds = null;
		if (hasInstAwareBpps) {

			if (pvs == null) {

				pvs = mbd.getPropertyValues();
			}
			for (BeanPostProcessor bp : getBeanPostProcessors()) {

				if (bp instanceof InstantiationAwareBeanPostProcessor) {

					InstantiationAwareBeanPostProcessor ibp = (InstantiationAwareBeanPostProcessor) bp;
					//处理@Autowired、@Resource等注解注入,根据MergedBeanDefinitionPostProcessor所找出的InjectionMetadata元素,从容器中找出所依赖bean注入
					PropertyValues pvsToUse = ibp.postProcessProperties(pvs, bw.getWrappedInstance(), beanName);//关键步骤3
					if (pvsToUse == null) {

						if (filteredPds == null) {

							filteredPds = filterPropertyDescriptorsForDependencyCheck(bw, mbd.allowCaching);
						}
						pvsToUse = ibp.postProcessPropertyValues(pvs, filteredPds, bw.getWrappedInstance(), beanName);
						if (pvsToUse == null) {

							return;
						}
					}
					pvs = pvsToUse;
				}
			}
		}
	    //省略非关键代码
		if (pvs != null) {
     //xml方式注入属性
			applyPropertyValues(beanName, mbd, bw, pvs);
		}
	}
以上流程可以拆解成3步:
-
关键步骤1
InstantiationAwareBeanPostProcessor——>postProcessAfterInstantiation; -
关键步骤2
autowireMode的处理:
int AUTOWIRE_NO = 0;
//目前非xml都是使用这种,需要开发者手动注入,比如用@Autowired。int AUTOWIRE_BY_NAME = 1;
//根据名字注入,需要写set方法。比如setXX(YY yy)方法,spring按set方法名字(XX)去容器查找bean并注入。int AUTOWIRE_BY_TYPE = 2;
//根据类型注入,需要写set方法。比如setXX(YY yy) spring按set方法里面的参数类型YY去容器中查找beanint AUTOWIRE_CONSTRUCTOR = 3;
//构造注入 -
关键步骤3
InstantiationAwareBeanPostProcessor——>postProcessProperties
针对前面MergedBeanDefinitionPostProcessor解析出来的InjectionMetadata,从容器中查找bean实现注入;
3、initializeBean
protected Object initializeBean(String beanName, Object bean, @Nullable RootBeanDefinition mbd) {

		if (System.getSecurityManager() != null) {

         //省略非关键代码
		}
		else {

			//执行Aware接口—BeanNameAware BeanClassLoaderAware   BeanFactoryAware
			invokeAwareMethods(beanName, bean);//关键步骤1
		}

		Object wrappedBean = bean;
		if (mbd == null || !mbd.isSynthetic()) {

		    //BeanPostProcessor before处理,比如执行@PostConstruct标记的方法
			wrappedBean = applyBeanPostProcessorsBeforeInitialization(wrappedBean, beanName);//关键步骤2
		}

		try {

	      	//InitializingBean init-method方法
			invokeInitMethods(beanName, wrappedBean, mbd);//关键步骤3
		}
		catch (Throwable ex) {

		//省略非关键代码
		}
		if (mbd == null || !mbd.isSynthetic()) {

			//BeanPostProcessor after aop
			wrappedBean = applyBeanPostProcessorsAfterInitialization(wrappedBean, beanName);//关键步骤4
		}
		return wrappedBean;
	}
以上流程可以拆解成4步:
-
关键步骤1
xxxAware执行———BeanNameAware、BeanClassLoaderAware、BeanFactoryAware -
关键步骤2
BeanPostProcessor——postProcessBeforeInitialization 比如处理@PostConstruct -
关键步骤3
invokeInitMethods——InitializingBean接口、init-method -
关键步骤4
BeanPostProcessor——postProcessAfterInitialization
比如处理aop
4、bean生命周期
bean生命周期分广义和狭义,广义指从bean定义(注解、xml)解析成beanDefinition,以及从beanDefinition生成bean的整个过程。而狭义主要从beanDefinition生成bean的过程。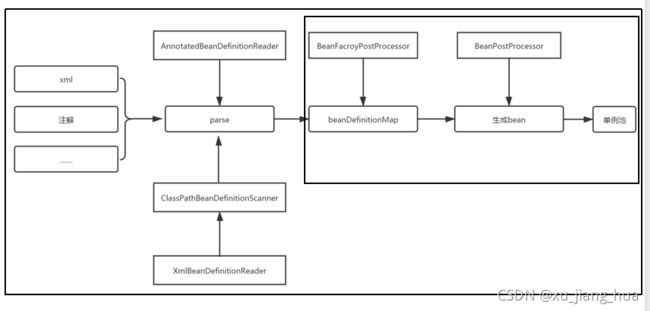 外层的框则代表广义生命周期,内层的框则代表狭义生命周期。
狭义bean的生命周期如下:
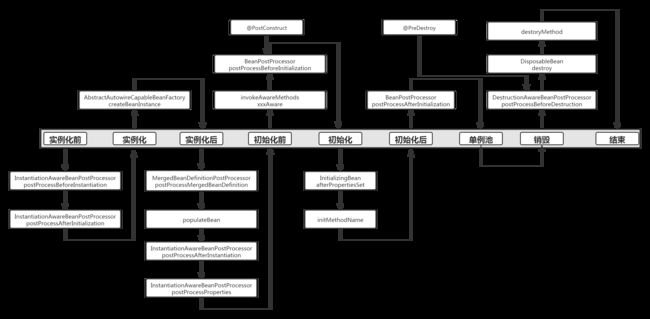
通过分析bean的生成过程得到生命周期,通过生命周期得到拓展点,从而可以控制bean的生成,为我所用。
5、总结
通过从系列3到系列7总共5篇文章分析bean的整个生成过程,得到bean的生命周期,通过分析生命周期可以得到bean的拓展点,从而可以控制bean的生成。前面流程只是分析了主流程,部分细节尚需继续研究,比如循环依赖、构造函数的选择、factoryBean、重要注解(@Autowired、@Resource、@PostConstruct等注解分析),敬请期待后续系列。