如何在Windows中将图像合并为一个PDF文件
PDFs were designed to be a universal, easy-to-read document format, and they serve that purpose well. If you have a collection of images–say, documents you scanned into your computer as JPEGs–you can combine them into a PDF document for easy sharing.
PDF被设计为一种通用的,易于阅读的文档格式,并且可以很好地达到此目的。 如果您有图像集合(例如,以JPEG格式扫描到计算机中的文档),则可以将它们合并为PDF文档以方便共享。
Windows 10 now includes an option to print to a PDF file natively in File Explorer. You can simply select a bunch of image files and print them to a PDF file directly within File Explorer. If you’re using Windows 10, start with the first section below.
Windows 10现在包括在文件资源管理器中本机打印为PDF文件的选项。 您可以简单地选择一堆图像文件,然后直接在文件资源管理器中将它们打印为PDF文件。 如果您使用的是Windows 10,请从下面的第一部分开始。
If you use Windows 7 or 8, the procedure is the same as in Windows 10, but you have to install a third-party tool to be able to accomplish the same task. We discuss this tool in the third section below.
如果使用Windows 7或8,则过程与Windows 10中的过程相同,但是必须安装第三方工具才能完成相同的任务。 我们将在下面的第三部分中讨论此工具。
如何在Windows 10中打印到PDF文件 (How to Print to a PDF File in Windows 10)
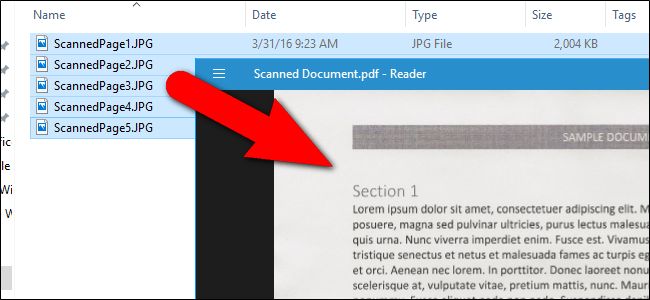
To combine a group of images into a PDF file in Windows 10, first you need to make sure your files are listed in File Explorer in the order you want them to appear in the PDF file. You might have to rename them so they get sorted the way you want.
要将一组图像合并到Windows 10中的PDF文件中,首先需要确保文件在文件资源管理器中的排列顺序是希望它们在PDF文件中显示的顺序。 您可能需要重命名它们,以便它们按照您想要的方式进行排序。
Once you have your images in the right order, select them all and right-click on them. Select “Print” from the popup menu.
以正确的顺序排列图像后,将其全部选中,然后右键单击它们。 从弹出菜单中选择“打印”。
The Print Pictures dialog box displays. Select “Microsoft Print to PDF” from the “Printer” drop-down list. If you don’t see that option in the list, see the next section for information on activating it. Then, continue with the process from here.
显示“打印图片”对话框。 从“打印机”下拉列表中选择“ Microsoft打印为PDF”。 如果您在列表中没有看到该选项,请参阅下一节以获取有关激活它的信息。 然后,从此处继续该过程。
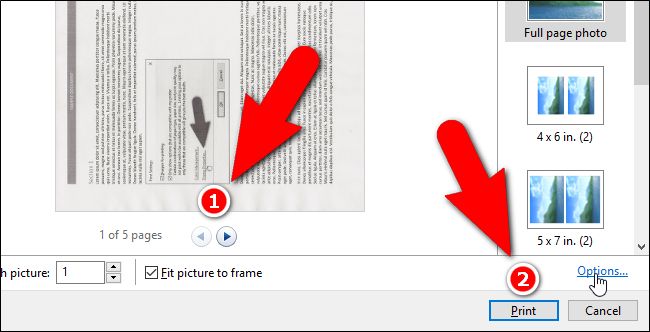
Use the right and left arrow button below the image to scroll through the images that will be added to the PDF file. Click the “Options” link in the lower-right corner of the dialog box to access additional options for the PDF file.
使用图像下方的左右箭头按钮滚动浏览将添加到PDF文件的图像。 单击对话框右下角的“选项”链接,以访问PDF文件的其他选项。
NOTE: The images may look cut off, but don’t worry. We’ll show you how to fix that a bit later in this article.
注意:图像可能看起来被剪掉,但请不要担心。 本文稍后将向您展示如何解决该问题。
On the Print Settings dialog box, you can choose to sharpen the images for printing, if you know the PDF file will be printed. If you also know you will be printing the PDF file on your own printer most of the time, leave the “Only show options that are compatible with my printer” option selected to get the best results.
如果您知道将打印PDF文件,则可以在“打印设置”对话框中选择要锐化的图像以进行打印。 如果您还知道大多数时候将在自己的打印机上打印PDF文件,请选中“仅显示与我的打印机兼容的选项”选项,以获取最佳效果。
You can access properties for your printer from here by clicking the “Printer Properties” link.
您可以通过单击“打印机属性”链接从此处访问打印机的属性。
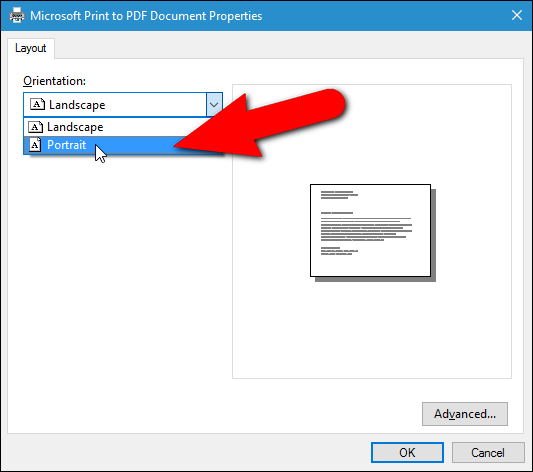
On the Microsoft Print to PDF Document Properties dialog box, you can select whether you want to the document to be “Landscape” or “Portrait” from the “Orientation” drop-down list. Click “OK” to accept the change or click “Cancel” if you don’t want to save the change or you didn’t change the orientation.
在“ Microsoft打印到PDF文档的属性”对话框上,可以从“方向”下拉列表中选择将文档显示为“横向”还是“纵向”。 单击“确定”接受更改,或者如果不想保存更改或未更改方向,则单击“取消”。
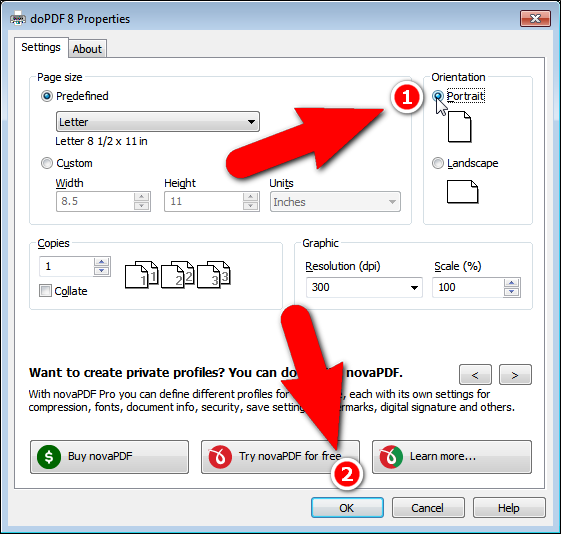
NOTE: If you’re using Windows 7, the Printer Properties link opens the doPDF Properties dialog box displays, allowing you to change the page Orientation (as well as other settings). Again, click “OK” to accept your changes or click “Cancel” if you don’t want to save the changes you made or you didn’t make any changes.
注意:如果您使用的是Windows 7,则“打印机属性”链接将打开显示的doPDF属性对话框,您可以更改页面方向(以及其他设置)。 再次单击“确定”接受更改,或者如果您不想保存所做的更改或未进行任何更改,请单击“取消”。
You are returned to the Print Pictures dialog box. If you noticed earlier that the sides of your images seem to be cut off, click the “Fit picture to frame” check box so there is no check mark in the box. You should see the entire image now. Enabling or disabling the Fit picture to frame option affects all the images you’re adding to the PDF file.
您将返回到“打印图片”对话框。 如果您之前注意到图像的两边似乎已被切除,请单击“使图像适合边框”复选框,以使该复选框中没有复选标记。 您现在应该看到整个图像。 启用或禁用“使图片适合框架”选项会影响您要添加到PDF文件的所有图像。
Click “Print” to create your PDF file.
单击“打印”以创建您的PDF文件。
The Save Print Output As dialog box displays. Navigate to the location where you want to save the PDF file. The same directory where the images are stored is selected as the default location, but you can change that. Enter a file name for the PDF file in the “File name” edit box and click “Save”.
显示“将打印输出另存为”对话框。 导航到要保存PDF文件的位置。 默认位置是存储图像的相同目录,但是您可以更改它。 在“文件名”编辑框中输入PDF文件的文件名,然后单击“保存”。
You’re done! The PDF file is created in the selected folder and you can open it in the default PDF viewer in Windows, or in any other PDF reader you have installed.
你完成了! PDF文件在选定的文件夹中创建,您可以在Windows的默认PDF查看器中或在已安装的任何其他PDF阅读器中打开它。
如何在Windows 10中激活Microsoft Print to PDF选项 (How to Activate the Microsoft Print to PDF Option in Windows 10)
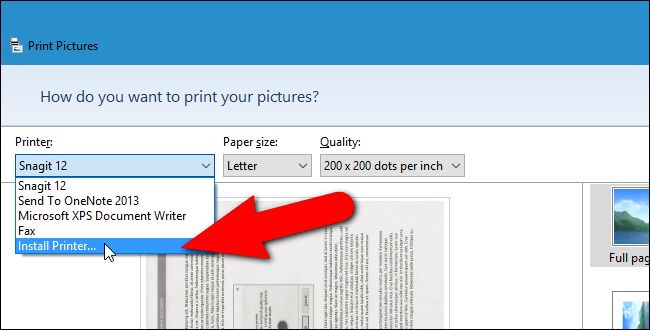
If the Microsoft Print to PDF option is not available in the Printer drop-down list on the Print Pictures dialog box, you can easily add it. To install the Microsoft Print to PDF printer driver, open the Print Pictures dialog box as we discussed in the previous section (if it’s not already open). Then, select “Install Printer” from the “Printer” drop-down list.
如果“打印图片”对话框的“打印机”下拉列表中没有“ Microsoft打印为PDF”选项,则可以轻松添加它。 要安装Microsoft Print to PDF打印机驱动程序,请按照上一节中的说明打开“打印图片”对话框(如果尚未打开)。 然后,从“打印机”下拉列表中选择“安装打印机”。
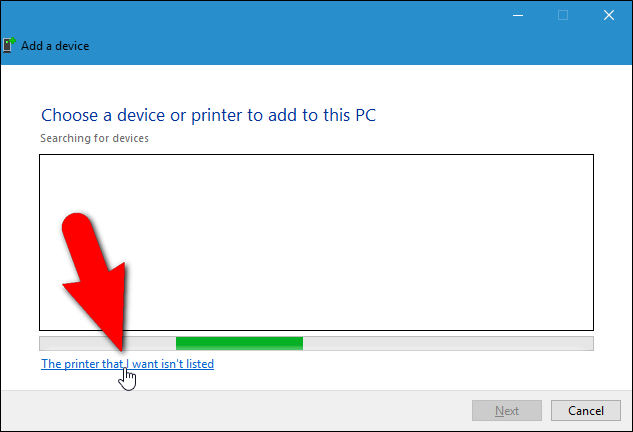
The Add a device dialog box displays and a search for devices begins. You don’t need to wait for the search to finish. Click the “The printer that I want isn’t listed” link near the bottom of the dialog box.
显示“添加设备”对话框,并开始搜索设备。 您无需等待搜索完成。 单击对话框底部附近的“我所需的打印机未列出”链接。
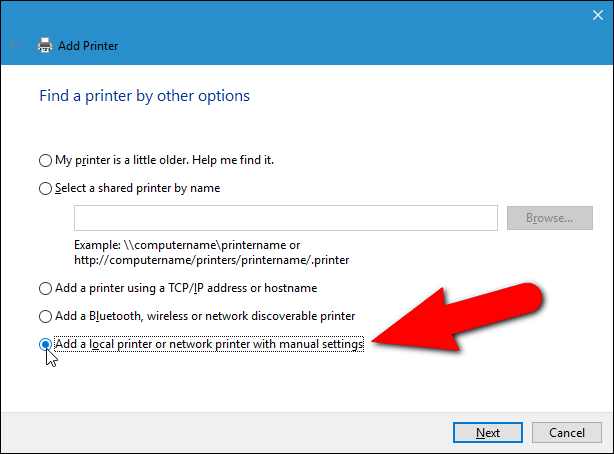
On the Add Printer dialog box, click the “Add a local printer or network printer with manual settings” option and click “Next”.
在“添加打印机”对话框上,单击“使用手动设置添加本地打印机或网络打印机”选项,然后单击“下一步”。
NOTE: You can also access this dialog box by opening PC Settings and clicking Devices > Printers & Scanners > Add a printer or scanner. Then, click the “The printer that I want isn’t listed” link that displays on that screen as Windows tries to search for devices. The Printers & Scanners screen also contains a list of all the printers and scanners available on your system and you can set any one device as the default and remove any of the devices.
注意:您也可以通过打开PC设置并单击设备>打印机和扫描仪>添加打印机或扫描仪来访问此对话框。 然后,在Windows尝试搜索设备时,单击在该屏幕上显示的“我所需的打印机未列出”链接。 “打印机和扫描仪”屏幕还包含系统上所有可用打印机和扫描仪的列表,您可以将任何一台设备设置为默认设备,并删除任何设备。
Then, make sure the “Use an existing port” option is selected (it’s the default). Select “FILE: (Print to File)” from the drop-down list to the right of that option and click “Next”.
然后,确保选中“使用现有端口”选项(默认设置)。 从该选项右侧的下拉列表中选择“文件:(打印到文件)”,然后单击“下一步”。
To select the PDF printer driver, select “Microsoft” in the list on the left and then “Microsoft Print To PDF” in the list on the right. Click “Next”.
要选择PDF打印机驱动程序,请在左侧列表中选择“ Microsoft”,然后在右侧列表中选择“ Microsoft Print To PDF”。 点击下一步”。
You may already have this printer driver installed, in which case the following screen displays on the Add Printer dialog box asking which version of the driver you want to use. Make sure the “Use the driver that is currently installed (recommended)” option, which is the default, is selected and click “Next”.
您可能已经安装了该打印机驱动程序,在这种情况下,“添加打印机”对话框中将显示以下屏幕,询问您要使用哪个版本的驱动程序。 确保已选择默认选项“使用当前安装的驱动程序(推荐)”,然后单击“下一步”。
By default, the printer driver is named “Microsoft Print To PDF”. This name displays in the Printer drop-down list on the Print Pictures dialog box and anywhere else in Windows or programs where you would choose a printer. However, you can change the name by entering a new one in the “Printer name” edit box. Click “Next”.
默认情况下,打印机驱动程序名为“ Microsoft Print To PDF”。 该名称显示在“打印图片”对话框的“打印机”下拉列表中,以及Windows或程序中您选择打印机的其他任何位置。 但是,您可以通过在“打印机名称”编辑框中输入一个新名称来更改名称。 点击下一步”。
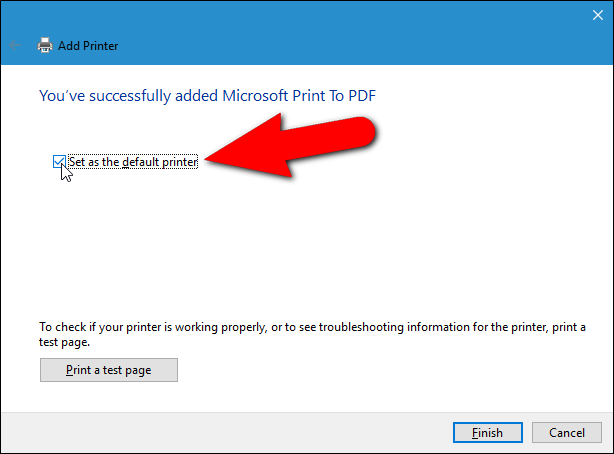
You should get a message that the printer driver has successfully been added. If you print to PDF files more often than you actually print to your printer, you can set this driver as the default printer. To do so, click the “Set as the default printer” check box so there is a check mark in the box. Click “Finish”.
您应该收到一条消息,说明打印机驱动程序已成功添加。 如果打印到PDF文件的频率比实际打印到打印机的频率高,则可以将此驱动程序设置为默认打印机。 为此,请单击“设置为默认打印机”复选框,以使该复选框中有一个复选标记。 点击“完成”。
You are returned to the Print Pictures dialog box where the Microsoft Print To PDF printer driver has been added to the Printer drop-down list and is automatically selected. Now you can continue with the process in the first section to create a PDF file from the selected images.
您将返回到“打印图片”对话框,在该对话框中,“ Microsoft Print To PDF”打印机驱动程序已添加到“打印机”下拉列表中并被自动选择。 现在,您可以继续第一部分中的过程,以从选定的图像创建PDF文件。
如何在Windows 7和8中打印到PDF文件 (How to Print to a PDF File in Windows 7 and 8)
The procedure for creating a PDF file from multiple image files is the same in Windows 7 and 8 as it is in Windows 10 with one exception. When you right click on a group of selected image files and select “Print” from the popup menu to access the Print Pictures dialog box (as discussed in the first section above), you’ll notice the absence of the Microsoft Print To PDF option in the Printer drop-down list.
在Windows 7和8中,从多个图像文件创建PDF文件的过程与Windows 10中的过程相同,但有一个例外。 当您右键单击一组选定的图像文件并从弹出菜单中选择“打印”以访问“打印图片”对话框时(如上面第一部分所述),您会注意到没有Microsoft Print To PDF选项。在打印机下拉列表中。
There are many PDF tools available that will add a PDF printer driver to Windows when you install the program and those drivers will be available in the Printer drop-down list. Here, we’ll show you how to install and use a tool called doPDF that will allow you to create a PDF file from multiple image files (among other useful features).
安装该程序时,有许多可用的PDF工具会将PDF打印机驱动程序添加到Windows,并且这些驱动程序将在“打印机”下拉列表中可用。 在这里,我们将向您展示如何安装和使用名为doPDF的工具,该工具将允许您从多个图像文件创建PDF文件(以及其他有用的功能)。
Download doPDF and install it. The next time you open the Print Pictures dialog box, “doPDF 8” (that’s the version number as of the time this article was published) is an option in the Printer drop-down list. Select that option.
下载doPDF并安装它。 下次打开“打印图片”对话框时,“打印机”下拉列表中的一个选项是“ doPDF 8”(即本文发布时的版本号)。 选择该选项。
Now, you can follow the same steps in the first section above for Windows 10 until you click “Print” to create the PDF file. Once you do that after selecting doPDF 8 from the Printer drop-down list, the doPDF 8 – Save PDF file dialog box displays. A default file name and location is automatically entered in the “File name” edit box. To change that, click “Browse”.
现在,对于Windows 10,您可以按照上面第一部分中的相同步骤进行操作,直到单击“打印”以创建PDF文件。 在从打印机下拉列表中选择doPDF 8之后,将执行doPDF 8 –保存PDF文件对话框。 默认文件名和位置会自动输入到“文件名”编辑框中。 要更改它,请单击“浏览”。
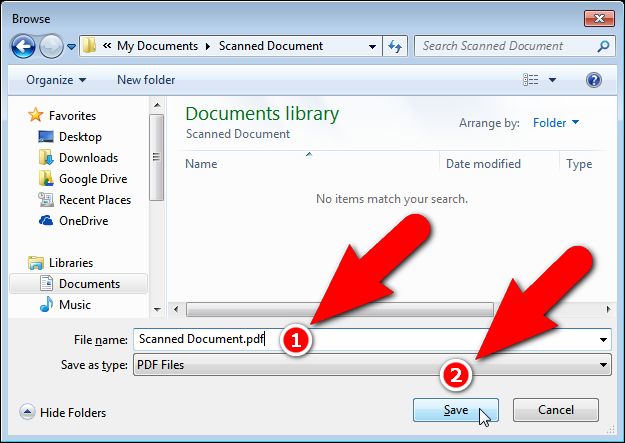
The Browse dialog box displays. Navigate to the location where you want to save the PDF file. The same directory where the images are stored is selected as the default location, but you can change that. Enter a file name for the PDF file in the “File name” edit box and click “Save”.
显示“浏览”对话框。 导航到要保存PDF文件的位置。 默认位置是存储图像的相同目录,但是您可以更改它。 在“文件名”编辑框中输入PDF文件的文件名,然后单击“保存”。
You are returned to the doPDF 8 – Save PDF file dialog box where you can select the quality and size of the PDF file and embed fonts under PDF options. If you want to always use the folder you just selected to save PDF files, click the “Always use this folder” check box so there is a check mark in the box. To open the PDF file in the default PDF reader program on your PC, make sure the “Open PDF in reader” check box is checked. Click “OK” to start creating the PDF file.
返回到doPDF 8 –保存PDF文件对话框,您可以在其中选择PDF文件的质量和大小,以及在PDF选项下嵌入字体。 如果要始终使用刚刚选择的文件夹来保存PDF文件,请单击“始终使用此文件夹”复选框,以便在该复选框中打勾。 要在PC上默认的PDF阅读器程序中打开PDF文件,请确保选中“在阅读器中打开PDF”复选框。 单击“确定”开始创建PDF文件。
The file is created and added to the folder you specified and it opens in the default PDF reader, if you selected that option.
文件已创建并添加到您指定的文件夹中,如果您选择了该选项,它将在默认的PDF阅读器中打开。
PDF printer drivers can also be used to create a PDF file from any document that can be sent to a physical printer. Simply select the PDF driver as the device on the Print dialog box, rather than your standard printer.
PDF打印机驱动程序还可用于从任何可发送到物理打印机的文档创建PDF文件。 只需在“打印”对话框中选择PDF驱动程序作为设备,而不是标准打印机即可。
翻译自: https://www.howtogeek.com/248462/how-to-combine-images-into-one-pdf-file-in-windows/
