大规模 WebSocket 集群项目 AnyIM 实战
一、概述
WebSocket 应用场景非常广泛,例如社交聊天、弹幕、多玩家游戏、协同编辑、股票基金实时报价、体育实况更新、视频会议/聊天、实时定位、在线教育、智能家居等,这些场景都与我们的生活息息相关。
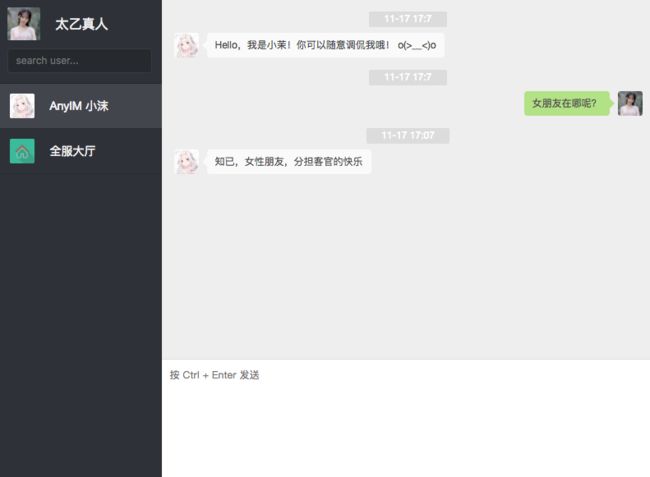
ANY-IM 2.0 是基于 Spring Boot 2.X 框架开发的 WEB 在线即时通信应用,混合使用了 Spring MVC 及 Spring WebFLux,支持点对点通信、群通信、系统群发消息等多种方式。由于单体应用的局限性,又在单体应用的基础上设计了集群方案,解决资源合理利用的问题。
演示地址:https://www.ictgu.cn/
二、系统架构

架构简单说明:
- KeepAlived:配合VIP,实现高可用
- HAProxy:负载均衡,将请求分发到不同的服务上
- Consul Template:监听 Consul 中的数据,动态修改 HAProxy 的配置文件
- Consul:Consul 是一个支持多数据中心分布式高可用的服务发现和配置共享的服务软件,一致性协议采用 Raft 算法,用来保证服务的高可用. 使用 GOSSIP 协议管理成员和广播消息, 并且支持 ACL 访问控制
- Registrator:注册器,监听 Docker 容器的变化,动态注册信息到 Consul
- Service:基于 Spring Boot 开发的 WebSocket 后端服务
- MongoDB:用于存储 Http Session 信息,实现 Http Session 共享,还用于存储用户消息
- Redis:用于缓存用户基本信息,还用于服务间通信
三、基于 Spring Boot 的 WebSocket 应用实现
作为一名 Java 工程师,使用 Spring Boot 来构建单体应用无疑是最好的选择,简洁、高效、稳定!
1、工欲善其事必先利其器
- IntelliJ IDEA:https://www.jetbrains.com/idea/download/#section=mac
- Docker:http://get.daocloud.io/
- Docker 镜像仓库:https://dev.aliyun.com/search.html
2、创建 Spring Boot 应用
快速创建,参考官方文档 https://projects.spring.io/spring-boot/ ,为了加快开发速度,使用到 Lombok、Jsoup、Fastjson 等第三方依赖,开发时使用热部署,避免频繁地重启应用。
3、集成 WebSocket
    org.springframework.boot
    spring-boot-starter-websocket
前端需要使用 sockjs.js、stomp.js 来连接 WebSocket, 推荐使用 Vue.js 来渲染前端页面。
入门 DEMO:https://spring.io/guides/gs/messaging-stomp-websocket/
STOMP协议详解:https://www.cnblogs.com/my_life/articles/7002138.html
4、集成 Spring Security 、Spring Session 及 MongoDB
| 需求 | 参考资料 | 官方文档 |
|---|---|---|
| Spring Security | Spring Security Demo | Spring Security |
| Spring Session | Spring Session Data MongoDB | Spring Session |
| MognoDB | Spring Boot 集成 MongoDB | docker 安装方式 |
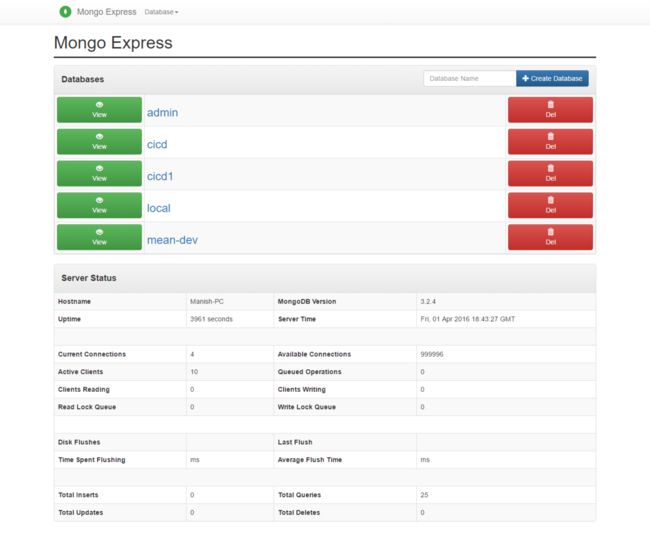
MongoDB Web可视化工具:Mongo Express
| 首页 | Database 视图 | Collection 视图 | 编辑文档 |
|---|---|---|---|
 |
 |
 |
 |
四、基于 Redis 的跨容器 WebSocket Session 共享
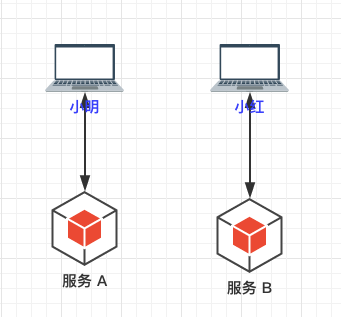
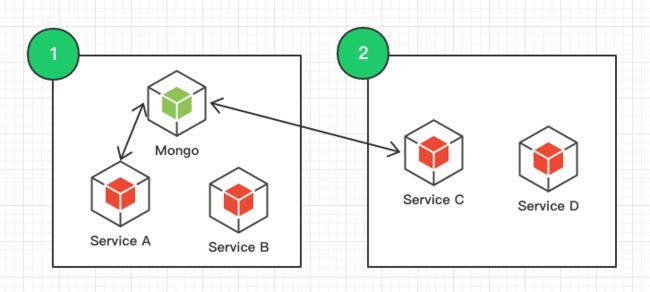
如图所示,小明和服务A建立了长连接,小红和服务B建立了长连接。此时,小明想给小红发消息,但是服务A和服务B之间互不关联,所以小明发给小红的消息会丢失。要想小明能联系到小红,就要实现服务A和服务B之间的通信。
跨服务间 WebSocket 通信实现
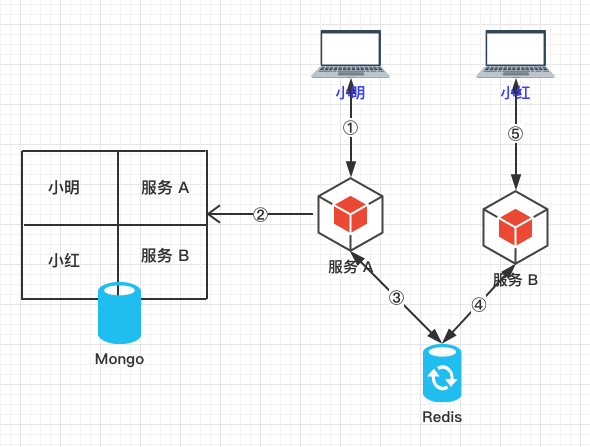
- 〇 客户端和服务器端建立连接时需要将自己的身份ID和服务器ID写到数据库,断开连接时删除记录
- 〇 每个服务上线时,根据服务唯一ID在Redis上订阅对应的Topic
- ① 小明发送给小红的消息先被传输到服务A
- ② 服务A收到消息从数据库中查到小红所连接的服务器是服务B
- ③ 服务A将小明的消息转发到Redis中服务B的Topic
- ④ 服务B收到Redis发来的消息
- ⑤ 服务B将消息发送给小红
至此,小明就能到把消息发送给小红了。
WebSocket配置相关代码
/**
 * WebSocket 配置
 */
@Configuration
@EnableScheduling
@EnableWebSocketMessageBroker
@Log4j2
public class WebSocketConfig extends AbstractWebSocketMessageBrokerConfigurer {

    private final WebSocketRepository webSocketRepository;

    private final ServerConfiguration serverConfiguration;

    public WebSocketConfig(WebSocketRepository webSocketRepository, ServerConfiguration serverConfiguration){
        this.webSocketRepository = webSocketRepository;
        this.serverConfiguration = serverConfiguration;
    }

    @Override
    public void registerStompEndpoints(@Nullable StompEndpointRegistry registry) {
        if (registry == null){
            throw new RuntimeException("registry is null");
        }
        registry.addEndpoint("/any-socket").withSockJS();
    }

    @Override
    public void configureMessageBroker(MessageBrokerRegistry messageBrokerRegistry) {
        messageBrokerRegistry.setApplicationDestinationPrefixes("/app");
        messageBrokerRegistry.enableSimpleBroker("/topic", "/queue");
    }

    @Override
    public void configureWebSocketTransport(final WebSocketTransportRegistration registration) {
        registration.addDecoratorFactory(new WebSocketHandlerDecoratorFactory() {
            @Override
            public WebSocketHandler decorate(final WebSocketHandler handler) {
                return new WebSocketHandlerDecorator(handler) {

                    /**
                     * 建立 WebSocket 连接之后
                     */
                    @Override
                    public void afterConnectionEstablished(@Nullable final WebSocketSession session) throws Exception {
                        if (session == null){
                            throw new RuntimeException("session is null");
                        }
                        Principal principal = session.getPrincipal();
                        if (principal == null){
                            throw new RuntimeException("principal is null");
                        }
                        String username = principal.getName();
                        WebSocketSessionBean webSocketSessionBean = new WebSocketSessionBean(username, serverConfiguration.getServerId());
                        log.info("上线: " + username);
                        webSocketRepository.save(webSocketSessionBean);
                        super.afterConnectionEstablished(session);
                    }

                    /**
                     * 关闭 WebSocket 连接之后
                     */
                    @Override
                    public void afterConnectionClosed(@Nullable WebSocketSession session, @Nullable CloseStatus closeStatus)
                            throws Exception {
                        if (session == null || closeStatus == null){
                            throw new RuntimeException("session isnull or closeStatus is null");
                        }
                        Principal principal = session.getPrincipal();
                        if (principal == null){
                            throw new RuntimeException("principal is null");
                        }
                        String username = principal.getName();
                        log.info("下线: " + username);
                        webSocketRepository.deleteByKeyAndValue(username, serverConfiguration.getServerId());
                        super.afterConnectionClosed(session, closeStatus);
                    }
                };
            }
        });
        super.configureWebSocketTransport(registration);
    }
}
五、基于 Docker Swarm 的集群解决方案
Docker Swarm 是 Docker 官网维护的集群管理工具,应用 Docker Swarm 可以很便捷地解决跨主机网络、动态扩容等问题。
入门文章可以参考:http://www.jianshu.com/p/096244610e15
如图所示,实现任意容器之间的网络互通,只需要两步即可。
1、在Docker Swarm 集群的 Manager 上创建网络
docker network create -d overlay --attachable [networkName]
2、启动容器时,带上网络参数
- 启动单个容器:
docker run --net [networkName] IMAGE - 启动服务:
docker service create --network [networkName] IMAGE
动态扩容,也比较简单。
1、将 Spring Boot 应用构建成镜像
参考文章:http://www.jianshu.com/p/b06de710c109
2、在 Swarm 集群中启动
docker service create --name anyim --network [networkName] IMAGE
3、动态扩容
docker service scale anyim=[扩容数量]

六、基于 Registrator 和 Consul 的服务注册与发现
Registrator:https://gliderlabs.com/registrator/latest/
Consul:https://www.consul.io/
1、启动服务注册中心 Consul
docker run -d --name=consul -p 8500:8500 --net [networkName] consul
启动完毕后,可以访问 http://localhost:8500/ 查看服务信息
2、启动 Registrator 监听 Docker 容器
docker run -d \
    --name=registrator \
    -v /var/run/docker.sock:/tmp/docker.sock \
    --net [networkName] \
    --link consul:consul \
    registrator \
    -cleanup=true \
    -internal \
    -resync=60 \
    consul://consul:8500
额外说明: 需要在每台主机上部署
3、使用 Consul Template 刷新 HAProxy 配置
此处,已封装好镜像,直接启动即可:
docker run -d \
 --name consul-template-haproxy \
-p 8080:8080 \
--link consul:consul \
--net [networkName] \
registry.cn-hangzhou.aliyuncs.com/anoy/consul-template-haproxy
镜像地址:https://dev.aliyun.com/detail.html?spm=5176.1972343.2.2.jxJj3Q&repoId=87739
七、基于 HAProxy 和 KeepAlived 的负载均衡与高可用
详见文章:http://www.jianshu.com/p/83036a320036
八、AB 测试
详见文章:http://www.jianshu.com/p/43d04d8baaf7
九、常见问题总结
如有疑问,可以“评论”或者通过“简信”联系作者