(二)裸机开发框架构建之---点灯大师
裸机开发框架构建
- 3.设备管理层
- 抽象出结构体
- 初始化结构体
- 第一种初始化方法(c89标准)
- 第二种初始化方法(C99标准)
- 2.硬件接口层
- 1.硬件层
- 硬件LED层初始化函数
- 硬件层LED控制函数
- 4.应用层
- 整体源代码(mdk4下调试编译通过,主控STM32F103RB)
- 硬件层
- 硬件接口层
- 设备管理层
- 应用层
- 源工程下载链接
接上一篇 (一)裸机开发框架构建之—开发框架思想
实际设计代码,
总共分四层:硬件层—硬件接口层—设备管理层—应用层面
面向对象编程步骤:
3.设备管理层
1.首先对对象进行描述,有什么属性,任务要求可以实现什么功能,
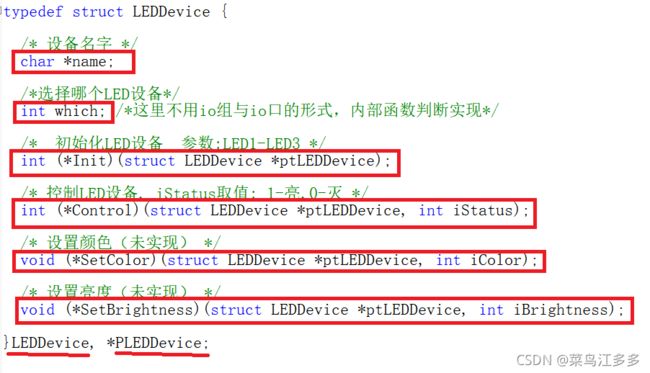
拿LED来说:使用需要初始化函数,可能有相同的多个设备,我们要准确控制哪一个设备的开关状态,颜色??亮度??根据项目需求可以自己设计,写法一般是把设备所有实现的功能抽象出一个结构体,实现函数啥的全部放到结构体里面,如下:
这里描述了设备名字,选择哪一个LED,初始化函数,控制LED的开关函数,设置LED颜色,亮度等等,这里的参数为结构体指针的形式
抽象出结构体
初始化结构体
结构体的初始化看相同设备的数量,如果数量比较多的话就用结构体数组,如果只是单个设备就用结构体变量,这里的初始化可以用两种形式,第一种c89标准下,这里描述相同设备比较多,使用结构体数组的形式
第一种初始化方法(c89标准)
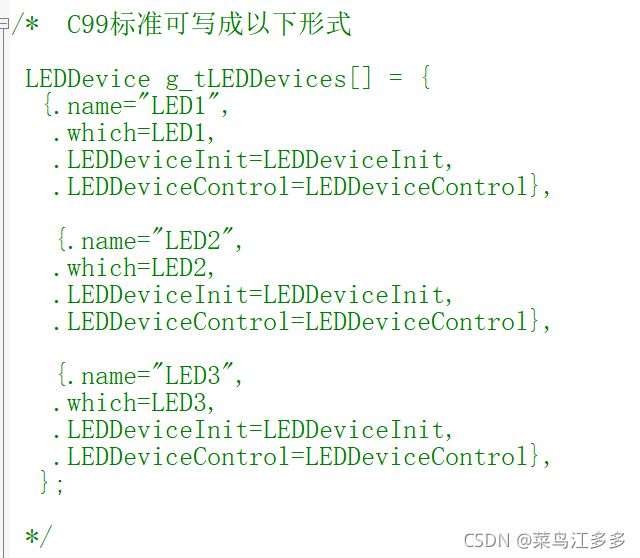
第二种初始化方法(C99标准)
第二种c99以上标准,此种方法代码可读性更高(MDK下使用需要勾选C99标准)

这一层的函数还没实现

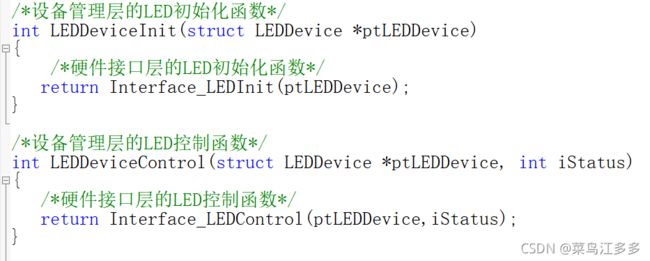
实现如下:可以看到,调用了硬件接口层的函数
接下来就实现硬件接口层的函数
2.硬件接口层
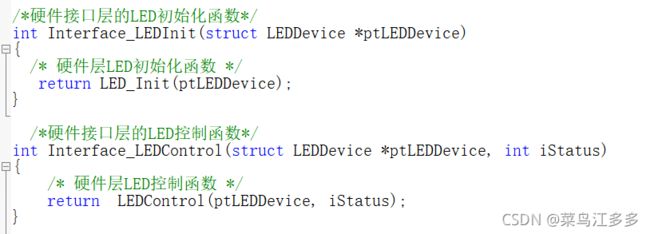
这一层仅仅是对硬件层的函数进行封装,比较简单
可以看到,就是一层包装而已,实现应用层和硬件层的分离

1.硬件层
这一层就是直接对硬件的操作,根据库不同和板子不同会有不同的写法,但是最终这个函数实现的,都将被硬件接口层封装
硬件LED层初始化函数
int LED_Init(struct LEDDevice *ptLEDDevice)
{

	 static char ucLed=0;
	 GPIO_InitTypeDef GPIO_InitStruct;

	if (!ptLEDDevice) /* 防御式编程:判断为空指针 */
		return -1;


  switch (ptLEDDevice->which)  /*选择使能哪个LED*/
	{

		case LED1:
		{

		 RCC_APB2PeriphClockCmd(RCC_APB2Periph_GPIOC, ENABLE);
	     GPIO_InitStruct.GPIO_Pin = GPIO_Pin_8;
		 break;
		}

		case LED2:
		{

		 RCC_APB2PeriphClockCmd(RCC_APB2Periph_GPIOC, ENABLE);
		 GPIO_InitStruct.GPIO_Pin = GPIO_Pin_9;
		 break;
		}

		case LED3:
		{

		   RCC_APB2PeriphClockCmd(RCC_APB2Periph_GPIOC, ENABLE);
		   GPIO_InitStruct.GPIO_Pin = GPIO_Pin_10;
		   break;
		}
			default:
			return -1;
}

    RCC_APB2PeriphClockCmd(RCC_APB2Periph_GPIOD, ENABLE);/*锁存器时钟*/
    GPIO_InitStruct.GPIO_Speed = GPIO_Speed_2MHz;
    GPIO_InitStruct.GPIO_Mode = GPIO_Mode_Out_PP;
    GPIO_Init(GPIOC, &GPIO_InitStruct);															//数据引脚

    GPIO_InitStruct.GPIO_Pin = GPIO_Pin_2;
    GPIO_Init(GPIOD, &GPIO_InitStruct);															//锁存引脚

    GPIO_Write(GPIOC, ~ucLed <<8);
    GPIO_SetBits(GPIOD,GPIO_Pin_2);
    GPIO_ResetBits(GPIOD,GPIO_Pin_2);

	return 0;
	}
硬件层LED控制函数
int LEDControl(struct LEDDevice *ptLEDDevice, int iStatus)
{

	BitAction pinstate;

	if (!ptLEDDevice)
		return -1;

	pinstate = iStatus ? Bit_RESET : Bit_SET;

	switch (ptLEDDevice->which)
	{

		case LED1:
		{

		   GPIO_WriteBit(GPIOC,GPIO_Pin_8,pinstate);
		   GPIO_SetBits(GPIOD,GPIO_Pin_2);/*锁存器引脚*/
           GPIO_ResetBits(GPIOD,GPIO_Pin_2);

			break;
		}

		case LED2:
		{

		   GPIO_WriteBit(GPIOC,GPIO_Pin_9,pinstate);
		   GPIO_SetBits(GPIOD,GPIO_Pin_2);
           GPIO_ResetBits(GPIOD,GPIO_Pin_2);
			break;
		}

		case LED3:
		{

		    GPIO_WriteBit(GPIOC,GPIO_Pin_10,pinstate);
			GPIO_SetBits(GPIOD,GPIO_Pin_2);
            GPIO_ResetBits(GPIOD,GPIO_Pin_2);
			break;
		}

		default:
			return -1;
	}

	return 0;

}
这里有三个设备,如何使用某一个LED设备,这里在设备管理层还写了这么一个函数
定义一个指针函数,这里传输的参数是witch,通过输入witch值确定哪一个数组
PLEDDevice GetLEDDevice(int which)
{

	if (which >= LED1 && which <= LED3)
		return &g_tLEDDevices[which];
	else
		return NULL;
}
4.应用层
最后应用测试代码
void Led_test(void)
{

	PLEDDevice PLED1 = GetLEDDevice(LED1);
	PLEDDevice PLED2 = GetLEDDevice(LED2);
	PLEDDevice PLED3 = GetLEDDevice(LED3);

    PLED1->Init(PLED1);
	PLED2->Init(PLED2);
	PLED3->Init(PLED3);

    PLED1->Control(PLED1, 0); /*打开设备*/
    PLED2->Control(PLED2, 0);
	PLED3->Control(PLED3, 0);
}
整体源代码(mdk4下调试编译通过,主控STM32F103RB)
硬件层
led.c
#include "led.h"


/*硬件层LED函数的初始化,返回值:-1失败,0:成功*/
int LED_Init(struct LEDDevice *ptLEDDevice)
{

	 static char ucLed=0;
	 GPIO_InitTypeDef GPIO_InitStruct;

	if (!ptLEDDevice) /* 防御式编程:判断为空指针 */
		return -1;


  switch (ptLEDDevice->which)  /*选择使能哪个LED*/
	{

		case LED1:
		{

		 RCC_APB2PeriphClockCmd(RCC_APB2Periph_GPIOC, ENABLE);
	   GPIO_InitStruct.GPIO_Pin = GPIO_Pin_8;
		 break;
		}

		case LED2:
		{

		 RCC_APB2PeriphClockCmd(RCC_APB2Periph_GPIOC, ENABLE);
		 GPIO_InitStruct.GPIO_Pin = GPIO_Pin_9;
		 break;
		}

		case LED3:
		{

		   RCC_APB2PeriphClockCmd(RCC_APB2Periph_GPIOC, ENABLE);
			 GPIO_InitStruct.GPIO_Pin = GPIO_Pin_10;

			break;
		}
			default:
			return -1;
}

	RCC_APB2PeriphClockCmd(RCC_APB2Periph_GPIOD, ENABLE);
	GPIO_InitStruct.GPIO_Speed = GPIO_Speed_2MHz;
    GPIO_InitStruct.GPIO_Mode = GPIO_Mode_Out_PP;
    GPIO_Init(GPIOC, &GPIO_InitStruct);															//数据引脚

    GPIO_InitStruct.GPIO_Pin = GPIO_Pin_2;
    GPIO_Init(GPIOD, &GPIO_InitStruct);															//锁存引脚

	GPIO_Write(GPIOC, ~ucLed <<8);
	GPIO_SetBits(GPIOD,GPIO_Pin_2);
    GPIO_ResetBits(GPIOD,GPIO_Pin_2);

	return 0;
	}


int LEDControl(struct LEDDevice *ptLEDDevice, int iStatus)
{

	BitAction pinstate;

	if (!ptLEDDevice)
		return -1;

	pinstate = iStatus ? Bit_RESET : Bit_SET;

	switch (ptLEDDevice->which)
	{

		case LED1:
		{

			GPIO_WriteBit(GPIOC,GPIO_Pin_8,pinstate);
			GPIO_SetBits(GPIOD,GPIO_Pin_2);/*锁存器*/
            GPIO_ResetBits(GPIOD,GPIO_Pin_2);

			break;
		}

		case LED2:
		{

		  GPIO_WriteBit(GPIOC,GPIO_Pin_9,pinstate);
		  GPIO_SetBits(GPIOD,GPIO_Pin_2);
          GPIO_ResetBits(GPIOD,GPIO_Pin_2);
			break;
		}

		case LED3:
		{


			GPIO_WriteBit(GPIOC,GPIO_Pin_10,pinstate);
			GPIO_SetBits(GPIOD,GPIO_Pin_2);
           GPIO_ResetBits(GPIOD,GPIO_Pin_2);
			break;
		}

		default:
			return -1;
	}

	return 0;

}
led.h
#ifndef __LED_H
#define __LED_H

#include "stm32f10x.h"
#include "bsp_interface_led.h"
#include "bsp_device_led.h"

int LEDControl(struct LEDDevice *ptLEDDevice, int iStatus);/*LED控制函数*/
int LED_Init(struct LEDDevice *ptLEDDevice);

#endif
硬件接口层
bsp_interface_led.c
#include "bsp_interface_led.h"
#include "bsp_device_led.h"
#include "led.h"

/*硬件接口层的LED初始化函数*/
int Interface_LEDInit(struct LEDDevice *ptLEDDevice)
{

	/* 硬件层LED初始化函数 */
   return LED_Init(ptLEDDevice);
}

	/*硬件接口层的LED控制函数*/
int Interface_LEDControl(struct LEDDevice *ptLEDDevice, int iStatus)
{

	  /* 硬件层LED控制函数 */
		return  LEDControl(ptLEDDevice, iStatus);
}
bsp_interface_led.h
#ifndef __BSP_LED_INTERFACE_H
#define __BSP_LED_INTERFACE_H

#include "bsp_device_led.h"

int Interface_LEDInit(struct LEDDevice *ptLEDDevice);
int Interface_LEDControl(struct LEDDevice *ptLEDDevice, int iStatus);


#endif /* __BSP_LED_INTERFACE_H */
设备管理层
bsp_device_led.c
#include "bsp_device_led.h"
#include "bsp_interface_led.h"

/*设备管理层的LED初始化函数*/
int LEDDeviceInit(struct LEDDevice *ptLEDDevice)
{

	 	/*硬件接口层的LED初始化函数*/
   return Interface_LEDInit(ptLEDDevice);
}

/*设备管理层的LED控制函数*/
int LEDDeviceControl(struct LEDDevice *ptLEDDevice, int iStatus)
{

	 /*硬件接口层的LED控制函数*/
	 return Interface_LEDControl(ptLEDDevice,iStatus);
}


 LEDDevice g_tLEDDevices[] = {

	{
     "LED1",LED1, LEDDeviceInit, LEDDeviceControl},
	{
     "LED2",LED2, LEDDeviceInit, LEDDeviceControl},
	{
     "LED3",LED3, LEDDeviceInit, LEDDeviceControl},
};


/*  C99标准可写成以下形式

 LEDDevice g_tLEDDevices[] = {
	{.name="LED1",
	 .which=LED1,
	 .LEDDeviceInit=LEDDeviceInit,
	 .LEDDeviceControl=LEDDeviceControl},

	 {.name="LED2",
	 .which=LED2,
	 .LEDDeviceInit=LEDDeviceInit,
	 .LEDDeviceControl=LEDDeviceControl},

	 {.name="LED3",
	 .which=LED3,
	 .LEDDeviceInit=LEDDeviceInit,
	 .LEDDeviceControl=LEDDeviceControl},
	};

 */


PLEDDevice GetLEDDevice(int which)
{

	if (which >= LED1 && which <= LED3)
		return &g_tLEDDevices[which];
	else
		return NULL;
}
bsp_device_led.c
#ifndef __BSP_LED_DEVICE_H
#define __BSP_LED_DEVICE_H

#ifndef NULL
#define NULL (void *)0
#endif

#define LED1 	  0
#define LED2  	  1
#define LED3 	  2


typedef struct LEDDevice {


	/* 设备名字 */
	char *name;

	/*选择哪个LED设备*/
	int which; /*这里不用io组与io口的形式,内部函数判断实现*/

	/*  初始化LED设备  参数:LED1-LED3 */
  int (*Init)(struct LEDDevice *ptLEDDevice);

	/* 控制LED设备, iStatus取值: 1-亮,0-灭 */
  int (*Control)(struct LEDDevice *ptLEDDevice, int iStatus);

	/* 设置颜色(未实现) */
	void (*SetColor)(struct LEDDevice *ptLEDDevice, int iColor);

	/* 设置亮度(未实现) */
	void (*SetBrightness)(struct LEDDevice *ptLEDDevice, int iBrightness);

}LEDDevice, *PLEDDevice;


PLEDDevice GetLEDDevice(int which);


#endif /* __BSP_LED_DEVICE_H */
应用层
void Led_test(void)
{

	PLEDDevice PLED1 = GetLEDDevice(LED1);
	PLEDDevice PLED2 = GetLEDDevice(LED2);
	PLEDDevice PLED3 = GetLEDDevice(LED3);

    PLED1->Init(PLED1);
	PLED2->Init(PLED2);
	PLED3->Init(PLED3);

    PLED1->Control(PLED1, 1); /*打开设备*/
    PLED2->Control(PLED2, 1);
	PLED3->Control(PLED3, 1);
}
源工程下载链接
git地址:https://gitee.com/he-dejiang/framework.git


