Haproxy
一.Haproxy介绍
HAProxy 提供高可用性、负载均衡以及基于 TCP 和 HTTP 应用的代理,支持虚拟主机,它是免费、快速并且可靠的一种解决方案.HAProxy 特别适用于那些负载特大的 web 站点, 这些站点通常又需要会话保持或七层处理.HAProxy 运行在当前的硬件上,完全可以支持数以万计的并发连接.并且它的运行模式使得它可以很简单安全的整合进您当前的架构中, 同时可以保护你的 web 服务器不被暴露到网络上.
二.服务安装
实验环境:rhel7.6 selinux and iptables disabled
实验主机: Load balancer: 172.25.2.1 server1 haproxy
RS:172.25.2.2 server2 httpd
172.25.2.3 server3 httpd
172.25.2.1 172.25.2.4 haproxy+pacemaker
172.25.2.250 真机 fence
(一)负载均衡
1.基本配置
server1
yum install haproxy -y
vim /etc/haproxy/haproxy.cfg
# Global settings
#---------------------------------------------------------------------
global
    # to have these messages end up in /var/log/haproxy.log you will
    # need to:
    #
    # 1) configure syslog to accept network log events.  This is done
    #    by adding the '-r' option to the SYSLOGD_OPTIONS in
    #    /etc/sysconfig/syslog
    #
    # 2) configure local2 events to go to the /var/log/haproxy.log
    #   file. A line like the following can be added to
    #   /etc/sysconfig/syslog
    #
    #    local2.*                       /var/log/haproxy.log
    #
    log         127.0.0.1 local2  #指定日志设备
    log loghost local2 info #指定日志类型,还有 err warning debug
    chroot      /var/lib/haproxy  #jail 目录
    pidfile     /var/run/haproxy.pid
    maxconn     4000  #并发最大连接数量
    user        haproxy  #用户
    group       haproxy  #组
    daemon  #后台运行

    # turn on stats unix socket
    stats socket /var/lib/haproxy/stats

#---------------------------------------------------------------------
# common defaults that all the 'listen' and 'backend' sections will
# use if not designated in their block
#---------------------------------------------------------------------
defaults
    mode                    http  #默认使用 http 的 7 层模式 tcp: 4 层
    log                     global
    option                  httplog  #http 日志格式
    option                  dontlognull  #禁用空链接日志
    option http-server-close
    option forwardfor       except 127.0.0.0/8
    option                  redispatch  #当 client 连接到挂掉的机器时,重新分配到健康的主机
    retries                 3  #重试 3 次失败认为服务器不可用
    timeout http-request    10s
    timeout queue           1m
    timeout connect         10s  #连接超时
    timeout client          1m  #客户端超时
    timeout server          1m  #服务器端超时
    timeout http-keep-alive 10s
    timeout check           10s
    maxconn                 3000

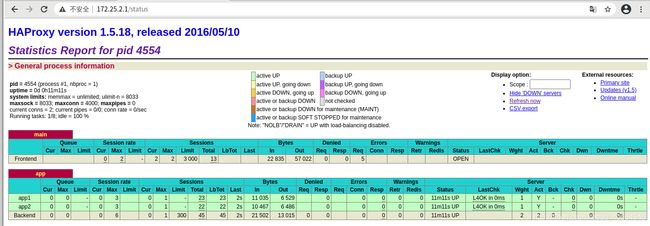
    stats uri /status   #haproxy 监控页面
#---------------------------------------------------------------------
# main frontend which proxys to the backends
#---------------------------------------------------------------------
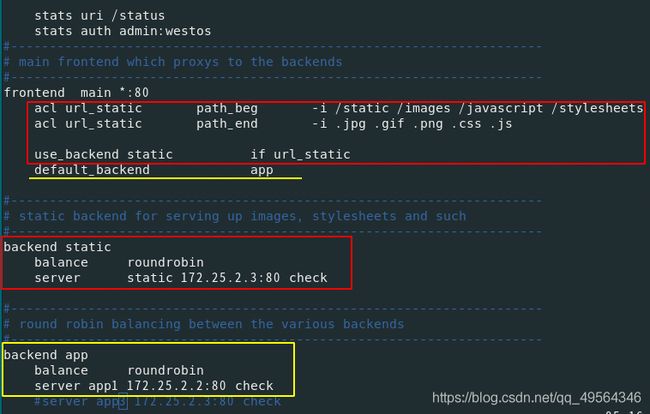
frontend  main *:80  #监听的实例名称,地址和端口
#    acl url_static       path_beg       -i /static /images /javascript /stylesheets
#    acl url_static       path_end       -i .jpg .gif .png .css .js
#
#    use_backend static          if url_static
    default_backend             app

#---------------------------------------------------------------------
# static backend for serving up images, stylesheets and such
#---------------------------------------------------------------------
#backend static
#    balance     roundrobin
#    server      static 127.0.0.1:4331 check

#---------------------------------------------------------------------
# round robin balancing between the various backends
#---------------------------------------------------------------------
backend app
    balance     roundrobin
    server app1 172.25.2.2:80 check
    server app2 172.25.2.3:80 check

systemctl start haproxy.service
2.并发数上限修改
maxconn 4000 #并发最大连接数量
系统限制需修改配置,最大文件数kernel>system>app
vim /etc/security/limits.conf
haproxy         - #软硬不限       nofile          4096  #最后一行添加,即改即生效
3.日志配置
vim /etc/sysconfig/rsyslog
SYSLOGD_OPTIONS="-r"
根据/etc/haproxy/haproxy.cfg文件提示修改日志配置
vim /etc/rsyslog.conf
# Provides UDP syslog reception  #UDP传输模式打开,接受 haproxy 日志
$ModLoad imudp
$UDPServerRun 514
# Don't log private authentication messages!
*.info;mail.none;authpriv.none;cron.none;local2.none    /var/log/messages
local2.*                                                /var/log/haproxy.log  #定义日志文件位置

systemctl restart rsyslog.service
cat /var/log/haproxy.log
4.网页监控的密码登陆
vim /etc/haproxy/haproxy.cfg
    stats uri /status  #监控页面地址
    stats auth admin:westos  #管理帐号和密码
    stats refresh 5s #刷新频率

systemctl restart haproxy.service
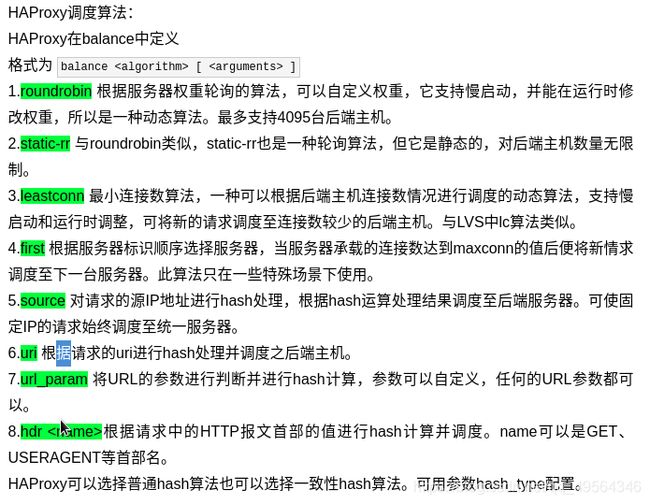
5.haproxy的调度算法
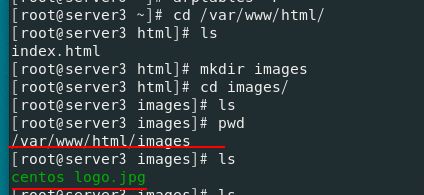
6.动 静分离
7.黑名单IP
8.IP重定向
9.读写分离的服务器

systemctl reload haproxy.service
server2 server3
yum install php -y
cd /var/www/html/
get upload  #已经制作好的php网页,可以上传图片
cd upload/
mv * ..
cd ..
vim upload_file.php  #更改上传图片大小控制
systemctl restart httpd
(二)高可用集群
1.haproxy+keepalived
2.haproxy+pacemaker
pacemaker是一个开源的高可用资源管理器(CRM),是一个集群资源管理器,位于HA集群架构中资源管理、资源代理(RA)这个层次,它不能提供底层心跳信息传递功能,要想与对方节点通信需要借助底层的心跳传递服务,将信息通告给对方,Corosync可以实现HA心跳信息传输的功能.
前面server1的负载均衡已经做好,接着做一下server4的,只需将配置修改和server1保持一致,全部关闭,并禁止开机自启.
server4
yum install haproxy -y
scp [email protected]:/etc/haproxy/haproxy.cfg /etc/haproxy/haproxy.cfg
systemctl disable --now haproxy.service
server4
ssh-keygen
ssh-copy-id server1  #server1server4实现免密连接,方便控制

server4 1
一.安装与启用高可用集群套件
vim /etc/yum.repos.d/rhel7.6.repo
[rhel7.6]
name=rhel7.6
baseurl=http://172.25.2.250/rhel7.6
gpgcheck=0

[HighAvailability]  #高可用软件包
name=HighAvailability
baseurl=http://172.25.2.250/rhel7.6/addons/HighAvailability
gpgcheck=0
scp /etc/yum.repos.d/rhel7.6.repo server1:/etc/yum.repos.d/rhel7.6.repo

yum install -y pacemaker pcs psmisc policycoreutils-python
ssh server1 yum install -y pacemaker pcs psmisc policycoreutils-python
systemctl enable --now pcsd.service
ssh server1 systemctl enable --now pcsd.service

passwd hacluster  #为hacluster用户设置密码,在两个server上使用相同的密码,同步corosync配置,或者在其他server上启动和停止集群
ssh server1 "echo westos | passwd --stdin hacluster"

二.Configure Corosync
pcs cluster auth server1 server4  #在任一节点上,使用pcs cluster auth作为hacluster用户进行身份验证
pcs cluster setup --name mycluster server1 server4  #在同一个节点上创建mycluster集群,并同步corosync配置

三.Pacemaker Tools
(一)使用群集shell简化管理,两种流行的命令行shell是pcs和crmsh
(二)pcs #查看帮助
pcs cluster help  #某一个命令的帮助
pacemakerd --features  #版本

四.启动并验证corosync(心跳传递服务)
(一)pcs cluster start --all  #等效下面
# systemctl start corosync.service  #Openais心跳
# systemctl start pacemaker.service  #集群资源管理器
pcs cluster enable --all  #开机自启
(二)corosync-cfgtool -s  #检查心跳传递服务通信是否正常
Printing ring status.
Local node ID 1
RING ID 0
	id	= 172.25.2.1
	status	= ring 0 active with no faults
如果看到一些不同的情况,可能需要首先检查节点的网络、防火墙和selinux配置

接着检查server1和server4的状态
corosync-cmapctl | grep members
[root@server1 haproxy]# pcs status corosync  #server1和4已经加入心跳
Membership information
----------------------
    Nodeid      Votes Name
         1          1 server1 (local)
         2          1 server4

五.验证Pacemaker(集群资源管理)
[root@server1 haproxy]# ps auxf  #验证是否正在运行必要的进程
root     15092  0.0  0.7 104264  7336 ?        Ss   1月02   0:05 /usr/sbin/pacemakerd -f
haclust+ 15093  0.0  1.4 107604 15212 ?        Ss   1月02   0:05  \_ /usr/libexec/pacemaker/cib
root     15094  0.0  0.7 107824  7444 ?        Ss   1月02   0:04  \_ /usr/libexec/pacemaker/sto
root     15095  0.0  0.4  98820  4676 ?        Ss   1月02   0:06  \_ /usr/libexec/pacemaker/lrm
haclust+ 15096  0.0  0.6 128028  6732 ?        Ss   1月02   0:04  \_ /usr/libexec/pacemaker/att
haclust+ 15097  0.0  1.9 116632 20180 ?        Ss   1月02   0:04  \_ /usr/libexec/pacemaker/pen
haclust+ 15098  0.0  1.1 181376 11420 ?        Ss   1月02   0:07  \_ /usr/libexec/pacemaker/crm
pcs status  #如果进程正常,检查pcs状态输出
WARNING: no stonith devices and stonith-enabled is not false  #出现此警告
暂时禁用此功能,稍后再进行配置.**要禁用STONITH**,先将STONITH enabled 集群选项设置为false.
pcs property set stonith-enabled=false
crm_verify -LV  #检查报错

六.创建主动/被动群集
(一)浏览现有配置
pcs status  #确保集群状态正常
(二)添加资源
pcs resource create vip ocf:heartbeat:IPaddr2 ip=172.25.2.100 op monitor interval=30s  #添加VIP(新的地址),并让集群每30秒检查一次它是否正在运行  ocf:资源脚本所遵循的标准以及在何处执行  heartbeat:特定标准,提供脚本资源  IPaddr2:资源脚本的名称  op monitor:监控 interval=30s:监控频率
pcs resource standards  #获取可用标准资源列表
pcs resource providers  #获取可用资源提供程序的列表
pcs resource agents ocf:heartbeat  ##查看某一个标准的所有资源程序(代理脚本)
pcs node standby  #不让其调用集群管理资源
pcs status  #再次查看
(三)执行故障转移
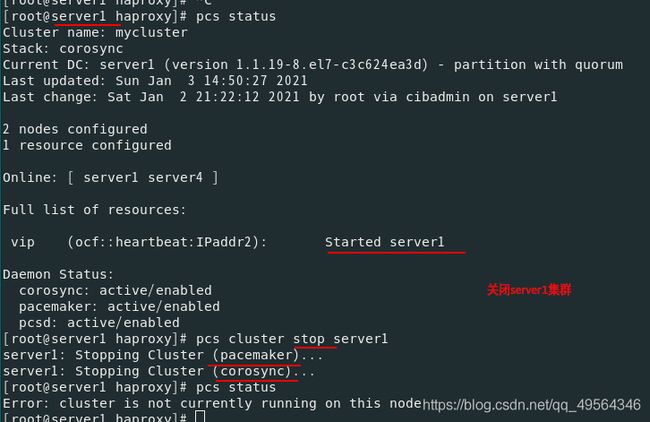
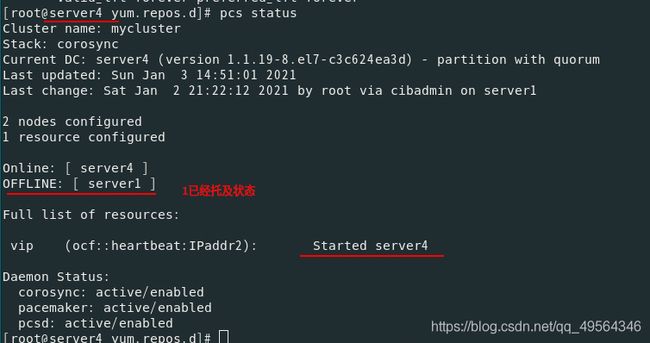
重启sever1后,服务仍然在server4接管(对于旧版本的pacemaker,集群可能会将IP移回其原始位置server1)
(四)防止资源在恢复后移动
在大多数情况下,需要防止健康资源在集群中移动,移动资源几乎总是需要一段的停机时间,对于像数据库这样的复杂服务,这个周期可能相当长.为了解决这个问题,Pacemaker提出了资源粘性的概念,它控制了一个服务在其所在位置保持运行的强度.

七.接入haproxy资源
1.systemctl disable --now haproxy #1 4都停止服务
让pacemaker控制haproxy,创建systemd下的haproxy的启动脚本资源
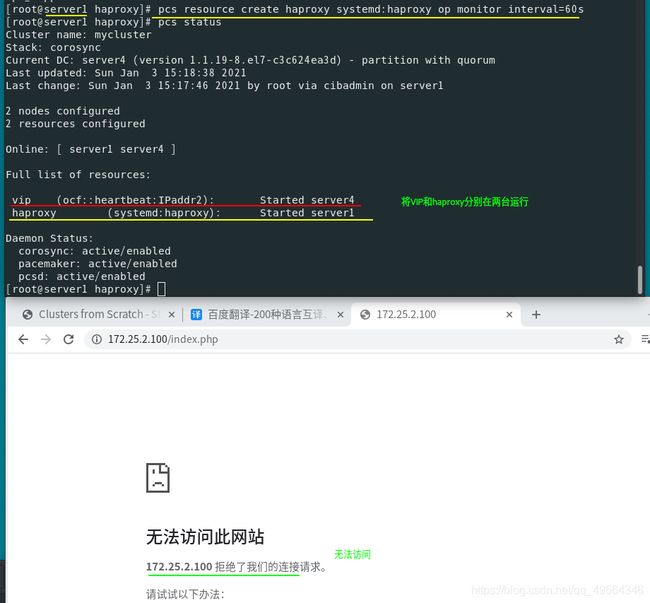
因此需要建立资源管理组,约束资源,控制管理资源启动顺序,使其运行在一台服务器
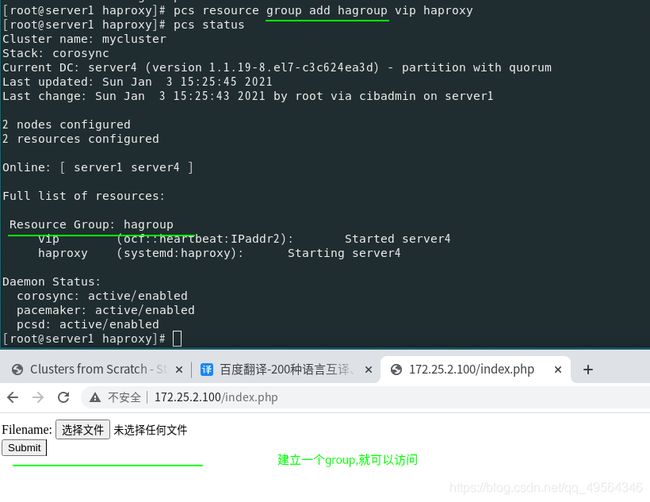
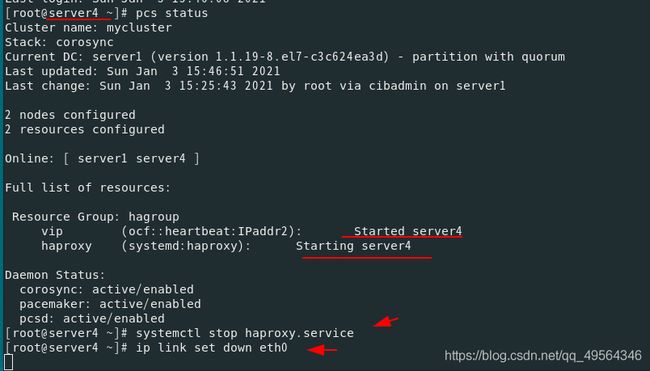
2.如果VIP或者haproxy停止工作,那么集群就会自动添加VIP或者重启haproxy,在本地恢复.
ip addr 查看
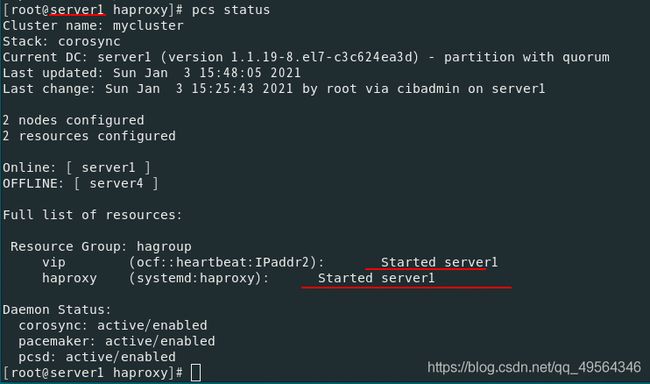
3.如果网卡down,那么就会重启集群中的另一台(热备,备用机)
如果此时server4网卡修好,那么会迅速接管server1,这样很不好,容易发生脑裂
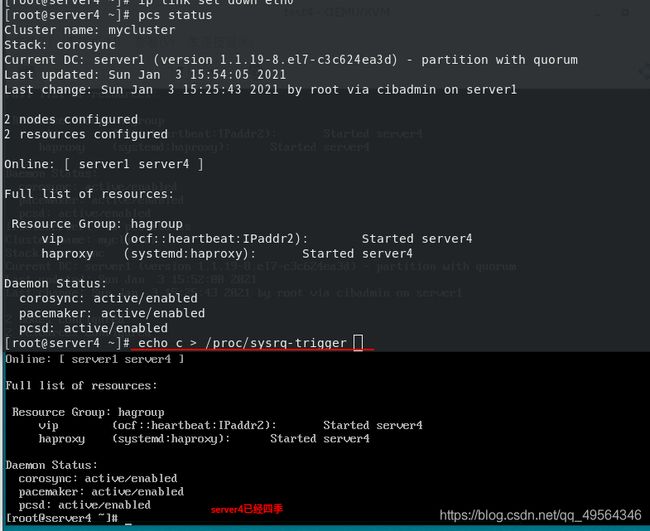
4.模拟内核崩溃
server4断电重启即可恢复
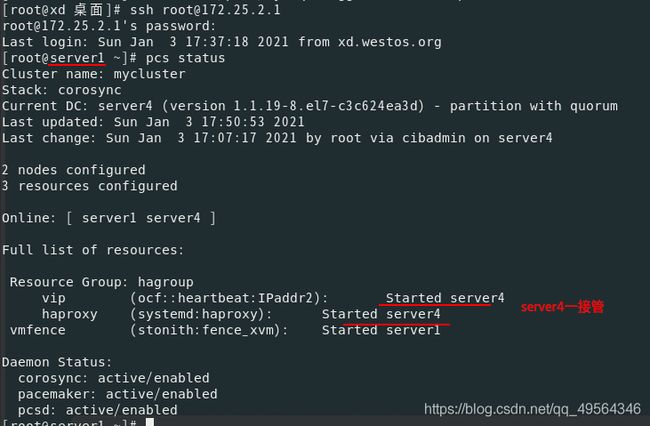
5.Configure STONITH
(1).STONITH保护数据不受恶意节点或意外并发访问的破坏
Stonith 即shoot the other node in the head使Heartbeat软件包的一部分,该组件允许系统自动复位一个失败的服务器使用连接到一个健康的服务器的遥远电源设备,简单的说Stonith设备可以接受一台主机发来的信号从而切断不能传递心跳信息的节点电源,从而避免产生资源争用的设备;节点没有响应并不意味着它已经停止访问您的数据,要100%确保数据安全,唯一的方法是使用STONITH确保节点真正脱机,然后再允许从另一个节点访问数据
STONITH还可以在集群服务无法停止的情况下发挥作用。在这种情况下,集群使用STONITH强制整个节点脱机,从而使在别处启动服务变得安全。
(2).至关重要的是,STONITH设备能够允许集群区分节点故障和网络故障
也可以使用远程电源开关(例如许多板载IPMI控制器),该开关与其控制的节点共享电源。如果在这种情况下出现电源故障,集群无法确定节点是否真的处于脱机状态,或者是否处于活动状态,并且存在网络故障,因此集群将停止所有资源,以避免可能出现的大脑分裂情况。同样,任何依赖于处于活动状态的机器的设备(例如有时在测试期间使用的基于SSH的“设备”)都是不合适的
(3)为STONITH配置集群
server1.server4
yum install fence-virt -y  #安装fence
[root@server4 ~]# pcs stonith list  或stonith_admin -I #列出fence设备
fence_virt - Fence agent for virtual machines
fence_xvm - Fence agent for virtual machines  #虚拟机
真机172.25.2.250
[root@xd cluster]# rpm -qa | grep fence  #安装所需软件
libxshmfence-1.3-2.el8.x86_64
fence-virtd-0.4.0-9.el8.x86_64  #fence服务
fence-virtd-multicast-0.4.0-9.el8.x86_64  #网络监听器
fence-virtd-libvirt-0.4.0-9.el8.x86_64  #后台

fence_virtd -c  #注意网卡选桥接网卡
mkdir /etc/cluster
dd if=/dev/urandom of=/etc/cluster/fence_xvm.key bs=128 count=1  #密钥生成/dev/random是 Linux系统下的随机数生成器,它会从当前系统的内存中一个叫熵池的地址空间中根据系统中断来生成随机数
systemctl restart fence_virtd.service  #先生成key,再启动服务

[root@xd cluster]# netstat -anlp | grep :1229
tcp        0      0 172.25.2.250:37276      172.25.2.1:1229         TIME_WAIT   -
udp        0      0 0.0.0.0:1229            0.0.0.0:*                           82876/fence_virtd
火墙允许或者直接关掉

[root@server4 ~]# stonith_admin -M -a fence_xvm  #元数据


        Shared key file (default=/etc/cluster/fence_xvm.key)   #虚拟机要使用key来连接真机
因此:
scp /etc/cluster/fence_xvm.key server4:/etc/cluster/fence_xvm.key
scp /etc/cluster/fence_xvm.key server1:/etc/cluster/fence_xvm.key
server1.server4  #将fence设备添加到集群
mkdir /etc/cluster
ssh server1 mkdir /etc/cluster
pcs stonith create vmfence fence_xvm pcmk_host_map="server1:test1;server4:test4" op monitor interval=60s  #创建集群资源
vmfence:名字  fence_xvm:类型 pcmk_host_map:映射(主机名和域名相对应)  op monitor interval=60s:监控频率60 fence通常启动在对端
pcs property set stonith-enabled=true  #启用
