Day01_谷粒商城(分布式基础篇)摘要
文章目录
- 总说:关于如何启动这个基础篇的项目:
-
-
- 1.关于软件的安装
- 2.如何启动这个项目
-
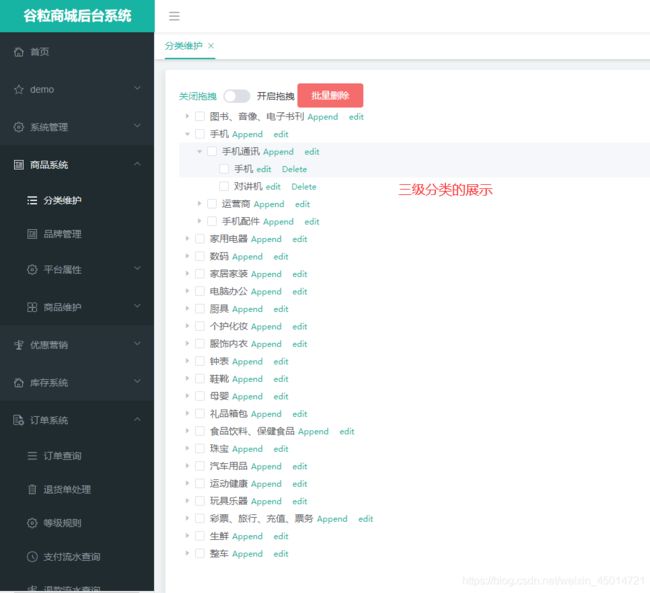
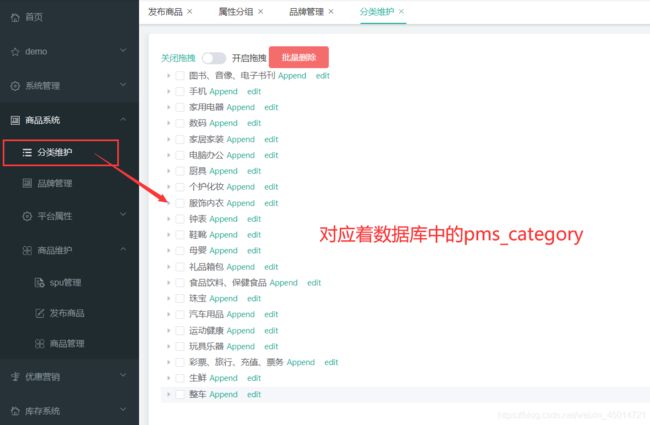
- p45(后台)菜单的三级分类
-
-
-
-
- 1)分析需求
- 2)实现方法
- 3)实现的代码
-
-
-
- p46(后台)配置网关路由与路径重写
-
-
-
-
- 1)分析需求:
- 2)实现方法:
- 第一步:
- 第二步:
- 第三步:([p47跨域问题](https://www.bilibili.com/video/BV1np4y1C7Yf?p=47))
-
-
-
- p48 树形展示菜单的三级分类数据
-
-
-
-
- 1)分析需求
- 2)实现方法:
- 第一步:把gulimall-product注册进Nacos注册中心(这样网关才能找到你)
- 第二步:配置gulimall-gateway的路由规则
-
-
-
- p49(前台)完成菜单的删除功能1
- p50(后台)完成菜单的删除功能2
-
-
-
-
- 1)分析需求
- 2)实现方法:修改gulimall-product
-
-
-
- p51(前台)完成菜单的删除功能3
- p52(前台)完成菜单的添加功能
-
-
-
-
- 1)分析需求:
- 2)实现方法:修改gulimall-product
-
-
-
- p53(前台)完成菜单的修改功能
-
-
-
-
- 1)分析需求
- 2)实现方法:
-
-
-
- p54(前台)完成菜单的拖拽功能1
- p55(前台)完成菜单的拖拽功能2
- p56(后台+前台)菜单的拖拽功能3
-
-
-
-
- 1)分析需求
- 2)实现方法:修改gulimall-product
-
-
-
- p57(前台)完成菜单的拖拽功能4
- p58(前台)完成菜单的批量删除功能
-
-
-
-
- 1)分析需求
- 2)实现方法:
-
-
-
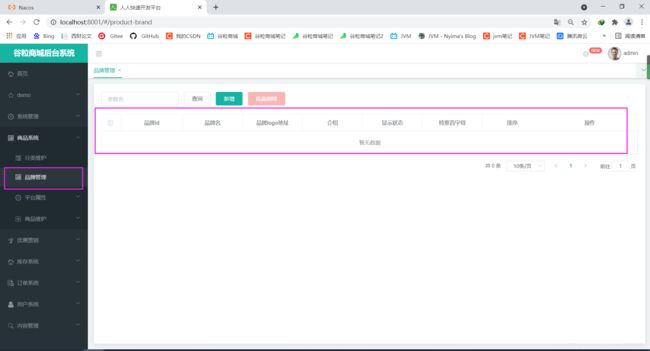
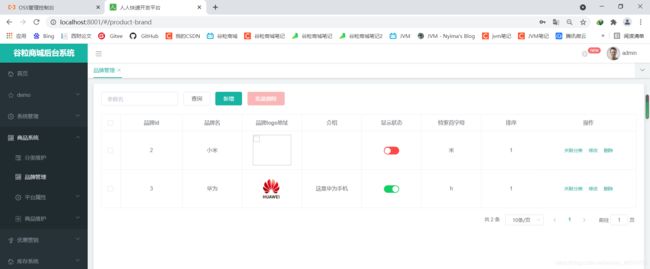
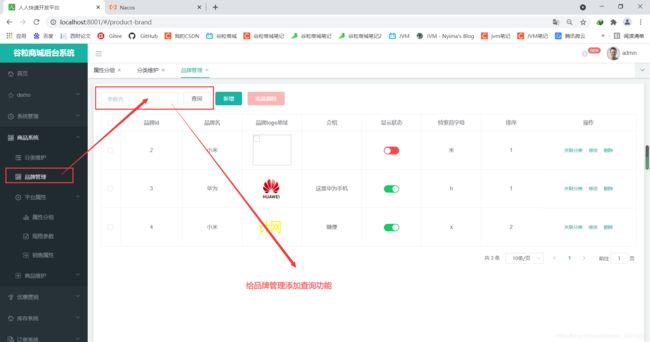
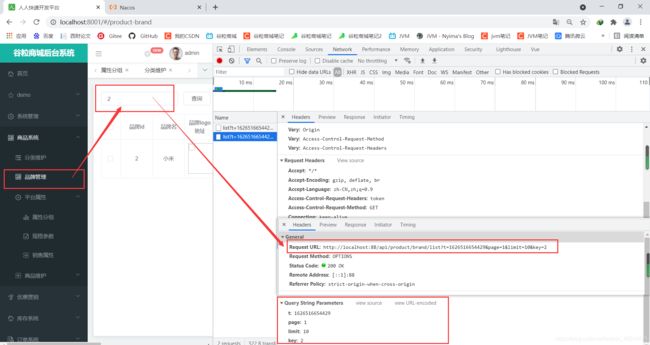
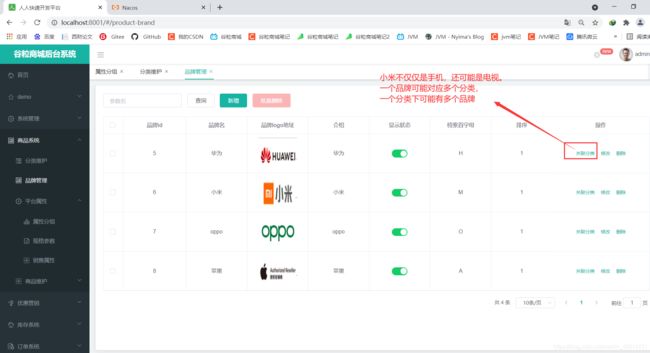
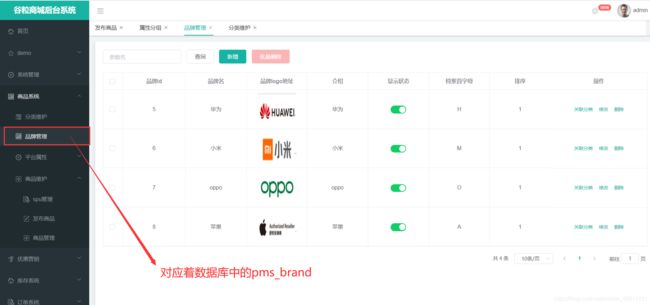
- p59品牌管理总说
- p60(前台)品牌的显示开关
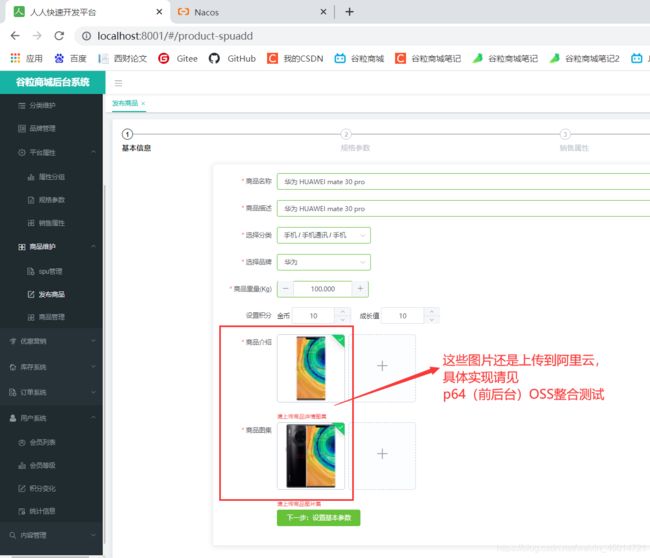
- p61(后台)云存储OSS开通与使用
- p62(后台)OSS整合测试1
- p63(后台)OSS整合测试2
- p64(前后台)OSS整合测试3
-
-
-
-
- 1)分析需求:
- 2)实现方法
-
-
-
- p65(前台)表单校验
- p66(后台)表单校验
-
-
-
-
- 1)分析需求:
- 2)实现方法:修改gulimall-product
-
-
-
- p67(后台)统一异常处理来处理校验结果
- p68(后台)分组校验
-
-
-
-
- 1)分析需求:
- 2)实现方法:
-
-
-
- p69(后台)自定义校验
-
-
-
-
- 1)需求分析:
- 2)实现方法:
-
-
-
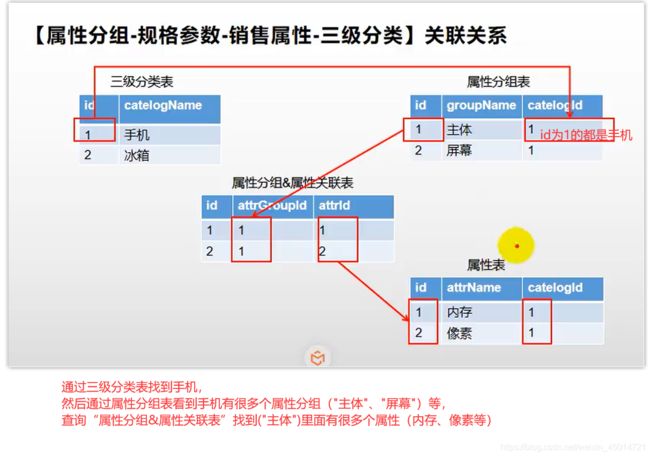
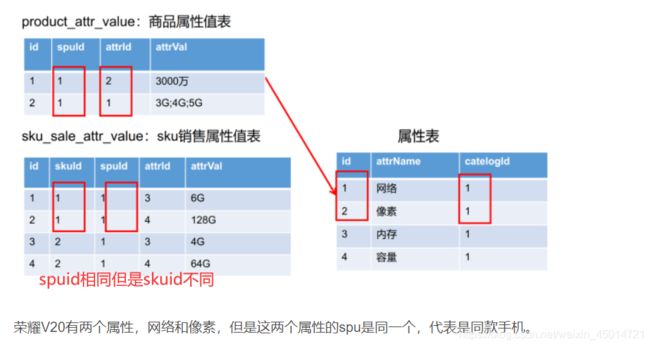
- p70(分析)SPU与SKU
- p71(前台)搭建属性分组
- p72(后台)属性分组查询功能
-
-
-
-
- 1)分析需求
- 2)实现方法:
-
-
-
- p73(前端)属性分组的新增功能
- p74(前端+后端)属性分组的修改功能
- p75(后台)品牌分类的查询
- p76(后台)规格参数的新增
- p77(后台)规格参数的查询所有
- p78(后台)规格参数的修改
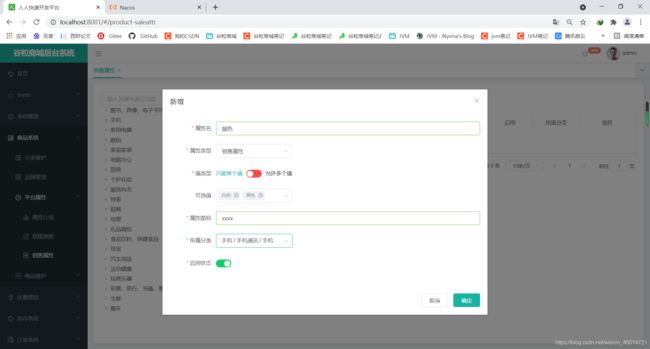
- p79(后台)销售属性的获取
- p80(后台)查询属性分组关联的属性+删除关联
- p81(后台)查询未关联的属性
- p82(后台)添加分组与属性的关联关系
- p83 (后台)会员模块
-
-
- 1.添加新的模块
- 2.启动测试
-
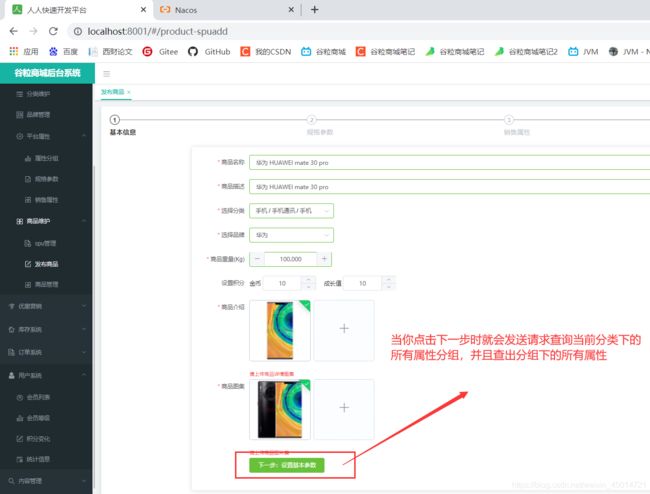
- p84(后台)新增商品
- p85(后台)新增商品2
- p86(后台)录入商品数据,测试商品保存1
- P87(后台)录入商品数据,测试商品保存2
- P88(后台)录入商品数据,测试商品保存3
- P89(后台)录入商品数据,测试商品保存3
- P90(后台)录入商品数据,测试商品保存4
- P91(后台)录入商品数据,测试商品保存5
- P92(后台)录入商品数据,测试商品保存5
-
-
-
-
- 1.预先准备—启动gulimall-coupon模块(请看p22的OpenFeign)
- 2.开始学习
- 3.启动
-
-
-
- P93(后台)SPU检索
- P94(后台)SKU检索
- p100(后台)SPU规格维护
- p95(后台)仓库列表的查询
- p96(后台)库存的查询与采购的查询
- p97(后台)合并采购需求
- p98(后台)采购人员领取采购单
- P99(后台)完成采购
总说:关于如何启动这个基础篇的项目:
1.关于软件的安装
说明:关于你的vagrant


关于docker的安装与挂载
sudo docker run -p 3306:3306 --name mysql \
-v /mydata/mysql/log:/var/log/mysql \
-v /mydata/mysql/data:/var/lib/mysql \
-v /mydata/mysql/conf:/etc/mysql \
-e MYSQL_ROOT_PASSWORD=root \
-d mysql:5.7
关于docker中mysql的安装与挂载
sudo docker run -p 3306:3306 --name mysql \
-v /mydata/mysql/log:/var/log/mysql \
-v /mydata/mysql/data:/var/lib/mysql \
-v /mydata/mysql/conf:/etc/mysql \
-e MYSQL_ROOT_PASSWORD=root \
-d mysql:5.7
关于docker中redis的安装与挂载
docker run -p 6379:6379 --name redis \
-v /mydata/redis/data:/data \
-v /mydata/redis/conf/redis.conf:/etc/redis/redis.conf \
-d redis redis-server /etc/redis/redis.conf
2.如何启动这个项目
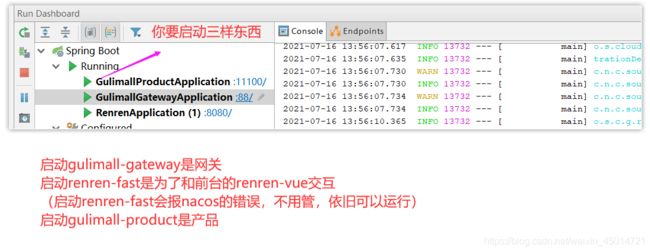
1.启动vagrant

2.启动Nacos
3.启动idea

4.启动前台

5.访问前台

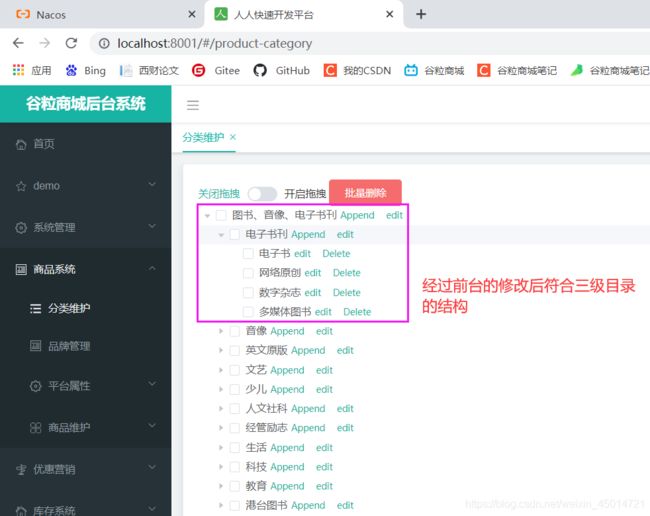
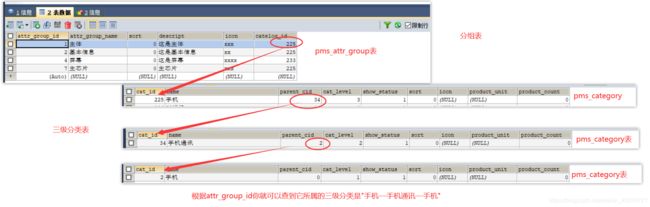
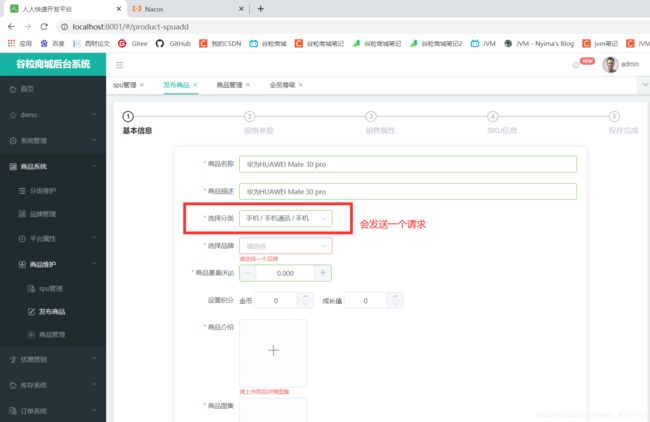
p45(后台)菜单的三级分类
1)分析需求

2)实现方法

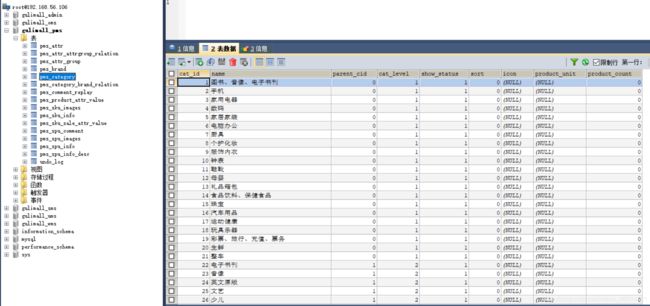

①CategoryEntity实体类和数据库pms_category表的字段是一一对应的,
但CategoryEntity有一个数据库中不存在的字段List ,在List中封装了所有当前实体的子分类。
②一个CategoryEntity中有个字段是List,在List中的每一个CategoryEntity中有又有一个字段是List…无限套娃的感觉
③前台发送http://localhost:88/api/product/category/list/tree请求,后台就会查询pms_category表,得到所有的parent_cid=0的实体集合List0,这个集合List0里面一定有一个CategoryEntity是“手机”(手机的id是2),继续查找pms_category表中所有parent_cid=2的实体就找到了“手机”的子分类的集合List1,把List1设置到"手机"的CategoryEntity中;在List1中一定有一个CategoryEntity是"手机通讯"(手机通讯的id是34),继续查找pms_category表中所有parent_cid=34的实体就找到了“手机通讯”的子分类的集合List2,把List2设置到"手机通讯"的CategoryEntity中;
3)实现的代码
端口号是11100(老师的是10000,但是因为端口冲突我改成了11100)
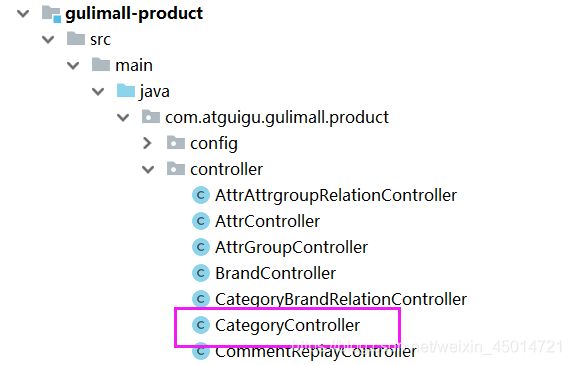
2.1修改Controller层
	//查出所有分类以及子分类,以树形结构组装起来

    @RequestMapping("/list/tree")
    public R list(){

		//list()是查出所有,listWithTree()是我们自己写的方法,表示一次性查出所有并且组装成树形结构
        List<CategoryEntity> categoryEntities = categoryService.listWithTree();
        return R.ok().put("data", categoryEntities);
    }
2.1修改Service层:
1.CategoryService接口添加该抽象方法
//CategoryService接口添加改抽象方法
public interface CategoryService extends IService<CategoryEntity> {


    List<CategoryEntity> listWithTree()
}
2.CategoryServiceImpl实现类重写该方法:
@Service("categoryService")
public class CategoryServiceImpl extends ServiceImpl<CategoryDao, CategoryEntity> implements CategoryService {


    @Override
    public List<CategoryEntity> listWithTree() {


        //1、没有查询条件就是查出所有
        List<CategoryEntity> entities = baseMapper.selectList(null);

        //2、组装成父子的树形结构
        //找到所有的一级分类(一级分类父id为0),然后调用getChildrens()找到它的子分类,然后把它的子分类设置进去,然后递增排序,然后输出
        List<CategoryEntity> level1Menus = entities.stream().filter(categoryEntity -> categoryEntity.getParentCid() == 0)
        .map((menu)->{
     menu.setChildren(getChildrens(menu,entities)); return menu;})
        .sorted((menu1,menu2)->{
     return (menu1.getSort()==null?0:menu1.getSort()) - (menu2.getSort()==null?0:menu2.getSort());})
        .collect(Collectors.toList());

        return level1Menus;
    }

    //getChildrens()方法递归查找所有菜单的子菜单
    private List<CategoryEntity> getChildrens(CategoryEntity root,List<CategoryEntity> all){


		//从all所有菜单中找到当前菜单root的子菜单

		//先找到父id为当前菜单id的那些子菜单,
        List<CategoryEntity> children = all.stream().filter(categoryEntity -> {
     return categoryEntity.getParentCid() == root.getCatId();})
        .map(categoryEntity -> {

            //再继续找子菜单的子菜单
            categoryEntity.setChildren(getChildrens(categoryEntity,all));
            return categoryEntity;
        }).sorted((menu1,menu2)->{

            //递增排序
            return (menu1.getSort()==null?0:menu1.getSort()) - (menu2.getSort()==null?0:menu2.getSort());
        }).collect(Collectors.toList());

        return children;
    }
}
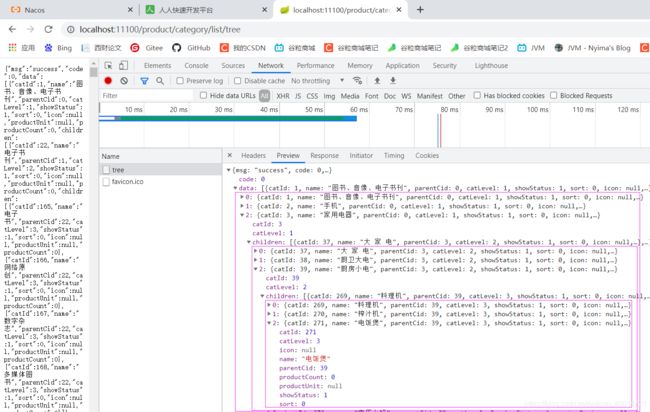
2.3展示效果
树形目录的真实的访问地址是localhost:11100/product/category/list/tree,要记住,后面要用
p46(后台)配置网关路由与路径重写
1)分析需求:
- 我们修改前端代码的基准路径为网关路径
http://localhost:88/api,意思是说本vue项目中要请求的资源url都发给网关88,然后匹配到/api请求即可。 - 就以登陆页面的验证码为例,修改之前页面是发送
http://localhost:8080/renren-fast/captcha.jpg这样url,它的结构是localhost:8080+ 项目名renren-fast+ 请求地址/captcha.jpg。 - 修改之后,现在前台发送的url是
http://localhost:88/api/captcha.jsp,网关见到/api/captcha.jsp符合/api/**的路由规则,就会把/api/captcha.jsp路由给renren-fast,现在的地址就是http://localhost:8080/api/captcha.jsp,在网关处添加一层url过滤,把url中的/api/改变成/renren-fast/,也就是说刚刚的url就会被修改为http://localhost:8080/renren-fast/captcha.jsp - 想法很完美,但是人人开源的登陆页面的地址是
http://localhost:8001/#/login,而你验证码发送的请求却是http://localhost:88/api/captcha.jsp,存在跨域问题。
2)实现方法:
第一步:
修改renren-fast模块,你先得把renren-fast服务注册到nacos中才能被网关找到你
修改pom
让fast里加入注册中心的依赖,我们把公共用到的东西放到common模块,common中有nacos依赖,所以引入common
<dependency>

    <groupId>com.atguigu.gulimallgroupId>
    <artifactId>gulimall-commonartifactId>
    <version>0.0.1-SNAPSHOTversion>
dependency>
修改yml
spring:
  application:
    name: renren-fast
  cloud:
    nacos:
      discovery:
        server-addr: 127.0.0.1:8848
主启动类添加:@EnableDiscoveryClient
@EnableDiscoveryClient
@SpringBootApplication
public class RenrenApplication {


	public static void main(String[] args) {

		SpringApplication.run(RenrenApplication.class, args);
	}

}
第二步:
修改gulimall-gateway模块,添加路由规则

修改yml,添加路由规则
spring:
  cloud:
    gateway:
      routes:
        - id: admin_route
          uri: lb://renren-fast #lb是负载均衡,表示负载均衡地路由给renren-fast
          predicates:  #什么情况下路由给它
            - Path=/api/** # 默认前端项目都带上api前缀,就是也就是满足localhost:88/api这种格式的url
          filters:
            - RewritePath=/api/(?>.*),/renren-fast/$\{
     segment}  # 把/api/* 改变成 /renren-fast/*

#获取登陆页面的验证码发送的url是http://localhost:88/api/captcha.jsp,
#网关见到/api/captcha.jsp符合/api/**的路由规则,就会把/api/captcha.jsp路由给renren-fast,
#现在的地址就是http://localhost:8080/api/captcha.jsp,
#在网关处添加一层url过滤,把url中的/api/*改变成/renren-fast/*,也就是说刚刚的url就会被修改为http://localhost:8080/renren-fast/captcha.jsp
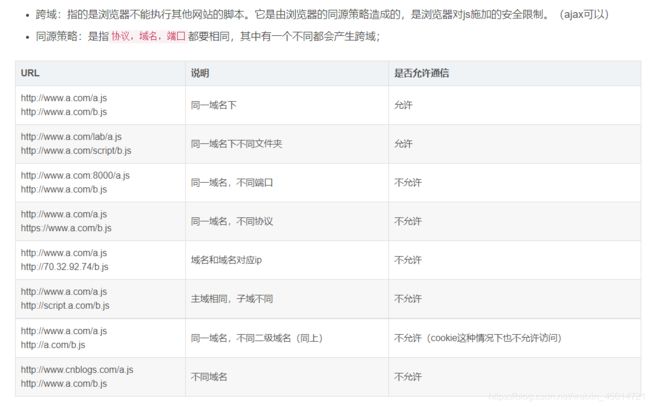
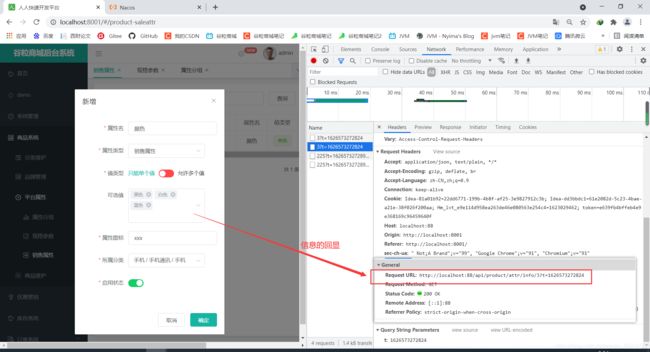
第三步:(p47跨域问题)
存在的跨域问题:
人人开源的登陆页面的地址是http://localhost:8001/#/login,而你验证码发送的请求却是http://localhost:88/api/captcha.jsp,存在跨域问题。就是说vue项目是8001端口,却要跳转到88端口,这是不安全的,不被浏览器通过。
解决跨域问题:
修改gulimall-gateway
1.在application.properties配置文件里面写好Nacos注册中心的地址:
spring.cloud.nacos.discovery.server-addr=127.0.0.1:8848
spring.application.name=gulimall-gateway
server.port=88
2.在bootstrap.properties配置文件里面关联好Nacos配置中心的地址:
spring.application.name=gulimall-coupon

spring.cloud.nacos.config.server-addr=127.0.0.1:8848
spring.cloud.nacos.config.namespace=daff482d-e2ad-4798-a055-ca7f8a18464d
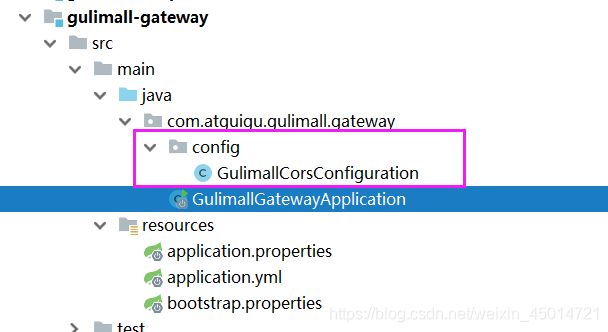
3.写一个配置类:
package com.atguigu.gulimall.gateway.config;

@Configuration
public class GulimallCorsConfiguration {


	// 添加过滤器
    @Bean
    public CorsWebFilter corsWebFilter(){

        // 基于url跨域,选择reactive包下的
        UrlBasedCorsConfigurationSource source=new UrlBasedCorsConfigurationSource();
        // 跨域配置信息
        CorsConfiguration corsConfiguration = new CorsConfiguration();
        // 允许跨域的头
        corsConfiguration.addAllowedHeader("*");
        // 允许跨域的请求方式
        corsConfiguration.addAllowedMethod("*");
        // 允许跨域的请求来源
        corsConfiguration.addAllowedOrigin("*");
        // 是否允许携带cookie跨域
        corsConfiguration.setAllowCredentials(true);

       // 任意url都要进行跨域配置
        source.registerCorsConfiguration("/**",corsConfiguration);
        return new CorsWebFilter(source);
    }
}
p48 树形展示菜单的三级分类数据
1)分析需求
树形结构目录的访问地址是localhost:11100/product/category/list/tree
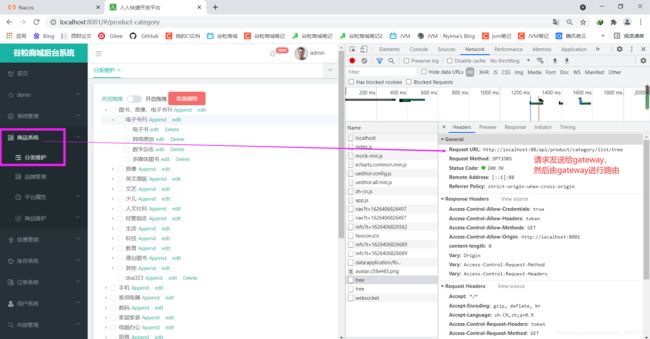
前台请求发送的是http://localhost:88/api/product/category/list/tree
而我们的树形结构真实的路径是http://localhost:11100/product/category/list/tree,
所以,我们需要在网关处将/api/product/**这样的url进行路由,路由后的地址是http://localhost:11100/api/product/category/list/tree,经过路径重写后http://localhost:11100/product/category/list/tree
2)实现方法:
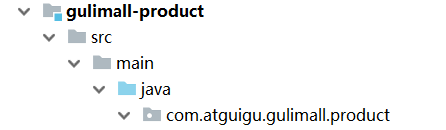
第一步:把gulimall-product注册进Nacos注册中心(这样网关才能找到你)
1.在application.properties配置文件里面关联好Nacos注册中心的地址:
spring:
  cloud:
    nacos:
      discovery:
        server-addr: 127.0.0.1:8848
2.在bootstrap.properties配置文件里面关联好Nacos配置中心的地址:
spring.application.name=gulimall-product

spring.cloud.nacos.config.server-addr=127.0.0.1:8848
spring.cloud.nacos.config.namespace=7d5908cd-4806-4541-b113-1c8306c3e1e2
3.主启动类上开启服务注册功能:@EnableDiscoveryClient
第二步:配置gulimall-gateway的路由规则
spring:
  cloud:
    gateway:
      routes:
        - id: product_route
          uri: lb://gulimall-product
          predicates:
            - Path=/api/product/**
          filters:
            - RewritePath=/api/(?>.*),/$\{
     segment}
#前台请求发送的是http://localhost:88/api/product/category/list/tree,我们需要在网关处将/api/product/**这样的url进行路由,
#路由后的地址是http://localhost:11100/api/product/category/list/tree,经过路径重写后http://localhost:11100/product/category/list/tree
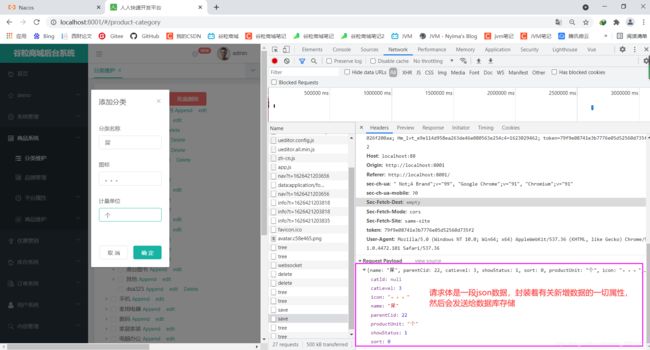
p49(前台)完成菜单的删除功能1

p50(后台)完成菜单的删除功能2
1)分析需求
- p49是前台的代码,我们不管;p50是我们后台进行菜单的删除,但是不到数据库中进行真实删除,而是逻辑删除,把状态由1改为0就是删除。
- 前台发送post请求,请求url为
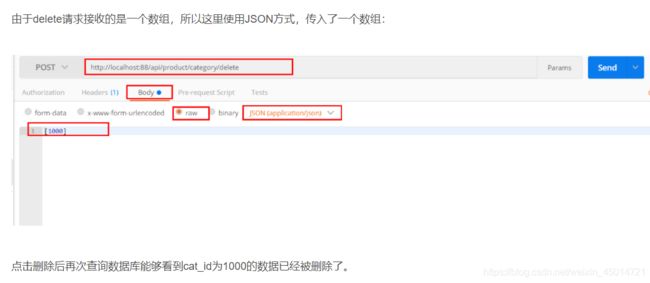
http://localhost:88/api/product/category/delete,路由加过滤后实际的url为http://localhost:11100/product/category/delete - 请求体携带json的数据
[1432](数组里面存放着要删除的id,因为现在只是一个一个删除,所以数组里面就这么一条记录,等以后批量删除就是很多个id了),意思就是删除数据库中id为1432的菜单数据

2)实现方法:修改gulimall-product

1.编写删除的controller与service
1.修改CategoryController
/**
* 后台凡是@RequestBody获取请求体的,前台必须发送POST请求
* SpringMVC自动将请求体的数据(json),转为对应的对象
*/
@RequestMapping("/delete")
public R delete(@RequestBody Long[] catIds){
categoryService.removeMenuByIds(Arrays.asList(catIds));
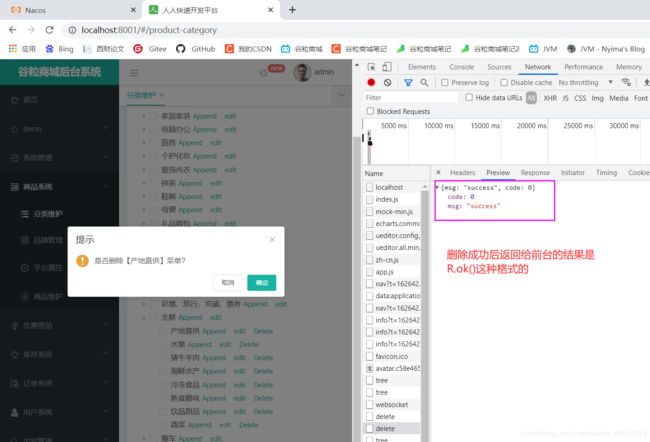
return R.ok();
}
2.修改CategoryServiceImpl
@Override // CategoryServiceImpl
public void removeMenuByIds(List<Long> asList) {

    //TODO 1. 删除之前需要检查当前的菜单是否被别的地方所引用

    // 2.进行删除
    baseMapper.deleteBatchIds(asList);
}
2.添加逻辑删除
application.yml
mybatis-plus:
  mapper-locations: classpath:/mapper/**/*.xml
  global-config:
    db-config:
      id-type: auto
      logic-delete-value: 1
      logic-not-delete-value: 0
修改CategoryEntity实体类,添加上@TableLogic,表明使用逻辑删除:
	/**
	 * 是否显示[value = "1"就是不删除用1表示,delval = "0"表示删除用0表示]
	 */
	@TableLogic(value = "1",delval = "0")
	private Integer showStatus;
p51(前台)完成菜单的删除功能3
p52(前台)完成菜单的添加功能
1)分析需求:
前台发送http://localhost:88/api/product/category/save,路由到http://localhost:11100/product/category/save
2)实现方法:修改gulimall-product
    @RequestMapping("/save")
    public R save(@RequestBody CategoryEntity category){

		categoryService.save(category);

        return R.ok();
    }

//save()方法是categoryService继承IService后就自带的方法,所以不需要你写service层实现类的代码
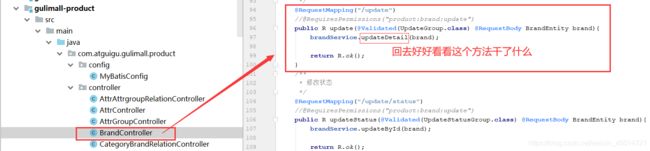
p53(前台)完成菜单的修改功能
1)分析需求


2)实现方法:
//这是renren-fast自动生成的,没什么好讲的
    @RequestMapping("/update")
    public R update(@RequestBody CategoryEntity category){

		categoryService.updateCascade(category);
        return R.ok();
    }
p54(前台)完成菜单的拖拽功能1
p55(前台)完成菜单的拖拽功能2
p56(后台+前台)菜单的拖拽功能3
1)分析需求


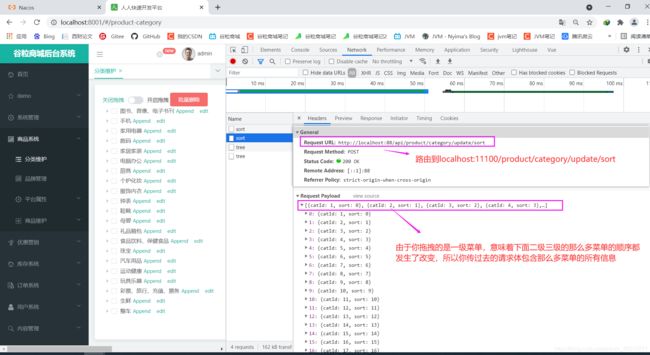
2)实现方法:修改gulimall-product
1.修改CategoryController
    @RequestMapping("/update/sort")
    public R updateSort(@RequestBody CategoryEntity[] category){

        categoryService.updateBatchById(Arrays.asList(category));
        return R.ok();
    }
2.修改CategoryServiceImpl
由于updateBatchById()方法是categoryService继承IService<CategoryEntity>后就自带的方法,所以不需要你写service层代码
p57(前台)完成菜单的拖拽功能4
p58(前台)完成菜单的批量删除功能
1)分析需求
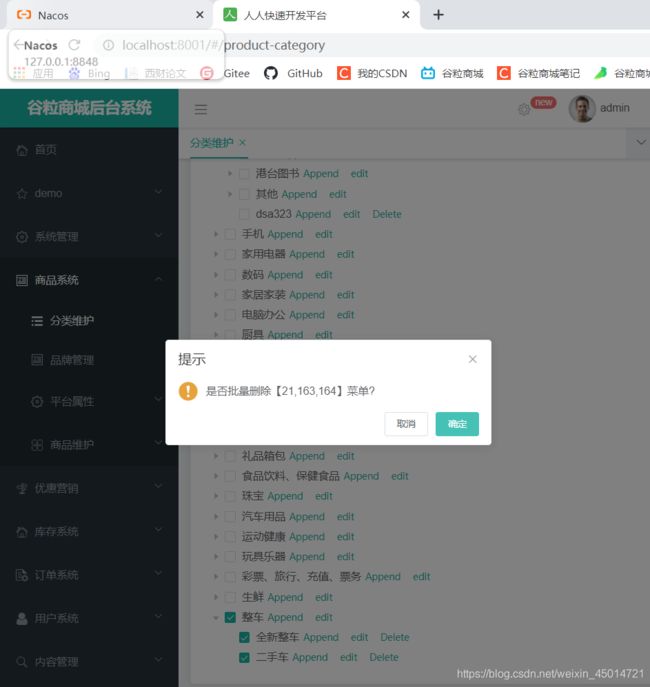
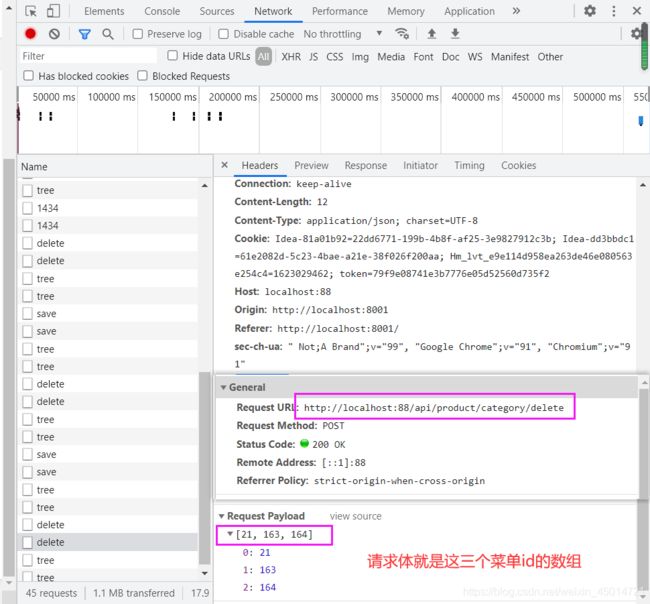
2)实现方法:
具体的实现回见p50(后台)完成菜单的删除功能2
p59品牌管理总说


p60(前台)品牌的显示开关
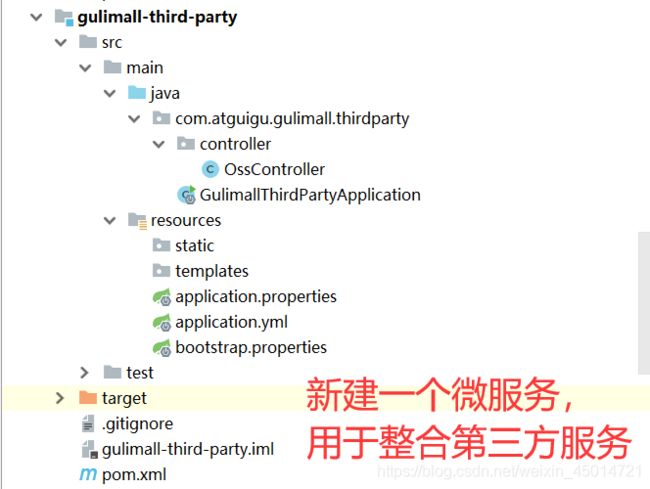
p61(后台)云存储OSS开通与使用
p62(后台)OSS整合测试1
p63(后台)OSS整合测试2
p64(前后台)OSS整合测试3
1)分析需求:
具体的oss是什么、如何在阿里云搭建oss请见p60—p64
2)实现方法
1.在application.properties配置文件里面写好Nacos注册中心的地址
spring:
  cloud:
    nacos:
      discovery:
        server-addr: 127.0.0.1:8848
  application:
    name: gulimall-third-party

server:
  port: 30000 #添加自己的网关
2.在bootstrap.properties配置文件里面关联好Nacos配置中心的地址:
spring.application.name=gulimall-third-party
spring.cloud.nacos.config.server-addr=127.0.0.1:8848
spring.cloud.nacos.config.namespace=a9eeee99-4d68-4496-941a-6b820ba72e32


spring.cloud.nacos.config.ext-config[0].data-id=oss.yml
spring.cloud.nacos.config.ext-config[0].group=DEFAULT_GROUP
spring.cloud.nacos.config.ext-config[0].refresh=true

3.主启动类@EnableDiscoveryClient
好了,以上的操做是注册进nacos的步骤,接下来我们要完成阿里云相关的配置
4.在application.properties配置文件里面写好阿里云相关的配置
spring:
  cloud:
    nacos:
      discovery:
        server-addr: 127.0.0.1:8848
    alicloud:
      access-key: LTAI5tJbBoWagm2CVCTLTz2B  #阿里云配置
      secret-key: qRZsyTXB3uWdu8Rsz4gbWjGMZ3gqfk  #阿里云配置
      oss:
        endpoint: oss-cn-chengdu.aliyuncs.com  #阿里云配置
        bucket: gulimall-hello-redhur  #阿里云配置

  application:
    name: gulimall-third-party
5.写一个ossController用于上传文件
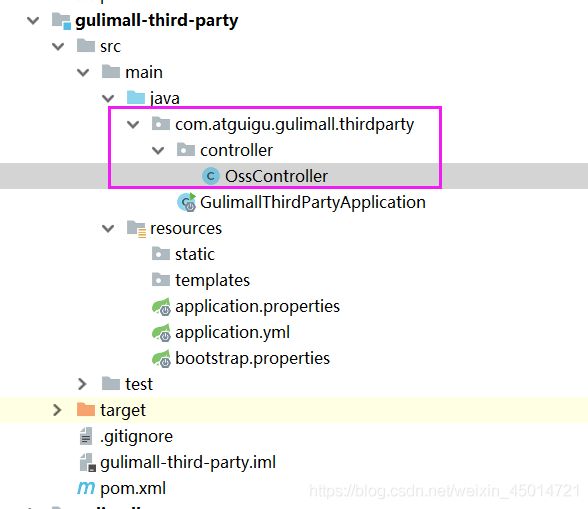
@RestController
public class OssController {


    @Autowired
    OSS ossClient;

    @Value("${spring.cloud.alicloud.oss.endpoint}")
    private String endpoint;
    @Value("${spring.cloud.alicloud.oss.bucket}")
    private String bucket;
    @Value("${spring.cloud.alicloud.access-key}")
    private String accessId;


    @RequestMapping("/oss/policy")
    public R policy() {


        //https://gulimall-hello-redhur.oss-cn-chengdu.aliyuncs.com/hahaha.jpg
        String host = "https://" + bucket + "." + endpoint; // host的格式为 bucketname.endpoint

        String format = new SimpleDateFormat("yyyy-MM-dd").format(new Date());
        String dir = format + "/"; // 我们希望以一个日期的方式为一个目录,某一天的图片全部上传到改目录下

        Map<String, String> respMap = null;
        try {

            long expireTime = 30;
            long expireEndTime = System.currentTimeMillis() + expireTime * 1000;
            Date expiration = new Date(expireEndTime);
            PolicyConditions policyConds = new PolicyConditions();
            policyConds.addConditionItem(PolicyConditions.COND_CONTENT_LENGTH_RANGE, 0, 1048576000);
            policyConds.addConditionItem(MatchMode.StartWith, PolicyConditions.COND_KEY, dir);

            String postPolicy = ossClient.generatePostPolicy(expiration, policyConds);
            byte[] binaryData = postPolicy.getBytes("utf-8");
            String encodedPolicy = BinaryUtil.toBase64String(binaryData);
            String postSignature = ossClient.calculatePostSignature(postPolicy);

            respMap = new LinkedHashMap<String, String>();
            respMap.put("accessid", accessId);
            respMap.put("policy", encodedPolicy);
            respMap.put("signature", postSignature);
            respMap.put("dir", dir);
            respMap.put("host", host);
            respMap.put("expire", String.valueOf(expireEndTime / 1000));


        } catch (Exception e) {

            System.out.println(e.getMessage());
        }

        return R.ok().put("data",respMap);
    }
}
6.测试访问:

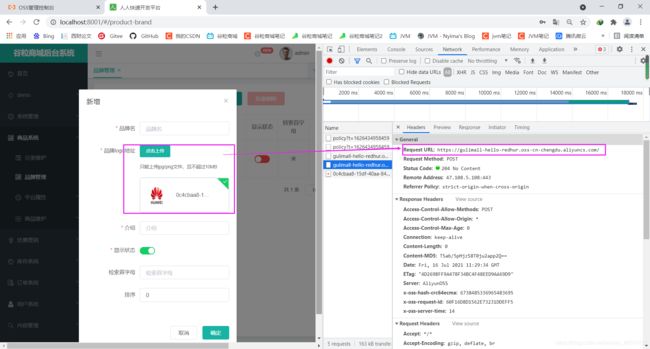
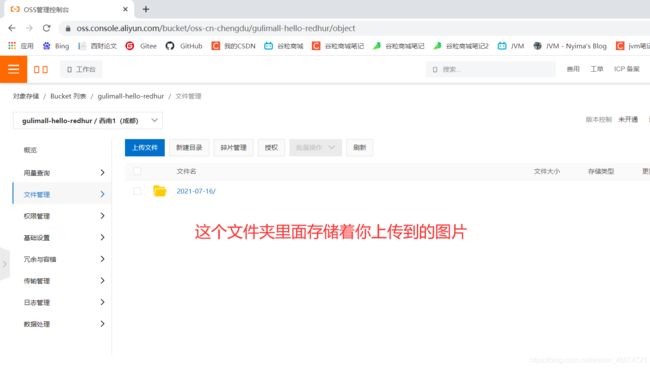
7.添加网关
当你访问localhost:88/api/thirdparty/oss/policy时就会路由到localhost:3000/oss/policy,然后localhost:3000/oss/policy又会让你访问https://gulimall-hello-redhur.oss-cn-chengdu.aliyuncs.com/来存储你的文件
修改yml为如下:
spring:
  cloud:
    gateway:
      routes:
        - id: product_route
          uri: lb://gulimall-product
          predicates:
            - Path=/api/product/**
          filters:
            - RewritePath=/api/(?>.*),/$\{
     segment}

        - id: third_party_route
          uri: lb://gulimall-third-party
          predicates:
            - Path=/api/thirdparty/**
          filters:
            - RewritePath=/api/thirdparty/(?>.*),/$\{
     segment}

        - id: admin_route
          uri: lb://renren-fast
          predicates:
            - Path=/api/**  #前面的精确匹配(/api/product/**和/api/thirdparty/**)一定要放到前面,剩下的匹配不到的(/api/**)才走这条路由
          filters:
            - RewritePath=/api/(?>.*),/renren-fast/$\{
     segment}
8.前后端联合测试
p65(前台)表单校验
p66(后台)表单校验
1)分析需求:
前台有了表单校验还不够,我们后台还得校验一次才能保证安全。后台我们使用JSR303校验
2)实现方法:修改gulimall-product
1.导入pom依赖
<dependency>
    <groupId>org.springframework.bootgroupId>
    <artifactId>spring-boot-starter-validationartifactId>
dependency>
里面依赖了hibernate-validator
2.在entity实体类里面添加@NotNull,@NotBlank、@NotEmpty、@Email、@URL这些注解
- @NotNull 该属性不能为null
- @NotEmpty 该字段不能为null或""(比如collection集合、Map、Array数组等长度不能为空)
- @NotBlank:不能为空,不能仅为一个空格
- @URL必须是url格式
- @Pattern(regexp="^ [a-zA-Z] $")在@Pattern里面自定义校验规则,比如这里自定义了一个正则表达式
- @Min(value = 0)最小值为0
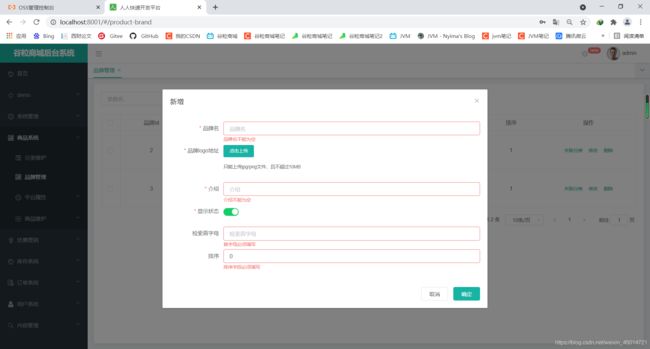
@Data
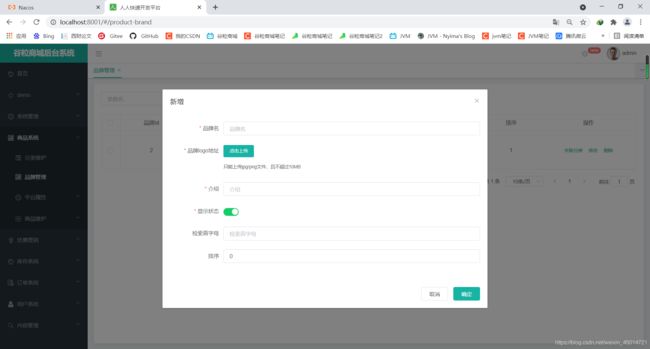
@TableName("pms_brand")
public class BrandEntity implements Serializable {
private static final long serialVersionUID = 1L;
@NotNull
@TableId
private Long brandId; //品牌id
@NotBlank
private String name; //品牌名
@NotBlank
@URL
private String logo; //品牌logo地址
private String descript; //介绍
@NotNull
private Integer showStatus;
@Pattern(regexp="^[a-zA-Z]$")
private String firstLetter;//检索首字母
@NotNull
@Min(value = 0)
private Integer sort;//排序
}
3.在编写的Controller中加校验注解@Valid,开启校验
//加了@Valid相当于告诉SpringMVC说BrandEntity里的这些字段需要进行校验
@RequestMapping("/save")
public R save(@Valid @RequestBody BrandEntity brand){


    brandService.save(brand);
    return R.ok();
}
4.关于消息提示
//这是源码:它返回的消息是javax.validation.constraints.NotBlank.message里面的消息
public @interface NotBlank {


	String message() default "{javax.validation.constraints.NotBlank.message}";
查看源码就发现后台定义了很多的错误规则,所以当校验不成功时就会由默认返回的消息
javax.validation.constraints.AssertFalse.message     = 只能为false
javax.validation.constraints.AssertTrue.message      = 只能为true
javax.validation.constraints.DecimalMax.message      = 必须小于或等于{
     value}
javax.validation.constraints.DecimalMin.message      = 必须大于或等于{
     value}
javax.validation.constraints.Digits.message          = 数字的值超出了允许范围(只允许在{
     integer}位整数和{
     fraction}位小数范围内)
javax.validation.constraints.Email.message           = 不是一个合法的电子邮件地址
javax.validation.constraints.Future.message          = 需要是一个将来的时间
javax.validation.constraints.FutureOrPresent.message = 需要是一个将来或现在的时间
javax.validation.constraints.Max.message             = 最大不能超过{
     value}
javax.validation.constraints.Min.message             = 最小不能小于{
     value}
javax.validation.constraints.Negative.message        = 必须是负数
javax.validation.constraints.NegativeOrZero.message  = 必须是负数或零
javax.validation.constraints.NotBlank.message        = 不能为空
javax.validation.constraints.NotEmpty.message        = 不能为空
javax.validation.constraints.NotNull.message         = 不能为null
javax.validation.constraints.Null.message            = 必须为null
javax.validation.constraints.Past.message            = 需要是一个过去的时间
javax.validation.constraints.PastOrPresent.message   = 需要是一个过去或现在的时间
javax.validation.constraints.Pattern.message         = 需要匹配正则表达式"{regexp}"
javax.validation.constraints.Positive.message        = 必须是正数
javax.validation.constraints.PositiveOrZero.message  = 必须是正数或零
javax.validation.constraints.Size.message            = 个数必须在{
     min}和{
     max}之间

org.hibernate.validator.constraints.CreditCardNumber.message        = 不合法的信用卡号码
org.hibernate.validator.constraints.Currency.message                = 不合法的货币 (必须是{
     value}其中之一)
org.hibernate.validator.constraints.EAN.message                     = 不合法的{
     type}条形码
org.hibernate.validator.constraints.Email.message                   = 不是一个合法的电子邮件地址
org.hibernate.validator.constraints.Length.message                  = 长度需要在{
     min}和{
     max}之间
org.hibernate.validator.constraints.CodePointLength.message         = 长度需要在{
     min}和{
     max}之间
org.hibernate.validator.constraints.LuhnCheck.message               = ${
     validatedValue}的校验码不合法, Luhn模10校验和不匹配
org.hibernate.validator.constraints.Mod10Check.message              = ${
     validatedValue}的校验码不合法, 模10校验和不匹配
org.hibernate.validator.constraints.Mod11Check.message              = ${
     validatedValue}的校验码不合法, 模11校验和不匹配
org.hibernate.validator.constraints.ModCheck.message                = ${
     validatedValue}的校验码不合法, ${
     modType}校验和不匹配
org.hibernate.validator.constraints.NotBlank.message                = 不能为空
org.hibernate.validator.constraints.NotEmpty.message                = 不能为空
org.hibernate.validator.constraints.ParametersScriptAssert.message  = 执行脚本表达式"{script}"没有返回期望结果
org.hibernate.validator.constraints.Range.message                   = 需要在{
     min}和{
     max}之间
org.hibernate.validator.constraints.SafeHtml.message                = 可能有不安全的HTML内容
org.hibernate.validator.constraints.ScriptAssert.message            = 执行脚本表达式"{script}"没有返回期望结果
org.hibernate.validator.constraints.URL.message                     = 需要是一个合法的URL

org.hibernate.validator.constraints.time.DurationMax.message        = 必须小于${
     inclusive == true ? '或等于' : ''}${
     days == 0 ? '' : days += '天'}${
     hours == 0 ? '' : hours += '小时'}${
     minutes == 0 ? '' : minutes += '分钟'}${
     seconds == 0 ? '' : seconds += '秒'}${
     millis == 0 ? '' : millis += '毫秒'}${
     nanos == 0 ? '' : nanos += '纳秒'}
org.hibernate.validator.constraints.time.DurationMin.message        = 必须大于${
     inclusive == true ? '或等于' : ''}${
     days == 0 ? '' : days += '天'}${
     hours == 0 ? '' : hours += '小时'}${
     minutes == 0 ? '' : minutes += '分钟'}${
     seconds == 0 ? '' : seconds += '秒'}${
     millis == 0 ? '' : millis += '毫秒'}${
     nanos == 0 ? '' : nanos += '纳秒'}
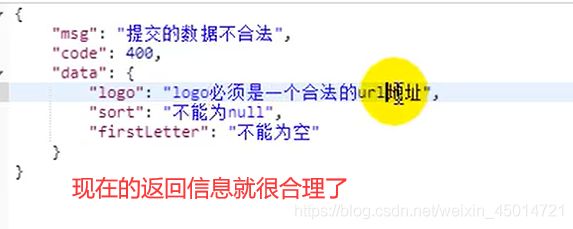
5.自定义错误消息
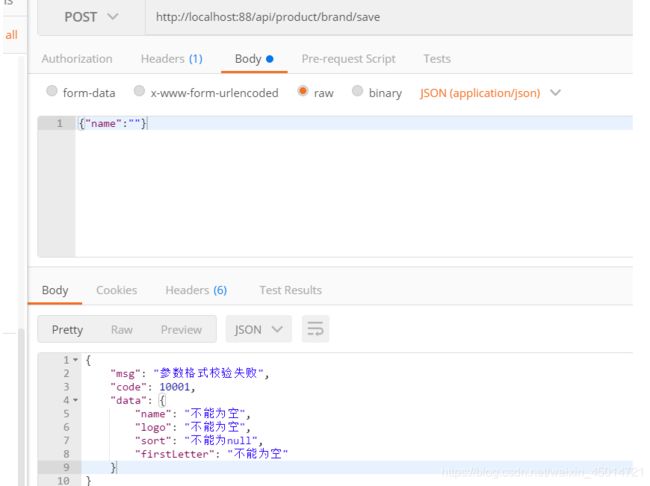
	@NotBlank(message = "品牌名必须非空")
	private String name;
6.局部异常处理BindResult
虽然你自定义了错误消息,但是返回的错误体还是像下面这么啰嗦:
{

    "timestamp": "2020-04-29T09:36:04.125+0000",
    "status": 400,
    "error": "Bad Request",
    "errors": [
        {

            "codes": [
                "NotBlank.brandEntity.name",
                "NotBlank.name",
                "NotBlank.java.lang.String",
                "NotBlank"
            ],
            "arguments": [
                {

                    "codes": [
                        "brandEntity.name",
                        "name"
                    ],
                    "arguments": null,
                    "defaultMessage": "name",
                    "code": "name"
                }
            ],
            "defaultMessage": "品牌名必须非空",
            "objectName": "brandEntity",
            "field": "name",
            "rejectedValue": "",
            "bindingFailure": false,
            "code": "NotBlank"
        }
    ],
    "message": "Validation failed for object='brandEntity'. Error count: 1",
    "path": "/product/brand/save"
}
不管是自定义的错误消息还是系统默认的返回错误消息,总之返回的错误体不是R对象,影响接收端的接收,我们可以通过局部异常处理或者统一一次处理解决

这种是针对于该请求设置了一个内容校验,如果针对于每个请求都单独进行配置,显然不是太合适,实际上可以统一的对于异常进行处理。
p67(后台)统一异常处理来处理校验结果
(1)现在的Controller不需要像上面那么罗嗦了,因为凡是出现异常就会抛出去交给统一异常处理类处理
@RestController
@RequestMapping("product/brand")
public class BrandController {

    @Autowired
    private BrandService brandService;

    @RequestMapping("/save")
    public R save(@Validated @RequestBody BrandEntity brand){


		//如果@Validated校验不成功就会直接抛出异常
        brandService.save(brand);
        return R.ok();
    }
(2)编写统一错误状态码
正规开发过程中,错误状态码有着严格的定义规则,如该在项目中我们的错误状态码定义
BizCodeEnum为了定义这些错误状态码,我们可以单独定义一个常量类,用来存储这些错误状态码
/***
 * 错误码和错误信息定义类
 * 1. 错误码定义规则为5为数字
 * 2. 前两位表示业务场景,最后三位表示错误码。例如:100001。10:通用 001:系统未知异常
 * 3. 维护错误码后需要维护错误描述,将他们定义为枚举形式
 * 错误码列表:
 *  10: 通用
 *      001:参数格式校验
 *  11: 商品
 *  12: 订单
 *  13: 购物车
 *  14: 物流
 */
public enum BizCodeEnum {


    UNKNOW_EXEPTION(10000,"系统未知异常"),

    VALID_EXCEPTION( 10001,"参数格式校验失败");

    private int code;
    private String msg;

    BizCodeEnum(int code, String msg) {

        this.code = code;
        this.msg = msg;
    }

    public int getCode() {

        return code;
    }

    public String getMsg() {

        return msg;
    }
}
调用方式就是BizCodeEnume.VAILD_EXCEPTION.getCode()
(3)抽取一个异常处理类
@ControllerAdvice(basePackages = "com.atguigu.gulimall.product.controller")表示这个包下的所有异常我都可以处理
@ExceptionHandler(value = 异常类型.class)标注在方法上
@Slf4j
//@ResponseBody
//@ControllerAdvice(basePackages = "com.atguigu.gulimall.product.controller")
@RestControllerAdvice(basePackages = "com.atguigu.gulimall.product.controller")
public class GulimallExceptionControllerAdvice {


    @ExceptionHandler(value= MethodArgumentNotValidException.class) //标注好能处理的异常类型
    public R handleVaildException(MethodArgumentNotValidException e){

        log.error("数据校验出现问题{},异常类型:{}",e.getMessage(),e.getClass());
        BindingResult bindingResult = e.getBindingResult();

        Map<String,String> errorMap = new HashMap<>();
        bindingResult.getFieldErrors().forEach((fieldError)->{

            errorMap.put(fieldError.getField(),fieldError.getDefaultMessage());
        });
        return R.error(BizCodeEnume.VAILD_EXCEPTION.getCode(),BizCodeEnume.VAILD_EXCEPTION.getMsg()).put("data",errorMap);
    }

    @ExceptionHandler(value = Throwable.class)  //标注好能处理的异常类型
    public R handleException(Throwable throwable){


        log.error("错误:",throwable);
        return R.error(BizCodeEnume.UNKNOW_EXCEPTION.getCode(),BizCodeEnume.UNKNOW_EXCEPTION.getMsg());
    }


}
p68(后台)分组校验
1)分析需求:
如果新增和修改两个接口需要验证的字段不同,比如id字段,新增可以不传递,但是修改必须传递id,我们就需要用到分组校验来实现。
步骤:
- 创建分组接口
Insert.class和Update.class - 注解中指定分组
@NotNull(message = "用户姓名不能为空",groups = {Insert.class,Update.class}) - controller的方法上或者方法参数上写要处理的分组的接口信息,如
@Validated(AddGroup.class)
2)实现方法:
1.创建接口

2.指定分组

@Data
@TableName("pms_brand")
public class BrandEntity implements Serializable {

	private static final long serialVersionUID = 1L;

	//对于品牌id,品牌id是数据库中生成的,所以新增时id必须是空;修改品牌时,品牌id不能是空
	@NotNull(message = "修改必须指定品牌id",groups = {
     UpdateGroup.class})
	@Null(message = "新增不能指定id",groups = {
     AddGroup.class})
	@TableId
	private Long brandId;//品牌id

	//无论修改还是新增,品牌名都不能是空
	@NotBlank(message = "品牌名必须提交",groups = {
     AddGroup.class,UpdateGroup.class})
	private String name;//品牌名

	@NotBlank(groups = {
     AddGroup.class})
	@URL(message = "logo必须是一个合法的url地址",groups={
     AddGroup.class,UpdateGroup.class})
	private String logo;//品牌logo地址

	private String descript;//介绍

	@NotNull(groups = {
     AddGroup.class, UpdateStatusGroup.class})
  	@ListValue(vals={
     0,1},groups = {
     AddGroup.class, UpdateStatusGroup.class})
	private Integer showStatus;//显示状态[0-不显示;1-显示]

	@NotEmpty(groups={
     AddGroup.class})
	@Pattern(regexp="^[a-zA-Z]$",message = "检索首字母必须是一个字母",groups={
     AddGroup.class,UpdateGroup.class})
	private String firstLetter;//检索首字母

	@NotNull(groups={
     AddGroup.class})
	@Min(value = 0,message = "排序必须大于等于0",groups={
     AddGroup.class,UpdateGroup.class})
	private Integer sort;//排序

}
3.修改controller

@RestController
@RequestMapping("product/brand")
public class BrandController {

    @Autowired
    private BrandService brandService;

	//@Validated({AddGroup.class})表示这个方法校验的是在AddGroup.class这个组的那些字段
    @RequestMapping("/save")
    public R save(@Validated({
     AddGroup.class}) @RequestBody BrandEntity brand/*,BindingResult result*/){


        brandService.save(brand);
        return R.ok();
    }
}
4.问题来了:
//这些没有指定分组的校验字段,在是校验呢还是不校验呢?答案是没有指定分组的校验注解,默认是不起作用的。想要起作用就必须要加groups。
	@NotNull
	private Integer sort;//排序
5.当Controller为:
```java
@RestController
@RequestMapping("product/brand")
public class BrandController {

    @Autowired
    private BrandService brandService;

	//@Validated表示没有标注分组的会生效,标注了分组的不会生效
    @RequestMapping("/save")
    public R save(@Validated @RequestBody BrandEntity brand/*,BindingResult result*/){


        brandService.save(brand);
        return R.ok();
    }
}
p69(后台)自定义校验
1)需求分析:
你想要在实体类的字段上添加自定义校验注解@ListValue(vals = {0,1}),其中的@ListValue是你自己起的名的注解,你想用它表示值只能是0和1
@NotNull(groups = {
     AddGroup.class, UpdateStatusGroup.class})
@ListValue(vals = {
     0,1}, groups = {
     AddGroup.class, UpdateGroup.class, UpdateStatusGroup.class})
private Integer showStatus;
2)实现方法:
实现过程:自定义校验注解
1.编写一个自定义注解

@Documented
@Constraint(validatedBy = {
      ListValueConstraintValidator.class}) // 指明使用哪个校验器进行校验(需要我们编写这个类)
@Target({
      METHOD, FIELD, ANNOTATION_TYPE, CONSTRUCTOR, PARAMETER, TYPE_USE }) //指明这个注解可以标注在哪里
@Retention(RUNTIME)  //这个注解的生命周期
public @interface ListValue {


    //default "{com.atguigu.common.valid.ListValue.message}"表示默认值从"{com.atguigu.common.valid.ListValue.message}"里面获取
    String message() default "{com.atguigu.common.valid.ListValue.message}";  //错误信息

    Class<?>[] groups() default {
      }; //分组信息

    Class<? extends Payload>[] payload() default {
      }; //自定义负载信息

    // default {}表示默认取值就是从{}里面获取
    int[] value() default {
     };  //自定义取值信息
}
上面的代码留下两个疑点,
一是String message() default "{com.atguigu.common.valid.ListValue.message}"; //错误信息
二是@Constraint(validatedBy = { ListValueConstraintValidator.class}) // 指明使用哪个校验器进行校验(需要我们编写这个类)
2.定义错误信息

3.编写校验类
因为上面的@Constraint(validatedBy = { ListValueConstraintValidator.class}) // 指明使用ListValueConstraintValidator.class校验器进行校验,所以我们编写一个自定义校验器:
//具体的校验类需要实现ConstraintValidator接口,第一个泛型参数是所对应的校验注解类型,第二个是校验对象类型。
public class ListValueConstraintValidator implements ConstraintValidator<ListValue,Integer> {


    // 存储所有可能的值
    private Set<Integer> set=new HashSet<>();

    // 在初始化方法中你可以获取注解上的内容并进行处理
    @Override
    public void initialize(ListValue constraintAnnotation) {

        // 这个value就是ListValue里的value,也就是@ListValue(value={0,1})里的0和1
        int[] value = constraintAnnotation.value();
        for (int i : value) {

            set.add(i);
        }
    }

	//真正的验证逻辑由isValid完成
    @Override
    public boolean isValid(Integer value, ConstraintValidatorContext context) {

        // 看是否在限制的值里
        return  set.contains(value);
    }
}
4.使用
	/**
	 * 显示状态[0-不显示;1-显示]
	  用value[]指定可以写的值
	 */
	@ListValue(value = {
     0,1},groups ={
     AddGroup.class})
	private Integer showStatus;
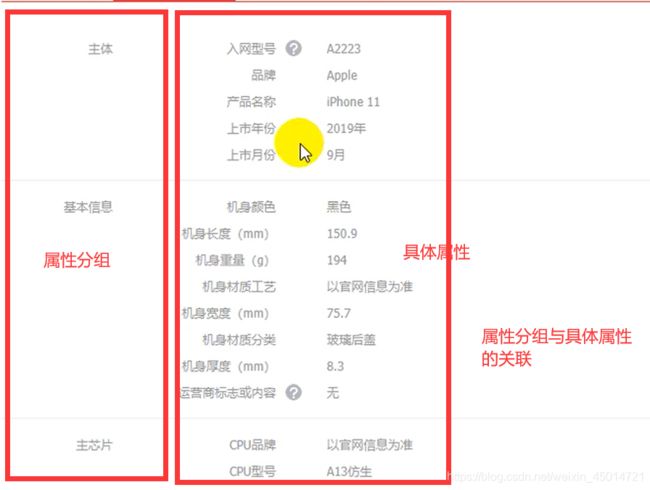
p70(分析)SPU与SKU
- SPU的属性就是基本属性。一款小米10手机的机身长度、宽度、厚度、重量、材质等等属性是所有小米10公用的属性,也是同一款手机的基本属性。这些属性就是spu属性。
- SKU的属性就是销售属性。你要买的小米10是什么颜色的?多少G的手机?这两个属性决定了价格,也决定了库存数量(比如
幻夜黑+64G的手机我们还剩1000件),这就是销售属性,就是sku属性。


p71(前台)搭建属性分组
p71是前台代码,但是前5分钟搭建了数据库
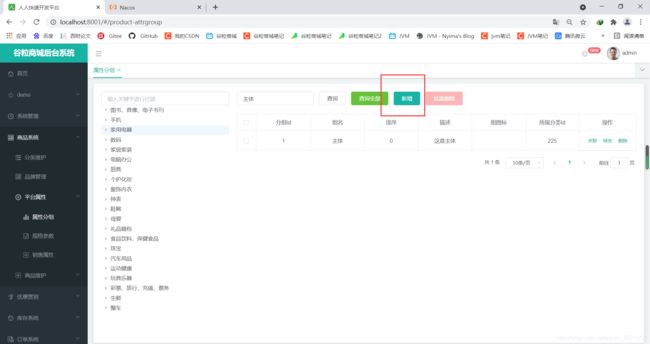
p72(后台)属性分组查询功能
1)分析需求


2)实现方法:

前台把(分页信息page、limit)和(catalogid)还有(查询的条件key)传过来
后台查询pms_attr_group表
先判断key有没有值,如果有就拼接上分组id等于这个key或分组名字like这个key;
然后判断catalogid是否为0,如果不为0就拼接上这个条件,如果为0就列出所有;
最后使用分页工具PageUtils包装回去
1.修改controller
@RestController
@RequestMapping("product/attrgroup")
public class AttrGroupController {
@Autowired
private AttrGroupService attrGroupService;
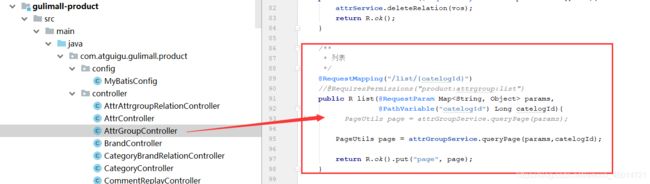
@RequestMapping("/list/{catelogId}")
public R list(@RequestParam Map<String, Object> params,
@PathVariable("catelogId") Long catelogId){
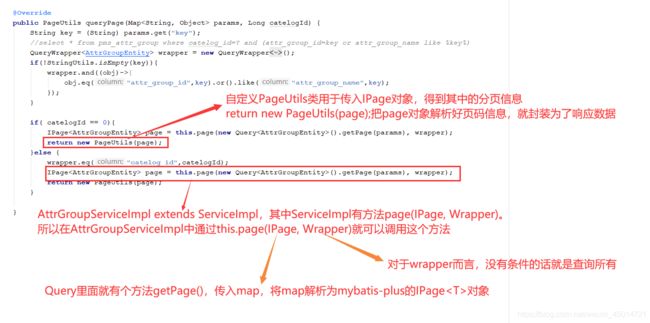
PageUtils page = attrGroupService.queryPage(params,catelogId);
return R.ok().put("page", page);
}
}
2.修改service接口
public interface AttrGroupService extends IService<AttrGroupEntity> {


    PageUtils queryPage(Map<String, Object> params, Long catelogId);

}
3.修改service实现类
@Service("attrGroupService")
public class AttrGroupServiceImpl extends ServiceImpl<AttrGroupDao, AttrGroupEntity> implements AttrGroupService {


    @Autowired
    AttrService attrService;

    @Override
    public PageUtils queryPage(Map<String, Object> params, Long catelogId) {

        String key = (String) params.get("key");

        //下面的语句等价于select * from pms_attr_group where catelog_id=? and (attr_group_id=key or attr_group_name like %key%)
        QueryWrapper<AttrGroupEntity> wrapper = new QueryWrapper<AttrGroupEntity>();
        if(!StringUtils.isEmpty(key)){

            wrapper.and((obj)->{

                obj.eq("attr_group_id",key).or().like("attr_group_name",key);
            });
        }


        if( catelogId == 0){

        	//如果前端没有把三级分类id传过来,那就说明是列出所有
            IPage<AttrGroupEntity> page = this.page(new Query<AttrGroupEntity>().getPage(params),wrapper);
            return new PageUtils(page);
        }else {

        	//如果前端把三级分类idid传过来了,那就查询指定id的内容
            wrapper.eq("catelog_id",catelogId);
            IPage<AttrGroupEntity> page = this.page(new Query<AttrGroupEntity>().getPage(params),wrapper);
            return new PageUtils(page);
        }

    }
4.测试


5.属性分组的查询所有


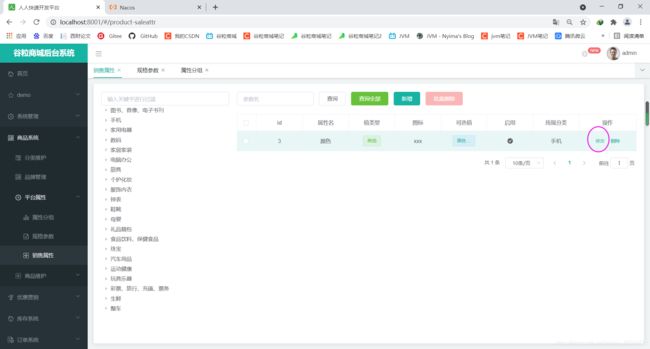
p73(前端)属性分组的新增功能
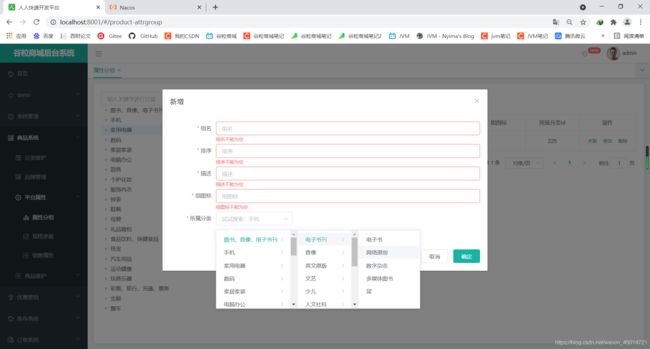
@JsonInclude去空字段
优化:没有下级菜单时不要有下一级空菜单,在java端把children属性空值去掉,空集合时去掉children字段,
可以用@JsonInclude(Inlcude.NON_EMPTY)注解标注在实体类的属性上,
@TableField(exist =false) //数据库中没有这个字段
@JsonInclude(JsonInclude.Include.NON_EMPTY) // 不为空时返回的json才带该children字段
private List<CategoryEntity> children;


@RestController
@RequestMapping("product/attrgroup")
public class AttrGroupController {

    @Autowired
    private AttrGroupService attrGroupService;

    @RequestMapping("/save")
    public R save(@RequestBody AttrGroupEntity attrGroup){

		attrGroupService.save(attrGroup);

        return R.ok();
    }
}
public interface AttrGroupService extends IService<AttrGroupEntity> {


}
@Service("attrGroupService")
public class AttrGroupServiceImpl extends ServiceImpl<AttrGroupDao, AttrGroupEntity> implements AttrGroupService {


}
p74(前端+后端)属性分组的修改功能
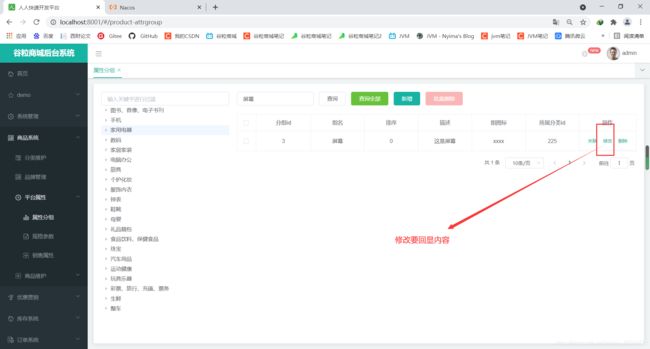
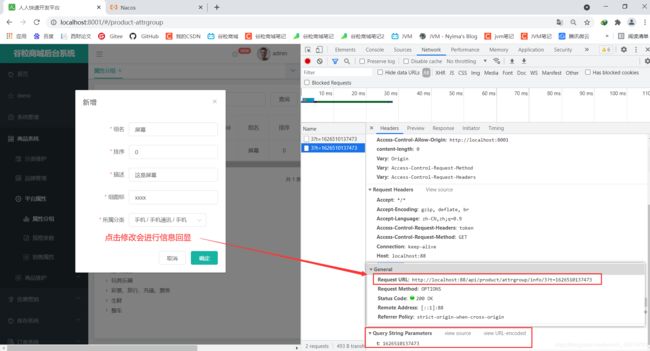

前台传回来arrtGroupId,
后台根据arrtGroupId查询"pms_attr_group"表得到AttrGroupEntity(AttrGroupEntity里面就有回显的绝大部分东西),
AttrGroupEntity里面有catelogId,后台根据catelogId查询"pms_category"表得到CategoryEntity,
CategoryEntity里面有parent_cid,如果parent_cid不为0就继续根据parent_cid查询"pms_category"表得到CategoryEntity
类似于这种的后台代码我就不写出来了,你完全可以根据前台哪个功能是通过发送什么请求以及携带了什么参数到后台找一下对应的controller对应的方法就可以查看这个功能是怎么实现的。
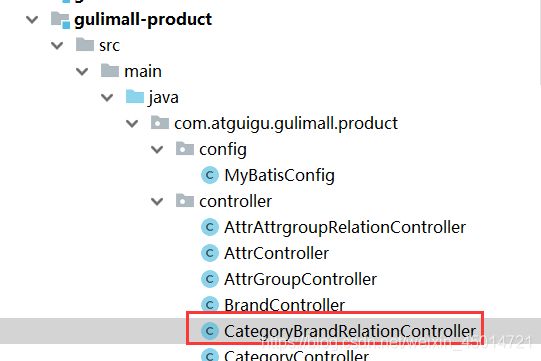
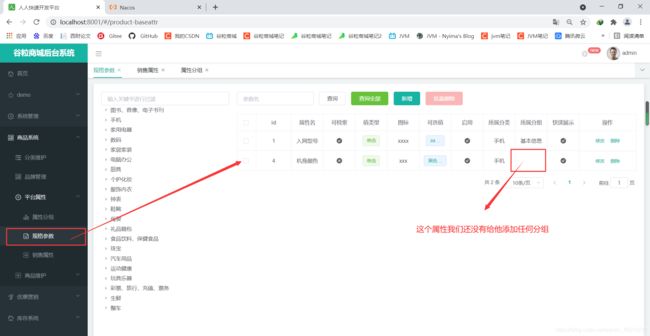
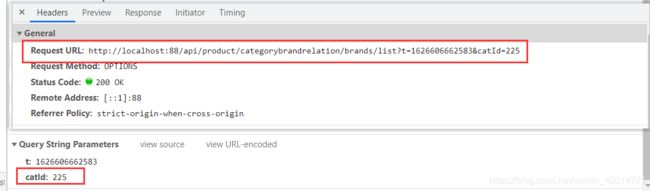
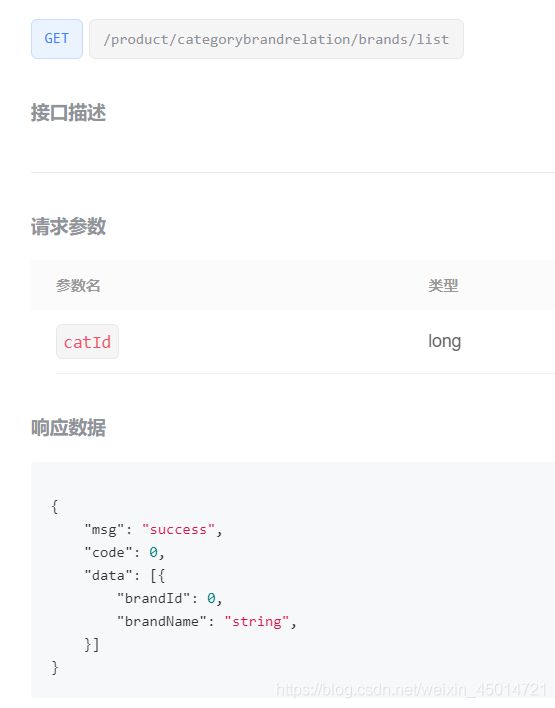
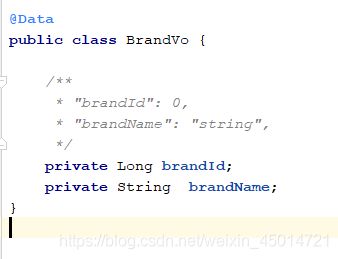
p75(后台)品牌分类的查询
1.查询功能

前台把(分页信息page、limit)和(查询的条件key)传过来
后台查询"pms_category_brand_relation"表
先判断key有没有值,如果有就拼接上"brand_id"等于这个key或名字like这个key;
最后使用分页工具PageUtils包装回去
    @Override
    public PageUtils queryPage(Map<String, Object> params) {

        //1、获取key
        String key = (String) params.get("key");
        QueryWrapper<BrandEntity> queryWrapper = new QueryWrapper<>();
        if(!StringUtils.isEmpty(key)){

            queryWrapper.eq("brand_id",key).or().like("name",key);
        }

        IPage<BrandEntity> page = this.page(
                new Query<BrandEntity>().getPage(params),
                queryWrapper

        );

        return new PageUtils(page);
    }
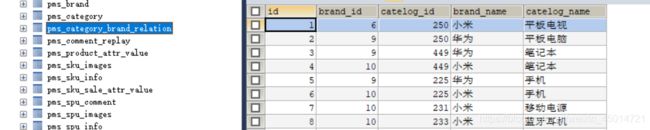
2.品牌与分类的关联
前端发送的请求以及携带的参数

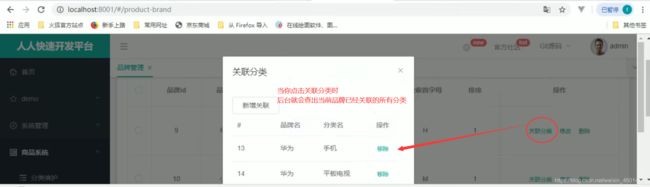
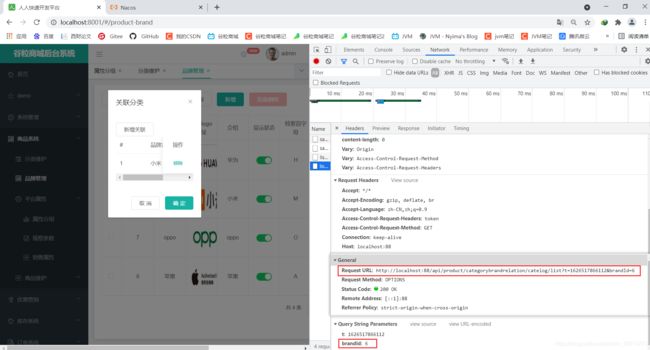
根据brand_id查询pms_category_brand_relation表得到List然后返回即可
3.保存品牌与分类的关联信息
前端发送的请求以及携带的参数
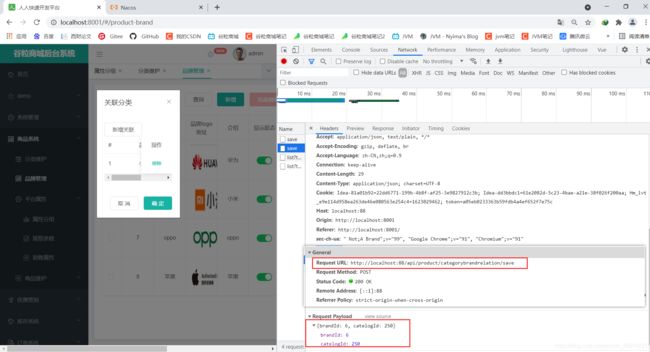


前台传过来brand_id和catelog_id
后台根据brand_id查询"pms_brand"表得到brand_name
后台根据catelog_id查询"pms_category"表得到catelog_name
4.级联更新

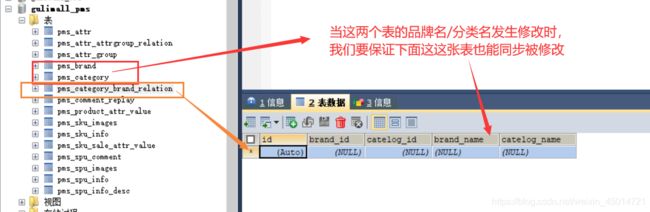

效果测试


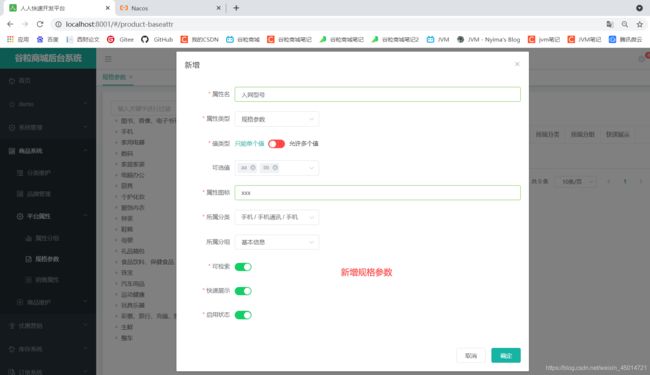
p76(后台)规格参数的新增
1.总说
前端传回来的是要封装到attrVo里,我们返回给前端的是封装到AttrRespVo里,而attrEntity只是和数据库打交道的。
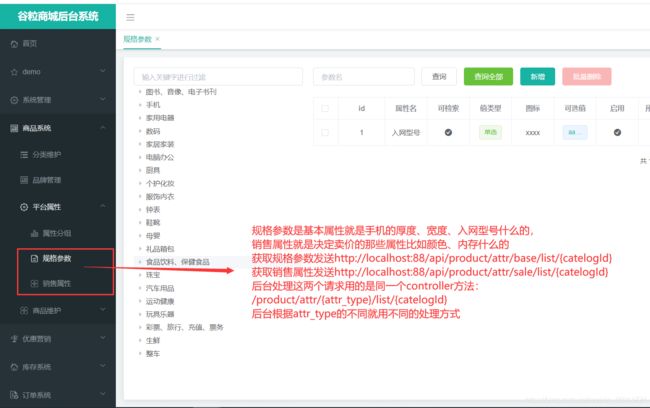


2.新增功能


p77(后台)规格参数的查询所有
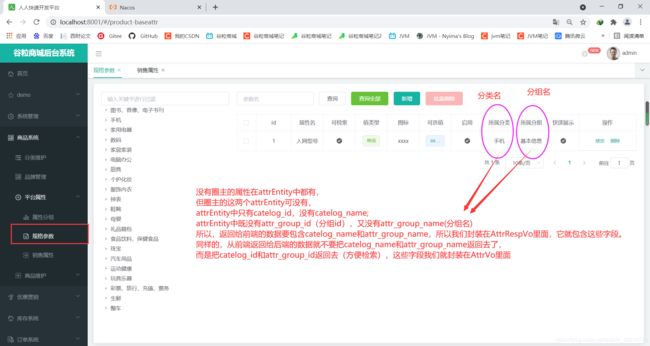
①从前端的请求中可以得到这些东西:params(参数里装着分页信息+检索信息key), catelogId目录id, 还有attr_type
②要判断attr_type是base还是sale,
如果是base就执行SELECT * FROM pms_attr WHERE attr_type=1(查询基本属性)
如果是sale就执行SELECT * FROM pms_attr WHERE attr_type=0(查询销售属性)
③前台传回来catelogId不一定有值,如果有就在原来的语句上添加and “catelog_id” =#{catelogId}
④前台传回来用户输入的检索条件key也不一定有值,如果用户输入了检索条件,他输入的检索条件是什么?可能是要查询的id,也可能是关键字。所以就在原来的语句上添加and “attr_id”=#{key} or “attr_name” like %key%
⑤把查询到的attrEntity复制给AttrRespVo,
⑥另外,如果attr_type是base,返回给前端的数据还要包含attr_group_name和catelog_name
(根据"attr_id"从pms_attr_attrgroup_relation中检索到attr_group_id,然后根据attr_group_id从pms_attr_group中检索到attr_group_name),
(从分类表(pms_catelog)根据分类id(即catelog_id)检索得到catelog_name)
⑦如果attr_type是sale,返回给前端的数据还要包含catelog_name
(从分类表(pms_catelog)根据分类id(即catelog_id)检索得到catelog_name即可)。
⑧把以上所有封装到AttrRespVo


p78(后台)规格参数的修改
1.信息的回显
前台发送的请求及携带的参数
①根据attr_id查询属性表(pms_attr)找到atrrEntity;
②把AtrrEntity复制给AttrRespVo,
③根据attr_id查询关系表(pms_attr_attrgroup_relation)找到分组id(attr_group_id),根据分组id到分组表(pms_attr_group)查询到attr_group_name,设置到AttrRespVo里面
④根据atrrEntity里的catelog_id,我们之前写好的findCatelogPath(catelog_id)这个方法可以根据catelog_id找到catelog的完整路径(因为是三级目录),把完整路径设置到AttrRespVo里面
⑤根据atrrEntity里的catelog_id查询分类表(pms_catelog)找到catelog_name,设置到AttrRespVo里面
⑥返回AttrRespVo


findCatelogPath(catelog_id)这个方法:
根据catelog_id查询分类表(pms_catelog)找到当前目录的父分类id,将父分类id存进列表;
再根据父分类id 找 父类id的父分类id,存进列表;
直到父分类id=0说明当前目录就是根目录
根据catelog_id找到catelog的完整路径(因为是三级目录),把完整路径设置到AttrRespVo里面
2.修改信息的提交
它规格参数的修改和规格参数的新增调用的都是updateAttr(attrVo)方法,所以后台需要判断,如果是新增就需要用insert,如果是修改就需要用update
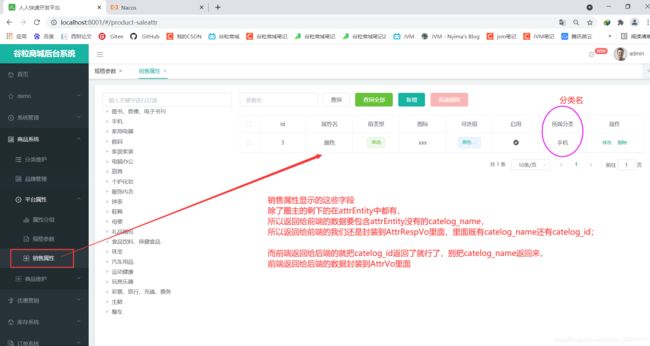
p79(后台)销售属性的获取
1.销售属性的获取
前台发送的请求及携带的参数
销售属性的获取和规格参数的获取调用的是同样的方法,上面讲过了。
①从前端的请求中可以得到这些东西:params(参数里装着分页信息+检索信息key), catelogId目录id, 还有attr_type
②要判断attr_type是base还是sale,
如果是base就执行SELECT * FROM pms_attr WHERE attr_type=1(查询基本属性)
如果是sale就执行SELECT * FROM pms_attr WHERE attr_type=0(查询销售属性)
③前台传回来catelogId不一定有值,如果有就在原来的语句上添加and “catelog_id” =#{catelogId}
④前台传回来用户输入的检索条件key也不一定有值,如果用户输入了检索条件,他输入的检索条件是什么?可能是要查询的id,也可能是关键字。所以就在原来的语句上添加and “attr_id”=#{key} or “attr_name” like %key%
⑤把查询到的attrEntity复制给AttrRespVo,
⑥另外,如果attr_type是base,返回给前端的数据还要包含attr_group_name和catelog_name
(根据"attr_id"从pms_attr_attrgroup_relation中检索到attr_group_id,然后根据attr_group_id从pms_attr_group中检索到attr_group_name),
(从分类表(pms_catelog)根据分类id(即catelog_id)检索得到catelog_name)
⑦如果attr_type是sale,返回给前端的数据还要包含catelog_name
(从分类表(pms_catelog)根据分类id(即catelog_id)检索得到catelog_name即可)。
⑧把以上所有封装到AttrRespVo
2.销售属性的新增
销售属性的新增和规格参数的新增调用的是同样的方法,上面讲过了。

3.销售属性修改时信息的回显
销售属性的信息回显和规格参数的信息回显调用的是同样的方法,上面讲过了。
①根据attr_id查询属性表(pms_attr)找到atrrEntity;
②把AtrrEntity复制给AttrRespVo,
③根据attr_id查询关系表(pms_attr_attrgroup_relation)找到分组id(attr_group_id),根据分组id到分组表(pms_attr_group)查询到attr_group_name,设置到AttrRespVo里面
④根据atrrEntity里的catelog_id,我们之前写好的findCatelogPath(catelog_id)这个方法可以根据catelog_id找到catelog的完整路径(因为是三级目录),把完整路径设置到AttrRespVo里面
⑤根据atrrEntity里的catelog_id查询分类表(pms_catelog)找到catelog_name,设置到AttrRespVo里面
⑥返回AttrRespVo
findCatelogPath(catelog_id)这个方法:
根据catelog_id查询分类表(pms_catelog)找到当前目录的父分类id,将父分类id存进列表;
再根据父分类id 找 父类id的父分类id,存进列表;
直到父分类id=0说明当前目录就是根目录
4.销售属性修改信息的提交
销售属性的修改信息的提交和规格参数的的修改信息的提交调用的是同样的方法,上面讲过了。
它规格参数的修改和规格参数的新增调用的都是updateAttr(attrVo)方法,所以后台需要判断,如果是新增就需要用insert,如果是修改就需要用update


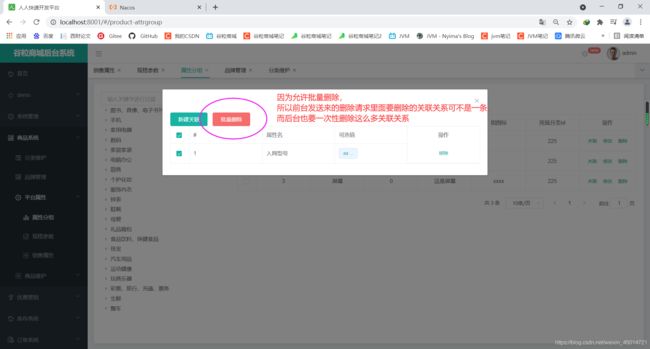
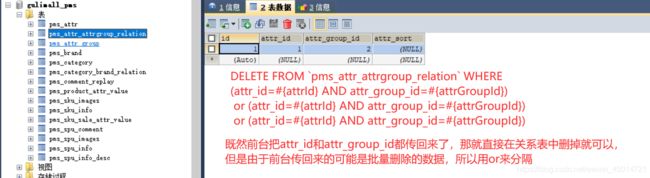
p80(后台)查询属性分组关联的属性+删除关联
1.查询属性分组所有关联到的属性
查询属性分组关联时前台发送的请求以及携带的参数

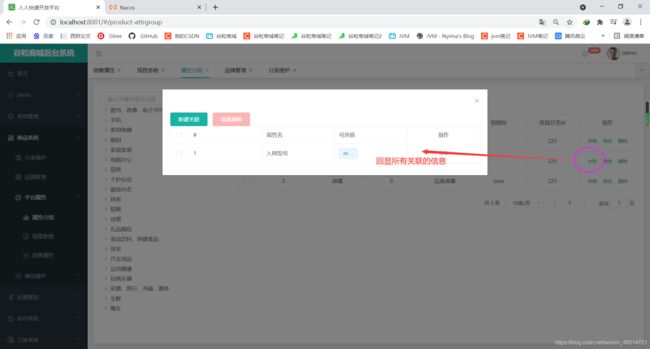

2.删除关联


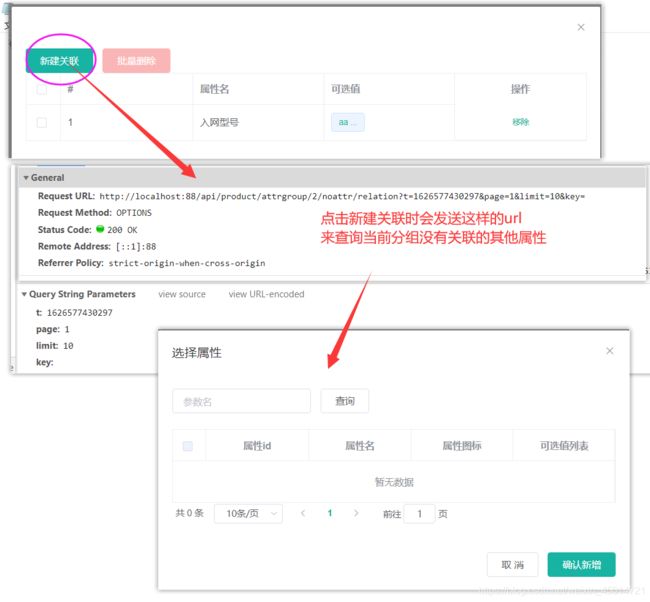
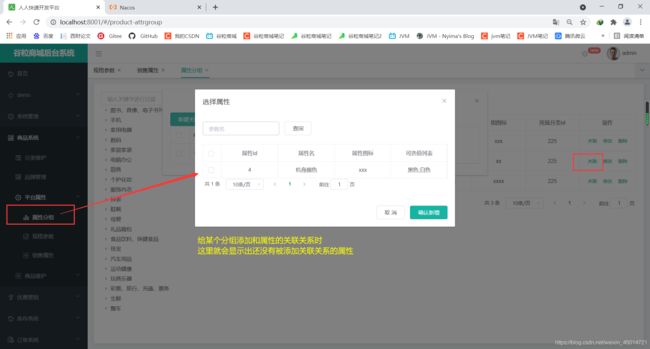
p81(后台)查询未关联的属性
发送的url以及传递的参数
①根据分组查出分类id:从分组表pms_attr_group根据分组id(attr_group_id)查出当前分组的分类id(catelog_id),
②根据分类查出所有分组:然后根据分类id(catelog_id)在分组表pms_attr_group中查出当前分类下的所有分组的id集合list1
③根据分组找出属性:根据list1中收集的分组id(attr_group_id)一个一个地从pms_attr_attrgroup_relation表找出它们关联的所有属性的集合list2,
④根据分类找出属性:属性分两类—基本属性和销售属性,我们用到的是attr_type为基本属性的那些属性,根据catelog_id和attr_type查询pms_attr表中所有在当前分类中的而且属于基本属性的那些属性的集合list3,
⑤从list3中把list2中的属性全部移除得到的list4就是没有被当前分组以及其它分组引用的属性,
⑥用户可能输入了查询条件key,从list4中筛选符合查询条件的属性


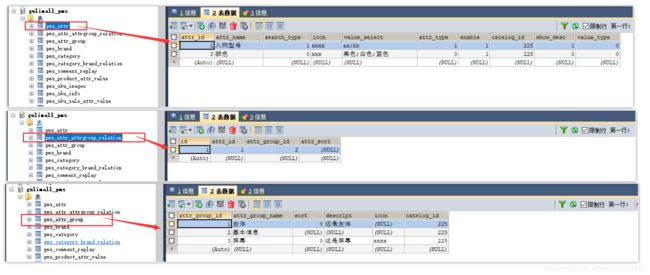
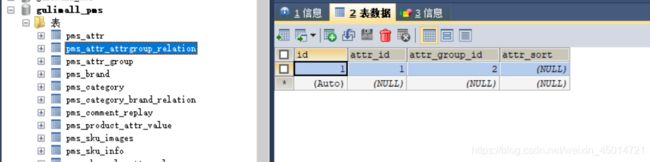
p82(后台)添加分组与属性的关联关系
把前台传过来的attr_id和attr_group_id(因为可以批量新增所以可能不止一组)封装到List,
到了后台把AttrGroupRelationVo里的数据复制给AttrAttrgroupRelationEntity,然后就能到数据库里面进行新增了。


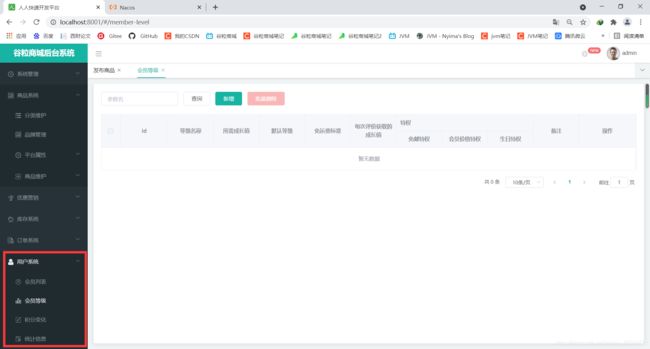
p83 (后台)会员模块
1.添加新的模块
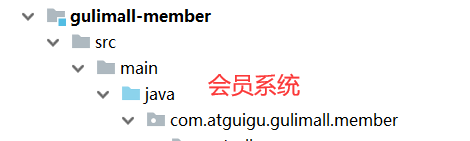
1.在application.properties配置文件里面写好Nacos注册中心的地址:
spring:
  datasource:
    username: root
    password: root
    url: jdbc:mysql://192.168.56.106:3306/gulimall_ums
    driver-class-name: com.mysql.jdbc.Driver

  cloud:
    nacos:
      discovery:
        server-addr: 127.0.0.1:8848

  application:
    name: gulimall-member
mybatis-plus:
  mapper-locations: classpath:/mapper/**/*.xml
  global-config:
    db-config:
      id-type: auto
server:
  port: 8000
2.在bootstrap.properties配置文件里面关联好Nacos配置中心的地址:
spring.application.name=gulimall-member

spring.cloud.nacos.config.server-addr=127.0.0.1:8848
spring.cloud.nacos.config.namespace=c3800aa8-5b28-4ec2-b82c-3450f3246cce
3.在gulimall-gateway里面添加路由规则
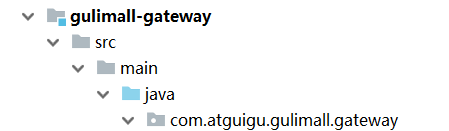
spring:
  cloud:
    gateway:
      routes:
        - id: member_route
          uri: lb://gulimall-member
          predicates:
            - Path=/api/member/**
          filters:
            - RewritePath=/api/(?>.*),/$\{
     segment}
4.从今以后要启动5个模块
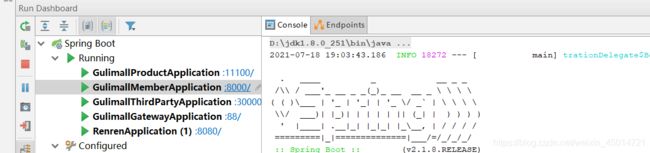
2.启动测试
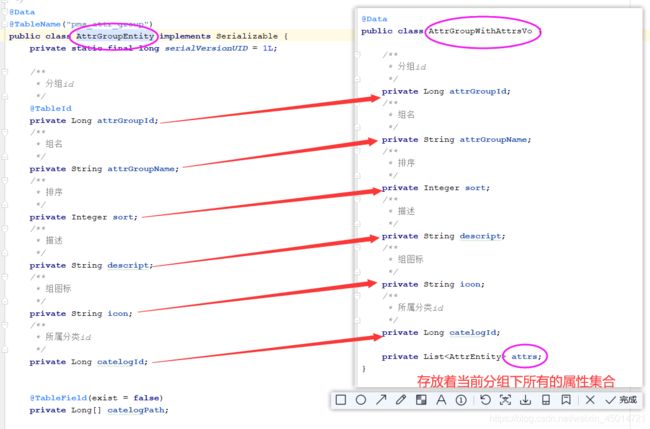
p84(后台)新增商品


p85(后台)新增商品2

发送的请求以及响应的参数
查出当前分类下的所有属性分组,查出每个属性分组的所有属性
①前台传回去catelog_id,
②后台根据catelog_id查询pms_attr_group分组表得到List,将AttrGroupEntity复制到AttrGroupWithAttrsVo里面,
③后台再根据AttrGroupEntity里面的attr_group_id查询pms_attr_attrgroup_relation关系表获得当前分组下attr_id的集合,根据attr_id查询pms_attr表获得List
④然后就是把List存到AttrGroupWithAttrsVo里面
⑤返回List

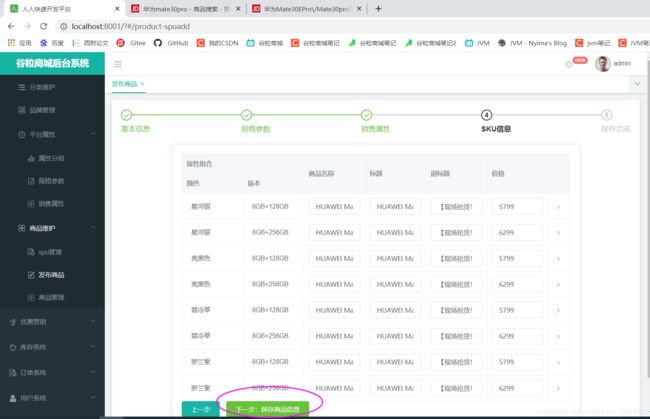
p86(后台)录入商品数据,测试商品保存1
P87(后台)录入商品数据,测试商品保存2
P88(后台)录入商品数据,测试商品保存3
P89(后台)录入商品数据,测试商品保存3
P90(后台)录入商品数据,测试商品保存4
P91(后台)录入商品数据,测试商品保存5
P92(后台)录入商品数据,测试商品保存5
1.预先准备—启动gulimall-coupon模块(请看p22的OpenFeign)
积分信息在gulimall-coupon模块里面,我们现在写的是gulimall-product模块的service层,所以gulimall-product模块需要调用gulimall-coupon模块里的方法就需要用到OpenFeign。
gulimall-product会先到Nacos注册中心中找gulimall-coupon的地址,然后去调用。所以gulimall-product与gulimall-coupon都得在Nacos注册中心中。

1.在application.properties配置文件里面写好Nacos注册中心的地址:
spring:
  datasource:
    username: root
    password: root
    url: jdbc:mysql://192.168.56.106:3306/gulimall_sms
    driver-class-name: com.mysql.jdbc.Driver
  cloud:
    nacos:
      discovery:
        server-addr: 127.0.0.1:8848
  application:
    name: gulimall-coupon


mybatis-plus:
  mapper-locations: classpath:/mapper/**/*.xml
  global-config:
    db-config:
      id-type: auto
server:
  port: 7000
2.在bootstrap.properties配置文件里面关联好Nacos配置中心的地址:
spring.application.name=gulimall-coupon

spring.cloud.nacos.config.server-addr=127.0.0.1:8848
spring.cloud.nacos.config.namespace=coupon3e433f64-5f1e-435e-82c6-737472d4e5c7
#spring.cloud.nacos.config.group=prod

spring.cloud.nacos.config.ext-config[0].data-id=datasource.yml
spring.cloud.nacos.config.ext-config[0].group=dev
spring.cloud.nacos.config.ext-config[0].refresh=true

spring.cloud.nacos.config.ext-config[1].data-id=mybatis.yml
spring.cloud.nacos.config.ext-config[1].group=dev
spring.cloud.nacos.config.ext-config[1].refresh=true

spring.cloud.nacos.config.ext-config[2].data-id=other.yml
spring.cloud.nacos.config.ext-config[2].group=dev
spring.cloud.nacos.config.ext-config[2].refresh=true
# 为什么写了这么多请见p25的讲解
3.主启动类@EnableDiscoveryClient
当完成把gulimall-coupon注册进Nacos注册中心后,接下来我们要完成OpenFeign的远程调用
1、gulimall-coupon模块写一个要被feign调用的方法
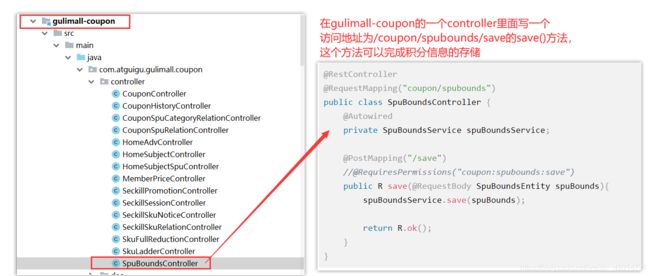
2、gulimall-product模块的主启动类上添加@EnableFeignClients(basePackages = "com.atguigu.gulimall.product.feign"),表示开启远程调用功能。这样一启动gulimall-product就会到com.atguigu.gulimall.product.feign包下找远程调用的那些接口

3、给gulimall-product模块编写feign接口

4、gulimall-product模块调用该接口里的该方法:
你想要在SpuInfoServiceImpl里面调用,就这样写
    @Autowired
    CouponFeignService couponFeignService;//先注入openfeign

	R r = couponFeignService.saveSpuBounds(spuBoundTo);//完成调用
2.开始学习
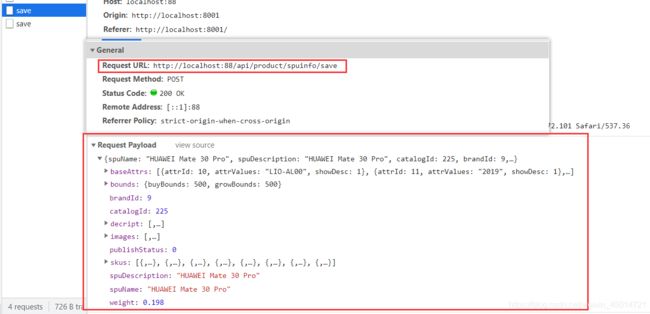


1、保存spu基本信息 pms_spu_info
把SpuSaveVo里的属性复制到SpuInfoEntity
然后把createTime和updateTime设置进SpuInfoEntity即可
然后SpuInfoEntity保存进pms_spu_info数据库即可

2、保存Spu的描述图片 pms_spu_info_desc


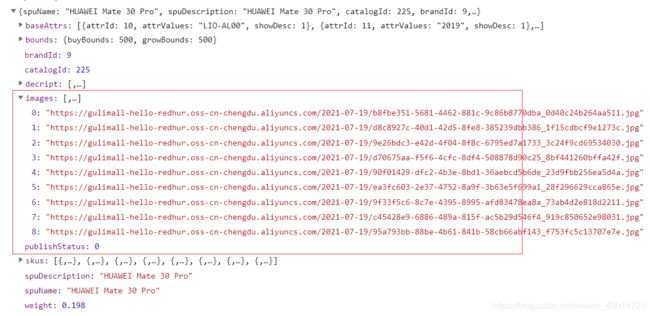
3、保存spu的图片集 pms_spu_images

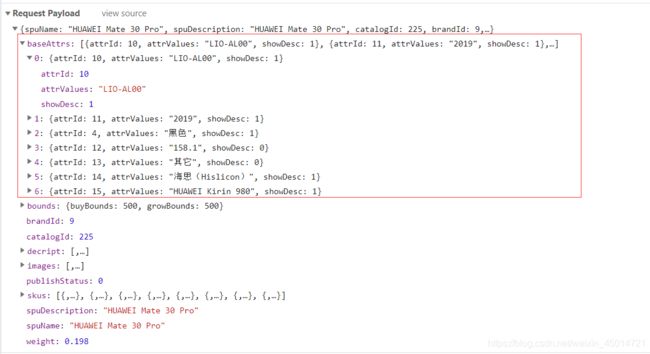
4、保存spu的规格参数;pms_product_attr_value

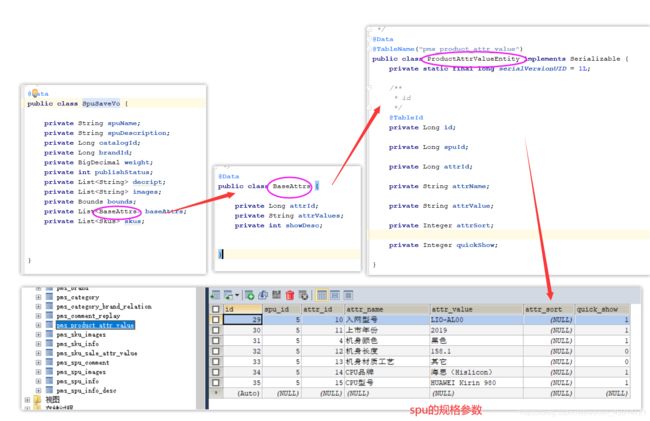
把BaseAttrs里面的attrid、attrValue、showDesc保存到ProductAttrValueEntity里面,
然后根据attrid查询"pms_attr"表得到attr_name等
然后把ProductAttrValueEntity的字段存入数据库pms_product_attr_value表
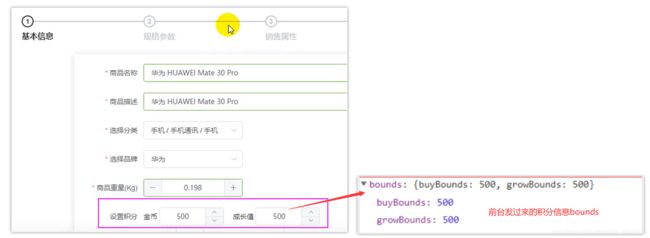
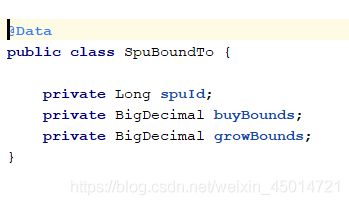
5、保存spu的积分信息;gulimall_sms->sms_spu_bounds
积分信息在gulimall-coupon模块里面,我们现在写的是gulimall-product模块的service层,所以gulimall-product模块需要调用gulimall-coupon模块里的方法就需要用到OpenFeign。

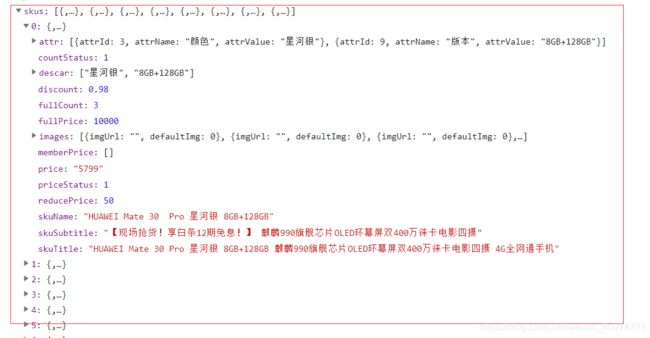
6、保存当前spu对应的所有sku信息;


3.启动

P93(后台)SPU检索
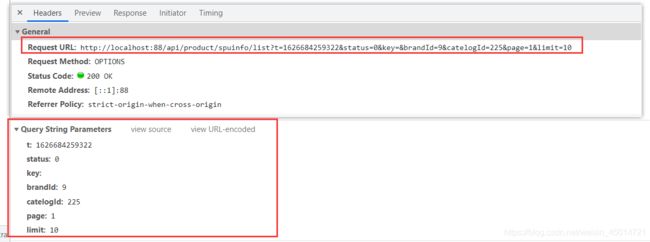
前台把(分页信息page、limit)和(catalogid、brand_id、status)还有(查询的条件key)传过来
后台查询"pms_spu_info"表
先判断key有没有值,如果有就拼接上id等于这个key或spu的名字like这个key;
然后判断status是否为空,如果不为空就拼接上publish_status等于传过来的值;
然后判断brand_id是否为空或为0,如果不是空也不是0就拼接上brand_id等于传过来的值;
然后判断catalogid是否为空或为0,如果不为空不为0就拼接上这个条件;
最后使用分页工具PageUtils包装回去
P94(后台)SKU检索

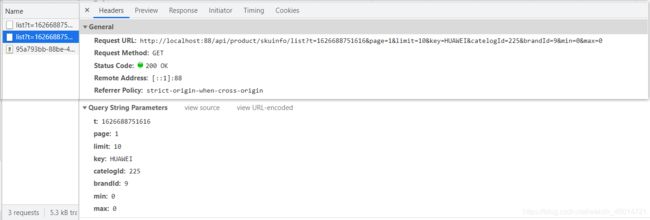

前台把(分页信息page、limit)和(catalogid、brand_id、min、max)还有(查询的条件key)传过来
后台查询"pms_sku_info"表
先判断key有没有值,如果有就拼接上id等于这个key或sku的名字like这个key;
然后判断brand_id是否为空或为0,如果不是空也不是0就拼接上brand_id等于传过来的值;
然后判断catalogid是否为空或为0,如果不为空不为0就拼接上这个条件;
然后判断min是否为空,不为空就让price大于这个传回来的值;
然后判断max是否为空,因为默认值是0,所以不为空且为0就不做处理,不为空也不为0就让price小于这个值
最后使用分页工具PageUtils包装回去
p100(后台)SPU规格维护
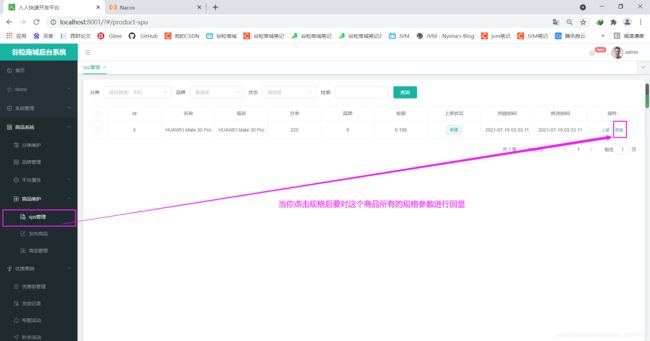
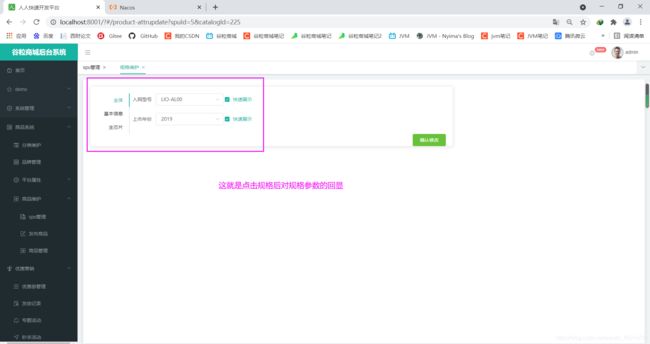
后台发送的请求以及携带的参数

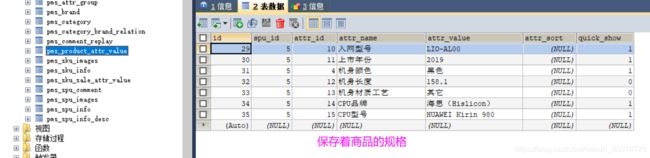
后台根据spuid查询"pms_product_attr_value"表
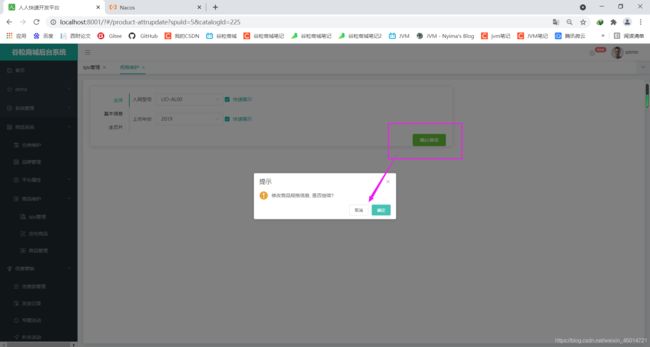

前台传回来spuid、List
后台根据spuid删除"pms_product_attr_value"表中spuid下的所有数据,
然后根据spuid和List保存到"pms_product_attr_value"表中
p95(后台)仓库列表的查询
1.添加到注册中心,添加路由规则
1.在application.properties配置文件里面写好Nacos注册中心的地址:
server:
  port: 11000

spring:
  datasource:
    username: root
    password: root
    url: jdbc:mysql://192.168.56.106:3306/gulimall_wms
    driver-class-name: com.mysql.jdbc.Driver

  cloud:
    nacos:
      discovery:
        server-addr: 127.0.0.1:8848
2.在bootstrap.properties配置文件里面关联好Nacos配置中心的地址:
spring.application.name=gulimall-ware
spring.cloud.nacos.config.server-addr=127.0.0.1:8848
spring.cloud.nacos.config.namespace=728d17c1-adb7-4c4b-8365-92c03a0e061a
3.主启动类@EnableDiscoveryClient
4.在gulimall-gateway中添加路由规则

spring:
  cloud:
    gateway:
      routes:
        - id: ware_route
          uri: lb://gulimall-ware
          predicates:
            - Path=/api/ware/**
          filters:
            - RewritePath=/api/(?>.*),/$\{
     segment}
5.从今以后要启动七个模块了

2.查询


前台把(分页信息page、limit)还有(查询的条件key)传过来
后台查询"wms_ware_info"表
先判断key有没有值,如果有就拼接上id等于这个key 或 name像这个key 或 address像这个key 或 areacode像这个key;
然后使用分页工具PageUtils包装回去
p96(后台)库存的查询与采购的查询
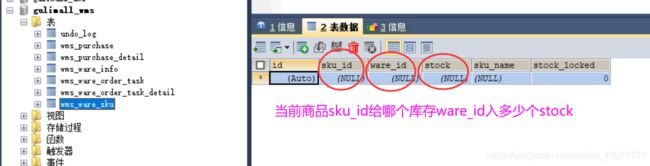
1.库存的查询

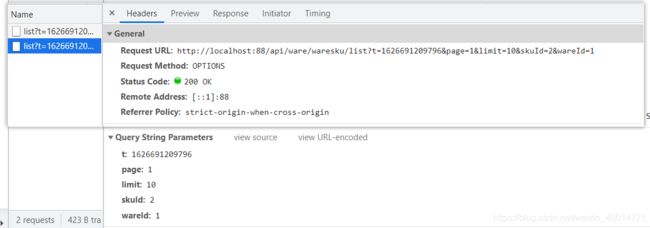
前台把(分页信息page、limit)和 (skuId、wareId)传过来
后台查询"wms_ware_sku"表
先判断skuid有没有值,如果skuid有值就拼接上它;
后判断wareId有没有值,如果wareId有值就拼接上它;
然后使用分页工具PageUtils包装回去
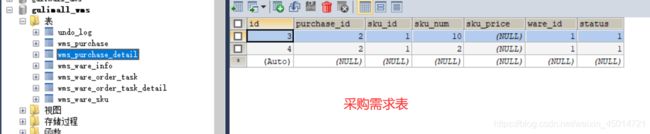
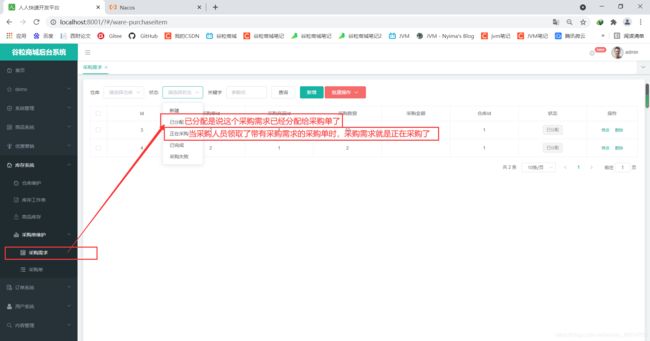
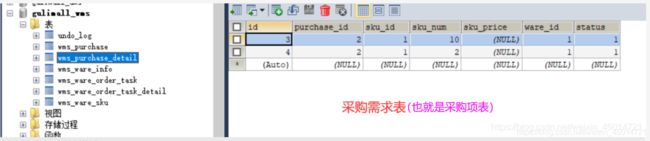
2.采购需求的查询


前台把(分页信息page、limit)和 (status、wareId)还有(查询条件key)传过来
后台查询"wms_purchase_detail"表
先判断key有没有值,如果有就purchase_id等于key或sku_id等于key
先判断status有没有值,如果status有值就拼接上它;
后判断wareId有没有值,如果wareId有值就拼接上它;
然后使用分页工具PageUtils包装回去
p97(后台)合并采购需求


前台传回去分页参数(page、limit)
后台查询"wms_purchase"表,找status=0或status=1的那些PurchaseEntity
发送的请求及携带的参数


前台传回去采购需求id(purchaseId)和采购项id数组[1,2]
如果purchaseId为空就到"wms_purchase"表中新建一个,新建后拿到purchaseId;
后台根据采购项id查询"wms_purchase_detail"表,更新采购项的状态为已分配,并且purchase_id处赋予值;
然后在"wms_purchase"表中插入一条记录,指明purchaseId与更新时间
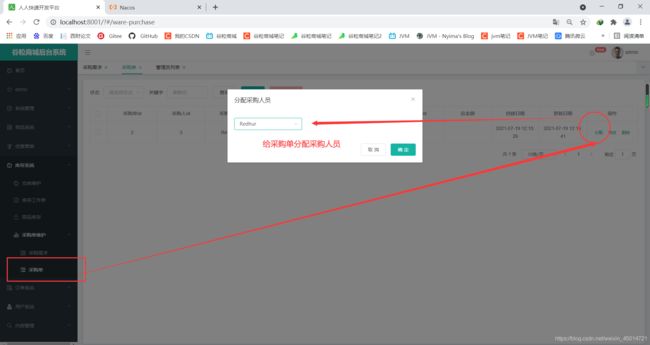
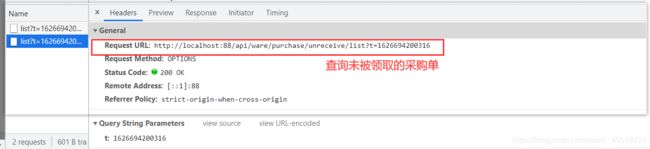
p98(后台)采购人员领取采购单

前台发送的请求以及携带的参数
测试


根据采购项id到"wms_purchase"表中拿到List,
修改采购单状态为“已领取”
根据采购项id到"wms_purchase_detail"表中拿到List
修改采购项的状态为“正在采购”
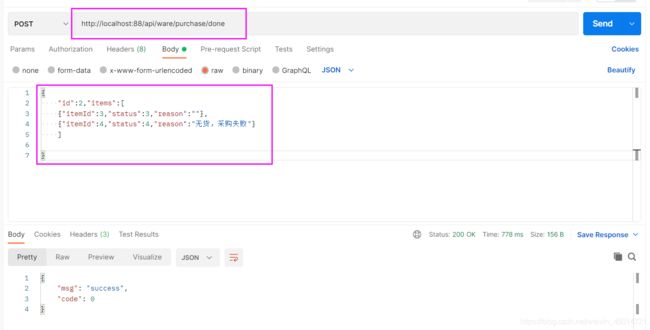
P99(后台)完成采购
前台发送的请求及携带的参数
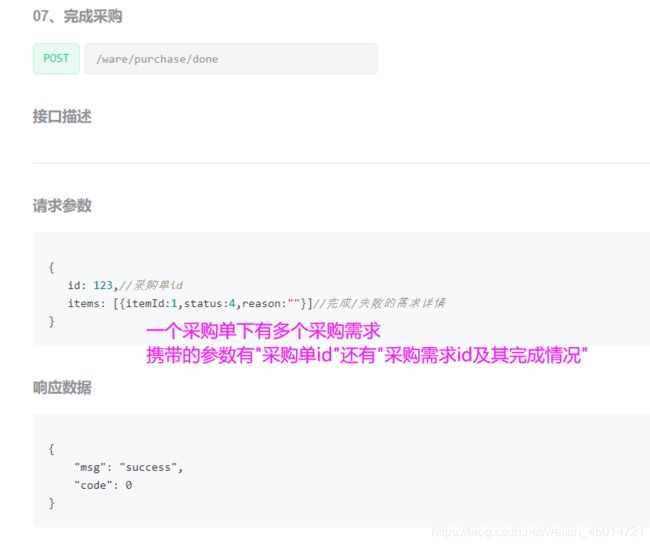

①一个采购单下多个采购项,遍历每一个采购项,根据采购项的状态更新wms_purchase_detail采购项表 和 wms_ware_sku库存表。
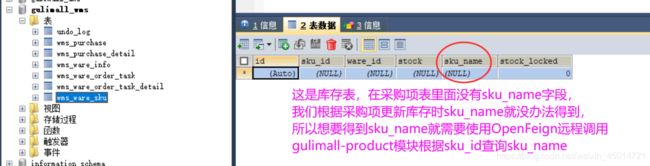
②在采购项表里面没有sku_name字段,我们根据采购项更新wms_ware_sku库存表时sku_name就没办法得到,所以想要得到sku_name就需要使用OpenFeign远程调用gulimall-product模块根据sku_id查询sku_name
③最后,根据采购项的状态更新采购单wms_purchase表,如果有一个采购项的状态是失败的,那么采购单状态也是失败的。
测试