使用 Tensorflow 2 进行自定义对象检测的一般方法
在本文中,将向你介绍如何使用 Tensorflow 2 训练你自己的自定义对象检测器。这不是进行特定类型检测的教程,而是我们可以用来检测任何东西的常用方法。
要使用 Tensorflow 对象检测 API 训练自定义对象检测模型,你需要执行以下步骤:
下载 Tensorflow 对象检测 API
获取数据
为 OD API 准备数据
超参数调优
训练模型
保存模型
测试模型
安装
你可以使用 Python Package Installer (pip) 或Docker(用于部署和管理容器化应用程序的开源平台)安装 TensorFlow 对象检测 API 。
为了在本地运行 Tensorflow 对象检测 API,建议使用 Docker。如果你不熟悉 Docker,使用 pip 安装它可能会更容易。
首先克隆 Tensorflow Models 存储库的 master 分支:
git clone https://github.com/tensorflow/models.gitDocker 安装
# From the root of the git repository (inside the models directory)
docker build -f research/object_detection/dockerfiles/tf2/Dockerfile -t od .
docker run -it od
Python包安装
cd models/research
# Compile protos.
protoc object_detection/protos/*.proto --python_out=.
# Install TensorFlow Object Detection API.
cp object_detection/packages/tf2/setup.py .
python -m pip install .
import os
import sys
args = sys.argv
directory = args[1]
protoc_path = args[2]
for file in os.listdir(directory):
    if file.endswith(".proto"):
        os.system(protoc_path+" "+directory+"/"+file+" --python_out=.")
python use_protobuf.py
要测试安装运行:
python object_detection/builders/model_builder_tf2_test.py如果一切安装正确,你应该看到如下内容:
...
[       OK ] ModelBuilderTF2Test.test_create_ssd_models_from_config
[ RUN      ] ModelBuilderTF2Test.test_invalid_faster_rcnn_batchnorm_update
[       OK ] ModelBuilderTF2Test.test_invalid_faster_rcnn_batchnorm_update
[ RUN      ] ModelBuilderTF2Test.test_invalid_first_stage_nms_iou_threshold
[       OK ] ModelBuilderTF2Test.test_invalid_first_stage_nms_iou_threshold
[ RUN      ] ModelBuilderTF2Test.test_invalid_model_config_proto
[       OK ] ModelBuilderTF2Test.test_invalid_model_config_proto
[ RUN      ] ModelBuilderTF2Test.test_invalid_second_stage_batch_size
[       OK ] ModelBuilderTF2Test.test_invalid_second_stage_batch_size
[ RUN      ] ModelBuilderTF2Test.test_session
[  SKIPPED ] ModelBuilderTF2Test.test_session
[ RUN      ] ModelBuilderTF2Test.test_unknown_faster_rcnn_feature_extractor
[       OK ] ModelBuilderTF2Test.test_unknown_faster_rcnn_feature_extractor
[ RUN      ] ModelBuilderTF2Test.test_unknown_meta_architecture
[       OK ] ModelBuilderTF2Test.test_unknown_meta_architecture
[ RUN      ] ModelBuilderTF2Test.test_unknown_ssd_feature_extractor
[       OK ] ModelBuilderTF2Test.test_unknown_ssd_feature_extractor
----------------------------------------------------------------------
Ran 20 tests in 91.767s
OK (skipped=1)
获取数据
在开始构建对象检测器之前,你需要一些数据。如果你已经有一个带标签的数据集,你可以跳过本节并直接转到为 Tensorflow OD API 准备数据。
公共数据集
如果你对构建和使用对象检测模型的过程更感兴趣,最好使用已标记的公共数据集。
Kaggle
github
收集数据
如果要创建自己的数据集,首先需要获取一些图片。为了训练一个健壮的模型,图片应该尽可能多样化。所以他们应该有不同的背景,不同的视角,不同的光照条件,以及其中不相关的随机物体。
可以自己拍照,也可以从网上下载图片。对于我的头盔检测器,我使用的是 kaggle 数据集


之后,你拥有所有图像,将大约 90% 移动到 object_detection/images/train 目录,将另外 10% 移动到 object_detection/images/test 目录。确保两个目录中的图像都有各种各样的类。
标签数据
如果你使用自己的数据集,则需要标记图像。有许多免费的开源标签工具可以帮助你解决这个问题。
首先,我建议使用LabelImg,因为它可以轻松下载和使用:https://github.com/tzutalin/labelImg
还有许多其他很棒的工具,包括VGG 图像注释工具和VoTT(视觉对象标记工具)。
VGG 图像注释工具:http://www.robots.ox.ac.uk/~vgg/software/via/
VoTT(视觉对象标记工具):https://github.com/microsoft/VoTT
为对象检测 API 准备数据
标记数据后,是时候将其转换为 Tensorflow 可以使用的格式了。API 处理TFRecod 格式的文件(https://www.tensorflow.org/tutorials/load_data/tfrecord),这是一种用于存储二进制记录序列的简单格式。
将数据转换为 TFRecord 格式的过程会因不同的标签格式而异。在本文中,我将向你展示如何使用 Pascal VOC 格式,即 LabelImg 生成的格式。
你可以在object_detection/dataset_tools 目录中(https://github.com/tensorflow/models/tree/master/research/object_detection/dataset_tools)找到用于转换其他数据格式的文件。
对于 Pascal VOC 格式,首先使用我的 Github 中的xml_to_csv.py (https://github.com/TannerGilbert/Tensorflow-Object-Detection-API-Train-Model/blob/master/xml_to_csv.py)文件将所有 xml 文件转换为单个 csv 文件。
python xml_to_csv.py接下来,下载并打开generate_tfrecord.py ( https://github.com/TannerGilbert/Tensorflow-Object-Detection-API-Train-Model/blob/master/generate_tfrecord.py ) 文件并将 class_text_to_int 方法中的标签图替换为你自己的标签图。
对于我的数据集, class_text_to_int 方法如下所示:
def class_text_to_int(row_label):
    if row_label == 'With Helmet':
        return 1
    elif row_label == 'Without Helmet':
        return 2
    else:
        return None
现在可以通过键入以下内容生成 TFRecords:
python generate_tfrecord.py --csv_input=images/train_labels.csv --image_dir=images/train --output_path=train.record
python generate_tfrecord.py --csv_input=images/test_labels.csv --image_dir=images/test --output_path=test.record
执行上述命令后,object_detection 文件夹中应该有一个 train.record 和 test.record 文件。
配置训练
训练前你需要做的最后一件事是创建标签图和训练配置文件。
标签图
标签映射将 id 映射到名称。我的检测器的标签映射如下所示。
item {
    id: 1
    name: 'With Helmet'
}
item {
    id: 2
    name: 'Without Helmet'
}
从 id 到 name 的映射应该与 generate_tfrecord.py 文件中的映射相同。
训练配置
接下来,你需要根据你选择的模型创建一个训练配置文件。
在本文中,我将使用 mobilenetv2_fnite——最近在神经架构搜索的帮助下发现的 SOTA 模型系列。你可以在TensorFlow 2 对象检测model zoo中(https://github.com/tensorflow/models/blob/master/research/object_detection/g3doc/tf2_detection_zoo.md)找到 Tensorflow 2 的所有可用模型的列表。
模型的基础(https://github.com/tensorflow/models/blob/master/research/object_detection/configs/tf2/ssd_efficientdet_d0_512x512_coco17_tpu-8.config)可以在模型 github 存储库的configs/tf2 文件夹中找到。
它需要更改为指向自定义数据和预训练权重。一些训练参数也需要改变。
变化如下:
将类数更改为要检测的对象数(在我的情况下为 4)
将fine_tune_checkpoint 更改为model.ckpt 文件的路径。
fine_tune_checkpoint: "/SSD MobileNet V2 FPNLite 320x320/checkpoint/ckpt-0" 将 Fine_tune_checkpoint_type 更改为detection
将 train_input_reader 的 input_path 更改为 train.record 文件的路径:
input_path: "/train.record" 将 eval_input_reader 的 input_path 更改为 test.record 文件的路径:
input_path: "/test.record" 将 label_map_path 更改为标签图的路径:
label_map_path: "/label_map.pbtxt" 将 batch_size 更改为适合你的硬件的数字,例如 4、8 或 16。
训练模型
要训练模型,请在命令行中执行以下命令:
python model_main_tf2.py \
    --pipeline_config_path=training/ssd_efficientdet_d0_512x512_coco17_tpu-8.config \
    --model_dir=training \
    --alsologtostderr
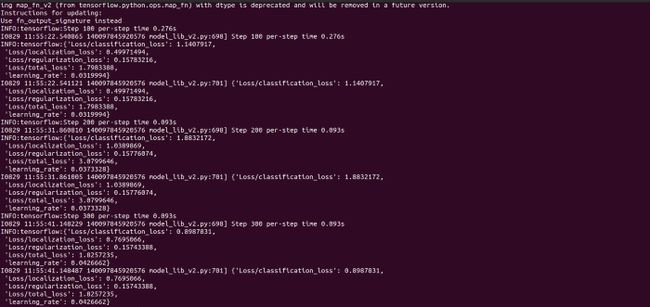
如果一切设置正确,训练应该很快开始,你应该会看到如下所示的内容:

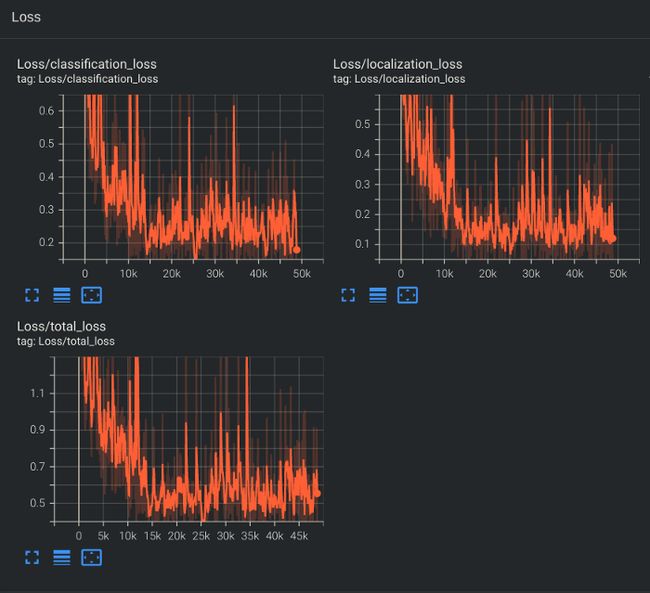
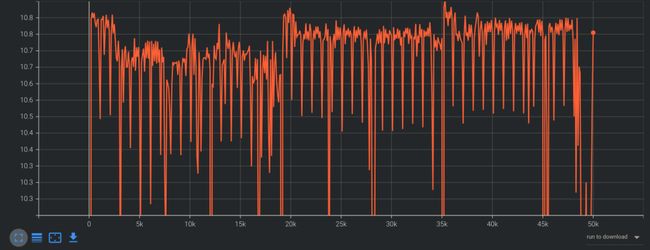
每隔几分钟,当前状态就会记录到 Tensorboard。通过打开第二个命令行打开 Tensorboard,导航到 object_detection 文件夹并键入:
tensorboard --logdir=training/train这将在 localhost:6006 上打开一个网页。

训练脚本每隔几分钟保存一次检查点。训练模型直到达到令人满意的损失,然后你可以按 Ctrl+C 终止训练过程。
导出推理图
为了更易于使用和部署你的模型,我建议将其转换为冻结的图形文件。
这可以使用 exporter_main_v2.py 脚本来完成。
python exporter_main_v2.py \
    --trained_checkpoint_dir=training \
    --pipeline_config_path=training/ssd MobileNet V2 FPNLite_tpu-8.config \
    --output_directory inference_graph
测试模型
现在你已经训练了模型并将其导出到推理图,你可以将其用于推理。
你可以在训练结束时借助 open cv 找到推理示例


资源
Tensorflow 对象检测 API 存储库
https://github.com/tensorflow/models/tree/master/research/object_detection
Tensorflow 对象检测 API 文档
https://github.com/tensorflow/models/tree/master/research/object_detection/g3doc
model zoo
https://github.com/tensorflow/models/blob/master/research/object_detection/g3doc/tf2_detection_zoo.md
☆ END ☆
如果看到这里,说明你喜欢这篇文章,请转发、点赞。微信搜索「uncle_pn」,欢迎添加小编微信「 woshicver」,每日朋友圈更新一篇高质量博文。
↓扫描二维码添加小编↓

