vue设计模式
之前写过三篇vue的解析,那个按源码顺序走的,看着有点乱,这里看了很多资料之后又整理一版。
首先说下源码结构,源代码都在src下
src
├── compiler        # 编译相关
├── core            # 核心代码
├── platforms       # 不同平台的支持
├── server          # 服务端渲染
├── sfc             # .vue 文件解析
├── shared          # 共享代码
compiler
compiler 目录包含 Vue.js 所有编译相关的代码。它包括把模板解析成 ast 语法树,ast 语法树优化,代码生成等功能。
编译的工作可以在构建时做(借助 webpack、vue-loader 等辅助插件);也可以在运行时做,使用包含构建功能的 Vue.js。显然,编译是一项耗性能的工作,所以更推荐前者——离线编译。
core
core 目录包含了 Vue.js 的核心代码,包括内置组件、全局 API 封装,Vue 实例化、观察者、虚拟 DOM、工具函数等等。
这里的代码可谓是 Vue.js 的灵魂,也是我们之后需要重点分析的地方。
platform
Vue.js 是一个跨平台的 MVVM 框架,它可以跑在 web 上,也可以配合 weex 跑在 native 客户端上。platform 是 Vue.js 的入口,2 个目录代表 2 个主要入口,分别打包成运行在 web 上和 weex 上的 Vue.js。
我们主要目标是web端的,weex 有兴趣可以自己看下
server
Vue.js 2.0 支持了服务端渲染,所有服务端渲染相关的逻辑都在这个目录下。注意:这部分代码是跑在服务端的 Node.js,不要和跑在浏览器端的 Vue.js 混为一谈。
服务端渲染主要的工作是把组件渲染为服务器端的 HTML 字符串,将它们直接发送到浏览器,最后将静态标记"混合"为客户端上完全交互的应用程序。
sfc
通常我们开发 Vue.js 都会借助 webpack 构建, 然后通过 .vue 单文件来编写组件。
这个目录下的代码逻辑会把 .vue 文件内容解析成一个 JavaScript 的对象。
shared
Vue.js 会定义一些工具方法,这里定义的工具方法都是会被浏览器端的 Vue.js 和服务端的 Vue.js 所共享的。
从 Vue.js 的目录设计可以看到,作者把功能模块拆分的非常清楚,相关的逻辑放在一个独立的目录下维护,并且把复用的代码也抽成一个独立目录。
这样的目录设计让代码的阅读性和可维护性都变强,是非常值得学习的。
调试准备
首先这里注释了一份vue2.6的源代码,大家可以下载下来跟着走
- vscode中打开设置把javascript.validate.enable暂时设置为false,不检查javascript的语法问题,防止flow报错,flow和typescript类似,用来做类型检测。
- 这会源码里部分代码是没有高亮显示的,vscode下载一个插件,Babel javascript开其它就有高亮显示了
- 然后大家可以安装一个全局包,serve,然后在examples目录下运行 serve .,把该目录当成静态服务器启动,然后该文件里放的都是vue测试例子,然后把src的vue地址改为../../dist/vue.js",这个是我们下面命令改后,构建出的vue,这样就可以自由打断点调试了。
我们改下 vue 源码 package.json 的scripts的配置方便后续调试
dev命令改为
"dev": "rollup -w -c scripts/config.js --sourcemap --environment TARGET:web-full-dev"开启热加载 -w -c 设置配置文件 开启sourcemap 设置环境变量
找到 scripts/configs.js 搜索对应的环境变量值 web-full-dev 找到对应的入口 src/platforms/web/entry-runtime-with-compiler.js
我们这里调试的是全量的vue,vue-cli里是runtime运行时版本,全量版本的可以更好的调试vue所有代码。
因为vue的源码,里面跳来跳去的,首次看逻辑很难串起来,这里画了一个大体的思维导图。
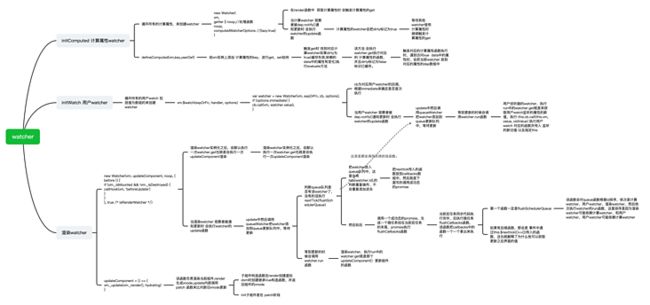
上图有3个watcher 创建的关键地方,这里也有一个对应的思维导图
watcher示意图
注意:从watcher被dep.notify()发布通知,然后执行watcher.update() 我们可以看到,计算的watcher.update只是dirty=true 标记缓存失效,依赖的值有更新. 而不会执行queueWatcher(this)把当前计算watcher 放入queue更新 watcher队列中。
而 用户watcher和渲染watcher 执行update时,基本都会执行queueWatcher(this),把当前watcher放到queue 队列中,因为计算watcher是有缓存的。
这里需要注意一下。
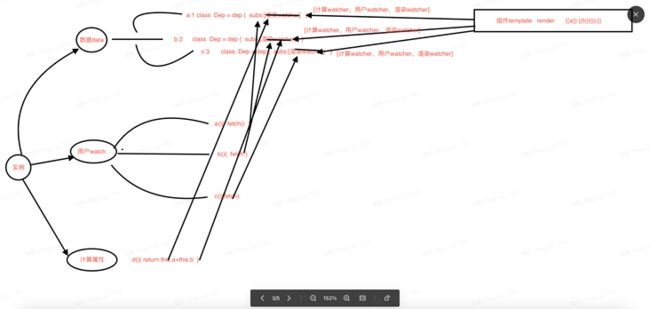
未缩减版的图太大了,步骤太多,这里写了一个缩减版的思维导图。
从入口开始
我们根据我的思维导图找到vue最终定义的地方,发现vue它是一个构造函数,它实际上就是一个用 Function 实现的类,我们只能通过 new Vue 去实例化它。
有些同学看到这不禁想问,为何 Vue 不用 ES6 的 Class 去实现呢?我们往后看这里有很多 xxxMixin 的函数调用,并把 Vue 当参数传入,它们的功能都是给 Vue 的 prototype 上扩展一些方法(这里具体的细节会在之后的文章介绍,这里不展开),Vue 按功能把这些扩展分散到多个模块中去实现,而不是在一个模块里实现所有,这种方式是用 Class 难以实现的。这么做的好处是非常方便代码的维护和管理,这种编程技巧也非常值得我们去学习。
数据驱动
那实际我们用vue时,会new Vue()这样调用,这会实际上我们根据源码,看到实际就是调用了this._init()初始化函数,大家按我思维导图结合源码会发现,vue初始化 init主要就干了几件事情,合并配置,初始化生命周期,初始化事件中心,初始化渲染,初始化 data、props、computed、watcher 等等。
Vue 的初始化逻辑写的非常清楚,把不同的功能逻辑拆成一些单独的函数执行,让主线逻辑一目了然,这样的编程思想是非常值得借鉴和学习的。
vue实例挂载
Vue 中我们是通过 $mount 实例方法去挂载 vm 的,$mount 方法在多个文件中都有定义,如 src/platform/web/entry-runtime-with-compiler.js、src/platform/web/runtime/index.js、src/platform/weex/runtime/index.js。因为 $mount 这个方法的实现是和平台、构建方式都相关的。接下来我们重点分析带 compiler 版本的 $mount 实现,因为抛开 webpack 的 vue-loader,我们在纯前端浏览器环境分析 Vue 的工作原理,有助于我们对原理理解的深入。
compiler 版本的 $mount 实现非常有意思,先来看一下 src/platform/web/entry-runtime-with-compiler.js 文件中定义:
const mount = Vue.prototype.$mount
Vue.prototype.$mount = function (
  el?: string | Element,
  hydrating?: boolean
): Component {
  el = el && query(el)

  /* istanbul ignore if */
  if (el === document.body || el === document.documentElement) {
    process.env.NODE_ENV !== 'production' && warn(
      `Do not mount Vue to  or  - mount to normal elements instead.`
    )
    return this
  }

  const options = this.$options
  // resolve template/el and convert to render function
  if (!options.render) {
    let template = options.template
    if (template) {
      if (typeof template === 'string') {
        if (template.charAt(0) === '#') {
          template = idToTemplate(template)
          /* istanbul ignore if */
          if (process.env.NODE_ENV !== 'production' && !template) {
            warn(
              `Template element not found or is empty: ${options.template}`,
              this
            )
          }
        }
      } else if (template.nodeType) {
        template = template.innerHTML
      } else {
        if (process.env.NODE_ENV !== 'production') {
          warn('invalid template option:' + template, this)
        }
        return this
      }
    } else if (el) {
      template = getOuterHTML(el)
    }
    if (template) {
      /* istanbul ignore if */
      if (process.env.NODE_ENV !== 'production' && config.performance && mark) {
        mark('compile')
      }

      const { render, staticRenderFns } = compileToFunctions(template, {
        shouldDecodeNewlines,
        shouldDecodeNewlinesForHref,
        delimiters: options.delimiters,
        comments: options.comments
      }, this)
      options.render = render
      options.staticRenderFns = staticRenderFns

      /* istanbul ignore if */
      if (process.env.NODE_ENV !== 'production' && config.performance && mark) {
        mark('compile end')
        measure(`vue ${this._name} compile`, 'compile', 'compile end')
      }
    }
  }
  return mount.call(this, el, hydrating)
}
这段代码首先缓存了原型上的 $mount 方法,再重新定义该方法,我们先来分析这段代码。首先,它对 el 做了限制,Vue 不能挂载在 body、html 这样的根节点上。接下来的是很关键的逻辑 —— 如果没有定义 render 方法,则会把 el 或者 template 字符串转换成 render 方法。这里我们要牢记,在 Vue 2.0 版本中,所有 Vue 的组件的渲染最终都需要 render 方法,无论我们是用单文件 .vue 方式开发组件,还是写了 el 或者 template 属性,最终都会转换成 render 方法,那么这个过程是 Vue 的一个“在线编译”的过程,它是调用 compileToFunctions 方法实现的,编译过程我们之后会介绍。最后,调用原先原型上的 $mount 方法挂载。
原先原型上的 $mount 方法在src/platform/web/runtime/index.js 中定义,之所以这么设计完全是为了复用,因为它是可以被 runtime only (运行时)版本的 Vue 直接使用的。
// public mount method
Vue.prototype.$mount = function (
  el?: string | Element,
  hydrating?: boolean
): Component {
  el = el && inBrowser ? query(el) : undefined
  return mountComponent(this, el, hydrating)
}
最后会调用mountComponent,src/core/instance/lifecycle.js
export function mountComponent (
  vm: Component,
  el: ?Element,
  hydrating?: boolean
): Component {
  vm.$el = el
  if (!vm.$options.render) {
    vm.$options.render = createEmptyVNode
    if (process.env.NODE_ENV !== 'production') {
      /* istanbul ignore if */
      if ((vm.$options.template && vm.$options.template.charAt(0) !== '#') ||
        vm.$options.el || el) {
        warn(
          'You are using the runtime-only build of Vue where the template ' +
          'compiler is not available. Either pre-compile the templates into ' +
          'render functions, or use the compiler-included build.',
          vm
        )
      } else {
        warn(
          'Failed to mount component: template or render function not defined.',
          vm
        )
      }
    }
  }
  callHook(vm, 'beforeMount')

  let updateComponent
  /* istanbul ignore if */
  if (process.env.NODE_ENV !== 'production' && config.performance && mark) {
    updateComponent = () => {
      const name = vm._name
      const id = vm._uid
      const startTag = `vue-perf-start:${id}`
      const endTag = `vue-perf-end:${id}`

      mark(startTag)
      const vnode = vm._render()
      mark(endTag)
      measure(`vue ${name} render`, startTag, endTag)

      mark(startTag)
      vm._update(vnode, hydrating)
      mark(endTag)
      measure(`vue ${name} patch`, startTag, endTag)
    }
  } else {
    updateComponent = () => {
      vm._update(vm._render(), hydrating)
    }
  }

  // we set this to vm._watcher inside the watcher's constructor
  // since the watcher's initial patch may call $forceUpdate (e.g. inside child
  // component's mounted hook), which relies on vm._watcher being already defined
  new Watcher(vm, updateComponent, noop, {
    before () {
      if (vm._isMounted) {
        callHook(vm, 'beforeUpdate')
      }
    }
  }, true /* isRenderWatcher */)
  hydrating = false

  // manually mounted instance, call mounted on self
  // mounted is called for render-created child components in its inserted hook
  if (vm.$vnode == null) {
    vm._isMounted = true
    callHook(vm, 'mounted')
  }
  return vm
}
从上面的代码可以看到,mountComponent 核心就是先实例化一个渲染Watcher(思维导图中有),在它的回调函数中会调用 updateComponent 方法,在此方法中调用 vm._render 方法先生成虚拟 Node,最终调用 vm._update 更新 DOM。
Watcher 在这里起到两个作用,一个是初始化的时候会执行回调函数,另一个是当 vm 实例中的监测的数据发生变化的时候执行回调函数。
函数最后判断为根节点的时候设置 vm._isMounted 为 true, 表示这个实例已经挂载了,同时执行 mounted 钩子函数。 这里注意 vm.$vnode 表示 Vue 实例的父虚拟 Node,所以它为 Null 则表示当前是根 Vue 的实例。
mountComponent 方法的逻辑也是非常清晰的,它会完成整个渲染工作,接下来我们要重点分析其中的细节,也就是最核心的 2 个方法:vm._render 和 vm._update。
