LDAP
文章目录
-
- OpenLDAP搭建
-
- PhpLDAPAdmin的搭建
OpenLDAP搭建
系统环境信息
操作系统:CentOS release 6.7
基础的环境准备
关闭防火墙
[root@localhost ~]# /etc/init.d/iptables stop
[root@localhost ~]# chkconfig iptables off

[root@localhost ~]# systemctl stop firewalld
[root@localhost ~]# systemctl disable firewalld
关闭NetworkManager
[root@localhost ~]# /etc/init.d/NetworkManager stop
[root@localhost ~]# chkconfig NetworkManager off

[root@localhost ~]# systemctl stop NetworkManager
[root@localhost ~]# systemctl disable NetworkManager
SeLinux设为disabled
[root@localhost ~]# setenforce 0 								#临时
修改配置文件 vim /etc/sysconfig/selinux 把SELINUX=disabled		   #永久
更换为腾讯在线源
[root@localhost ~]# cd /etc/yum.repos.d/
[root@localhost yum.repos.d]# rm -rf ./*

[root@localhost yum.repos.d]# wget -O /etc/yum.repos.d/CentOS-Base.repo http://mirrors.cloud.tencent.com/repo/centos6_base.repo

[root@localhost yum.repos.d]# yum clean all
[root@localhost yum.repos.d]# yum makecache
OpenLDAP服务器的搭建
1)安装OpenLDAP的相关
[root@localhost ~]# yum -y install openldap openldap-servers openldap-clients openldap-devel compat-openldap
其中compat-openldap这个包与主从有很大的关系
安装完后,可以看到自动创建了ldap用户
[root@localhost ~]# tail -n 1 /etc/passwd
ldap:x:55:55:OpenLDAP server:/var/lib/ldap:/sbin/nologin
可以通过rpm -qa |grep openldap查看安装了哪些包:
[root@localhost ~]# rpm -qa | grep openldap
openldap-2.4.44-24.el7_9.x86_64
openldap-servers-2.4.44-24.el7_9.x86_64
openldap-devel-2.4.44-24.el7_9.x86_64
openldap-clients-2.4.44-24.el7_9.x86_64
compat-openldap-2.3.43-5.el7.x86_64
2)OpenLDAP的相关配置文件信息
/etc/openldap/slapd.conf: OpenLDAP的主配置文件,记录根域信息,管理员名称,密码,日志,权限等
/etc/openldap/slapd.d/ 这下面是/etc/openldap/slapd.conf配置信息生成的文件,每修改一次配置信息,这里的东西就要重新生成
/etc/openldap/schema/ OpenLDAP的schema存放的地方
/var/lib/ldap/ OpenLDAP的数据文件
/usr/share/openldap-servers/slapd.conf.obsolete 模板配置文件
/usr/share/openldap-servers/DB_CONFIG.example 模板数据库配置文件
检查是否存在缺失配置文件情况
OpenLDAP监听的端口:
默认监听端口:389(明文数据传输)
加密监听端口:636(密文数据传输)
3)初始化OpenLDAP的配置
[root@localhost openldap]# cp /usr/share/openldap-servers/DB_CONFIG.example /var/lib/ldap/DB_CONFIG
[root@localhost openldap]# cp /usr/share/openldap-servers/slapd.conf.obsolete /etc/openldap/slapd.conf
4)修改配置文件
slappasswd生成密文密码123456
[root@localhost openldap]# slappasswd
New password:
Re-enter new password:
{
     SSHA}Ey0hmyaQMJoMTloRj01XVXk9q6gpaNzy
拷贝 {SSHA}Ey0hmyaQMJoMTloRj01XVXk9q6gpaNzy 到 /etc/openldap/slapd.conf 里


5)重新生成配置文件信息文件
先检测/etc/openldap/slapd.conf是否有错误:
[root@localhost openldap]# slaptest -f /etc/openldap/slapd.conf
615d1cab bdb_db_open: database "dc=innosilicon,dc=com,dc=cn": db_open(/var/lib/ldap/id2entry.bdb) failed: No such file or directory (2).
615d1cab backend_startup_one (type=bdb, suffix="dc=innosilicon,dc=com,dc=cn"): bi_db_open failed! (2)
slap_startup failed (test would succeed using the -u switch)
这里报错是因为在第三步后没有重新生成配置文件,启动slapd。而是直接修改配置文件去了
先启动slapd:/etc/init.d/slapd restart
[root@localhost openldap]# /etc/init.d/slapd start
/var/lib/ldap/__db.006 is not owned by "ldap"              [WARNING]
/var/lib/ldap/alock is not owned by "ldap"                 [WARNING]
/var/lib/ldap/__db.002 is not owned by "ldap"              [WARNING]
/var/lib/ldap/__db.005 is not owned by "ldap"              [WARNING]
/var/lib/ldap/__db.003 is not owned by "ldap"              [WARNING]
/var/lib/ldap/__db.004 is not owned by "ldap"              [WARNING]
/var/lib/ldap/__db.001 is not owned by "ldap"              [WARNING]
Starting slapd:                                            [FAILED]
这里又报错,这是因为没有给/var/lib/ldap授权,授权后 chown -R ldap.ldap /var/lib/ldap/ 再重启slapd /etc/init.d/slapd restart 可以看到成功的
[root@localhost openldap]# cd /var/lib/
[root@localhost lib]# chown -R ldap:ldap ldap/

[root@localhost lib]# /etc/init.d/slapd restart
Stopping slapd:                                            [FAILED]
Starting slapd:                                            [  OK  ]
接着回到检测/etc/openldap/slapd.conf是否有错误:slaptest -f /etc/openldap/slapd.conf
[root@localhost ~]# slaptest -f /etc/openldap/slapd.conf
config file testing succeeded
可以看到没问题,然后重新生成配置文件的配置信息
先删除最先的配置文件生成的信息:rm -rf /etc/openldap/slapd.d/*
重新生成:slaptest -f /etc/openldap/slapd.conf -F /etc/openldap/slapd.d/
查看是否生成的是自己修改的配置文件信息:
[root@localhost cn=config]# cat /etc/openldap/slapd.d/cn\=config/olcDatabase\=\{2\}bdb.ldif | grep innosilicon
olcSuffix: dc=innosilicon,dc=com,dc=cn
olcRootDN: cn=Manager,dc=innosilicon,dc=com,dc=cn
授权;重启
[root@localhost cn=config]# chown -R ldap:ldap /etc/openldap/slapd.d/
[root@localhost cn=config]# /etc/init.d/slapd restart
Stopping slapd:                                            [  OK  ]
Starting slapd:                                            [  OK  ]
到这里为止,OpenLDAP服务端基本上完成了,我们可以通过PhpLDAPAdmin来登录看一下,那先得安装PhpLDAPAdmin
查看下slapd是否启动,使用netstat命令/ps命令
[root@localhost yum.repos.d]# ps -ef | grep slapd
ldap      10742      1  0 18:57 ?        00:00:00 /usr/sbin/slapd -h  ldap:/// ldapi:/// -u ldap
root      33038  10381  0 19:10 pts/1    00:00:00 grep slapd

[root@localhost yum.repos.d]# netstat -nltp | grep slapd
tcp        0      0 0.0.0.0:389                 0.0.0.0:*                   LISTEN      10742/slapd
tcp        0      0 :::389                      :::*                        LISTEN      10742/slapd
PhpLDAPAdmin的搭建
1)安装apache php 环境
[root@localhost ~]# yum install -y httpd php php-ldap
2)下载PhpLDAPAdmin
http://sourceforge.net/projects/phpldapadmin/
上传并解压
[root@localhost ~]# yum install -y lrzsz
[root@localhost ~]# rz

[root@localhost ~]# unzip phpldapadmin-1.2.3.zip -d /var/www/html/

[root@localhost html]# mv phpldapadmin-1.2.3/ phpldapadmin 	#改名

[root@localhost config]# mv config.php.example config.php
3)修改配置文件:vim /var/www/html/phpldapadmin/config/config.php
$servers->setValue('login','attr','dn'); 这一行的注释去掉
[root@localhost html]# /etc/init.d/httpd restart

登录,输入管理员的DN,也就是配置文件里配置的
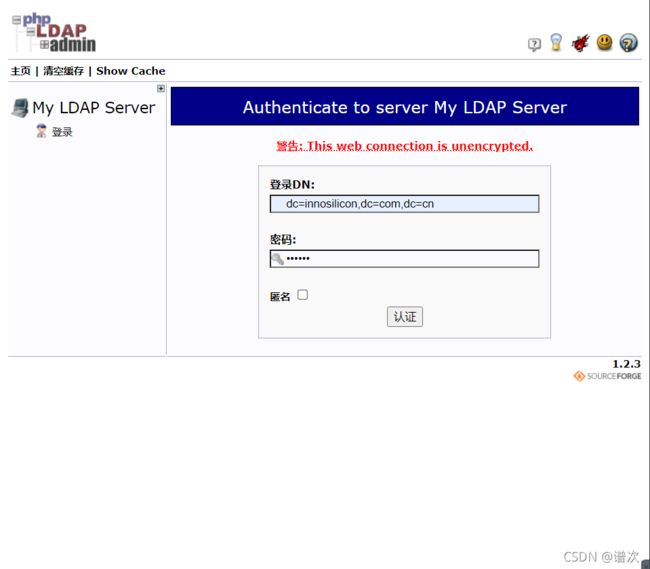
认证,报错
这是因为在第一步搭建OpenLDAP服务端的时候,并没有把管理员的账号信息导入,编辑root.ldif,然后导入
[root@localhost ~]# vim root.ldif

dn: dc=innosilicon,dc=com,dc=cn
objectclass: dcObject
objectclass: organization
o: Yunzhi,Inc.
dc: innosilicon

dn: cn=Manager,dc=innosilicon,dc=com,dc=cn
objectclass: organizationalRole
cn: Manager
这里得注意每一个属性: 后必须有空格,但是值的后面不能有任何空格
然后导入:ldapadd -x -D “cn=Manager,dc=innosilicon,dc=com,dc=cn” -W -f root.ldif
[root@localhost ~]# ldapadd -x -D "cn=Manager,dc=innosilicon,dc=com,dc=cn" -W -f root.ldif
Enter LDAP Password:
adding new entry "dc=innosilicon,dc=com,dc=cn"

adding new entry "cn=Manager,dc=innosilicon,dc=com,dc=cn"
登录
cn=Manager,dc=innosilicon,dc=com,dc=cn

登录成功


到这里,PhpLDAPAdmin搭建完了,接下来,咱们得把日志打开,这样的话好排错,嘿嘿嘿
三:OpenLDAP的打开日志信息
配置文件里加上日志行 ,这里的日志级别有很多种,-1的话会记录很多日志信息
vim /etc/openldap/slapd.conf 加上 loglevel -1
这里修改了配置文件,所有得重新生成配置文件的信息
[root@localhost ~]# vim /etc/openldap/slapd.conf  												#loglevel -1

[root@localhost ~]#  rm -rf /etc/openldap/slapd.d/*
[root@localhost ~]# slaptest -f /etc/openldap/slapd.conf -F /etc/openldap/slapd.d/
[root@localhost ~]# chown -R ldap.ldap /etc/openldap/slapd.d/
vim /etc/rsyslog.conf

# Save boot messages also to boot.log
local7.*                                                /var/log/boot.log
local4.*                                                /var/log/slapd/slapd.log

/etc/init.d/rsyslog restart
创建日志文件目录
[root@localhost ~]# mkdir -p /var/log/slapd
[root@localhost ~]# chmod 755 /var/log/slapd/
[root@localhost ~]# chown ldap.ldap /var/log/slapd/
重启slapd服务
[root@localhost ~]# /etc/init.d/slapd restart
就可以看到日志信息了tail -f /var/log/slapd/slapd.log
四:OpenLDAP与migrationtools实现导入系统账号的相关信息
安装migrationtools
[root@openldap-server openldap]# yum install migrationtools -y
修改migrationtools的配置文件
在/usr/share/migrationtools/这个目录下有很多migrationtools的文件
修改以下的两个地方
$DEFAULT_MAIL_DOMAIN = “innosilicon.com.cn”;
$DEFAULT_BASE = “dc=innosilicon,dc=com,dc=cn”;
[root@localhost ~]# vim /usr/share/migrationtools/migrate_common.ph

# Default DNS domain
$DEFAULT_MAIL_DOMAIN = "innosilicon.com.cn";

# Default base
$DEFAULT_BASE = "dc=innosilicon,dc=com,dc=cn";
生成基础的数据文件,可以自己修改这个生成的base.ldif文件,把不需要的去掉
[root@localhost ~]# cd /usr/share/migrationtools/

[root@localhost migrationtools]# /usr/share/migrationtools/migrate_base.pl > base.ldif
把base.ldif导入OpenLDAP
[root@localhost migrationtools]# ldapadd -x -D "cn=Manager,dc=innosilicon,dc=com,dc=cn" -W -f base.ldifEnter LDAP Password:
adding new entry "dc=innosilicon,dc=com,dc=cn"
ldap_add: Already exists (68)
这里会报错,我们可以通过-c参数强制加入
[root@localhost migrationtools]# ldapadd -c -x -D "cn=Manager,dc=innosilicon,dc=com,dc=cn" -W -f base.ldif
Enter LDAP Password:
adding new entry "dc=innosilicon,dc=com,dc=cn"
ldap_add: Already exists (68)

adding new entry "ou=Hosts,dc=innosilicon,dc=com,dc=cn"

adding new entry "ou=Rpc,dc=innosilicon,dc=com,dc=cn"

adding new entry "ou=Services,dc=innosilicon,dc=com,dc=cn"

adding new entry "nisMapName=netgroup.byuser,dc=innosilicon,dc=com,dc=cn"

adding new entry "ou=Mounts,dc=innosilicon,dc=com,dc=cn"

adding new entry "ou=Networks,dc=innosilicon,dc=com,dc=cn"

adding new entry "ou=People,dc=innosilicon,dc=com,dc=cn"

adding new entry "ou=Group,dc=innosilicon,dc=com,dc=cn"

adding new entry "ou=Netgroup,dc=innosilicon,dc=com,dc=cn"

adding new entry "ou=Protocols,dc=innosilicon,dc=com,dc=cn"

adding new entry "ou=Aliases,dc=innosilicon,dc=com,dc=cn"

adding new entry "nisMapName=netgroup.byhost,dc=innosilicon,dc=com,dc=cn"
导入之后,通过PhpLdapAdmin可以看到已经导入进来了

把系统的用户生成ldif文件
[root@localhost migrationtools]# cd /usr/share/migrationtools/
[root@localhost migrationtools]# ./migrate_passwd.pl /etc/passwd passwd.ldif
[root@localhost migrationtools]# ./migrate_group.pl /etc/group group.ldif
可以看到生成的文件,然后根据自己需要修改这两个ldif文件
passwd.ldif只留一个wangj测试用户
[root@localhost migrationtools]# vim passwd.ldif

dn: uid=wangj,ou=People,dc=innosilicon,dc=com,dc=cn
uid: wangj
cn: wangj
objectClass: account
objectClass: posixAccount
objectClass: top
objectClass: shadowAccount
userPassword: {
     crypt}$6$.0m74CPSYMx8Ilpa$trZut4KDQbqGR0xdLscNwTHHF8gOGEIRambxlugl79H1Hc4Il2.OmdvuHJN4JH75BXdfgRsdy.wDB/tJq5nGj0
shadowLastChange: 18905
shadowMin: 0
shadowMax: 99999
shadowWarning: 7
loginShell: /bin/bash
uidNumber: 500
gidNumber: 500
homeDirectory: /home/wangj
gecos: wangj

##新增成员信息
dn: uid=liuyww,ou=People,dc=innosilicon,dc=com,dc=cn
uid: liuyww
cn: liuyww
objectClass: account
objectClass: posixAccount
objectClass: top
objectClass: shadowAccount
userPassword: {
     crypt}$6$.0m74CPSYMx8Ilpa$trZut4KDQbqGR0xdLscNwTHHF8gOGEIRambxlugl79H1Hc4Il2.OmdvuHJN4JH75BXdfgRsdy.wDB/tJq5nGj0
shadowLastChange: 18906
shadowMin: 1
shadowMax: 99998
shadowWarning: 6
loginShell: /bin/bash
uidNumber: 501
gidNumber: 501
homeDirectory: /home/liuyww
gecos: liuyww
group.ldif留对应的IT:
[root@localhost migrationtools]# vim group.ldif

dn: cn=IT,ou=Group,dc=innosilicon,dc=com,dc=cn
objectClass: posixGroup
objectClass: top
cn: IT
userPassword: {
     crypt}x
gidNumber: 500
把用户导入进去:ldapadd -x -D “cn=Manager,dc=innosilicon,dc=com,dc=cn” -W -f passwd.ldif
[root@localhost migrationtools]# ldapadd -x -D "cn=Manager,dc=innosilicon,dc=com,dc=cn" -W -f passwd.ldif
Enter LDAP Password:
adding new entry "uid=wangj,ou=People,dc=innosilicon,dc=com,dc=cn"
把组导进去:ldapadd -x -D “cn=Manager,dc=innosilicon,dc=com,dc=cn” -W -f group.ldif
[root@localhost migrationtools]# ldapadd -x -D "cn=Manager,dc=innosilicon,dc=com,dc=cn" -W -f group.ldif
Enter LDAP Password:
adding new entry "cn=IT,ou=Group,dc=innosilicon,dc=com,dc=cn"
然后就可以看到

在这里就已经完成把系统的账号属性导入了OpenLDAP,然后就通过添加OpenLDAP用户,来进行验证,所以得先做好客户端的设置