springboot+mybatis+bootstrap简单项目实例一
流程
- 环境介绍
- 配置项目
-
- 1. 新建项目
- 2. 修改项目目录结构
- 3. 创建mysql数据库
- 4. 配置mybatis
- 添加一个登陆功能
-
- 1. 从数据库中获取数据
-
- 添加数据库实体
- 添加数据访问对象
- 添加xml文件
- 修改启动项
- 添加dao层测试
- 2. 添加一个登陆界面
-
- 1. 添加css js img font等文件
- 2. 修改登陆表单
- 3. 给项目添加路由controller
-
- 访问登陆界面
- 添加登陆功能
-
- 添加业务逻辑
- 添加post处理
- 添加主界面的路由
- 添加错误页面
- 百度云链接
制作一个简单的项目,功能在以后慢慢完善。
环境介绍
IDEA 2018.1
jdk-1.8
MySQL Server 5.6.26
Navicat Premium
配置项目
1. 新建项目

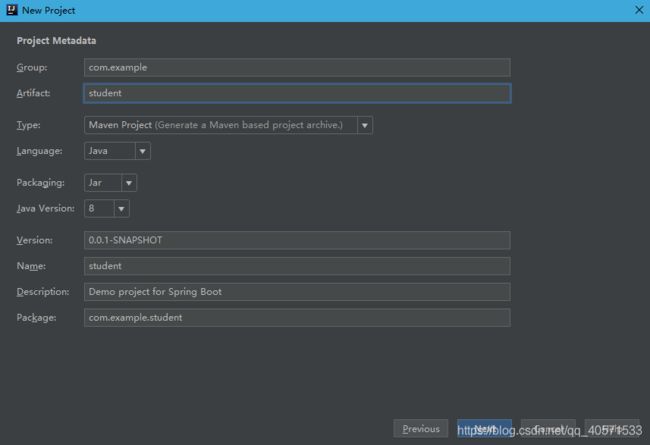
修改POM文件:
<project xmlns="http://maven.apache.org/POM/4.0.0" xmlns:xsi="http://www.w3.org/2001/XMLSchema-instance"
         xsi:schemaLocation="http://maven.apache.org/POM/4.0.0 https://maven.apache.org/xsd/maven-4.0.0.xsd">
    <modelVersion>4.0.0modelVersion>
    <parent>
        <groupId>org.springframework.bootgroupId>
        <artifactId>spring-boot-starter-parentartifactId>
        <version>2.2.6.RELEASEversion>
        <relativePath/>
    parent>
    <groupId>com.examplegroupId>
    <artifactId>studentartifactId>
    <version>0.0.1-SNAPSHOTversion>
    <name>studentname>
    <description>Demo project for Spring Bootdescription>

    <properties>
        <java.version>1.8java.version>
    properties>

    <dependencies>
        <dependency>
            <groupId>org.springframework.bootgroupId>
            <artifactId>spring-boot-starterartifactId>
        dependency>

        <dependency>
            <groupId>org.springframework.bootgroupId>
            <artifactId>spring-boot-starter-webartifactId>
        dependency>


        <dependency>
            <groupId>org.springframework.bootgroupId>
            <artifactId>spring-boot-starter-thymeleafartifactId>
        dependency>


        <dependency>
            <groupId>mysqlgroupId>
            <artifactId>mysql-connector-javaartifactId>
        dependency>


        <dependency>
            <groupId>org.mybatis.spring.bootgroupId>
            <artifactId>mybatis-spring-boot-starterartifactId>
            <version>1.3.1version>
        dependency>


        <dependency>
            <groupId>org.springframework.bootgroupId>
            <artifactId>spring-boot-starter-tomcatartifactId>
            <scope>providedscope>
        dependency>


        <dependency>
            <groupId>org.apache.commonsgroupId>
            <artifactId>commons-lang3artifactId>
        dependency>

        <dependency>
            <groupId>org.springframework.bootgroupId>
            <artifactId>spring-boot-starter-testartifactId>
            <scope>testscope>
            <exclusions>
                <exclusion>
                    <groupId>org.junit.vintagegroupId>
                    <artifactId>junit-vintage-engineartifactId>
                exclusion>
            exclusions>
        dependency>
    dependencies>

    <build>
        <plugins>
            <plugin>
                <groupId>org.springframework.bootgroupId>
                <artifactId>spring-boot-maven-pluginartifactId>
            plugin>
        plugins>
    build>

project>
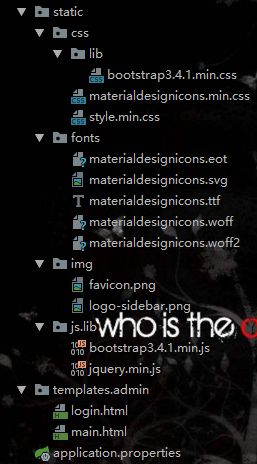
2. 修改项目目录结构

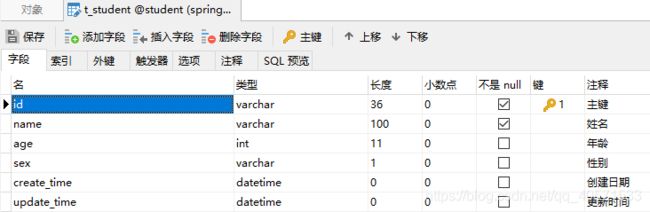
3. 创建mysql数据库
用户表:

学生表:
4. 配置mybatis
连接数据库 mapper文件映射:
# 数据库
spring.datasource.driver-class-name=com.mysql.cj.jdbc.Driver
spring.datasource.url=jdbc:mysql://localhost:3306/student?useUnicode=true&characterEncoding=UTF-8&zeroDateTimeBehavior=CONVERT_TO_NULL&serverTimezone=CTT
spring.datasource.username=root
spring.datasource.password=root

# mapper
mybatis.mapperLocations=classpath:/mapper/*sql-map.xml
添加一个登陆功能
1. 从数据库中获取数据
添加数据库实体
字段的名字和数据库不一定要一样
package com.example.student.entity;

import java.util.Date;

/**
 * 用户信息表
 *
 * @author xiaotao
 */
public class UserDO {


    /**
     * 主键
     */
    private String id;

    /**
     * 登陆名称
     */
    private String loginName;

    /**
     * 密码(MD5加密)
     */
    private String password;

    /**
     * 创建日期
     */
    private Date createTime;

    /**
     * 更新时间
     */
    private Date updateTime;

    public String getId() {

        return id;
    }

    public void setId(String id) {

        this.id = id;
    }

    public String getLoginName() {

        return loginName;
    }

    public void setLoginName(String loginName) {

        this.loginName = loginName;
    }

    public String getPassword() {

        return password;
    }

    public void setPassword(String password) {

        this.password = password;
    }

    public Date getCreateTime() {

        return createTime;
    }

    public void setCreateTime(Date createTime) {

        this.createTime = createTime;
    }

    public Date getUpdateTime() {

        return updateTime;
    }

    public void setUpdateTime(Date updateTime) {

        this.updateTime = updateTime;
    }

    @Override
    public String toString() {

        return "UserDO{" +
                "id='" + id + '\'' +
                ", loginName='" + loginName + '\'' +
                ", password='" + password + '\'' +
                ", createTime=" + createTime +
                ", updateTime=" + updateTime +
                '}';
    }

}
添加数据访问对象
package com.example.student.dao;

import com.example.student.entity.UserDO;
import org.apache.ibatis.annotations.Mapper;
import org.apache.ibatis.annotations.Param;

/**
 * 用户DAO接口
 *
 * @author xiaotao
 */
@Mapper
public interface UserDAO {


    /**
     * 登陆
     *
     * @param loginName 登录名
     * @param password 密码
     * @return 用户DO
     */
    UserDO login(@Param("loginName") String loginName, @Param("password") String password);

}
添加xml文件
column 填写数据库字段名
property 填写do字段名
<mapper namespace="com.example.student.dao.UserDAO">
    <resultMap id="UserDO" type="com.example.student.entity.UserDO">
        <id column="id" property="id" jdbcType="VARCHAR"/>
        <result column="login_name" property="loginName"/>
        <result column="password" property="password"/>
        <result column="create_time" property="createTime"/>
        <result column="update_time" property="updateTime"/>
    resultMap>

	<select id="login" resultMap="UserDO">
		SELECT *
		FROM `sy_user`
		WHERE `login_name` = #{loginName} AND `password` = #{password};
	select>

mapper>
添加完之后再打开dao文件就会有跳转箭头(需要安装mybatis插件 无法下载最后有插件链接)

修改启动项
package com.example.student;

import org.mybatis.spring.annotation.MapperScan;
import org.springframework.boot.SpringApplication;
import org.springframework.boot.autoconfigure.SpringBootApplication;

/**
 * 启动类
 *
 * @author xiaotao
 */
@SpringBootApplication
@MapperScan("com.example.student.dao.*")
public class StudentApplication {


    public static void main(String[] args) {

        SpringApplication.run(StudentApplication.class, args);
    }

}
添加dao层测试
添加测试是很关键的,虽然没有这个文件项目也能运行,但是有了这个测试以后排查错误的时候就会方便很多。
分层开发的时候写dao层的小伙伴就需要用测试验证代码的正确性,也可以采用测试驱动开发,代码写起来目的明确。
package com.example.student.dao;

import com.example.student.entity.UserDO;
import org.junit.jupiter.api.Test;
import org.springframework.boot.test.context.SpringBootTest;
import org.springframework.util.DigestUtils;

import javax.annotation.Resource;

import static org.junit.jupiter.api.Assertions.assertNotNull;


@SpringBootTest
class UserDAOTest {


    @Resource
    private UserDAO userDAO;

    @Test
    void testLogin() {

        UserDO userDO = userDAO.login("admin", DigestUtils.md5DigestAsHex("123456".getBytes()));
        assertNotNull(userDO);
    }

}
测试结果 绿了就行:

2. 添加一个登陆界面
更加界面也不能太简单,就去网上找个了个模板。链接在最后。
1. 添加css js img font等文件
样式什么的就不介绍了。
main.html 只有 登陆成功 四个字。
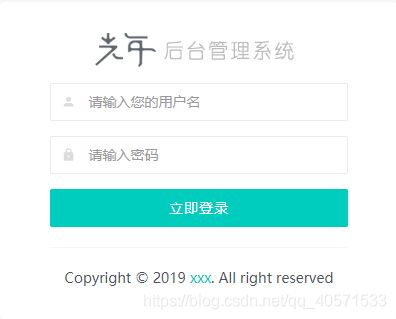
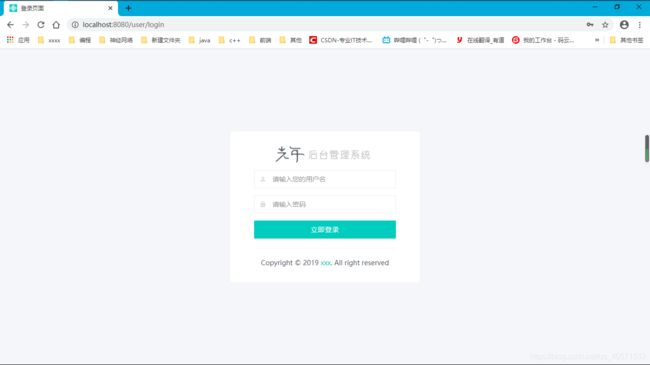
2. 修改登陆表单
主要是form的action为请求路径 method为请求方法,input的name为参数字段名。
<form action="/user/login" method="post">
    <div class="form-group has-feedback feedback-left">
        <input type="text" placeholder="请输入您的用户名" class="form-control" name="loginName" />
        <span class="mdi mdi-account form-control-feedback" aria-hidden="true">span>
    div>
    <div class="form-group has-feedback feedback-left">
        <input type="password" placeholder="请输入密码" class="form-control" name="password" />
        <span class="mdi mdi-lock form-control-feedback" aria-hidden="true">span>
    div>
    <div class="form-group">
        <button class="btn btn-block btn-primary" type="submit">立即登录button>
    div>
form>
最后登录页面长这个样子 (图片什么的不想换了):
3. 给项目添加路由controller
访问登陆界面
页面路径常量
package com.example.student.constant;

/**
 * 动态网页路径
 *
 * @author xiaotao
 */
public class TemplatePath {


    /**
     * 登录
     */
    public static final String USER_LOGIN = "admin/login";

}
跳转接口
package com.example.student.controller;

/**
 * 用户控制层接口
 *
 * @author xiaotao
 */
public interface UserController {


    /**
     * 展示登录页面
     *
     * @return 登陆界面
     */
    String showLogin();

}
跳转实现
package com.example.student.controller.impl;

import com.example.student.constant.TemplatePath;
import com.example.student.controller.UserController;
import org.springframework.context.annotation.ComponentScan;
import org.springframework.stereotype.Controller;
import org.springframework.web.bind.annotation.GetMapping;
import org.springframework.web.bind.annotation.RequestMapping;

/**
 * 用户接口实现
 *
 * @author xiaotao
 */
@Controller
@ComponentScan({
     "com.example.student.service"})
@RequestMapping("/user")
public class UserControllerImpl implements UserController {


    @Override
    @GetMapping("login")
    public String showLogin() {

        return TemplatePath.USER_LOGIN;
    }

}
运行结果 注意是通过localhost访问的:
添加登陆功能
实现我们要判断用户名和密码就需要访问数据库,这里我们需要添加业务逻辑层。
添加业务逻辑
首先添加一个返回值实体
package com.example.student.entity;

/**
 * 返回值
 *
 * @author xiaotao
 */
public class ResultDO<T> {


    /**
     * 是否调用以及过参数校验
     */
    private Boolean success;
    /**
     * 业务code,见{@linkplain com.example.student.constant.ResultCode}
     */
    private Integer code;
    /**
     * 业务消息,见{@linkplain com.example.student.constant.ResultCode}
     */
    private String msg;
    /**
     * 返回值
     */
    private T module;

    public ResultDO(boolean success, Integer code, String msg) {

        this.success = success;
        this.code = code;
        this.msg = msg;
    }

    public ResultDO(boolean success, Integer code, String msg, T module) {

        this.success = success;
        this.code = code;
        this.msg = msg;
        this.module = module;
    }

    public void set(boolean success, Integer code, String msg) {

        this.success = success;
        this.code = code;
        this.msg = msg;
    }

    public void set(boolean success, Integer code, String msg, T module) {

        this.success = success;
        this.code = code;
        this.msg = msg;
        this.module = module;
    }

    public boolean isSuccess() {

        return success;
    }

    public void setSuccess(boolean success) {

        this.success = success;
    }

    public int getCode() {

        return code;
    }

    public void setCode(int code) {

        this.code = code;
    }

    public String getMsg() {

        return msg;
    }

    public void setMsg(String msg) {

        this.msg = msg;
    }

    public T getModule() {

        return module;
    }

    public void setModule(T module) {

        this.module = module;
    }

    @Override
    public String toString() {

        StringBuilder builder = new StringBuilder();
        builder.append("ResultDO [success=");
        builder.append(success);
        builder.append(", code=");
        builder.append(code);
        builder.append(", msg=");
        builder.append(msg);
        builder.append(", module=");
        builder.append(module);
        builder.append("]");
        return builder.toString();
    }

}
添加一些返回值信息
package com.example.student.constant;

/**
 * 一些返回值
 *
 * @author xiaotao
 */
public class ResultCode {


    /**
     * 成功
     */
    public static final int SUCCESS = 1;
    public static final String MSG_SUCCESS = "success";

    // 业务中细分的code 1000-1999
    /**
     * 用户名或密码错误
     */
    public static final int WRONG_USERNAME_OR_PASSWORD = 1000;
    public static final String MSG_WRONG_USERNAME_OR_PASSWORD = "wrong username or password";

    // 一些可能共性的异常code 9000~9999
    /**
     * 接口已下线
     */
    public static final int INTERFACE_OFFLINE = 9000;
    public static final String MSG_INTERFACE_OFFLINE = "interface is offline";

    /**
     * 数据库错误
     */
    public static final int DB_ERROR = 9001;
    public static final String MSG_DB_ERROR = "db error";

    /**
     * 参数非法
     */
    public static final int PARAMETER_INVALID = 9002;
    public static final String MSG_PARAMETER_INVALID = "parameter invalid";

    /**
     * 系统错误
     */
    public static final int ERROR_SYSTEM_EXCEPTION = 9999;
    public static final String MSG_ERROR_SYSTEM_EXCEPTION = "system error";

}
业务逻辑接口
package com.example.student.service;


import com.example.student.entity.ResultDO;
import com.example.student.entity.UserDO;

/**
 * 用户逻辑接口
 *
 * @author xiaotao
 */
public interface UserInterService {


    /**
     * 登录
     *
     * @param userDO 用户DO
     * @return 是否登陆成功
     */
    ResultDO<Void> login(UserDO userDO);

}
业务逻辑实现
package com.example.student.service.impl;

import com.example.student.constant.ResultCode;
import com.example.student.dao.UserDAO;
import com.example.student.entity.ResultDO;
import com.example.student.entity.UserDO;
import com.example.student.service.UserInterService;
import org.apache.commons.lang3.StringUtils;
import org.springframework.context.annotation.ComponentScan;
import org.springframework.stereotype.Service;
import org.springframework.util.DigestUtils;

import javax.annotation.Resource;

/**
 * 用户逻辑实现
 *
 * @author xiaotao
 */
@ComponentScan({
     "com.example.student.dao"})
@Service("userService")
public class UserServiceImpl implements UserInterService {


    @Resource
    private UserDAO userDAO;

    @Override
    public ResultDO<Void> login(UserDO userDO) {

        // 参数检验
        if (StringUtils.isBlank(userDO.getLoginName()) || StringUtils.isBlank(userDO.getPassword())) {

            return new ResultDO<>(false, ResultCode.PARAMETER_INVALID, ResultCode.MSG_PARAMETER_INVALID, null);
        }

        // 检测
        UserDO result = userDAO.login(userDO.getLoginName(), DigestUtils.md5DigestAsHex(userDO.getPassword().getBytes()));
        if (result == null) {

            // 用户名或者密码错误
            return new ResultDO<>(false, ResultCode.WRONG_USERNAME_OR_PASSWORD, ResultCode.MSG_WRONG_USERNAME_OR_PASSWORD, null);
        }

        // 登陆成功
        return new ResultDO<>(true, ResultCode.SUCCESS, ResultCode.MSG_SUCCESS, null);
    }

}
添加post处理
添加静态路径
package com.example.student.constant;

/**
 * 静态页面路径
 *
 * @author xiaotao
 */
public class StaticPath {


    /**
     * 错误页面
     */
    public static final String ERROR = "error/error.html";

}
添加动态路径
/**
  * 主界面
  */
 public static final String MAIN_HTML = "admin/main";
添加controller接口
/**
 * 登录post请求
 *
 * @param userDO 用户DO
 * @return 主页面
 */
String login(UserDO userDO);
添加实现
@Resource
private UserInterService userService;

@Override
@PostMapping("login")
public String login(@ModelAttribute UserDO userDO) {

    if (StringUtils.isEmpty(userDO.getLoginName()) || StringUtils.isEmpty(userDO.getPassword())) {

        return "redirect:/" + StaticPath.ERROR + "?" + ResultCode.MSG_PARAMETER_INVALID;
    }

    ResultDO<Void> result = userService.login(userDO);
    if (!result.isSuccess()) {

        return "redirect:/" + StaticPath.ERROR + "?" + result.getMsg();
    }

    return "redirect:/" + TemplatePath.MAIN_HTML;
}
可以看到我们实现的时候还缺少 错误页面、主页面的路由。
添加主界面的路由
接口
package com.example.student.controller;

/**
 * 主界面控制接口
 *
 * @author xiaotao
 */
public interface ManagerController {


    /**
     * 展示主页面
     *
     * @return 主页面
     */
    String showMain();

}
实现
package com.example.student.controller.impl;

import com.example.student.constant.TemplatePath;
import com.example.student.controller.ManagerController;
import org.springframework.context.annotation.ComponentScan;
import org.springframework.stereotype.Controller;
import org.springframework.web.bind.annotation.GetMapping;
import org.springframework.web.bind.annotation.RequestMapping;

/**
 * 用户控制层实现
 *
 * @author xiaotao
 */
@Controller
@ComponentScan({
     "com.example.student.service"})
@RequestMapping("/admin")
public class ManagerControllerImpl implements ManagerController {


    @Override
    @GetMapping("main")
    public String showMain() {

        return TemplatePath.MAIN_HTML;
    }

}
运行结果:
添加错误页面
添加了error.css和两张图片,页面主要是这个js代码,用来提示用户错误信息。
<Script language="javascript">
    // 显示错误类型
    function GetRequest() {

        // 获取url中"?"符后的字串
        let url = location.search;
        if (url == "?parameter%20invalid") {

            document.getElementById("errorText").innerHTML = "参数非法";
            document.getElementById("error").innerHTML = "error";
        }
        if (url == "?wrong%20username%20or%20password") {

            document.getElementById("errorText").innerHTML = "用户名或密码错误";
            document.getElementById("error").innerHTML = "error";
        }
    }
script>
运行结果:

百度云链接
Navicat 百度云链接:https://pan.baidu.com/s/10pGv0W4KqZASKaAv8nrXGA
提取码:2lcr
mybatis插件 百度云链接:https://pan.baidu.com/s/18HHx1fAIfDsvMYOCUdrnKw
提取码:ecrt
网页模板 百度云链接:https://pan.baidu.com/s/1jFoAEQ1qvjdTFrrUegDljg
提取码:clmh
项目代码 百度云链接:https://pan.baidu.com/s/1duKbsXHcMCuLn-t82irKiw
提取码:6i39