sharding-jdbc 分库分表
看完这篇文章,分库分表不再是难事
首先我们为什么要分库分表的
随着我们生产用户积累,数据越来越多,表越来越大,我们不断优化我们的sql以及程序来提升系统性能,但是效果越来越不明显了,这是我们该怎么办?数据库表的数据已经在严重拖累我们了。这时候有人就说简单呀,分库分表就能解决。为你点赞。
如何考虑分库分表呢
一般垂直分在数据库设计阶段就要考虑进去,业务数据结构该拆分的都应该提前还分好,当我们系统数据量变大的时候我们需要首先考虑使用索引以及缓存来优化性能,但当数据量到达一定程度上述方法已经不足以明显优化i性能的时候我们就需要考虑水平拆分
分库分表基本策略有哪呢
1.垂直分表
拆表,将基本数据提取出来作为基础表,将其他使用频率低的字段提出作为新表储存
	好处1:避免io争抢,减少锁表的几率
	好处2:热点数据和低频数据拆分,热点数据不会被低频数据影响效率
2.水平分表
根据数据的一定规则将同一张表的数据分到若干个表中(同一个数据库中)
3.垂直分库
将不同业务模块的表和数据库拆分到不同数据库,使其不同模块避开物理资源竞争
4.水平分库
根据数据的一定规则将同一张表的数据分到若干个库中(不同数据库)
我们以及知道了他的优点,那他有什么问题呢?
下面我来列举下他的问题,我们需要带着问题去看待新的技术
1.分布式事务
2.跨结点关联数据
3.跨节点分页/排序
4.逐渐避重
5.公共表如何处理
我想大家对分库分表都有了一定的认识,我们接下来介绍sharding-jdbc
背景
他是当当网开源的分布式数据库中间件。是一个轻量级的java框架,他以jar的方式提供给我们,无需其他额外配置,是增强版的jdbc,完全兼容jdbc和orm框架。核心功能是数据分片和读写分离。
接下来如何使用呢,看好了您嘞
pom文件
            org.springframework.boot
            spring-boot-starter-web


            org.mybatis.spring.boot
            mybatis-spring-boot-starter
            2.1.4


            com.baomidou
            mybatis-plus-boot-starter
             3.0.5


            org.projectlombok
            lombok
            true


            mysql
            mysql-connector-java
            runtime


            com.alibaba
            druid
            1.2.4


            org.springframework.boot
            spring-boot-starter-test
            test


            junit
            junit
            4.12


            org.apache.shardingsphere
            sharding-jdbc-spring-boot-starter
            4.1.0
配置文件
server.port = 18080


server.servlet.encoding.enabled = true
server.servlet.encoding.force = true
server.servlet.encoding.charset = utf-8
server.servlet.context-path = /sharding-jdbc-simple
spring.application.name= sharding-jdbc-simple

#spring.profiles.active = twodatabase
#显示sql
spring.shardingsphere.props.show.sql = true

mybatis.configuration.map-underscore-to-camel-case =true
mybatis-plus.mapper-locations= classpath*:mapper/*.xml


#数据源

spring.shardingsphere.datasource.names=m1
# 配置数据源具体内容————————包含  连接池,驱动,地址,用户名,密码
spring.shardingsphere.datasource.m1.type = com.alibaba.druid.pool.DruidDataSource
spring.shardingsphere.datasource.m1.driver-class-name = com.mysql.cj.jdbc.Driver
spring.shardingsphere.datasource.m1.url = jdbc:mysql://localhost:3306/db_user?serverTimezone=Asia/Shanghai&useUnicode=true&characterEncoding=utf8&useSSL=false
spring.shardingsphere.datasource.m1.username = root
spring.shardingsphere.datasource.m1.password = root
#分片策略
#m1.tb_order_table$->{1,2} 表示会将表明拼接进行水平分表分别将表明拼接成tb_order_table1,tb_order_table2
spring.shardingsphere.sharding.tables.tb_order_table.actual-data-nodes= m1.tb_order_table$->{1..2}
#设置主键规则  指定雪花id生成
spring.shardingsphere.sharding.tables.tb_order_table.key-generator.column=order_id
spring.shardingsphere.sharding.tables.tb_order_table.key-generator.type=SNOWFLAKE

#分片算法 指定tb_order_table$ 的分片策略
spring.shardingsphere.sharding.tables.tb_order_table.table-strategy.inline.sharding-column=order_id
spring.shardingsphere.sharding.tables.tb_order_table.table-strategy.inline.algorithm-expression=tb_order_table$->{order_id % 2 + 1}
至此我们就配置好了一个简单的分表策略,接下来我们去试试吧
mapper接口 这里用的是mabatisplus
public interface OrderTableMapper extends BaseMapper {

}
测试类
@SpringBootTest(classes = ShardingjdbcSimpleApplication.class)
@RunWith(SpringRunner.class)
class OrderTable1MapperTest {
    @Autowired
    OrderTableMapper OrderTableMapper;
    @Autowired
    OrderTableXmlMapper OrderTableXmlMapper;

    @Test
     void testInsert(){
        for (int i = 0; i < 10; i++) {
            OrderTable orderTable1 = new OrderTable();
            orderTable1.setUserId((long)i);
            orderTable1.setPrice(BigDecimal.TEN);
            orderTable1.setStatus("1");
            OrderTableMapper.insert(orderTable1);
        }
    }
    }
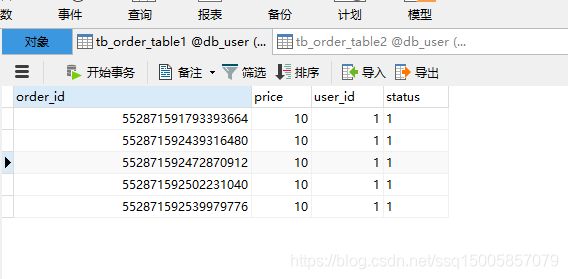
我们可以看到我们数据库的两张表中都已经按照我们的分片规则添加的数据。


至此简单的分表以及实现了,你是否有所期待呢。
接下来看下另一种配置方法,使用Config配置文件方法来配置我们的分片
废话不多说直接干,配置文件如下:
//@SpringBootApplication(exclude = SpringBootConfiguration.class)
//使用配置类方法配置规则需要在启动类排除shardingjdbc下的SpringBootConfiguration类
@Configuration
public class ShardingJdbcConfig {

    //创建datasourceMap
    @Bean
    Map createDateSourceMap(){
        DruidDataSource druidDataSource = new DruidDataSource();
        druidDataSource.setDriverClassName("com.mysql.cj.jdbc.Driver");
        druidDataSource.setUsername("root");
        druidDataSource.setPassword("root");
        druidDataSource.setUrl("jdbc:mysql://localhost:3306/db_user?serverTimezone=Asia/Shanghai&useUnicode=true&characterEncoding=utf8&useSSL=false");
        HashMap result = new HashMap<>();
        result.put("m1",druidDataSource);
        return result;
    }

    //主键生成策略
    @Bean
    KeyGeneratorConfiguration getKeyGeneratorConfiguration(){
        return new KeyGeneratorConfiguration("SNOWFLAKE","order_id");
    }

    //分表规则
    @Bean
    TableRuleConfiguration getTableRuleConfiguration(){
        TableRuleConfiguration tableRuleConfiguration = new TableRuleConfiguration("tb_order_table","m1.tb_order_table$->{1..2}");
        tableRuleConfiguration.setKeyGeneratorConfig(getKeyGeneratorConfiguration());
        tableRuleConfiguration.setTableShardingStrategyConfig(new InlineShardingStrategyConfiguration("order_id",
                "tb_order_table$->{order_id % 2 + 1}"));
        return tableRuleConfiguration;
    }
    //创建sharding-jdbc数据源
    @Bean
    DataSource getShardingJdbcDataSource() throws SQLException {
        ShardingRuleConfiguration shardingRuleConfiguration = new ShardingRuleConfiguration();
        shardingRuleConfiguration.getTableRuleConfigs().add(getTableRuleConfiguration());
        Properties properties = new Properties();
        properties.put("sql.show","true");
        return ShardingDataSourceFactory.createDataSource(createDateSourceMap(),shardingRuleConfiguration,properties);
    }
重点注意:
使用配置类方法配置规则需要在启动类排除shardingjdbc下的SpringBootConfiguration类也就是在启动类上加上以下注解
@SpringBootApplication(exclude = SpringBootConfiguration.class);不然你无法启动,回报一个IllegalArgumentException非法参数错误。
篇幅有点长了,记录下自己的脚步。