SpringCloud Alibaba Nacos服务注册和配置中心
Nacos
什么是nacos
nacos (Nacos:Dynamic Naming and Configuration Service) 一个更易于构建云原生应用的动态服务发
现,配置管理和服务管理中心
Nacos就是注册中心+配置中心的组合 等价于 netflix版本的 Eureka+Config+Bus+zik
解决了什么痛点
- 之前我们在netflix版本遇到的配置需要手动的区分发信息,
- 杜绝了我们需要专门自己建一个注册中心的包,阿里给我们提供了开箱即用的发行版本,我们只需要简单的配置,直接脚本启动
- 可以直接查看到集群信息,和调用链路
如何获得和社区文档
下载地址 :https://github.com/alibaba/Nacos
中文文档地址 :https://nacos.io/zh-cn/index.html
官方文档地址 :https://spring-cloud-alibaba-group.github.io/github-pages/greenwich/spring-cloud-alibaba.html#_spring_cloud_alibaba_nacos_discovery
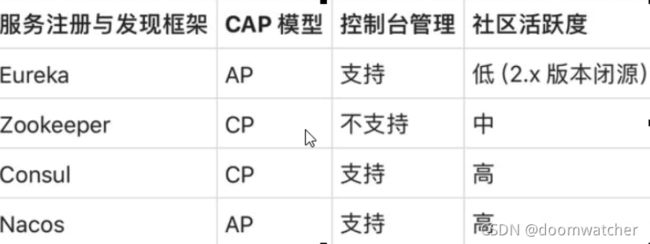
主流注册中心对比
安装nacos
环境:
- java 8
- Maven
解压安装包,直接运行bin目录下的startup.cmd
2.xx版本,需要修改单机版本,然后用命令启动 startup.cmd -m standalone
命令运行成功后直接访问http://localhost:8848/nacos
就是这么简单

作为服务注册中心
我们新建两个模块
基于nacos的服务提供者集群:cloudalibaba-provider-payment9001
基于nacos的服务提供者集群:cloudalibaba-provider-payment9002
cloudalibaba-provider-payment9001
nacos需要的主要依赖包
    <dependency>
        <groupId>com.alibaba.cloudgroupId>
        <artifactId>spring-cloud-starter-alibaba-nacos-discoveryartifactId>
    dependency>
    <dependency>
        <groupId>org.springframework.bootgroupId>
        <artifactId>spring-boot-starter-webartifactId>
    dependency>
    <dependency>
        <groupId>org.springframework.bootgroupId>
        <artifactId>spring-boot-starter-actuatorartifactId>
    dependency>
核心配置文件
server:
  port: 9001

spring:
  application:
    name: nacos-payment-provider
  cloud:
  #注册到nacos
    nacos:
      discovery:
        server-addr: localhost:8848 #配置Nacos地址

management:
  endpoints:
    web:
      exposure:
        include: '*'
配置注意项
- 一定要导入服务暴露
- 配置的时候 要加入 nacos的地址
编写一个方法测试
package com.atguigu.springcloud.alibaba.controller;

import org.springframework.beans.factory.annotation.Value;
import org.springframework.web.bind.annotation.GetMapping;
import org.springframework.web.bind.annotation.PathVariable;
import org.springframework.web.bind.annotation.RestController;


@RestController
public class PaymentController
{

    @Value("${server.port}")
    private String serverPort;

    @GetMapping(value = "/payment/nacos/{id}")
    public String getPayment(@PathVariable("id") Integer id)
    {

        return "nacos registry, serverPort: "+ serverPort+"\t id"+id;
    }
}
主启动类加上注解
import org.springframework.boot.SpringApplication;
import org.springframework.boot.autoconfigure.SpringBootApplication;
import org.springframework.cloud.client.discovery.EnableDiscoveryClient;

@EnableDiscoveryClient
@SpringBootApplication
public class PaymentMain9001 {

    public static void main(String[] args) {

        SpringApplication.run(PaymentMain9001.class,args);
    }
}
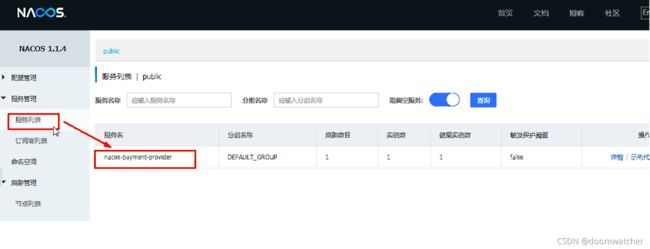
启动服务,就可以在nacos中看到我们的服务了

集群另一个模块 参考 9001的编写方式
作为服务配置中心
我们来建一个demo来体验一下,nacos的动态配置
配置模块 :cloudalibaba-config-nacos-client3377
基础配置
导入需要的jar包
<dependencies>

    <dependency>
        <groupId>com.alibaba.cloudgroupId>
        <artifactId>spring-cloud-starter-alibaba-nacos-configartifactId>
    dependency>

    <dependency>
        <groupId>com.alibaba.cloudgroupId>
        <artifactId>spring-cloud-starter-alibaba-nacos-discoveryartifactId>
    dependency>

    <dependency>
        <groupId>org.springframework.bootgroupId>
        <artifactId>spring-boot-starter-webartifactId>
    dependency>
    <dependency>
        <groupId>org.springframework.bootgroupId>
        <artifactId>spring-boot-starter-actuatorartifactId>
    dependency>

    <dependency>
        <groupId>org.springframework.bootgroupId>
        <artifactId>spring-boot-devtoolsartifactId>
        <scope>runtimescope>
        <optional>trueoptional>
    dependency>
    <dependency>
        <groupId>org.projectlombokgroupId>
        <artifactId>lombokartifactId>
        <optional>trueoptional>
    dependency>
    <dependency>
        <groupId>org.springframework.bootgroupId>
        <artifactId>spring-boot-starter-testartifactId>
        <scope>testscope>
    dependency>
dependencies>
编写配置文件
这里引入一个概念
bootstrap的启动优先级比application高
为了确保我们的nacos上的配置被加载成功
server:
  port: 3377

spring:
  application:
    name: nacos-config-client
  cloud:
    nacos:
      discovery:
        server-addr: localhost:8848 #服务注册中心地址
      config:
        server-addr: localhost:8848 #配置中心地址
        file-extension: yaml #指定yaml格式的配置
编写一个查看测试信息的controller
package com.atguigu.springcloud.alibaba.controller;

import org.springframework.beans.factory.annotation.Value;
import org.springframework.cloud.context.config.annotation.RefreshScope;
import org.springframework.web.bind.annotation.GetMapping;
import org.springframework.web.bind.annotation.RestController;


@RestController
@RefreshScope
public class ConfigClientController
{

    @Value("${config.info}")
    private String configInfo;

    @GetMapping("/config/info")
    public String getConfigInfo() {

        return configInfo;
    }
}
RefreshScope 我们可以使用 cloud的原生注解,来实现动态查看配置刷新,
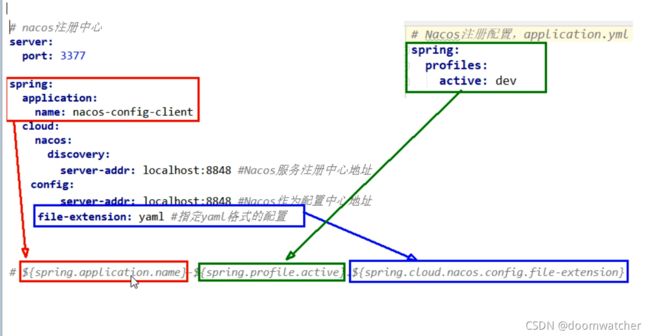
nacos 中的配置规则
nacos配置持久化
我们可以试验一下,配置都时候 nacos是自带了一个嵌入式数据库derby
我们这里可以修改设置,到自己的mysql上
先去nacos的文件夹中找到,nacos的sql的脚本

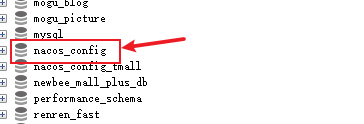
导入到mysql中 创建一个数据库 nacos_config

之后找到application文件
修改配置
spring.datasource.platform=mysql

db.num=1
db.url.0=jdbc:mysql://127.0.0.1:3306/nacos_config_tmall?characterEncoding=utf8&connectTimeout=1000&socketTimeout=3000&autoReconnect=true&serverTimezone=UTC
db.user=root
db.password=root
之后启动nacos ,就会看到全新的naocs 我们之后再创建的各种配置,就会保存在我们自己创建的数据库中
小结
使用过Eureka之后,使用nacos,感受到nacos是十分优秀的一款注册中心,我们可以快速启动,省去了很多的配置,这个技术简化了我们想要使用注册中心和动态配置查看链路需要的繁琐配置,


