基于 LNMP 快速简单搭建 wordpress 平台
目录
一、WordPress 简介
二、基础环境要求
三、安装 mysql 环境
1、安装mysql
2、启动mysql
3、获取默认密码
4、登录mysql5、修改密码
5、创建wordpress数据库并授权
四、安装 nginx 环境
1、更新yum
2、安装 nginx
3、添加配置文件
4、重新加载 nginx 配置
五、安装 php 环境
1、安装 php-fpm
2、启动 php-fpm
3、修改所属组
4、检测 php-fpm 端口
六、安装 wordpress
1、下载解压
2、设置 wordpress
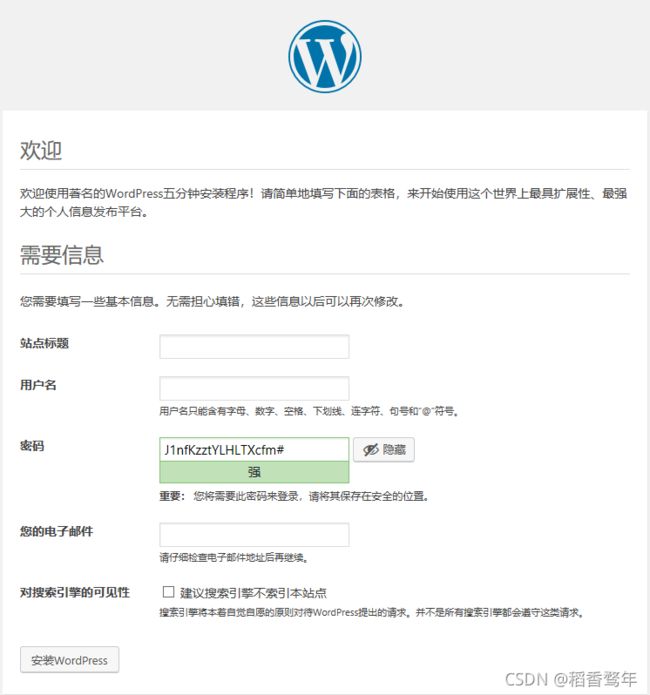
3、访问配置 Wordpress
4、使用默认模板的网站前端
一、WordPress 简介
WordPress是一种使用PHP语言开发的博客平台,用户可以在支持PHP和MySQL数据库的服务器上 架设属于自己的网站。也可以把 WordPress当作一个内容管理系统(CMS)来使用。WordPress是一 款个人博客系统,并逐步演化成一款内容管理系统软件,它是使用PHP语言和MySQL数据库开发的。用 户可以在支持 PHP 和 MySQL数据库的服务器上使用自己的博客。WordPress有许多第三方开发的免费 模板,安装方式简单易用。不过要做一个自己的模板,则需要你有一定的专业知识。比如你至少要懂的 标准通用标记语言下的一个应用HTML代码、CSS、PHP等相关知识。WordPress官方支持中文版,同 时有爱好者开发的第三方中文语言包,如wopus中文语言包。WordPress拥有成千上万个各式插件和不 计其数的主题模板样式。
二、基础环境要求
Mysql PHP nginx
三、安装 mysql 环境
1、安装mysql
[root@localhost ~]# wget -i -c http://dev.mysql.com/get/mysql57-community-release-el7-10.noarch.rpm
[root@localhost ~]# yum -y install mysql57-community-release-el7-10.noarch.rpm
[root@localhost ~]# yum -y install mysql-community-server
2、启动mysql
[root@localhost ~]# systemctl start mysqld3、获取默认密码
[root@localhost ~]# grep "password" /var/log/mysqld.log
2021-11-06T10:54:44.085231Z 1 [Note] A temporary password is generated for root@localhost: -BimmRixd9Lw
4、登录mysql5、修改密码
[root@localhost ~]# mysql -uroot -p'-BimmRixd9Lw'
mysql> alter user 'root'@'localhost' identified by 'Lile@5201314';
5、创建wordpress数据库并授权
mysql> create database wordpress;
Query OK, 1 row affected (0.00 sec)

mysql>  create user 'wordpress'@'localhost' identified by 'Qfedu.123com';
Query OK, 0 rows affected (0.00 sec)

mysql>  grant all privileges on wordpress.* to 'wordpress'@'localhost';
Query OK, 0 rows affected (0.00 sec)

mysql> flush privileges;
Query OK, 0 rows affected (0.00 sec)
四、安装 nginx 环境
1、更新yum
[root@localhost ~]# sudo yum install -y epel-release
[root@localhost ~]# yum update
2、安装 nginx
[root@localhost ~]# yum -y install nginx3、添加配置文件
[root@localhost ~]# vi /etc/nginx/conf.d/wordpress.conf
server {
listen 80;
server_name opswordpress.transspay.net;
root /wordpress;
location / {
index index.php index.html index.htm;
try_files $uri $uri/ /index.php index.php;
}
# pass the PHP scripts to FastCGI server listening on 127.0.0.1:9000
location ~ .php$ {
fastcgi_pass 127.0.0.1:9000;
fastcgi_index index.php;
fastcgi_param SCRIPT_FILENAME $document_root$fastcgi_script_name;
include fastcgi_params;
}
}
[root@localhost ~]# vi /etc/nginx/nginx.conf
4、重新加载 nginx 配置
[root@localhost ~]# systemctl restart nginx
五、安装 php 环境
1、安装 php-fpm
[root@localhost ~]# yum -y install php-fpm php-mysql2、启动 php-fpm
[root@localhost ~]# systemctl start php-fpm3、修改所属组
[root@localhost ~]# vi /etc/php-fpm.d/www.conf
; RPM: apache Choosed to be able to access some dir as httpd
user = nginx
; RPM: Keep a group allowed to write in log dir.
group = nginx

[root@localhost ~]# systemctl restart php-fpm
4、检测 php-fpm 端口
[root@localhost ~]# lsof -i:9000六、安装 wordpress
1、下载解压
wordpress下载地址:https://wordpress.org/news/2017/01/wordpress-4-7-2-security-release/
[root@localhost ~]# tar xf wordpress-4.7.2-zh_CN.tar.gz
[root@localhost ~]# mv wordpress /
[root@localhost ~]# cd /
[root@localhost /]# chmod -R 777 wordpress/
2、设置 wordpress
[root@localhost ~]# cp /wordpress/wp-config-sample.php /wordpress/wp-config.php
[root@localhost ~]# vim /wordpress/wp-config.php
// ** MySQL 设置 - 具体信息来自您正在使用的主机 ** //
/** WordPress数据库的名称 */
define('DB_NAME', 'wordpress');

/** MySQL数据库用户名 */
define('DB_USER', 'wordpress');

/** MySQL数据库密码 */
define('DB_PASSWORD', 'Qfedu.123com');

/** MySQL主机 */
define('DB_HOST', 'localhost');

/** 创建数据表时默认的文字编码 */
define('DB_CHARSET', 'utf8');
3、访问配置 Wordpress
4、使用默认模板的网站前端
注:在安装主题时,会需要你安装ftp,我们不需要安装,直接在wp-config.php配置文件里添加如 下几行即可
define("FS_METHOD","direct");
define("FS_CHMOD_DIR", 0777);
define("FS_CHMOD_FILE", 0777);
