seata TM源码分析
Seata 是阿里开源的分布式事务解决方案,致力于提供高性能和简单易用的分布式事务服务。Seata 将为用户提供了 AT、TCC、SAGA 和 XA 事务模式,为用户打造一站式的分布式解决方案,github地址:https://github.com/seata/seata。
seata 定义 3 个组件来协调分布式事务的处理过程:
Transaction Coordinator (TC):事务协调器,维护全局事务的运行状态,负责协调并驱动全局事务的提交或回滚。
Transaction Manager (TM):控制全局事务的边界,负责开启一个全局事务,并最终发起全局提交或全局回滚的决议。
Resource Manager (RM):控制分支事务,负责分支注册、状态汇报,并接收事务协调器的指令,驱动分支(本地)事务的提交和回滚。
下面就一起来看下TM模块的实现原理,TM模块是seata中全局事务发起者和掌控者,其核心逻辑有:业务逻辑切面代理:对全局事务注册/提交操作。启动netty客户端:会启动TM/RM客户端与TC通信。数据源切面代理:SQL解析、分支事务注册/提交、undolog保存、分支事务状态上报。Rpc代理:在RPC流程中传递seata上下文(xid等,非本文分析重点)。
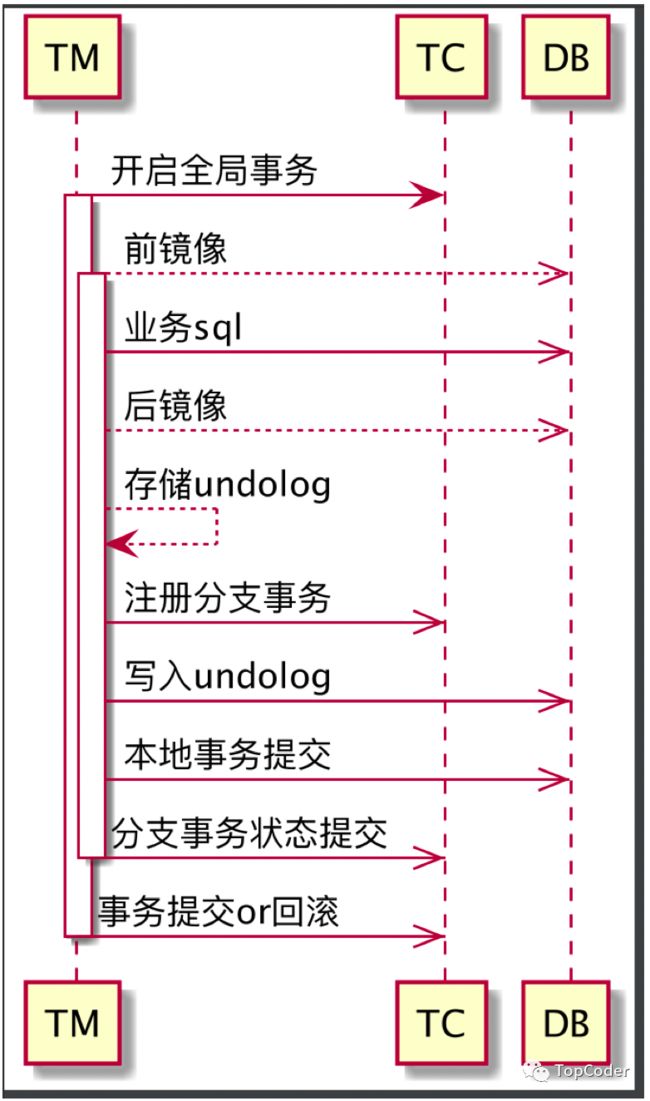
TM侧的大致执行流程如下所示,下面就按照上述的几个核心逻辑依次进行分析:
业务逻辑代理
TM中业务逻辑一般都是从注解 @GlobalTransactional 开始,比如seata-samples示例中BusinessService业务逻辑就是从该注解开始:
@GlobalTransactional(timeoutMills = 300000, name = "dubbo-demo-tx")
public void purchase(String userId, String commodityCode, int orderCount) {
    LOGGER.info("purchase begin ... xid: " + RootContext.getXID());
    storageService.deduct(commodityCode, orderCount);
    orderService.create(userId, commodityCode, orderCount);
    //throw new RuntimeException("xxx");
}
既然从注解@GlobalTransactional开始,肯定是在spring容器启动过程中针对该注解修饰的方法进行切面代理。
seata中有一个自动配置类SeataAutoConfiguration,其内部会创建bean对象GlobalTransactionScanner和SeataAutoDataSourceProxyCreator,二者都继承了类AbstractAutoProxyCreator(spring中类,该类通过BeanPostProcessor扩展的方式,使得bean在创建过程中完成被代理,回调方法wrapIfNecessary),前者就是针对业务逻辑代理,后者是针对sql操作代理。
spring启动流程中会回调GlobalTransactionScanner的方法wrapIfNecessary,该方法会对注解 @GlobalTransactional 和 @GlobalLock 修饰的方法做代理操作,对应的代理类为GlobalTransactionalInterceptor,源码如下:
//public class GlobalTransactionScanner extends AbstractAutoProxyCreator implements InitializingBean
@Override
protected Object wrapIfNecessary(Object bean, String beanName, Object cacheKey) {
    interceptor = null;
    //check TCC proxy
    if (TCCBeanParserUtils.isTccAutoProxy(bean, beanName, applicationContext)) {
        //TCC interceptor, proxy bean of sofa:reference/dubbo:reference, and LocalTCC
        interceptor = new TccActionInterceptor(TCCBeanParserUtils.getRemotingDesc(beanName));
        ConfigurationCache.addConfigListener(ConfigurationKeys.DISABLE_GLOBAL_TRANSACTION, (ConfigurationChangeListener)interceptor);
    } else {
        Class serviceInterface = SpringProxyUtils.findTargetClass(bean);
        Class[] interfacesIfJdk = SpringProxyUtils.findInterfaces(bean);

        // 只代理@GlobalTransactional 和 @GlobalLock修饰的逻辑
        if (!existsAnnotation(new Class[]{serviceInterface})
            && !existsAnnotation(interfacesIfJdk)) {
            return bean;
        }

        if (interceptor == null) {
            if (globalTransactionalInterceptor == null) {
                // AT模式的业务逻辑代理类 GlobalTransactionalInterceptor
                globalTransactionalInterceptor = new GlobalTransactionalInterceptor(failureHandlerHook);
                ConfigurationCache.addConfigListener(
                    ConfigurationKeys.DISABLE_GLOBAL_TRANSACTION, (ConfigurationChangeListener)globalTransactionalInterceptor);
            }
            interceptor = globalTransactionalInterceptor;
        }
    }
    // ...
}
AT模式的业务逻辑代理类 GlobalTransactionalInterceptor,其核心业务代理逻辑为(GlobalTransactional代理类型):初始化分布式事务所需资源、向TC发起开启全局分布式事务请求、开始执行业务逻辑、成功处理后进行全局事务的提交、异常时进行全局事务回滚,核心业务逻辑如下:
// GlobalTransactionalInterceptor#invoke -> TransactionalTemplate
public Object execute(TransactionalExecutor business) throws Throwable {
    // 1. Get transactionInfo
    TransactionInfo txInfo = business.getTransactionInfo();
    // 1.1 Get current transaction, if not null, the tx role is 'GlobalTransactionRole.Participant'.
    GlobalTransaction tx = GlobalTransactionContext.createNew();

    // 2. If the tx role is 'GlobalTransactionRole.Launcher', send the request of beginTransaction to TC,
    //    开启全局事务
    beginTransaction(txInfo, tx);

    try {
        // Do Your Business
        rs = business.execute();
    } catch (Throwable ex) {
        // 3. 事务回滚
        completeTransactionAfterThrowing(txInfo, tx, ex);
        throw ex;
    }

    // 4. 事务提交
    commitTransaction(tx);
    return rs;
既然知道了业务代理流程是如何实现的,接下来看下netty启动流程。
启动netty客户端
GlobalTransactionScanner实现了InitializingBean,其afterPropertiesSet方法中会执行netty客户端初始化工作,逻辑如下:
private void initClient() {
    //初始化TM
    TMClient.init(applicationId, txServiceGroup);
    ...
    //初始化RM
    RMClient.init(applicationId, txServiceGroup);
    ...
    // 注册Spring shutdown的回调,用来释放资源
    registerSpringShutdownHook();
 }
注意,TM侧为什么还会初始化RM呢,简单来讲可以理解TM是业务代理逻辑,主要实现了开启/提交全局分布式事务逻辑;TM是资源层代理逻辑,主要实现sql解析/分支事务注册上报等逻辑。一个服务中可能存在既开启了业务代理,也有对应的DB操作,因此是需要初始化RM的。
TM客户端类TmNettyRemotingClient,首先注册一些处理类,主要是针对TC返回结果的处理和心跳处理,代码如下:
private void registerProcessor() {
    // 1.registry TC response processor
    ClientOnResponseProcessor onResponseProcessor =
            new ClientOnResponseProcessor(mergeMsgMap, super.getFutures(), getTransactionMessageHandler());
    super.registerProcessor(MessageType.TYPE_SEATA_MERGE_RESULT, onResponseProcessor, null);
    super.registerProcessor(MessageType.TYPE_GLOBAL_BEGIN_RESULT, onResponseProcessor, null);
    super.registerProcessor(MessageType.TYPE_GLOBAL_COMMIT_RESULT, onResponseProcessor, null);
    super.registerProcessor(MessageType.TYPE_GLOBAL_REPORT_RESULT, onResponseProcessor, null);
    super.registerProcessor(MessageType.TYPE_GLOBAL_ROLLBACK_RESULT, onResponseProcessor, null);
    super.registerProcessor(MessageType.TYPE_GLOBAL_STATUS_RESULT, onResponseProcessor, null);
    super.registerProcessor(MessageType.TYPE_REG_CLT_RESULT, onResponseProcessor, null);
    // 2.registry heartbeat message processor
    ClientHeartbeatProcessor clientHeartbeatProcessor = new ClientHeartbeatProcessor();
    super.registerProcessor(MessageType.TYPE_HEARTBEAT_MSG, clientHeartbeatProcessor, null);
}
TmNettyRemotingClient的init主要是初始化一个定时任务,然后就启动netty client:
public void init() {
    // 定时重连任务
    timerExecutor.scheduleAtFixedRate(new Runnable() {
        @Override
        public void run() {
            clientChannelManager.reconnect(getTransactionServiceGroup());
        }
    }, SCHEDULE_DELAY_MILLS, SCHEDULE_INTERVAL_MILLS, TimeUnit.MILLISECONDS);

    // 请求future定时器
    super.init();
    // 标准的netty client初始化
    clientBootstrap.start();
}
启动netty client之后,TM和TC建立的连接channel会被添加到netty cilent管理中(Linux下底层基于epoll),当接收到TC响应结果或TC主动发送结果后,就会触发对应的处理器逻辑,也就是在方法registerProcessor中注册的各种处理器。
数据源切面代理
seata的数据源切面代理对应SeataAutoDataSourceProxyCreator类,其会初始化sql代理处理器为SeataAutoDataSourceProxyAdvice,如果是AT模式,会设置DataSourceProxy代理:
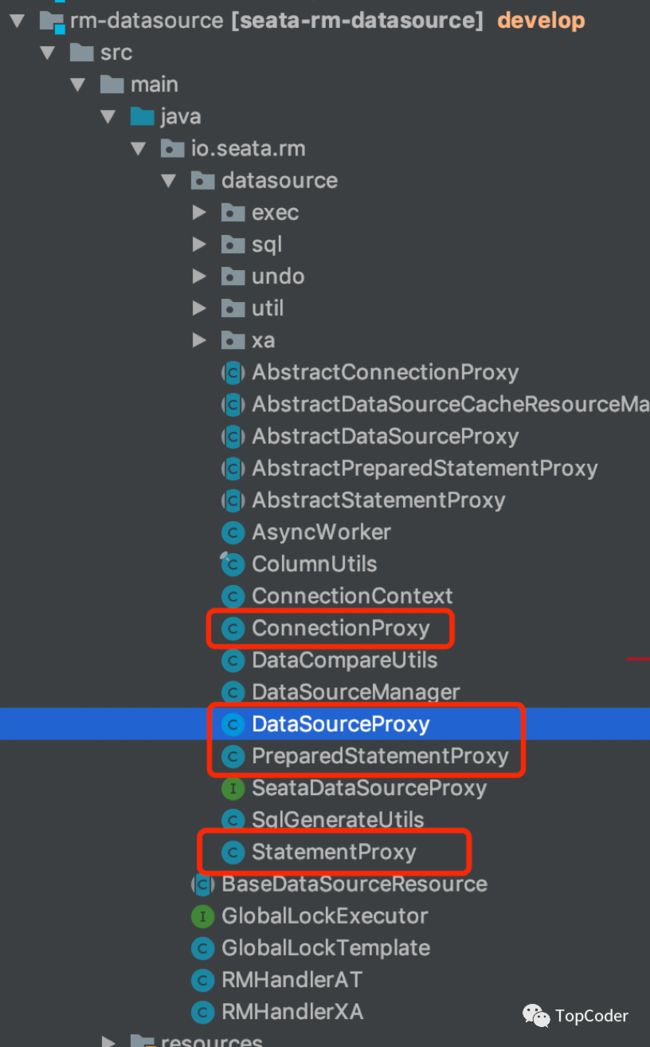
和DataSourceProxy相关的有多种类型的代理类,如下:
下面就以常见的update流程来分析下具体的sql代理执行流程,需要从类PreparedStatementProxy的方法execute开始,其最后会调用方法io.seata.rm.datasource.exec.ExecuteTemplate#execute():
public static  T execute(List sqlRecognizers,
                                                     StatementProxy statementProxy,
                                                     StatementCallback statementCallback,
                                                     Object... args) throws SQLException {
    SQLRecognizer sqlRecognizer = sqlRecognizers.get(0);
    switch (sqlRecognizer.getSQLType()) {
        case INSERT:
            executor = EnhancedServiceLoader.load(InsertExecutor.class, dbType,
                    new Class[]{StatementProxy.class, StatementCallback.class, SQLRecognizer.class},
                    new Object[]{statementProxy, statementCallback, sqlRecognizer});
            break;
        case UPDATE: // 更新操作
            executor = new UpdateExecutor<>(statementProxy, statementCallback, sqlRecognizer);
            break;
        case DELETE:
            executor = new DeleteExecutor<>(statementProxy, statementCallback, sqlRecognizer);
            break;
        case SELECT_FOR_UPDATE:
            executor = new SelectForUpdateExecutor<>(statementProxy, statementCallback, sqlRecognizer);
            break;
        default:
            executor = new PlainExecutor<>(statementProxy, statementCallback);
            break;
    }

    return executor.execute(args);
}
UpdateExecutor的处理逻辑,最后会走到方法io.seata.rm.datasource.exec.AbstractDMLBaseExecutor#executeAutoCommitTrue中,这里首先进行获取前镜像、执行业务sql、获取后镜像,构建undolog数据,然后进行分支事务注册,最后进行写入undolog和事务提交操作,最后上报分支事务状态。
protected T executeAutoCommitTrue(Object[] args) throws Throwable {
    ConnectionProxy connectionProxy = statementProxy.getConnectionProxy();
    try {
        connectionProxy.setAutoCommit(false);
        return new LockRetryPolicy(connectionProxy).execute(() -> {
            // 前处理
            T result = executeAutoCommitFalse(args);
            // 后处理
            connectionProxy.commit();
            return result;
        });
    } catch (Exception e) {
        if (!LockRetryPolicy.isLockRetryPolicyBranchRollbackOnConflict()) {
            connectionProxy.getTargetConnection().rollback();
        }
        throw e;
    } finally {
        connectionProxy.getContext().reset();
        connectionProxy.setAutoCommit(true);
    }
}

protected T executeAutoCommitFalse(Object[] args) throws Exception {
       // 获取前镜像、执行业务sql、获取后镜像
    TableRecords beforeImage = beforeImage();
    T result = statementCallback.execute(statementProxy.getTargetStatement(), args);
    TableRecords afterImage = afterImage(beforeImage);
    prepareUndoLog(beforeImage, afterImage);
    return result;
}

// connectionProxy.commit() --> 最后的处理逻辑
private void processGlobalTransactionCommit() throws SQLException {
    register(); // 分支事务注册

    try {
        // undo log 写入 & 事务提交
        UndoLogManagerFactory.getUndoLogManager(this.getDbType()).flushUndoLogs(this);
        targetConnection.commit();
    } catch (Throwable ex) {
        report(false); // 上报事务状态
        throw new SQLException(ex);
    }
    if (IS_REPORT_SUCCESS_ENABLE) {
        report(true); // 上报事务状态
    }
    context.reset();
}
注意:分支事务的注册涉及到携带lockKeys,在TC会针对lockKeys进行全局加锁操作,这些锁资源在全局事务提交或者回滚时候才会清除,这样可以在当前全局事务还未执行完成时阻塞另一个分布式事务针对同样的锁资源的加锁操作。针对update操作,使用的是后镜像涉及到的所有记录的主键id信息,lockKeys的构建在方法prepareUndoLog中完成。至此sql代理的核心流程已分析完毕。
seata这里使用上可能存在这样的问题,比如服务A使用seata方式更新DB,另一个服务B没有通过seata方式而是直接更新DB,这种是不建议的方式,此时服务B可通过加
@GlobalLock方式来进行更新操作。该问题就是seata这种在业务层实现分布式事务存在的潜在问题,直接基于DB实现的分布式事务就不存在该问题,比如XA。
推荐阅读
seata TC 请求处理流程
seata TC 模块分析
seata TC启动流程分析
seata AT模式流程
seata 事务提交流程
seata 是什么


