ML-Agents案例之推箱子游戏
本案例源自ML-Agents官方的示例,Github地址:https://github.com/Unity-Technologies/ml-agents
本文基于我前面发的两篇文章,需要对ML-Agents有一定的了解,详情请见:Unity强化学习之ML-Agents的使用、ML-Agents命令及配置大全。
参考资料:ML-Agents(八)PushBlock、训练ML-Agents玩躲避球、ML-Agents 2.0:合作行为训练
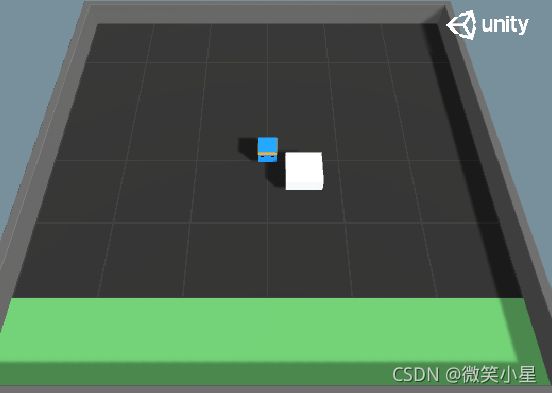
游戏目标:智能体把白色的方块推到指定的绿色区域为游戏胜利。
推箱子游戏分为单人模式和多人模式。
单人模式
脚本代码
由于推箱子在环境上的设定较简单,我们可以直接来查看挂载在Agent本体的脚本有什么。
首先是正常的Behavior Parameters,Decision Requester,Model Overrider三件套,Behavior Parameters的观测维度直接设定为0,这是由于我们采用了Ray Perception Sensor3D脚本来采集观测数据。输出的空间是离散的,只有一个输出,这就表示移动和旋转共用一个输出且移动方向固定。
射线感知器Ray Perception Sensor Component 3D组件

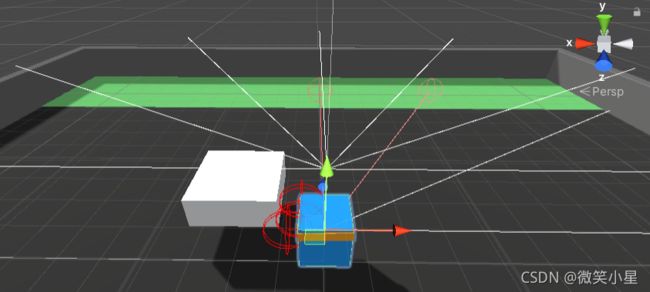
可以看到一个智能体上挂了两个Ray Perception Sensor Component 3D组件,第一个在脚下,主要用来探测方块和目标点,第二个在头顶,主要是为了越过方块探测到方块后有没有墙体。两个传感器的参数只在两个offset上有差异。
- Sensor Name:该Sensor的名字,类似于ID。
- Detectable Tags:设置射线能检测到物体的Tag集合。这里设置了3个Tag,分别代表了场景中的目标小白块、目标区域和墙体。
- Rays Per Direction:每个方向射线的条数。智能体正前方固定有一条射线,这里设置为3表示左右各3条,加上中间一条一共七条。
- Max Ray Degrees:射线覆盖的角度最大范围。90指的是左右两边各90,一共覆盖180度。
- Sphere Cast Radius:设置投射出去的碰撞球体的半径。也指射线的粗细,设为0代表一条线。
- Ray Length:设置射线投射的最远距离。
- Ray Layer Mask:设置射线可以检测到的Layer。
- Observation Stacks:堆叠之前观察的结果的数量,若设置为1则表示不堆叠以前的观察。
- Start Vertical Offset:调整射线发出的高度。
- End Vertical Offset:设置射线尾部的高度。这两个offset一起调整可以达到任意从上往下或从下往上的射线。
- Ray Hit Color:射线发生碰撞的颜色。
- Ray Miss Color:射线没有发生碰撞的颜色。
这里可以计算输维度了,我们有两个传感器,每个传感器七条射线,每条射线检测三个标签(one-hot向量表示),再加上射线自带的两个维度(碰撞距离的标准化和碰撞与否),在此基础上,叠加3次的观察信息就是3 * 2 * 7 * (2 + 3) = 210个观察维度。
把输入提交给智能体的方法有三种,这里用了最难的一种,也就是继承了一个ISensor的接口,其中的Write方法被用于实际生成观察。相机传感器,渲染贴图传感器,射线传感器,棋盘传感器,网格传感器都继承了这个接口。
详细内容查看文档:https://github.com/Unity-Technologies/ml-agents/blob/main/docs/Learning-Environment-Design-Agents.md
接下来看看主脚本Push Agent Basic:
先看看初始化时做了什么:
void Awake()
{
    // 找到挂载训练参数的脚本
    m_PushBlockSettings = FindObjectOfType();
}

public override void Initialize()
{
    goalDetect = block.GetComponent();
    goalDetect.agent = this;

    m_AgentRb = GetComponent();
    m_BlockRb = block.GetComponent();
    // 获取碰撞器的世界空间边界体积(只读)。
    areaBounds = ground.GetComponent().bounds;
    // 获取地面渲染器,便于更换材质
    m_GroundRenderer = ground.GetComponent();
    // 初始材质
    m_GroundMaterial = m_GroundRenderer.material;
	// 获取配置文件中的参数
    m_ResetParams = Academy.Instance.EnvironmentParameters;
	//设置参数
    SetResetParameters();
}
void SetResetParameters()
{
    // 设置方块动摩擦和静摩擦系数
    SetGroundMaterialFriction();
    // 设置方块的大小,以及空气阻力
    SetBlockProperties();
}

public void SetGroundMaterialFriction()
{
    var groundCollider = ground.GetComponent();
    groundCollider.material.dynamicFriction = m_ResetParams.GetWithDefault("dynamic_friction", 0);
    groundCollider.material.staticFriction = m_ResetParams.GetWithDefault("static_friction", 0);
}

public void SetBlockProperties()
{
    var scale = m_ResetParams.GetWithDefault("block_scale", 2);
    //Set the scale of the block
    m_BlockRb.transform.localScale = new Vector3(scale, 0.75f, scale);
    // Set the drag of the block
    m_BlockRb.drag = m_ResetParams.GetWithDefault("block_drag", 0.5f);
}
最为关键的OnActionReceived函数:
public void MoveAgent(ActionSegment act)
{
    var dirToGo = Vector3.zero;
    var rotateDir = Vector3.zero;
    // 获取一个离散输出,范围是0~6
    var action = act[0];
	// 根据离散的输出判断六种运动可能分别是前后左右移动和左右旋转,0是什么都不做。
    switch (action)
    {
        case 1:
            dirToGo = transform.forward * 1f;
            break;
        case 2:
            dirToGo = transform.forward * -1f;
            break;
        case 3:
            rotateDir = transform.up * 1f;
            break;
        case 4:
            rotateDir = transform.up * -1f;
            break;
        case 5:
            dirToGo = transform.right * -0.75f;
            break;
        case 6:
            dirToGo = transform.right * 0.75f;
            break;
    }
    transform.Rotate(rotateDir, Time.fixedDeltaTime * 200f);
    // 注意这里要对刚体施加力的方式让其前进,不能直接改变其位置,否则不能达到一个智能体推不动大方块的效果
    m_AgentRb.AddForce(dirToGo * m_PushBlockSettings.agentRunSpeed,
                       ForceMode.VelocityChange);
}

// 每个step都调用的函数,每次都扣除微量分数,这就鼓励智能体完成得越快越好
public override void OnActionReceived(ActionBuffers actionBuffers)

{
    MoveAgent(actionBuffers.DiscreteActions);
    AddReward(-1f / MaxStep);
}
Heuristic方法,可以由玩家手动控制智能体:
public override void Heuristic(in ActionBuffers actionsOut)
{
    var discreteActionsOut = actionsOut.DiscreteActions;
    if (Input.GetKey(KeyCode.D))
    {
        discreteActionsOut[0] = 3;
    }
    else if (Input.GetKey(KeyCode.W))
    {
        discreteActionsOut[0] = 1;
    }
    else if (Input.GetKey(KeyCode.A))
    {
        discreteActionsOut[0] = 4;
    }
    else if (Input.GetKey(KeyCode.S))
    {
        discreteActionsOut[0] = 2;
    }
}
每个episode开始时调用的OnEpisodeBegin方法:
public override void OnEpisodeBegin()
{
    // 场地四个角度任意旋转
    var rotation = Random.Range(0, 4);
    var rotationAngle = rotation * 90f;
    area.transform.Rotate(new Vector3(0f, rotationAngle, 0f));
	// 重置方块的参数,速度和角速度归零,位置随机
    ResetBlock();
    // 重置智能体参数,速度和角速度归零,位置随机
    transform.position = GetRandomSpawnPos();
    m_AgentRb.velocity = Vector3.zero;
    m_AgentRb.angularVelocity = Vector3.zero;
	// 设置方块动摩擦和静摩擦系数,方块大小,空气阻力
    SetResetParameters();
}
void ResetBlock()
{
    block.transform.position = GetRandomSpawnPos();
    m_BlockRb.velocity = Vector3.zero;
    m_BlockRb.angularVelocity = Vector3.zero;
}

public Vector3 GetRandomSpawnPos()
{
    var foundNewSpawnLocation = false;
    var randomSpawnPos = Vector3.zero;
    while (foundNewSpawnLocation == false)
    {
        var randomPosX = Random.Range(-areaBounds.extents.x * m_PushBlockSettings.spawnAreaMarginMultiplier,
                                      areaBounds.extents.x * m_PushBlockSettings.spawnAreaMarginMultiplier);

        var randomPosZ = Random.Range(-areaBounds.extents.z * m_PushBlockSettings.spawnAreaMarginMultiplier,
                                      areaBounds.extents.z * m_PushBlockSettings.spawnAreaMarginMultiplier);
        randomSpawnPos = ground.transform.position + new Vector3(randomPosX, 1f, randomPosZ);
        // checkBox检查生成的地方是否与其他碰撞体碰撞,第一个参数是中心,第二个是cube范围半径
        if (Physics.CheckBox(randomSpawnPos, new Vector3(2.5f, 0.01f, 2.5f)) == false)
        {
            foundNewSpawnLocation = true;
        }
    }
    return randomSpawnPos;
}
最后就是看看挂载在方块上检测碰撞的脚本了:
public class GoalDetect : MonoBehaviour
{
    [HideInInspector]
    public PushAgentBasic agent;
    void OnCollisionEnter(Collision col)
    {
        // 调用agent中的函数
        if (col.gameObject.CompareTag("goal"))
        {
            agent.ScoredAGoal();
        }
    }
}
在主脚本Push Agent Basic中有:
public void ScoredAGoal()
{
    // 方块到达指定区域加5分
    AddReward(5f);
    // 结束本轮
    EndEpisode();
    // 改变材质
    StartCoroutine(GoalScoredSwapGroundMaterial(m_PushBlockSettings.goalScoredMaterial, 0.5f));
}
配置文件
PPO算法:
behaviors:
  PushBlock:
    trainer_type: ppo
    hyperparameters:
      batch_size: 128
      buffer_size: 2048
      learning_rate: 0.0003
      beta: 0.01
      epsilon: 0.2
      lambd: 0.95
      num_epoch: 3
      learning_rate_schedule: linear
    network_settings:
      normalize: false
      hidden_units: 256
      num_layers: 2
      vis_encode_type: simple
    reward_signals:
      extrinsic:
        gamma: 0.99
        strength: 1.0
    keep_checkpoints: 5
    max_steps: 2000000
    time_horizon: 64
    summary_freq: 60000
SAC算法:
behaviors:
  PushBlock:
    trainer_type: sac
    hyperparameters:
      learning_rate: 0.0003
      learning_rate_schedule: constant
      batch_size: 128
      buffer_size: 50000
      buffer_init_steps: 0
      tau: 0.005
      steps_per_update: 10.0
      save_replay_buffer: false
      init_entcoef: 0.05
      reward_signal_steps_per_update: 10.0
    network_settings:
      normalize: false
      hidden_units: 256
      num_layers: 2
      vis_encode_type: simple
    reward_signals:
      extrinsic:
        gamma: 0.99
        strength: 1.0
    keep_checkpoints: 5
    max_steps: 2000000
    time_horizon: 64
    summary_freq: 100000
多人模式
接下来就是重头戏多人模式了:

这个模式拥有三个智能体,六个大小不一的方块随机放置在不靠近墙体边缘的地方,小方块一个人能推动,中等方块需要两个人才能推动,大的方块需要三个人才能推动,推的方块越大,奖励越高。如何把所有的方块都推到指定目标,并且用时最短是我们追求的目标。
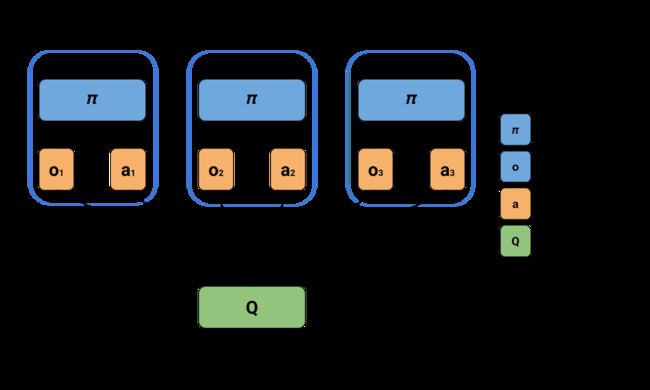
由于拥有多个智能体,所有团队协作是我们需要考虑的重要因素之一,因此单智能体算法已经满足不了我们的需求了,这里ML-Agents官方示例使用了一种多智能体算法MA-POCA,这也是ML-Agents目前新推出的唯一一种多智能体算法。在版本16之后,我们可以定义具有共同目标的多智能体了,MA-POCA是一个多智能体训练器,是所有智能体的“教练”。教练向整个团队发放奖励,智能体们也可以学习如何更好为共同目标做出贡献,每个智能体可以获得个人的reward,这样它们可以很好地保持积极性,并帮助彼此实现目标。即使有个智能体死亡(被移除),也依然可以采集信息,理解它们的行为是否可以有助于获得胜利,把群体放在第一位,能够通过自我牺牲来获取游戏的胜利。
这种新算法采用了集中式学习与分散式执行。一个中心裁判负责评估所有智能体的状态,进而对其表现进行打分,而多个分散的执行程序(每个智能体一个)负责控制智能体。如此一来,每个智能体可根据自己的感知进行决策,同时评估其行为在整个群体中的作用。下图展示了MA-POCA的集中式学习和分散式执行。
MA-POCA算法的一个新颖之处在于,它使用了一种称为attention networks(注意力网络)的特殊神经网络结构,可以处理不定量输入。这意味着裁判可以评估任意数量的智能体,而MA-POCA也因此特别适用于游戏中的合作行为。智能体可在任何时候加入或退出小组——类似于游戏角色在团战中的复活与死亡。MA-POCA的设计是为了让智能体能够做出利他性决定,让团队利益最大化。这种利他行为很难通过人工编程实现,但可在其他智能体为团队做贡献的先例中学习。最后,大多数多智能体强化学习算法默认让所有智能体在同一时间点选择下一个行动,但在真实游戏中,多智能体同时决策很有可能会产生掉帧。这也是为什么MA-POCA不会采取这种方法,而是支持异步的智能体行为决策。
MA-POCA 使用与 PPO 相同的配置,并且没有额外的 POCA 特定参数。
对比单人模式的推箱子,多人模式的机制并没有太大的改变。
脚本代码
Grid Sensor
多人模式的脚本甚至可以说变得更为简单了,Behavior Parameter的设置和单智能体一致。在获取观测值的方面,没有采用单智能体的射线传感器,而是采用了Grid Sensor(网格传感器),这个传感器并没有直接挂在智能体下,而是挂在智能体的子物体(空物体)下,这是为了使得这个传感器的中心不要放在智能体上,这样就能训练出一个只能探测到180度范围的传感器。现在我们来看看Grid Sensor。

Grid Sensor使用一组网格形状的框查询作为观察。

基于网格的观测结合了视觉观测中二维空间表示的优势和RayCast 观测中定义可检测对象的灵活性。传感器使用一组网格形状的框查询,并提供围绕智能体的自上而下的 2D 视图。
在观察过程中,传感器检测每个单元格中可检测物体的存在,并将其编码为 one-hot 表示。从每个单元收集的信息形成一个 3D 张量观察,并将像视觉观察一样馈入代理策略的卷积神经网络 (CNN)。对应标签的物体只要于网格发生碰撞,这个网格就会打上相应的标签。
因此,在平面2D的观察下,输入的维度就是网格的数量乘以标签数,也就是20 * 20 * 6 = 2400维的输入。
其中的参数属性如下:
- Cell Scale表示网格中每个单元格的比例。
- Grid Size表示每一侧的单元格数。
- Agent Game Object表示搭载该组件的智能体物体。便于把自己从检测范围排除。
- Rotate With Agent决定了网格是否随着智能体而转动,在相对变化较小的环境可以固定网格达到更好的训练效果。
- Detectable Tags是一个标签的列表,可以填上我们需要检测到的物体的标签。
- Collider Mask决定了检测碰撞的层级(layer),决定了哪些层的物体是能够检测的。
- Compression Type:压缩类型,可以选择PNG或者不压缩。
- Initial Collider Buffer Size在每个单元的非分配物理调用中使用的碰撞器经验池的初始大小。
- Max Collider Buffer Size在每个单元的非分配物理调用中使用的碰撞器经验池的最大大小。
- Show Gizmos可以可视化传感器的具体效果。
- Gizmo Y offset:Gizmo在Y轴上的偏移量。
- Debug Colors:检测到物体后响应的格子标注的颜色。
可检测的标签的数量和网格的数量要尽可能小,以减少数据量,这需要在观察精度和训练速度直接权衡。
注意:这个组件只使用3D环境,2D环境下无法运行。
智能体脚本
初始化:
void Awake()
{
    m_PushBlockSettings = FindObjectOfType();
}

public override void Initialize()
{
    m_AgentRb = GetComponent();
}
动作执行(和单智能体一样):
public void MoveAgent(ActionSegment act)
{
    var dirToGo = Vector3.zero;
    var rotateDir = Vector3.zero;

    var action = act[0];

    switch (action)
    {
        case 1:
            dirToGo = transform.forward * 1f;
            break;
        case 2:
            dirToGo = transform.forward * -1f;
            break;
        case 3:
            rotateDir = transform.up * 1f;
            break;
        case 4:
            rotateDir = transform.up * -1f;
            break;
        case 5:
            dirToGo = transform.right * -0.75f;
            break;
        case 6:
            dirToGo = transform.right * 0.75f;
            break;
    }
    transform.Rotate(rotateDir, Time.fixedDeltaTime * 200f);
    m_AgentRb.AddForce(dirToGo * m_PushBlockSettings.agentRunSpeed,
                       ForceMode.VelocityChange);
}

public override void OnActionReceived(ActionBuffers actionBuffers)
{
    MoveAgent(actionBuffers.DiscreteActions);
}
人工操作(和单智能体一样):
public override void Heuristic(in ActionBuffers actionsOut)
{
    var discreteActionsOut = actionsOut.DiscreteActions;
    if (Input.GetKey(KeyCode.D))
    {
        discreteActionsOut[0] = 3;
    }
    else if (Input.GetKey(KeyCode.W))
    {
        discreteActionsOut[0] = 1;
    }
    else if (Input.GetKey(KeyCode.A))
    {
        discreteActionsOut[0] = 4;
    }
    else if (Input.GetKey(KeyCode.S))
    {
        discreteActionsOut[0] = 2;
    }
}
挂载在物块上的脚本:
public class GoalDetectTrigger : MonoBehaviour
{

    [Header("Trigger Collider Tag To Detect")]
    public string tagToDetect = "goal"; //collider tag to detect

    [Header("Goal Value")]
    public float GoalValue = 1;

    private Collider m_col;
    // 继承了一个泛型事件
    [System.Serializable]
    public class TriggerEvent : UnityEvent
    {
    }

    // 实例化了三个事件,订阅事件要到Unity编辑器中
    [Header("Trigger Callbacks")]
    public TriggerEvent onTriggerEnterEvent = new TriggerEvent();
    public TriggerEvent onTriggerStayEvent = new TriggerEvent();
    public TriggerEvent onTriggerExitEvent = new TriggerEvent();

    private void OnTriggerEnter(Collider col)
    {
        if (col.CompareTag(tagToDetect))
        {
            onTriggerEnterEvent.Invoke(m_col, GoalValue);
        }
    }

    private void OnTriggerStay(Collider col)
    {
        if (col.CompareTag(tagToDetect))
        {
            onTriggerStayEvent.Invoke(m_col, GoalValue);
        }
    }

    private void OnTriggerExit(Collider col)
    {
        if (col.CompareTag(tagToDetect))
        {
            onTriggerExitEvent.Invoke(m_col, GoalValue);
        }
    }
    // Start is called before the first frame update
    void Awake()
    {
        m_col = GetComponent();
    }
}
事件是一种方便调用其他脚本函数的方法,订阅事件:
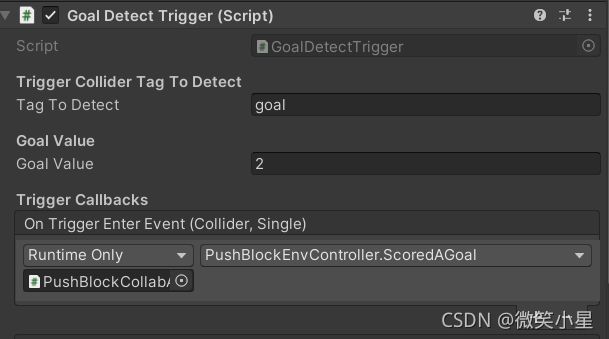
订阅事件对应的方法,位于环境脚本中(下面会讲):
public void ScoredAGoal(Collider col, float score)
{
    print($"Scored {score} on {gameObject.name}");

    // 场上剩余物体计数
    m_NumberOfRemainingBlocks--;

    // 是否结束游戏
    bool done = m_NumberOfRemainingBlocks == 0;

    // 把物体暂时从场景中删除
    col.gameObject.SetActive(false);

    // 添加集体奖励
    m_AgentGroup.AddGroupReward(score);

    // Swap ground material for a bit to indicate we scored.
    StartCoroutine(GoalScoredSwapGroundMaterial(m_PushBlockSettings.goalScoredMaterial, 0.5f));

    if (done)
    {
        //重新开始一轮游戏
        m_AgentGroup.EndGroupEpisode();
        ResetScene();
    }
}
注意了,多智能体的不同点显现出来了,添加奖励使用的是AddGroupReward函数添加的是集体奖励
环境控制脚本
这个脚本挂载在空物体上运行,智能体作为子物体。
using System.Collections;
using System.Collections.Generic;
using Unity.MLAgents;
using UnityEngine;

public class PushBlockEnvController : MonoBehaviour
{
    // 智能体信息类
    [System.Serializable]
    public class PlayerInfo
    {
        public PushAgentCollab Agent;
        [HideInInspector]
        public Vector3 StartingPos;
        [HideInInspector]
        public Quaternion StartingRot;
        [HideInInspector]
        public Rigidbody Rb;
    }
	// 物块信息类
    [System.Serializable]
    public class BlockInfo
    {
        public Transform T;
        [HideInInspector]
        public Vector3 StartingPos;
        [HideInInspector]
        public Quaternion StartingRot;
        [HideInInspector]
        public Rigidbody Rb;
    }

    [Header("Max Environment Steps")] public int MaxEnvironmentSteps = 25000;

	// 区域边界
    [HideInInspector]
    public Bounds areaBounds;

    public GameObject ground;

    public GameObject area;

    Material m_GroundMaterial; //cached on Awake()
    Renderer m_GroundRenderer;

    // 智能体信息的列表
    public List AgentsList = new List();
    // 物块信息的列表
    public List BlocksList = new List();

    public bool UseRandomAgentRotation = true;
    public bool UseRandomAgentPosition = true;
    public bool UseRandomBlockRotation = true;
    public bool UseRandomBlockPosition = true;
    private PushBlockSettings m_PushBlockSettings;

    private int m_NumberOfRemainingBlocks;
	// 注意了,这是一个多智能体类
    private SimpleMultiAgentGroup m_AgentGroup;
    private int m_ResetTimer;

    void Start()
    {

        // Get the ground's bounds
        areaBounds = ground.GetComponent().bounds;
        // Get the ground renderer so we can change the material when a goal is scored
        m_GroundRenderer = ground.GetComponent();
        // Starting material
        m_GroundMaterial = m_GroundRenderer.material;
        m_PushBlockSettings = FindObjectOfType();
        // Initialize Blocks
        foreach (var item in BlocksList)
        {
            item.StartingPos = item.T.transform.position;
            item.StartingRot = item.T.transform.rotation;
            item.Rb = item.T.GetComponent();
        }
        // Initialize TeamManager
        m_AgentGroup = new SimpleMultiAgentGroup();
        foreach (var item in AgentsList)
        {
            item.StartingPos = item.Agent.transform.position;
            item.StartingRot = item.Agent.transform.rotation;
            item.Rb = item.Agent.GetComponent();
            // 把单智能体都添加到多智能体中
            m_AgentGroup.RegisterAgent(item.Agent);
        }
        ResetScene();
    }

    void FixedUpdate()
    {
        m_ResetTimer += 1;
        // 到时间了并到达最大训练步数就结束训练
        if (m_ResetTimer >= MaxEnvironmentSteps && MaxEnvironmentSteps > 0)
        {
            m_AgentGroup.GroupEpisodeInterrupted();
            ResetScene();
        }

        // 存在惩罚
        m_AgentGroup.AddGroupReward(-0.5f / MaxEnvironmentSteps);
    }

    //返回在场地内没物体的位置,同单智能体
    public Vector3 GetRandomSpawnPos()
    {
        var foundNewSpawnLocation = false;
        var randomSpawnPos = Vector3.zero;
        while (foundNewSpawnLocation == false)
        {
            var randomPosX = Random.Range(-areaBounds.extents.x * m_PushBlockSettings.spawnAreaMarginMultiplier,
                areaBounds.extents.x * m_PushBlockSettings.spawnAreaMarginMultiplier);

            var randomPosZ = Random.Range(-areaBounds.extents.z * m_PushBlockSettings.spawnAreaMarginMultiplier,
                areaBounds.extents.z * m_PushBlockSettings.spawnAreaMarginMultiplier);
            randomSpawnPos = ground.transform.position + new Vector3(randomPosX, 1f, randomPosZ);
            if (Physics.CheckBox(randomSpawnPos, new Vector3(1.5f, 0.01f, 1.5f)) == false)
            {
                foundNewSpawnLocation = true;
            }
        }
        return randomSpawnPos;
    }

    // 重置物块
    void ResetBlock(BlockInfo block)
    {
        block.T.position = GetRandomSpawnPos();
        block.Rb.velocity = Vector3.zero;
        block.Rb.angularVelocity = Vector3.zero;
    }

    // 携程,任务完成时短暂切换地面材质
    IEnumerator GoalScoredSwapGroundMaterial(Material mat, float time)
    {
        m_GroundRenderer.material = mat;
        yield return new WaitForSeconds(time); // Wait for 2 sec
        m_GroundRenderer.material = m_GroundMaterial;
    }

    // 当物块触碰到目标时,被物块脚本中的事件调用,上面已经解释过
    public void ScoredAGoal(Collider col, float score)
    {
        print($"Scored {score} on {gameObject.name}");
        m_NumberOfRemainingBlocks--;
        bool done = m_NumberOfRemainingBlocks == 0;
        col.gameObject.SetActive(false);
        m_AgentGroup.AddGroupReward(score);
        StartCoroutine(GoalScoredSwapGroundMaterial(m_PushBlockSettings.goalScoredMaterial, 0.5f));
        if (done)
        {
            m_AgentGroup.EndGroupEpisode();
            ResetScene();
        }
    }
	// 返回任意的旋转四元数
    Quaternion GetRandomRot()
    {
        return Quaternion.Euler(0, Random.Range(0.0f, 360.0f), 0);
    }

    // 重置场景
    public void ResetScene()
    {
        m_ResetTimer = 0;

        // 场景四个角度任意旋转
        var rotation = Random.Range(0, 4);
        var rotationAngle = rotation * 90f;
        area.transform.Rotate(new Vector3(0f, rotationAngle, 0f));

        // 重置智能体们
        foreach (var item in AgentsList)
        {
            var pos = UseRandomAgentPosition ? GetRandomSpawnPos() : item.StartingPos;
            var rot = UseRandomAgentRotation ? GetRandomRot() : item.StartingRot;

            item.Agent.transform.SetPositionAndRotation(pos, rot);
            item.Rb.velocity = Vector3.zero;
            item.Rb.angularVelocity = Vector3.zero;
        }

        // 重置物块们
        foreach (var item in BlocksList)
        {
            var pos = UseRandomBlockPosition ? GetRandomSpawnPos() : item.StartingPos;
            var rot = UseRandomBlockRotation ? GetRandomRot() : item.StartingRot;

            item.T.transform.SetPositionAndRotation(pos, rot);
            item.Rb.velocity = Vector3.zero;
            item.Rb.angularVelocity = Vector3.zero;
            item.T.gameObject.SetActive(true);
        }

        // 重置物块计数
        m_NumberOfRemainingBlocks = BlocksList.Count;
    }
}
多智能体训练注意事项
ML-Agents 中的协作行为可以通过实例化来启用SimpleMultiAgentGroup,通常在环境控制器或类似脚本中,并使用该RegisterAgent方法向其中添加智能体。请注意,添加到同一个的所有智能体SimpleMultiAgentGroup 必须在Behavior Parameters中具有相同的Behavior Name和参数。使用SimpleMultiAgentGroup使组内的智能体能够学习实现共同目标(最大化团体奖励),即使一个或多个组成员在episode结束之前被移除,也同样可以添加团体奖励,可以使用AddGroupReward(),`SetGroupReward(),EndGroupEpisode(),和 GroupEpisodeInterrupted()方法。
这种多智能体的用法要与MA-POCA算法一起使用。
- 一个智能体一次只能注册到一个 MultiAgentGroup。如果要将智能体从一个组重新分配到另一个组,则必须先将其从当前组中取消注册。
- 不支持同一组中具有不同行为名称的智能体。
- 组内的智能体应始终将
Max Steps智能体脚本中的参数设置为 0。通过使用GroupEpisodeInterrupted() 结束整个组的episode。 EndGroupEpisode并GroupEpisodeInterrupted在游戏中做同样的工作,但对训练的影响略有不同。如果该episode已完成,您将需要使用EndGroupEpisode。但是如果episode还没有结束但它已经运行了足够多的步数,即达到最大步数,会调用GroupEpisodeInterrupted.- 如果智能体提前完成,例如已完成的任务/在游戏中被移除/被杀死,请不要呼叫
EndEpisode()代理。应该禁用智能体并在下一个episode开始时重新启用它,或者完全销毁智能体。这是因为调用EndEpisode()会调用OnEpisodeBegin(),这将立即重置智能体。虽然可以通过EndEpisode()这种方式调用,但不推荐。 - 如果需要重新启用在场景中禁用的智能体,则必须将其重新注册到 MultiAgentGroup。
- 群体奖励旨在加强智能体按照群体而非个人的最佳利益行事,并且在训练期间的处理方式与个体智能体奖励不同。所以调用
AddGroupReward()不等同于对组中的每个智能体调用agent.AddReward()。 - 我们仍然可以使用Agent.AddReward()对在一个组中的智能体添加奖励,这个作为个人的奖励,智能体激活时才能收到。
- 使用多智能体的环境可以使用 PPO 或 SAC 进行训练,但智能体将无法在停用/删除后从组奖励中学习,也不会有合作的表现。
配置文件
在配置上,MA-POCA算法和PPO算法的配置参数一致。
behaviors:
  PushBlockCollab:
    trainer_type: poca
    hyperparameters:
      batch_size: 1024
      buffer_size: 10240
      learning_rate: 0.0003
      beta: 0.01
      epsilon: 0.2
      lambd: 0.95
      num_epoch: 3
      learning_rate_schedule: constant
    network_settings:
      normalize: false
      hidden_units: 256
      num_layers: 2
      vis_encode_type: simple
    reward_signals:
      extrinsic:
        gamma: 0.99
        strength: 1.0
    keep_checkpoints: 5
    max_steps: 15000000
    time_horizon: 64
    summary_freq: 60000
个人改进想法
- 物块上可以加上一个物理材质,静摩擦力设置到合理水平,防止一个人就能稍微推动大的方块。
- 可以加上个人奖励,方块到达终点时出力最多的加更多的分数。
- 把稀疏奖励变得稠密,把方块和终点的距离作为奖励之一,同时只有推动方块的人才能获得个人奖励。
- 网格感知器有不合理的地方,第一是穿墙,能够无障碍物观察,第二是现在不能观察到背后的信息,建议改为在智能体近距离的周围采用网格感知,远距离的前方采用射线感知。
- 三个智能体训练出来的是同一个神经网络,能否训练三个不同的神经网络满足不同的工作要求?