Spring——Spring-Web三层架构实现前后端数据交互
目录
1.前言
2. 项目步骤
2.1 目录结构
2.2 数据库
2.3 在pom.xml文件中加入依赖
2.4 创建Student实体类
2.5 创建dao接口和对应的mapper文件
2.6 创建mybatis主配置文件
2.7 创建service接口和实现类
2.7.1 StudentService接口
2.7.2 StudentServiceImpl实现类
2.8 创建jdbc外部属性配置文件、spring配置文件
2.9 创建servlet
2.9.1 AddStudentServlet——对应添加学生操作
2.9.2 QueryStudentServlet——对应查询学生操作
2.9.3 在web.xml中注册servlet和监听器
2.10 创建jsp页面
2.10.1 提交请求参数 (主界面)
2.10.2 显示添加学生处理结果——对应AddStudentServlet
2.10.3 显示查询学生处理结果——对应QueryStudentServlet
2.11测试结果截图
2.11.1 添加学生(AddStudentServlet)的测试结果
2.11.2 查询学生(QueryStudentServlet)的测试结果
1.前言
在学完了Java Web(HTML、CSS、JS、Tomcat、Servlet、JSP、MVC)这些内容之后才能完成真正上的三层架构实现前后端交互。
本篇只是实现三层架构的最基本功能,很简陋,只是学习用的,本篇不含springMVC的内容只是通过Java Web+spring+mybatis的。
2. 项目步骤
2.1 目录结构
controller包:界面层
dao包:数据库访问层
service包:业务逻辑层
domain包:每一个Java类对应于数据库中的一个表
resources目录:mybatis主配置文件、spring配置文件、jdbc外部属性配置文件
webapp:web项目相关内容,注册servlet、监听器、jsp页面

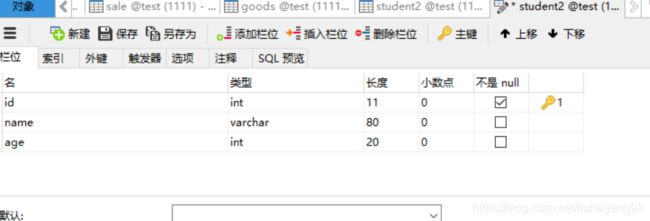
2.2 数据库
2.3 在pom.xml文件中加入依赖
  4.0.0

  org.example
  ch15-Web
  1.0.0
  war


    UTF-8
    1.8
    1.8


      junit
      junit
      4.11
      test


      org.springframework
      spring-web
      5.2.5.RELEASE


      javax.servlet
      javax.servlet-api
      3.0.1


      javax.servlet.jsp
      jsp-api
      2.2.1-b03


      org.springframework
      spring-context
      5.2.5.RELEASE


      org.springframework
      spring-tx
      5.2.5.RELEASE


      org.springframework
      spring-jdbc
      5.2.5.RELEASE


      org.mybatis
      mybatis
      3.5.1


      org.mybatis
      mybatis-spring
      1.3.1


      mysql
      mysql-connector-java
      5.1.9


      com.alibaba
      druid
      1.1.12


        src/main/java

          **/*.properties
          **/*.xml

        false
2.4 创建Student实体类
package com.liuhaiyang.domain;

public class Student {
    private Integer id;
    private  String name;
    private  Integer age;

    //set()和get()方法、toString()、有参构造和无参构造

}
2.5 创建dao接口和对应的mapper文件
package com.liuhaiyang.dao;

import com.liuhaiyang.domain.Student;

public interface StudentDao {
    public int insertStudent(Student student);
    public Student selectId(Integer id);
}
insert into student2(name,age) values(#{name},#{age})
2.6 创建mybatis主配置文件
2.7 创建service接口和实现类
2.7.1 StudentService接口
package com.liuhaiyang.service;

import com.liuhaiyang.domain.Student;

public interface StudentService {
    int addStudent(Student student);
    Student findStudentId(Integer id);
}
2.7.2 StudentServiceImpl实现类
package com.liuhaiyang.service.impl;

import com.liuhaiyang.dao.StudentDao;
import com.liuhaiyang.domain.Student;
import com.liuhaiyang.service.StudentService;

public class StudentServiceImpl implements StudentService {

    private  StudentDao stuDao;

    public void setStuDao(StudentDao studentDao) {
        this.stuDao = studentDao;
    }

    @Override
    public int addStudent(Student student) {
        System.out.println(student.getName());
        int a=stuDao.insertStudent(student);
        return a;
    }

    @Override
    public Student findStudentId(Integer id) {
        Student student=stuDao.selectId(id);
        return student;
    }
}
2.8 创建jdbc外部属性配置文件、spring配置文件
jdbc.url=jdbc:mysql://localhost:3306/test?useUnicode=true&characterEncoding=utf-8
jdbc.username=root
jdbc.password=123456
2.9 创建servlet
2.9.1 AddStudentServlet——对应添加学生操作
package com.liuhaiyang.controller;

import com.liuhaiyang.domain.Student;
import com.liuhaiyang.service.StudentService;
import org.springframework.context.ApplicationContext;
import org.springframework.context.support.ClassPathXmlApplicationContext;
import org.springframework.web.context.WebApplicationContext;

import javax.servlet.ServletContext;
import javax.servlet.ServletException;
import javax.servlet.http.HttpServlet;
import javax.servlet.http.HttpServletRequest;
import javax.servlet.http.HttpServletResponse;
import java.io.IOException;

public class AddStudentServlet extends HttpServlet {
    @Override
    protected void doPost(HttpServletRequest req, HttpServletResponse resp) throws ServletException, IOException {
        req.setCharacterEncoding("UTF-8");
        String name=req.getParameter("name");
       String age=req.getParameter("age");
       //这里写text的的东西
//        String config="application.xml";
//        ApplicationContext ctx=new ClassPathXmlApplicationContext(config);
        //使用监听器创建application.xml文件的容器
        WebApplicationContext ctx=null;
        String key=WebApplicationContext.ROOT_WEB_APPLICATION_CONTEXT_ATTRIBUTE;  //获取key的值
        ServletContext sc=req.getServletContext(); //获得全局作用域对象
        Object attr=sc.getAttribute(key); //取出全局作用域对象的value
        if (attr!=null){
            ctx=(WebApplicationContext) attr;  //强转,将object转换成为ApplicationContext类型
        }

        System.out.println("在servlet在创建的对象容器======"+ctx);
        StudentService service=(StudentService) ctx.getBean("studentService");
        Student student=new Student();
        student.setName(name);
        student.setAge(Integer.valueOf(age));
        service.addStudent(student);
        req.getRequestDispatcher("/show.jsp").forward(req,resp);
    }
}
2.9.2 QueryStudentServlet——对应查询学生操作
package com.liuhaiyang.controller;

import com.liuhaiyang.domain.Student;
import com.liuhaiyang.service.StudentService;
import com.liuhaiyang.service.impl.StudentServiceImpl;
import org.springframework.context.ApplicationContext;
import org.springframework.context.support.ClassPathXmlApplicationContext;
import org.springframework.web.context.WebApplicationContext;
import org.springframework.web.context.support.WebApplicationContextUtils;

import javax.servlet.ServletContext;
import javax.servlet.ServletException;
import javax.servlet.http.HttpServlet;
import javax.servlet.http.HttpServletRequest;
import javax.servlet.http.HttpServletResponse;
import java.io.IOException;

public class QueryStudentServlet extends HttpServlet {
    @Override
    protected void doGet(HttpServletRequest req, HttpServletResponse resp) throws ServletException, IOException {
       resp.setContentType("");
        String id=req.getParameter("id");
//        String config="application.xml";
//        ApplicationContext ctx=new ClassPathXmlApplicationContext(config);
        //使用spring提供的工具方法,获取容器对象
        // getRequiredWebApplicationContext底层还是调用全局变量的key值取获取value,在进行判断和强转 只是帮我们做好封装起来了而已
        WebApplicationContext ctx= WebApplicationContextUtils.getRequiredWebApplicationContext(getServletContext());

        StudentService service=(StudentService)ctx.getBean("studentService");
        Student student=service.findStudentId(Integer.valueOf(id));
        req.setAttribute("stu",student);
        req.getRequestDispatcher("/find.jsp").forward(req,resp);


    }

}
2.9.3 在web.xml中注册servlet和监听器
        one
        com.liuhaiyang.controller.AddStudentServlet


        one
        /one


        two
        com.liuhaiyang.controller.QueryStudentServlet


        two
        /two


        contextConfigLocation

        classpath:application.xml


        org.springframework.web.context.ContextLoaderListener
2.10 创建jsp页面
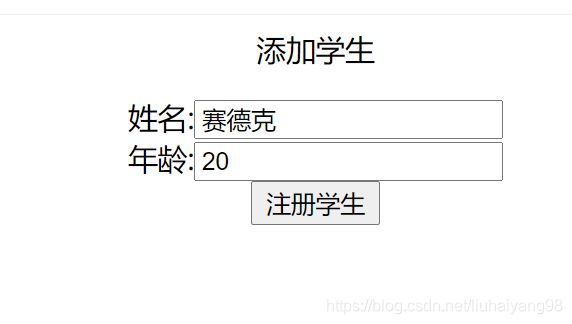
2.10.1 提交请求参数 (主界面)
<%@ page contentType="text/html;charset=UTF-8" language="java" %>
添加学生
添加学生
查询学生
2.10.2 显示添加学生处理结果——对应AddStudentServlet
<%@ page contentType="text/html;charset=UTF-8" language="java" %>


    Title


        注册成功
2.10.3 显示查询学生处理结果——对应QueryStudentServlet
<%@ page contentType="text/html;charset=UTF-8" language="java" %>


    Title


    查询结果:${stu}
2.11测试结果截图
2.11.1 添加学生(AddStudentServlet)的测试结果


数据库数据截图
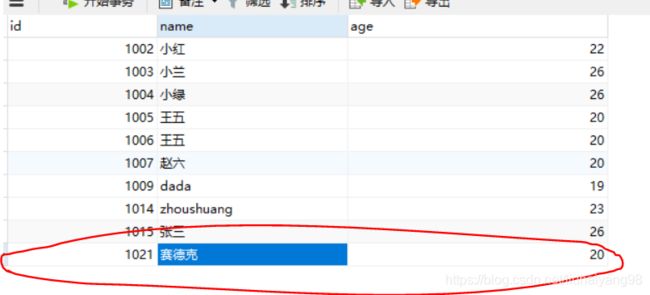
2.11.2 查询学生(QueryStudentServlet)的测试结果


和数据库的数据是一致的,证明程序没有错误,这就是前后端数据交互,界面很简陋主要是学习中间的操作,要在心里有相关步骤,会自己添加相关功能就可以了。spring基本学完了,接下来就是开始springMVC的学习了。