centos 7.6——ELK日志分析系统
文章目录
- 一、ELK日志分析系统简介
- 二、ELK日志分析系统
- 三、Elasticsearch介绍
-
- 3.1Elasticsearch的概述
- 3.2 Elasticsearch核心概念
-
- (1)接近实时(NRT)
- (2)集群(cluster)
- (3)节点(node)
- 四、Logstash介绍
-
- 4.1 LogStash主要组件
- 五、Kibana介绍
-
- 5.1 Kibana介绍
- 5.2 logstash 主机分类
- 5.2 Kibana主要功能
- 六、案例环境:配置ELK日志分析系统
-
- 6.1 实验环境
- 6.2 安装步骤分析
-
- (1)需求分析
- (2) 环境准备
- (3)安装Elasticsearch-head插件
- (4)安装部署Logstash
- (5)安装部署Kibana
一、ELK日志分析系统简介
- 日志服务器
- 提高安全性
- 集中存放日志
缺陷
- 对日志的分析困难
二、ELK日志分析系统
- Elasticsearch
- Logstash
- Kibana
- 日志处理步骤
- 将日志进行集中化管理
- 将日志格式化(Logstash)并输出到Elasticsearch
- 对格式化后的数据进行索引和存储(Elasticsearch)
- 前端数据的展示(Kibana)
三、Elasticsearch介绍
3.1Elasticsearch的概述
- 提供了一个分布式多用户能力的全文搜索引擎
- elasticsearch是一个基于Lucene的搜索服务器。它提供了一个分布式多用户能力的全文搜索引擎,基于restful web
接口。 - elasticsearch是用Java开发的,并作为Apache许可条款下的开放源码发布,是第二流行的企业搜索引擎,设计用于云计算中能够达到实时搜索,稳定,可靠,快速,安装使用方便。
3.2 Elasticsearch核心概念
- 接近实时
- 集群
- 节点
- 索引
- 索引(库) >>>>> 类型(表) >>>>> 文档(记录)
分片和副本
(1)接近实时(NRT)
- elasticsearch是一个接近实时的搜索平台,这意味着,从索引一个文档直到这个文档能够被搜索到有一个轻微的延迟(通常1秒)
(2)集群(cluster)
- 一个集群就是有一个或多个节点组织在一起,他们共同持有你整个的数据,并以其提供索引和搜索功能。其中一个节点为主节点,
- 这个主节点是可以通过选举产生的,并提供跨节点的联合索引和搜索的功能,集群有一个唯一性标识的名字,默认是elasticsearch,
集群名字很重要,每个节点是基于集群名字加入到其集群中的,因此确保在不同环境中使用不同的集群名字。 - 一个集群可以只有一个节点,强烈酱油在配置elasticsearch时,配置成集群模式。
(3)节点(node)
- 节点就是一台单一的服务器,是集群的一部分,存储数据并参与集群的索引和搜索功能。像集群一样。节点也是通过名字来标识,默认是在节点启动时随机分配的字符名、当然,你可以自己定义。改名字也很重要,在集群中用于识别服务器对应的节点。
- 节点可以通过制定集群名字来加入集群中,默认情况,每个节点被设置成加入到elasticsearch集群。如果启动了多个节点。假设能自动发现对方,他们将会自动组件一个恶名为elasticsearch的集群。
四、Logstash介绍
- 一款强大的数据处理工具
- 可实现数据传输、格式处理、格式化输出
- 数据输入、数据加工(如过滤,改写等)以及数据输出
4.1 LogStash主要组件
- Shipper
- Indexer
- Broker
- Search and Storage
- Web Interface
五、Kibana介绍
5.1 Kibana介绍
- 一个针对Elasticsearch的开源分析及可视化平台
- 搜索、查看存储在Elasticsearch索引中的数据
- 通过各种图表进行高级数据分析及展示
5.2 logstash 主机分类
- 代理主机(agent
host):作为事件的传递者(shipper),将各种日志数据发送至中心主机;主需运行logstash代理(agent)程序; - 中心主机(central host ) : 可运行包括中间转发器(broker)、索引(indexer)
- 搜索存储器(search and storage)
- web 界面端(web interface)在内的各个组件,以实现对日志数据的接收、处理和存储。
5.2 Kibana主要功能
-
Elasticsearch无缝之集成
-
整合数据,复杂数据分析
-
让更多团队成员受益
-
接口灵活,分享更容易
-
配置简单,可视化多数据源
-
简单数据导出
kibana 是一个针对elasticsearch的开源分析及可视化平台,用来搜索、查看交互存储在elasticsearch索引中的数据。
使用kibana,可以通过各种图表进行高级数据分析及展示。kibana让海量数据更容易理解。它操作简单。基于浏览器的用户界面可以快速创建仪表板(dashboard)
实时显示elasticsearch查询动态。设置kibana非常简单。无需编写代码,几分钟内就可以完成kibana安装并启动elasticsearch索引监测。
主要功能:
- 1.elasticsearch无缝之集成。kibana架构为elasticsearch定制。可以将任何结构化和非结构化数据加入elasticsearch索引。
kibana还充分利用了elasticsearch强大的搜索和分析功能。
六、案例环境:配置ELK日志分析系统
6.1 实验环境
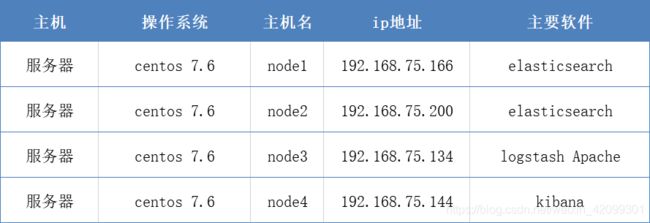
- 配置和安装ELK日志分析系统,安装集群方式,2个elasticsearch节点,并监控Apache服务器日志。
主机 操作系统 主机名 ip地址 主要软件
服务器 centos 7.6 node1 192.168.75.166 elasticsearch
服务器 centos 7.6 node2 192.168.75.200 elasticsearch
服务器 centos 7.6 node3 192.168.75.134 logstash Apache
服务器 centos 7.6 node4 192.168.75.144 kibana
6.2 安装步骤分析
(1)需求分析
- 配置ELK日志分析群集
- 使用Logstash收集日志
- 使用Kibana查看分析日志
(2) 环境准备
- 部署Elasticsearch软件
- 安装Elasticsearch-head插件
- Logstash安装及使用方法
- 安装Kibana
- ES端口号:9200
(3)安装Elasticsearch-head插件
安装步骤
- 编译安装node
- 安装phantomjs
- 安装Elasticsearch-head
- 修改Elasticsearch主配置文件
- 启动服务
- 通过Elasticsearch-head查看Elasticsearch信息
- 插入索引
(4)安装部署Logstash
- 安装步骤
- 在node3上安装Logstash
- 测试Logstash
- 修改Logstash配置文件
(5)安装部署Kibana
安装步骤
-
在node1服务器上安装Kibana,并设置开机启动
-
设置Kibana的主配置文件/etc/kibana/kibana.yml
-
启动Kibana服务
-
验证Kibana
-
将Apache服务器的日志添加到Elasticsearch并通过Kibana显示
-
node 1和node2都要配置(elasticsearch服务)
配置elasticsearch 环境
登录192.168.75.166 更改主机名 配置域名解析 查看Java环境

hostnamectl set-hostname node1
su
vim /etc/hosts
192.168.75.166 node1
192.168.75.200 node2

java -version


登录192.168.75.200 更改主机名 配置域名解析 查看Java环境

hostnamectl set-hostname node2
su
vim /etc/hosts
192.168.75.166 node1
192.168.75.200 node2

java -version

节点node1和node2 配置elasticsearch软件
- 安装elasticsearch -rpm 包
上传elasticsearch-5.5.0 rpm 到/opt目录下

cd /opt
rpm -ivh elasticsearch-5.5.0.rpm
- 加载系统服务
systemctl daemon-reload
systemctl enable elasticsearch.service
- 更改elasticsearch 主配置文件
cp /etc/elasticsearch/elasticsearch.yml /etc/elasticsearch/elasticsearch.yml.bak

vim /etc/elasticsearch/elasticsearch.yml

cluster.name: my-elk-cluster    	//17行集群名字
node.name: node1       		 //23行节点名字
path.data: /data/elk_data		//33存放数据路径
path.logs: /var/log/elasticsearch	//37日志存放路径
bootstrap.memory_lock: false		//43不在启动的时候锁定内存
network.host: 0.0.0.0		//55提供服务绑定的IP地址,0.0.0.0代表所有地址
http.port: 9200			//59侦听端口为9200
discovery.zen.ping.unicast.hosts: ["node1", "node2"]		//集群发现通过单播实现

grep -v "^#" /etc/elasticsearch/elasticsearch

cluster.name: my-elk-cluster
node.name: node1
path.data: /data/elk_data
path.logs: /var/log/elasticsearch
bootstrap.memory_lock: false
network.host: 0.0.0.0
http.port: 9200
discovery.zen.ping.unicast.hosts: ["node1", "node2"]
- 创建数据存放路径并授权
mkdir -p /data/elk_data
chown elasticsearch.elasticsearch /data/elk_data
- 启动elasticsearch 是否成功开启
systemctl daemon-reload  //因为修改了配置文件,加载一下
systemctl start elasticsearch.service  //重启服务

 netstat -lnupt | grep 9200
tcp6       0      0 :::9200                 :::*                    LISTEN      64667/java
- 查看节点信息 用真机192.168.75.166:9200 有文件打开下面是节点信息
http://192.168.75.166:9200/
name “node1”
cluster_name “my-elk-cluster”
cluster_uuid “mWQITSpQRWGgicI0Z2CyWA”
version
number “5.5.0”
build_hash “260387d”
build_date “2017-06-30T23:16:05.735Z”
build_snapshot false
lucene_version “6.6.0”
tagline “You Know, for Search”
http://192.168.75.200:9200/
name “node2”
cluster_name “my-elk-cluster”
cluster_uuid “mWQITSpQRWGgicI0Z2CyWA”
version
number “5.5.0”
build_hash “260387d”
build_date “2017-06-30T23:16:05.735Z”
build_snapshot false
lucene_version “6.6.0”
tagline “You Know, for Search”
【集群检查健康和状态】
在真机浏览器192.168.75.166打开 http://192.168.75.166:9200/_cluster/health?pretty ##检查群集健康情况
cluster_name “my-elk-cluster”
status “green”
timed_out false
number_of_nodes 2
number_of_data_nodes 2
active_primary_shards 5
active_shards 10
relocating_shards 0
initializing_shards 0
unassigned_shards 0
delayed_unassigned_shards 0
number_of_pending_tasks 0
number_of_in_flight_fetch 0
task_max_waiting_in_queue_millis 0
active_shards_percent_as_number 100
http://192.168.75.200:9200/_cluster/health?pretty
cluster_name “my-elk-cluster”
status “green” //green代表正常
timed_out false
number_of_nodes 2
number_of_data_nodes 2
active_primary_shards 5
active_shards 10
relocating_shards 0
initializing_shards 0
unassigned_shards 0
delayed_unassigned_shards 0
number_of_pending_tasks 0
number_of_in_flight_fetch 0
task_max_waiting_in_queue_millis 0
active_shards_percent_as_number 100
-
在真机浏览器192.168.75.166
-
打开http://192.168.75.166:9200/_cluster/state?pretty ##检查群集状态信息
-
在真机浏览器192.168.75.200打开http://192.168.75.200:9200/_cluster/state?pretty
-
检查群集状态信息
-
【安装elasticsearch-head插件】上述查看群集的方式,其实不方便,我们可以通过安装elasticsearch-head 插件后,来管理集群
在node1和node2设置
上传node-v8.2.1.tar.gz到/opt
yum -y install gcc gcc-c++ make
cd /opt
tar xzvf node-v8.2.1.tar.gz
cd node-v8.2.1.tar.gz
./configure
make -j3   ##时间很长30分钟
make install
- 安装phantomjs前端框架
上传软件包到/usr/local/src/
cd /usr/local/src/
tar xjvf phantomjs-2.1.1-linux-x86_64.tar.bz2
cd phantomjs-2.1.1-linux-x86_64/bin/
cp phantomjs /usr/local/bin
- 安装elasticsearch-head数据可视化工具
cd /usr/local/src
tar xzvf elasticsearch-head.tar.gz
cd elasticsearch-head/
npm install
- 修改主配置文件
cd ~
vim /etc/elasticsearch/elasticsearch.yml   ##下面配置文件,差末尾
http.cors.enabled.true   ##开启跨域访问支持,默认为false
http.cors.allow-origin:"*"  ##跨域访问允许的域名地址

systemctl restart elasticsearch
- 启动elasticsearch-head 启动服务器
cd /usr/local/src/elasticsearch-head/
npm run start &   ##切换到后台运行


[root@node1 elasticsearch-head]# netstat -lnupt | grep 9100
tcp        0      0 0.0.0.0:9100            0.0.0.0:*               LISTEN      64804/grunt
[root@node1 elasticsearch-head]# netstat -lnupt | grep 9200
tcp6       0      0 :::9200                 :::*                    LISTEN      64667/java
- 真机上打开浏览器输入http://192.168.75.166:9100/ 可以看见群集很健康是绿色
- 在elasticsearch后面栏目中输入http://192.168.75.166:9100
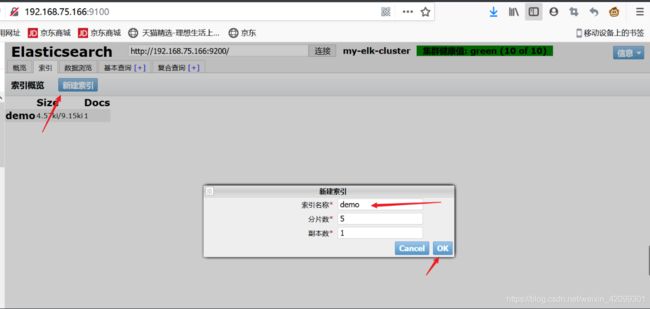
- 创建一个索引来验证
- 索引——新建索引——索引名称——分片数——副本数——OK 这边新建索引名称:demo
回到node1 输入

curl -XPUT 'localhost:9200/demo/test/1?pretty&pretty' -H 'content-Type:application/json' -d '{"user":"zhangsan","mesg":"hello world"}'
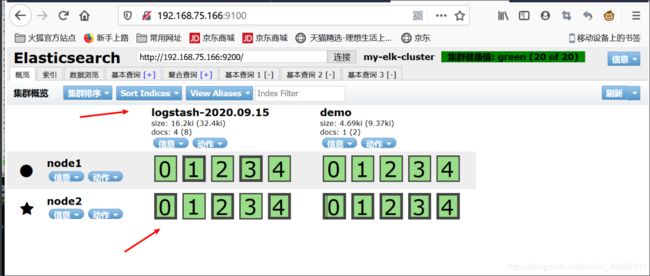
- 然后到浏览器中输入http://192.168.75.166:9100 查看索引——刷新
- 安装logstash ——node3:apache服务器:192.168.75.134
yum -y install httpd
systemctl start httpd
setenforce 0
systemctl stop firewalld
yum -y install java
java --version

将logstash 包上传到opt目录下
cd /opt
rpm -ivh logstash-5.5.1.rpm
systemctl start logstash.service
systemctl enable logstash.service
ln -s /usr/share/logstsh/bin/logstash /usr/local/bin

logstash -e 'input { stdin {} } output { stdout {} }'

ERROR StatusLogger No log4j2 configuration file found. Using default configuration: logging only errors to the console.
WARNING: Could not find logstash.yml which is typically located in $LS_HOME/config or /etc/logstash. You can specify the path using --path.settings. Continuing using the defaults
Could not find log4j2 configuration at path //usr/share/logstash/config/log4j2.properties. Using default config which logs to console
15:14:42.145 [[main]-pipeline-manager] INFO  logstash.pipeline - Starting pipeline {
     "id"=>"main", "pipeline.workers"=>4, "pipeline.batch.size"=>125, "pipeline.batch.delay"=>5, "pipeline.max_inflight"=>500}
15:14:42.227 [[main]-pipeline-manager] INFO  logstash.pipeline - Pipeline main started
The stdin plugin is now waiting for input:
15:14:42.369 [Api Webserver] INFO  logstash.agent - Successfully started Logstash API endpoint {
     :port=>9600}
www.kgc.com
2020-09-15T07:14:58.499Z apache www.kgc.com
zhangsna^H^H
2020-09-15T07:15:06.781Z apache zhangsna
- 使用rubydebg 显示详细输出,codec为一种编码器
[root@apache opt]# logstash -e 'input { stdin{} } output { stdout{ codec=>rubydebug } }'
ERROR StatusLogger No log4j2 configuration file found. Using default configuration: logging only errors to the console.
WARNING: Could not find logstash.yml which is typically located in $LS_HOME/config or /etc/logstash. You can specify the path using --path.settings. Continuing using the defaults
Could not find log4j2 configuration at path //usr/share/logstash/config/log4j2.properties. Using default config which logs to console
15:21:11.576 [[main]-pipeline-manager] INFO  logstash.pipeline - Starting pipeline {
     "id"=>"main", "pipeline.workers"=>4, "pipeline.batch.size"=>125, "pipeline.batch.delay"=>5, "pipeline.max_inflight"=>500}
15:21:11.675 [[main]-pipeline-manager] INFO  logstash.pipeline - Pipeline main started
The stdin plugin is now waiting for input:
15:21:11.864 [Api Webserver] INFO  logstash.agent - Successfully started Logstash API endpoint {
     :port=>9600}
www.kgc.com
{

    "@timestamp" => 2020-09-15T07:27:36.927Z,
      "@version" => "1",
          "host" => "apache",
       "message" => "www.kgc.com"
}
[root@apache opt]# systemctl start logstash.service

//建立node1192.168.75.166 的日志logstash到elasticsearch隧道

[root@apache opt]# logstash -e 'input { stdin{} } output { elasticsearch { hosts=>["192.168.75.166:9200"] } }'
..................................省略..................................
16:21:54.618 [[main]-pipeline-manager] INFO  logstash.pipeline - Starting pipeline {
     "id"=>"main", "pipeline.workers"=>4, "pipeline.batch.size"=>125, "pipeline.batch.delay"=>5, "pipeline.max_inflight"=>500}
16:21:54.904 [[main]-pipeline-manager] INFO  logstash.pipeline - Pipeline main started
The stdin plugin is now waiting for input:
16:21:55.120 [Api Webserver] INFO  logstash.agent - Successfully started Logstash API endpoint {
     :port=>9600}

www.baidu.com
- 验证
然后去真机浏览器查看应该生成信息的日志
出现logstash的日志索引
logstash-2020.09.15
size: 16.6ki (33.2ki)
docs: 4 (8)
cd /var/log

chmod o+r /var/log/messages

[root@apache conf.d]# pwd
/etc/logstash/conf.d
[root@apache conf.d]# vim system.conf

input {

        file{

         path => "/var/log/messages"
         type => "system"
         start_position => "beginning"
        }
       }
output {

         elasticsearch {

                hosts => ["192.168.75.166:9200"]
                index => "system-%{+YYYY.MM.dd}"
                }
        }
~

//多启动几次
systemctl start logstash.service
- 真机环境输入192.168.75.166:9100
- 查看日志索引
- 现在应该生成一个message是
system-2020.09.15
size: 28.1Mi (55.8Mi)
docs: 79,688 (159,376)

- 在node 4:192.168.75.144 安装kibana
[root@node4 ~]# hostnamectl set-hostname kibana
[root@node4 ~]# su
 上传kibana到/usr/local/src目录中
[root@kibana opt]# cd /usr/local/src/
[root@kibana src]# rpm -ivh kibana-5.5.1-x86_64.rpm

[root@kibana kibana]# vim kibana.yml
server.port: 5601  ##kibana 打开的端口
server.host: "0.0.0.0" ## kibana 侦听的地址
elasticsearch.url: "http://192.168.75.166:9200"  ##和elasticsearch建立联系
kibana.index: ".kibana"  ##开机启动kibana服务

[root@kibana kibana]# grep -v "^#" /etc/kibana/kibana.yml
server.port: 5601

server.host: "0.0.0.0"

elasticsearch.url: "http://192.168.75.166:9200"

kibana.index: ".kibana"


[root@kibana kibana]# systemctl start kibana.service
[root@kibana kibana]# systemctl enable kibana.service
- 然后去真机浏览器输入
192.168.75.144:5601 就会出现kibana界面
在
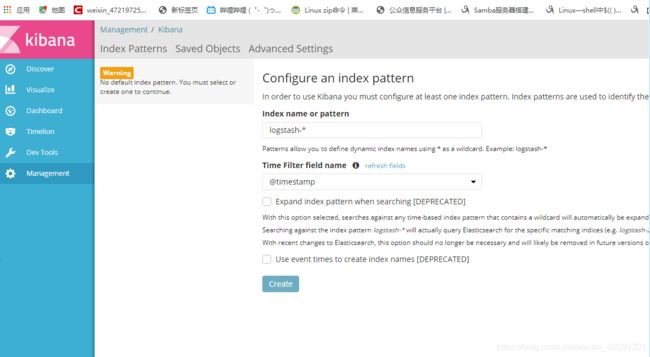
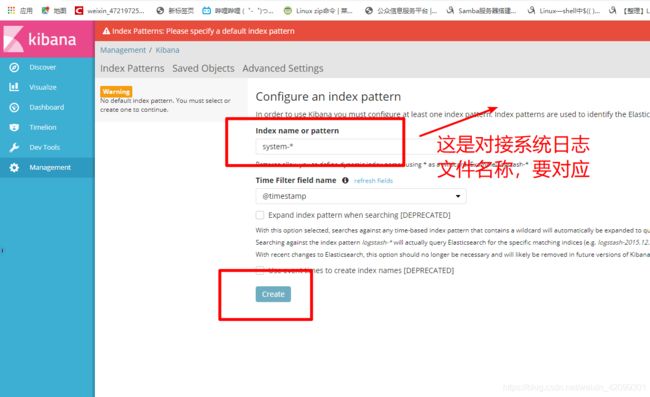
- management 》》Index name or pattern 》》logstash-* 或者Apache_access-* 》》
create 》》discover - 192.168.75.166:9200 就会出现新的索引日志
- 对接Apache主机 node 3 192.168.75.134 Apache日志文件(访问、错误日志)
cd /etc/logstash/conf.d/
touch apache_log.conf
vim apache_log.conf
        path => "/etc/httpd/logs/access_log"
        type => "access"
        start_position => "beginning"
        }
        file{

        path => "/etc/httpd/logs/error_log"
        type => "error"
        start_position => "beginning"
        }
    }
output {

        if [type] == "access" {

        elasticsearch {

        hosts => ["192.168.75.166:9200"]
        index => "apache_access-%{+YYYY.MM.dd}"
        }
      }
        if [type] == "error" {

        elasticsearch {

         hosts => ["192.168.75.166:9200"]
         index => "apache_error-%{+YYYY.MM.dd}"
    }
}
}

systemctl restart logstash.service

/usr/share/logstash/bin/logstash -f apache_log.conf   //Apache和logstash对接联系
- 真机浏览器查看 192.168.75.166:9100就会发现新的日志索引
apache_error-2020.09.15
size: 89.6ki (173ki)
docs: 21 (42)
- 访问Apache服务 器 192.168.75.134 时就会出现 Apache_access新的日志索引
apache_access-2020.09.15
size: 77.5ki (190ki)
docs: 57 (114)
- 如果一直不出现,新的日志索引多启动几次
systemctl restart logstash.service

