Vue-Element-Admin的项目集成自己的接口,登录跳转
1、先看一下请求配置文件,看axios.create这个方法,baseURL是基础路由
baseURL:process.env.VUE_APP_BASE_API,路径:src-utils-request.js
2、然后再看service.interceptors.request.use,设置token请求头,我后端集成的是jwt,所以请求头是Authentication,如图
config.headers['Authentication'] = getToken()3.设置自己的状态码,看service.interceptors.response.use,如图,设置为自己的状态码
这是我服务器响应的数据,如下,1是正常响应数据
{
    "code": 1,
    "data": {
    "token": "eyJhbGciOiJIUzI1NiIsInR5cCI6IkpXVCJ9.eyJBY2NvdW50SWQiOiJhZG1pbiIsIm5iZiI6MTYyNDE3NTM4MiwiZXhwIjoxNjI0MTc1NDQyLCJpYXQiOjE2MjQxNzUzODJ9.7p8EHMx1b4-yIMRN7Qxden3nZsDmBvevHEf-3oVhFMg",
    "message": "登录成功",
    "state": true
    }
}
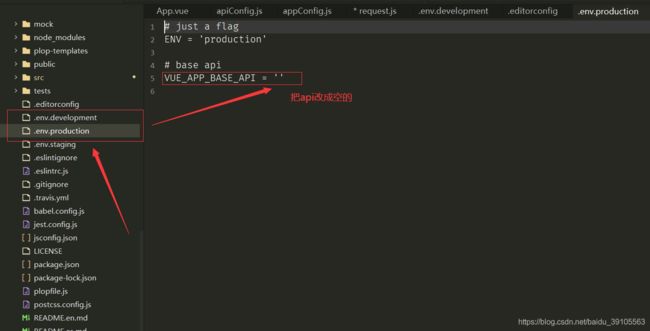
4、改.env.production和.env.development里面的api都为空,图只展示.env.production
5、改基础路由配置,在devServer后面添加如下代码(before这行注释掉,这个用来模拟数据的,用不到),如图
// before: require('./mock/mock-server.js')
    proxy: {
      [process.env.VUE_APP_BASE_API]: {
        target: 'https://xiaoxingbobo.top',
        // target: 'http://192.168.1.119:8081',
        // target: 'http://192.168.1.253:8081',
        changeOrigin: true,
        pathRewrite: {
          ['^' + process.env.VUE_APP_BASE_API]: ''
        }
      }
    }
到这里基础路由基本配置好了
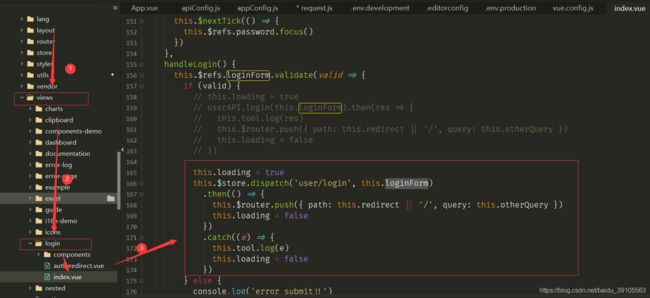
6、在src-view-login-index.html文件中,找到Vue-Element-Admin的登录接口,添加如下代码,如图,把官方的请求方式注释掉,this.loginForm是请求参数
this.loading = true
          this.$store.dispatch('user/login', this.loginForm)
            .then(() => {
              this.$router.push({ path: this.redirect || '/', query: this.otherQuery })
              this.loading = false
            })
            .catch((e) => {
              this.tool.log(e)
              this.loading = false
            })
7、设置用户登录成功后的跳转,登录后必须把token做缓存,不然登录页跳转不了
在src-store-moduls-use.js,如图
找到action下的login方法,修改代码如下
const actions = {
  // user login
  login({
    commit
  }, userInfo) {
    const {
      accountId,
      password
    } = userInfo

    return new Promise((resolve, reject) => {
      console.log('userInfo', userInfo)
      //服务器需要的登录参数
      const payload = {
        accountId: accountId,
        password: password
      }
      //请求服务器
      user.login(payload).then(response => {
        const {
          data
        } = response
        console.log('response', response)
        commit('SET_TOKEN', data.token)
        setToken(data.token)
        resolve()
      }).catch(error => {
        reject(error)
      })
    })
  },
找到getInfo方法,修改代码如下,因为获取用户信息接口没写,所以数据直接写死,根据自己的做调整
getInfo({
    commit,
    state
  }) {
    return new Promise((resolve, reject) => {
      /**
       * 这里请求用户信息和权限,目前接口没做,只注释了,data写死
       * */
      // user.getInfo(state.token).then(response => {
      // const {
      //   data
      // } = response
      const {
        data
      } = {
        data: {
          roles: ['admin'],
          introduction: 'Administrator',
          avatar: 'https://cloud.xiaoxingbobo.top/nongzhibang/20210429/1107491622257669573',
          name: 'administrator'
        }
      }

      if (!data) {
        reject('Verification failed, please Login again.')
      }

      const {
        roles,
        name,
        avatar,
        introduction,
        token
      } = data

      // roles must be a non-empty array
      if (!roles || roles.length <= 0) {
        reject('getInfo: roles must be a non-null array!')
      }

      commit('SET_ROLES', roles)
      commit('SET_NAME', name)
      commit('SET_AVATAR', avatar)
      commit('SET_INTRODUCTION', introduction)
      commit('SET_TOKEN', token)
      resolve(data)
      // }).catch(error => {
      //   reject(error)
      // })
    })
  },
这样就搞定了Vue-Element-Admin,可以登录到首页了


