Python实现社交网络可视化,看看你的人脉影响力如何
我们平常都会使用很多的社交媒体,有微信、微博、抖音等等,例如在微博上面,我们会关注某些KOL,同时自己身边的亲朋好友等等也会来关注我们自己,成为我们自己的粉丝。而慢慢地随着粉丝的量不断累积,这层关系网络也会不断地壮大,很多信息也是通过这样的关系网络不断地向外传播,分析这些社交网络并且了解透彻它对于我们做出各项商业决策来说也是至关重要的,今天小编就用一些Python的第三方库来进行社交网络的可视化
数据来源
小编用的数据是来自领英当中的社交数据,由于小编之前也在美国读书,也尝试过在国外找实习、找工作等等,都是通过领英在进行职场上的社交,投递简历、结交职场精英等等,久而久之也逐渐地形成了自己的社交网络,我们将这部分的社交数据下载下来,然后用pandas模块读取
数据的读取和清洗
当然我们先导入需要用到的模块
import pandas as pd
import janitor
import datetime

from IPython.core.display import display, HTML
from pyvis import network as net
import networkx as nx
读取所需要用到的数据集
df_ori = pd.read_csv("Connections.csv", skiprows=3)
df_ori.head()接下来我们进行数据的清洗,具体的思路就是将空值去除掉,并且数据集当中的“Connected on”这一列,内容是日期,但是数据类型却是字符串,因此我们也需要将其变成日期格式。
df = (
    df_ori
    .clean_names() # 去除掉字符串中的空格以及大写变成小写
    .drop(columns=['first_name', 'last_name', 'email_address']) # 去除掉这三列
    .dropna(subset=['company', 'position']) # 去除掉company和position这两列当中的空值
    .to_datetime('connected_on', format='%d %b %Y')
  )
output
company            position connected_on
0                xxxxxxxxxx  Talent Acquisition   2021-08-15
1               xxxxxxxxxxxx   Associate Partner   2021-08-14
2                      xxxxx                猎头顾问   2021-08-14
3  xxxxxxxxxxxxxxxxxxxxxxxxx          Consultant   2021-07-26
4    xxxxxxxxxxxxxxxxxxxxxx     Account Manager   2021-07-19
数据的分析与可视化
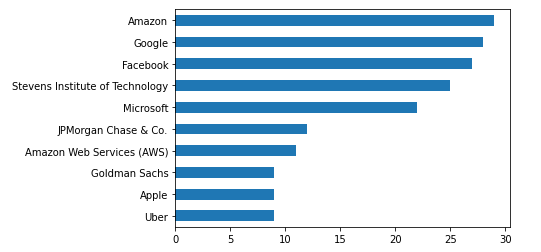
先来看一下小编认识的这些人脉中,分别都是在哪些公司工作的
df['company'].value_counts().head(10).plot(kind="barh").invert_yaxis()output
从上图可以看到,排在比较前面的大公司都是亚马逊、谷歌、Facebook、微软以及JP Morgan等大公司,看来在小编的校友以及人脉当中也就属小编混的最差了
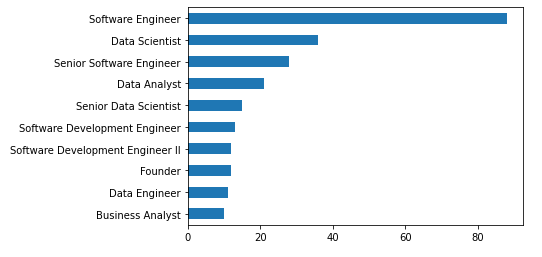
然后我们再来看一下小编所结交的人脉中,大多都是什么职业的
df['position'].value_counts().head(10).plot(kind="barh").invert_yaxis()output
从上图可以看出,大多都是从事的是软件工程师相关的工作,排在第二的则是数据科学家以及高级软件工程师,看来程序员认识的果然大多也都是程序员。
然后我们来看一下社交网络的可视化图表的绘制,但是在这之前呢,小编需要先说明几个术语,每一个社交网络都包含:
节点:社交网络当中的每个参与者
边缘:代表着每一个参与者的关系以及关系的紧密程度
我们先来简单的绘制一个社交网络,主要用到的是networkx模块以及pyvis模块,
g = nx.Graph()
g.add_node(0, label = "root") # intialize yourself as central node
g.add_node(1, label = "Company 1", size=10, title="info1")
g.add_node(2, label = "Company 2", size=40, title="info2")
g.add_node(3, label = "Company 3", size=60, title="info3")我们先是建立了4个节点,也分别给他们命名,其中的参数size代表着节点的大小,然后我们将这些个节点相连接
g.add_edge(0, 1)
g.add_edge(0, 2)
g.add_edge(0, 3)
最后出来的样子如下图
我们先从小编的人脉中,他们所属的公司来进行网络的可视化,首先我们对所属的公司做一个统计排序
df_company = df['company'].value_counts().reset_index()
df_company.columns = ['company', 'count']
df_company = df_company.sort_values(by="count", ascending=False)
df_company.head(10)
output
company  count
0                            Amazon     xx
1                            Google     xx
2                          Facebook     xx
3   Stevens Institute of Technology     xx
4                         Microsoft     xx
5              JPMorgan Chase & Co.     xx
6         Amazon Web Services (AWS)     xx
9                             Apple      x
10                    Goldman Sachs      x
8                            Oracle      x
然后我们来绘制社交网络的图表
# 实例化网络
g = nx.Graph()
g.add_node('myself') # 将自己放置在网络的中心
# 遍历数据集当中的每一行
for _, row in df_company_reduced.iterrows():
# 将公司名和统计结果赋值给新的变量
company = row['company']
count = row['count']
title = f"{company} – {count}"
positions = set([x for x in df[company == df['company']]['position']])
positions = ''.join('{} '.format(x) for x in positions)
position_list = f"{positions}
"
hover_info = title + position_list
g.add_node(company, size=count*2, title=hover_info, color='#3449eb')
g.add_edge('root', company, color='grey')
# 生成网络图表
nt = net.Network(height='700px', width='700px', bgcolor="black", font_color='white')
nt.from_nx(g)
nt.hrepulsion()
nt.show('company_graph.html')
display(HTML('company_graph.html'))output
我们从上面也能看到小编与谷歌、Facebook以及亚马逊、微软等公司的联系较为密切,认识较多从这些大公司当中出来的员工,与此同时呢,我们来可视化一下小编人脉中各种岗位的分布,我们先做一个统计排序
df_position = df['position'].value_counts().reset_index()
df_position.columns = ['position', 'count']
df_position = df_position.sort_values(by="count", ascending=False)
df_position.head(10)
output
position  count
0                 Software Engineer     xx
1                    Data Scientist     xx
2          Senior Software Engineer     xx
3                      Data Analyst     xx
4             Senior Data Scientist     xx
5     Software Development Engineer     xx
6  Software Development Engineer II     xx
7                           Founder     xx
8                     Data Engineer     xx
9                  Business Analyst     xx
然后进行网络图的绘制
g = nx.Graph()
g.add_node('myself') # 将自己放置在网络的中心
for _, row in df_position_reduced.iterrows():
# 将岗位名和统计结果赋值给新的变量
position = row['position']
count = row['count']
title = f"{position} – {count}"
positions = set([x for x in df[position == df['position']]['position']])
positions = ''.join('{} '.format(x) for x in positions)
position_list = f"{positions}
"
hover_info = title + position_list
g.add_node(position, size=count*2, title=hover_info, color='#3449eb')
g.add_edge('root', position, color='grey')
# 生成网络图表
nt = net.Network(height='700px', width='700px', bgcolor="black", font_color='white')
nt.from_nx(g)
nt.hrepulsion()
nt.show('position_graph.html')output
可以看出小编认识的大多数人都是“软件工程师”这个职业,其次便是数据科学家以及高级软件工程师等职位。
最后,本篇文章的源码可以通过在后台回复【社交分析】关键词来获取,感谢大家的关注,希望有所收获!
往
期
回
顾
教程
8000字概括精髓,pandas必知必会50例
教程
肝了整个周末,Python多进程、协程异步抓取英雄联盟皮肤并保存在本地
教程
4000字归纳总结 Pandas+Sklearn 带你做数据预处理
教程
7000字 23张图,Pandas一键生成炫酷的动态交互式图表
分享、收藏、点赞、在看安排一下?


