了解使用Haproxy+keepalived搭建wed群集
使用Haproxy+keepalived搭建wed群集
概述
Haproxy是目前比较流行的一种群集搭建工具,相比lvs与nginx它的功能比较综合,lvs性能虽好。但是搭建相对复杂,nginx的upstream模块支持群集功能,但是对节点的健康检查功能性不强。相对于Haproxy功能就比较综合。
一,准备环境
| 主机 | 系统 | ip地址 | 服务 |
|---|---|---|---|
| wed服务器1 | centos7 | 外:192.168.211.10 内:192.168.131.10 | http |
| wed服务器2 | centos7 | 外:192.168.211.11 内:192.168.131.11 | nginx |
| 调度器 | centos7 | 外:192.168.211.12 内:192.168.131.12 | |
| 备用调度器 | centos7 | 外:192.168.211.13 内:192.168.131.13 | nfs |
| 测试机 | windos10 |
二,配置wed服务器
配置wed服务器1
安装http
yum install -y httpd
配置wed服务器2
安装 nginx
解压
tar -zxf nginx-1.18.0.tar.gz -C /usr/src/
cd /usr/src/nginx-1.18.0/
配置:编译:安装
./configure --prefix=/usr/local/nginx --user=nginx --group=nginx --with-http_stub_status_module && make && make install
安装 Haproxy
安装依赖
yum install -y gcc pcer-devel bzip2-devel
解决lua环境
HAProxy 支持基于lua实现功能扩展,lua是一种小巧的脚本语言,于1993年由巴西里约热内卢天主教大学(Pontifical Catholic University of Rio de Janeiro)里的一个研究小组开发,其设计目的是为了嵌入应用程序中,从而为应用程序提供灵活的扩展和定制功能。
Lua 官网:www.lua.org
curl -R -O http://www.lua.org/ftp/lua-5.4.3.tar.gz
tar zxf lua-5.4.3.tar.gz
cd lua-5.4.3
make all test
[root@localhost lua-5.4.3]# lua -v //查看版本
Lua 5.1.4 Copyright © 1994-2008 Lua.org, PUC-Rio
由于CentOS7 之前版本自带的lua版本比较低并不符合HAProxy要求的lua最低版本(5.3)的要求,因此需要编译安装较新版本的lua环境,然后才能编译安装HAProxy,过程如下:
#安装基础命令及编译依赖环境
apt  install gcc iproute2  ntpdate  tcpdump telnet traceroute nfs-kernel-server nfs-common  lrzsz tree  openssl libssl-dev libpcre3 libpcre3-dev zlib1g-dev  openssh-server  libreadline-dev libsystemd-dev

 cd /usr/src

yum install gcc readline-devel

wget http://www.lua.org/ftp/lua-5.3.5.tar.gz

 tar xvf  lua-5.3.5.tar.gz

cd lua-5.3.5

make linux test

pwd /usr/local/src/lua-5.3.5

./src/lua -v
Lua 5.3.5  Copyright (C) 1994-2018 Lua.org, PUC-Rio
编译安装HAProxy
tar -xvf haproxy-1.8.22.tar.gz

yum -y install gcc openssl-devel pcre-devel systemd-devel

cd haproxy-1.8.22

make  ARCH=x86_64 TARGET=linux2628 USE_PCRE=1 USE_OPENSSL=1 USE_ZLIB=1 USE_SYSTEMD=1  USE_CPU_AFFINITY=1 PREFIX=/usr/local/haproxy

make install PREFIX=/usr/local/haproxy

ln -s /usr/local/haproxy/sbin/haproxy /usr/sbin/

haproxy -v //查看版本

which haproxy
vim /usr/lib/systemd/system/haproxy.service

[Unit]

 Description=HAProxy Load Balancer

After=syslog.target network.target

[Service]

ExecStartPre=/usr/sbin/haproxy -f /etc/haproxy/haproxy.cfg  -c -q ExecStart=/usr/sbin/haproxy -Ws -f /etc/haproxy/haproxy.cfg -p /var/lib/haproxy/haproxy.pid

ExecReload=/bin/kill -USR2 $MAINPID

 [Install]

 WantedBy=multi-user.target
默认缺少配置文件,无法启动
配置Haproxy.cfg文件
vim /etc/haproxy/haproxy.cfg
global
user haproxy # 用户
group haproxy
daemon
nbproc 2
#cpu-map 1 0
#cpu-map 2 1
maxconn 100000
chroot /usr/local/haproxy # 锁定家目录
pidfile /var/lib/haproxy/haproxy.pid #pid文件位置
log 127.0.0.1 local0 info
defaults
log global
option httplog
option http-keep-alive
option redispatch
option forwardfor
maxconn 100000
mode http
retries 3
timeout check 5s
timeout connect 5s
timeout client 60s
timeout server 60s
timeout http-request 10s
timeout queue 1m
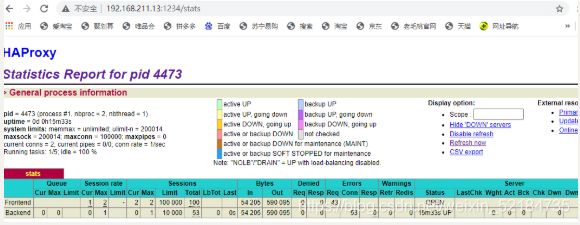
listen stats
bind 0.0.0.0:8089 # 端口1234
log global
mode http
stats enable
stats hide-version
stats realm Haproxy\ Statistics
stats uri /stats # 查看状态网页后缀
stats refresh 5s
stats auth admin:1234 # 授权访问 用户名:密码
浏览器访问
添加
frontend WEB_PORT
  bind :80
  use_backend lpan-host

backend pan-host
  server web1 192.168.211.10:80 check  inter 2s fall 3 rise 5
  server web2 192.168.211.11:80 check  inter 2s fall 3 rise 5
- global:全局配置段
进程及安全配置相关的参数
性能调整相关参数
Debug参数
- proxies:代理配置段
defaults:为frontend, backend, listen提供默认配置
frontend:前端,相当于nginx中的server {
     }
backend:后端,相当于nginx中的upstream {
     }
listen:同时拥有前端和后端配置
Proxies配置
官方文档:http://cbonte.github.io/haproxy-dconv/2.1/configuration.html#4
defaults [<name>] #默认配置项,针对以下的frontend、backend和listen生效,可以多个name也可以没有name
frontend <name>   #前端servername,类似于Nginx的一个虚拟主机 server和LVS服务集群。
backend  <name>   #后端服务器组,等于nginx的upstream和LVS中的RS服务器
listen   <name>   #将frontend和backend合并在一起配置,相对于frontend和backend配置更简洁,生产常用
global 配置参数说明
chroot #锁定运行目录
 deamon #以守护进程运行
 stats socket /var/lib/haproxy/haproxy.sock mode 600 level admin process 1 #socket文件
user, group, uid, gid  #运行haproxy的用户身份
nbproc    n     #开启的haproxy work 进程数,默认进程数是一个
#nbthread  1    #指定每个haproxy进程开启的线程数,默认为每个进程一个线程,和nbproc互斥(版本有关)

#如果同时启用nbproc和nbthread 会出现以下日志的错误,无法启动服务 Apr  7 14:46:23 haproxy haproxy: [ALERT] 097/144623 (1454) : config : cannot enable multiple processes if multiple threads are configured. Please use either nbproc or nbthread but not both.

cpu-map 1 0     #绑定haproxy 进程至指定CPU,将第一个work进程绑定至0号CPU
maxconn  n      #每个haproxy进程的最大并发连接数
maxsslconn  n   #每个haproxy进程ssl最大连接数,用于haproxy配置了证书的场景下
maxconnrate n   #每个进程每秒创建的最大连接数量

spread-checks n #后端server状态check随机提前或延迟百分比时间,建议2-5(20%-50%)之间,默认值0

pidfile         #指定pid文件路径
log 127.0.0.1  local2 info #定义全局的syslog服务器;日志服务器需要开启UDP协议,最多可以定义两个
配置HAProxy记录日志到指定日志文件中
HAProxy配置
#在global配置项定义:
log 127.0.0.1  local{
     1-7} info #基于syslog记录日志到指定设备,级别有(err、warning、info、debug)

listen  web_port
  bind 127.0.0.1:80
  mode http
  log global                                #开启当前web_port的日志功能,默认不记录日志
  server web1  127.0.0.1:8080  check inter 3000 fall 2 rise 5

# systemctl  restart haproxy
Rsyslog配置
vim /etc/rsyslog.conf
$ModLoad imudp
$UDPServerRun 514
......
local3.*    /var/log/haproxy.log
......

# systemctl  restart rsyslog
Proxies配置-defaults
defaults 配置参数:
option redispatch       #当server Id对应的服务器挂掉后,强制定向到其他健康的服务器,重新派发
option abortonclose     #当服务器负载很高时,自动结束掉当前队列处理比较久的链接,针对业务情况选择开启
option http-keep-alive  #开启与客户端的会话保持
option  forwardfor      #透传客户端真实IP至后端web服务器
mode http|tcp           #设置默认工作类型,使用TCP服务器性能更好,减少压力
timeout http-keep-alive 120s #session 会话保持超时时间,此时间段内会转发到相同的后端服务器
timeout connect 120s    #客户端请求从haproxy到后端server最长连接等待时间(TCP连接之前),默认单位ms
timeout server  600s    #客户端请求从haproxy到后端服务端的请求处理超时时长(TCP连接之后),默认单位ms,如果超时,会出现502错误,此值建议设置较大些,访止502错误
timeout client  600s    #设置haproxy与客户端的最长非活动时间,默认单位ms,建议和timeout server相同
timeout  check   5s     #对后端服务器的默认检测超时时间
default-server inter 1000 weight 3   #指定后端服务器的默认设置
Proxies配置-frontend
frontend 配置参数:
bind:   #指定HAProxy的监听地址,可以是IPV4或IPV6,可以同时监听多个IP或端口,可同时用于listen字段中

#格式:
bind [<address>]:<port_range> [, ...] [param*]

#注意:如果需要绑定在非本机的IP,需要开启内核参数:net.ipv4.ip_nonlocal_bind=1
范例:
listen http_proxy                           #监听http的多个IP的多个端口和sock文件
    bind :80,:443,:8801-8810
    bind 10.0.0.1:10080,10.0.0.1:10443
    bind /var/run/ssl-frontend.sock user root mode 600 accept-proxy

listen http_https_proxy                     #https监听
    bind :80
    bind :443 ssl crt /etc/haproxy/site.pem #公钥和私钥公共文件

listen http_https_proxy_explicit            #监听ipv6、ipv4和unix sock文件
    bind ipv6@:80
    bind ipv4@public_ssl:443 ssl crt /etc/haproxy/site.pem
    bind [email protected] user root mode 600 accept-proxy

listen external_bind_app1                   #监听file descriptor
    bind "fd@${FD_APP1}"
生产示例:
frontend  magedu_web_port               #可以采用后面形式命名:业务-服务-端口号
    bind :80,:8080
    bind 10.0.0.7:10080,:8801-8810,10.0.0.17:9001-9010
    mode  http|tcp              #指定负载协议类型
    use_backend <backend_name>  #调用的后端服务器组名称
Proxies配置-backend
定义一组后端服务器,backend服务器将被frontend进行调用。
mode  http|tcp      #指定负载协议类型,和对应的frontend必须一致
option              #配置选项
server              #定义后端real server
注意:option后面加 httpchk,smtpchk,mysql-check,pgsql-check,ssl-hello-chk方法,可用于实现更多应用层检测功能。
option 配置
check               #对指定real进行健康状态检查,如果不加此设置,默认不开启检查
    addr  <IP>        #可指定的健康状态监测IP,可以是专门的数据网段,减少业务网络的流量
    port  <num>   #指定的健康状态监测端口
    inter <num>   #健康状态检查间隔时间,默认2000 ms
    fall  <num>       #后端服务器从线上转为线下的检查的连续失效次数,默认为3
    rise  <num>       #后端服务器从下线恢复上线的检查的连续有效次数,默认为2
weight  <weight>  #默认为1,最大值为256,0表示不参与负载均衡,但仍接受持久连接
backup              #将后端服务器标记为备份状态,只在所有非备份主机down机时提供服务,类似Sorry Server
disabled            #将后端服务器标记为不可用状态,即维护状态,除了持久模式,将不再接受连接
redirect prefix  http://www.baidu.com/      #将请求临时(302)重定向至其它URL,只适用于http模式
redir http://www.baidu.com                  #将请求临时(302)重定向至其它URL,只适用于http模式
maxconn <maxconn>     #当前后端server的最大并发连接数
backlog <backlog> #当前端服务器的连接数达到上限后的后援队列长度,注意:不支持backend
frontend+backend配置实例
范例1:
frontend magedu-test-http
 bind :80,:8080
 mode tcp
 use_backend magedu-test-http-nodes

backend magedu-test-http-nodes
 mode tcp
 default-server inter 1000 weight 6
 server web1 10.0.0.17:80 check weight 2 addr 10.0.0.117 port 8080
 server web1 10.0.0.27:80 check
范例2:
#官网业务访问入口
frontend  WEB_PORT_80
    bind 10.0.0.7:80
    mode http
    use_backend  web_prot_http_nodes

backend web_prot_http_nodes
    mode  http
    option forwardfor
    server 10.0.0.17 10.0.0.17:8080   check inter 3000 fall 3 rise 5
    server 10.0.0.27 10.0.0.27:8080   check inter 3000 fall 3 rise 5
示范3:通过Haproxy配置文件中的frontend和backend 部分,重新定义ACL规则,可以实现动静分离
frontend mian

   bind *:80

  acl usl_static path_end -i  .html .png ........

use_bakend jingtai if use_static

default_backend app


backend jingtai

balance roundrobin

server 	inst1 192.168.211.10

server	inst2 192.168.211.11


backend app

option httpchk GET /tset.php

server 	inst3 192.168.211.12

server	inst4 192.168.211.13
Proxies配置-listen替代frontend+backend
使用listen替换上面的frontend和backend的配置方式,可以简化设置,通常只用于TCP协议的应用
#官网业务访问入口
listen  WEB_PORT_80
    bind 10.0.0.7:80
    mode http
    option  forwardfor
    server web1   10.0.0.17:8080   check inter 3000 fall 3 rise 5
    server web2   10.0.0.27:8080   check inter 3000 fall 3 rise 5
使用子配置文件保存配置
当业务众多时,将所有配置都放在一个配置文件中,会造成维护困难。可以考虑按业务分类,将配置信息拆分,放在不同的子配置文件中,从而达到方便维护的目的。
#创建子配置目录
[root@centos7 ~]#mkdir /etc/haproxy/conf.d/

#创建子配置文件,注意:必须为cfg后缀
[root@centos7 ~]#vim   /etc/haproxy/conf.d/test.cfg
listen WEB_PORT_80
    bind 10.0.0.7:80
    mode http
    balance roundrobin
    server web1  10.0.0.17:80  check inter 3000 fall 2 rise 5
    server web2  10.0.0.27:80  check inter 3000 fall 2 rise 5

#添加子配置目录到unit文件中
[root@centos7 ~]#vim  /lib/systemd/system/haproxy.service
[Unit]
Description=HAProxy Load Balancer
After=syslog.target network.target

[Service]
ExecStartPre=/usr/sbin/haproxy -f /etc/haproxy/haproxy.cfg -f /etc/haproxy/conf.d/ -c -q
ExecStart=/usr/sbin/haproxy -Ws -f /etc/haproxy/haproxy.cfg -f /etc/haproxy/conf.d/  -p /var/lib/haproxy/haproxy.pid
ExecReload=/bin/kill -USR2 $MAINPID

[Install]
WantedBy=multi-user.target

[root@centos7 ~]#systemctl daemon-reload
[root@centos7 ~]#systemctl restart haproxy
重启
浏览器验证


ok
搭建Haproxy+keepalived
主调度器
安装keepalived
编辑配置文件
vim /etc/keepalived/keepalived.cof

global_defs {

    pancheng_1
}

vrrp_script check_haproxy {

    script "/etc/keepalived/check.sh"
    interval 2
    weight 2
}
vrrp_instance VI_1 {

    state MASTER
    interface ens33
    virtual_router_id 1
    priority 100
    advert_int 1
    authentication {

        auth_type PASS
        auth_pass 1234
    }
    virtual_ipaddress {

        192.168.211.20
    }
track_script{

    check_haproxy
}
}
编写脚本
[root@localhost keepalived]# vim /etc/keepalived/check.sh

#!/bin/bash
A=`ps -C haproxy --no-header | wc -l`
if [ $A -eq 0 ];then
systemctl start haproxy
sleep 10
        if [ `ps -C haproxy --no-header | wc -l` -eq 0 ];then
        systemctl stop keepalived
        fi
fi
备份调度器
Haproxy配置一样
安装keepalived
配置文件
global_defs {

    pancheng_2
}

vrrp_script check_haproxy {

    script "/etc/keepalived/check.sh"
    interval 2
    weight 2
}
vrrp_instance VI_1 {

    state BACKUP
    interface ens33
    virtual_router_id 1
    priority 99
    advert_int 1
    authentication {

        auth_type PASS
        auth_pass 1234
    }
    virtual_ipaddress {

        192.168.211.20
    }
track_script{

    check_haproxy
}
}
编写脚本
[root@localhost keepalived]# vim /etc/keepalived/check.sh
#!/bin/bash
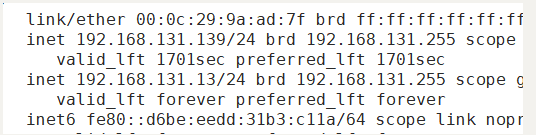
A=`ip a | grep 192.168.211.20 | wc -l`
B=`ps -ef | grep haproxy | grep -v grep | awk '{print $2}'`
if [ $A -gt 0 ];then
systemctl start haproxy
else
kill -9 $B
fi
测试
(1)
关闭Haproxy
因为脚本的原因他会自动再次开启
(1)
关闭主服务器网络
备份调度器将生成
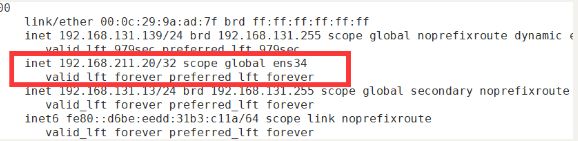
并通过脚本自动开启Haproxy服务
浏览器

在开启主调度器网卡

备份
因为自己也是刚学不全面,请见谅!!
自我认为写的比较详细的博客
http://www.yunweipai.com/35268.html