【YOLO-V3-SPP 源码解读】四、数据载入(数据增强)
以下的全部内容都是yolov3_spp源码的数据载入(数据增强)部分
下面的所有的内容都是按照代码执行的顺序进行讲解的
自定义数据集 继承自Dataset 所以要重写__len()__,__getitem()__抽象方法,另外目标检测一般还需要重写collate_fn函数。所以,理解这三个函数是理解数据增强(数据载入)的重中之重。
项目全部代码已上传至GitHub: yolov3-spp-annotations.
目录标题
- 一、数据增强的初始化:init函数
- 二、数据增强实现:getitem函数
-
- 2.1、val
-
- 2.1.1、load_image
- 2.1.2、letterbox
- 2.1.3、label转换
- 2.2、train
-
- 2.2.1、mosaic增强
- 2.2.2、random_affine增强
- 2.2.3、augment_hsv增强
- 2.2.4、左右上下翻转增强
- 三、数据打包collate_fn函数
- 四、coco_index
- Reference
一、数据增强的初始化:init函数
数据增强的初始化调用入口:
train.py
# ================================ step 1/5 数据处理(数据增强)=====================================
....
    # 训练集的图像尺寸指定为multi_scale_range中最大的尺寸(736)  数据增强
    train_dataset = LoadImagesAndLabels(train_path, imgsz_train, batch_size,
                                        augment=augment,
                                        hyp=hyp,  # augmentation hyperparameters
                                        rect=rect,  # rectangular training
                                        mosaic=mosaic)
    # 验证集的图像尺寸指定为img_size(512)
    val_dataset = LoadImagesAndLabels(test_path, imgsz_test, batch_size,
                                      hyp=hyp,
                                      rect=False)  # 将每个batch的图像调整到合适大小,可减少运算量(并不是512x512标准尺寸)
....
\qquad 其实初始化过程并没有什么实质性的操作,更多是一个定义参数的过程(self参数),以便在__getitem()__中进行数据增强操作,所以这部分代码只需要抓住self中的各个变量的含义就算差不多了。
掌握以下红色部分是如何在 init 函数中被定义的,就掌握了 init 函数。
self.img_files: 存放每张照片的地址
self.label_files: 存放每张照片的label的地址
self.imgs=[None] * n cache image 恐怕没那么大的显存
self.labels: 存放每4张图片的label值 [cls+xywh] xywh都是相对值 cache label
\qquad\qquad 并在cache label过程中统计nm, nf, ne, nd等4个变量
self.batch: 存放每张图片属于哪个batch \quad self.shape: 存放每张图片原始的shape
self.n: 总的图片数量 \quad\quad self.hyp \quad\quad self.img_size
数据增强相关变量: self.augment; \quad self.rect; \quad self.mosaic
rect=True: 会生成 self.batch_shapes:每个batch的所有图片统一输入网络的shape
dataset.py
import os
import random
from pathlib import Path
import numpy as np
import torch
from PIL import Image, ExifTags
from torch.utils.data import Dataset
from tqdm import tqdm
import cv2
import math
import matplotlib.pyplot as plt
from train_val_utils.post_processing_utils import xyxy2xywh
plt.rcParams['font.sans-serif'] = ['SimHei']  # 显示中文标签
plt.rcParams['axes.unicode_minus'] = False    # 这两行需要手动设置


help_url = 'https://github.com/ultralytics/yolov3/wiki/Train-Custom-Data'
img_formats = ['.bmp', '.jpg', '.jpeg', '.png', '.tif', '.dng']  # 支持的图片类型


'''
get orientation in exif tag
找到图像exif信息中对应旋转信息的key值
可交换图像文件格式(Exchangeable image file format 简称Exif)
是专门为数码相机的照片设定的,可以记录数码相机的属性信息和拍摄数据
'''
for orientation in ExifTags.TAGS.keys():
    if ExifTags.TAGS[orientation] == "Orientation":
        break

def exif_size(img):
    """
    获取图像的img size
    通过exif的orientation信息判断图像是否有旋转,如果有旋转则返回旋转前的size
    :param img: PIL图片
    :return: 图像的size
    """
    # Returns exif-corrected PIL size
    s = img.size  # (width, height) 获得图像宽高信息
    try:
        rotation = dict(img._getexif().items())[orientation]  # 获取数码相机图片的旋转信息
        # 调整照相机的照片方向
        if rotation == 6:  # rotation 270  顺时针翻转90度
            s = (s[1], s[0])
        elif rotation == 8:  # ratation 90  逆时针翻转90度
            s = (s[1], s[0])
    except:
        # 如果图像的exif信息中没有旋转信息,则跳过
        pass

    return s


class LoadImagesAndLabels(Dataset):  # for training/testing
    def __init__(self, path, img_size=416, batch_size=16, hyp=None,
                 rank=-1, augment=False, rect=False, mosaic=False):
        """
        自定义数据集 继承自Dataset 所以要重写__len()__,__getitem()__抽象方法
        __init__主要是得到 self.img_files  self.label_files  self.labels
        :param path: 指向data/my_train_data.txt或data/my_val_data.txt(存放着每一张图片的路径)
        :param img_size: 这里设置的是预处理后输出的图片尺寸
                         当为训练集时,设置的是训练过程中(开启多尺度)的最大尺寸 736
                         当为验证集时,设置的是最终使用的网络大小  512
        :param batch_size: 16
        :param hyp: 超参数字典,其中包含图像增强会使用到的超参数
        :param pad: 没用到
        :param rank: 单GPU训练rank=-1  进程管理
        :param augment: 训练集设置为True(augment_hsv),验证集设置为False
        :param rect: 是否使用rectangular training(矩形训练) 训练False 验证为True
        :param mosaic: 是否使用mosaic augment 训练True/False 验证为False
        这个阶段会生成: self.img_files: 存放每张照片的地址
                     self.label_files: 存放每张照片的label的地址
                     self.imgs=[None] * n  cache image 恐怕没那么大的显存
                     self.labels: 存放每4张图片的label值 [cls+xywh] xywh都是相对值 cache label
                                  并在cache label过程中统计nm, nf, ne, nd等4个变量
                     self.batch: 存放每张图片属于哪个batch  self.shape: 存放每张图片原始的shape
                     self.n: 总的图片数量     self.hyp  self.img_size
                     数据增强相关变量: self.augment; self.rect; self.mosaic
                     rect=True: 会生成self.batch_shapes 每个batch的所有图片统一输入网络的shape
        """
        # =============================== 1、将数据从文件中导入 ==========================================
        try:
            path = str(Path(path))  # train.txt/val.txt
            # parent = str(Path(path).parent) + os.sep
            if os.path.isfile(path):  # 判断path是否是一个文件
                # 打开txt文件,读取每一张图片的路径信息
                with open(path, "r") as f:
                    f = f.read().splitlines()
            else:
                raise Exception("%s does not exist" % path)

            # 检查每张图片后缀格式是否在支持的列表中,保存所有支持的图片的路径
            # img_formats = ['.bmp', '.jpg', '.jpeg', '.png', '.tif', '.dng']  .lower()转换为小写形式
            self.img_files = [x for x in f if os.path.splitext(x)[-1].lower() in img_formats]
        except Exception as e:
            raise FileNotFoundError("Error loading data from {}. {}".format(path, e))

        # 如果图片列表中没有图片,则报错
        n = len(self.img_files)  # 导入的图片数量
        assert n > 0, "No images found in %s. See %s" % (path, help_url)

        # ================================ 2、保存一些变量到self ====================================
        # batch index  bi 判断每个数据分别属于哪个batch
        # 将数据划分到一个个batch中    np.floor: 向下取整操作  .astype(np.int): float->int
        bi = np.floor(np.arange(n) / batch_size).astype(np.int)
        # 记录数据集划分后的总batch数  number of batches
        nb = bi[-1] + 1

        self.n = n  # number of images 图像总数目
        self.batch = bi  # batch index of image 记录哪些图片属于哪个batch
        self.img_size = img_size  # 这里设置的是预处理后输出的图片尺寸
        self.hyp = hyp  # 超参数字典,其中包含图像增强会使用到的超参数
        self.augment = augment  # 是否启用augment_hsv 默认是
        self.rect = rect  # 是否使用rectangular training  训练False 验证 True
        # 注意: 开启rect后,mosaic就默认关闭  训练True 验证False
        self.mosaic = mosaic  # load 4 images at a time into a mosaic (only during training)

        # Define labels
        # 遍历设置图像对应的label路径
        # 举例:(E:\yolo-v3-spp\voc\yolov3-my\data\dataset\train\images\2007_000027.jpg)
        #  ->  (E:\yolo-v3-spp\voc\yolov3-my\data\dataset\train\labels\2007_000027.txt)
        self.label_files = [x.replace("images", "labels").replace(os.path.splitext(x)[-1], ".txt")
                            for x in self.img_files]

        # ================================ 3、生成shape文件 ==============================
        # Read image shapes (wh)
        # 查看data文件下是否缓存有对应数据集的.shapes文件,里面存储了每张图像的width, height
        sp = path.replace(".txt", ".shapes")  # shapefile path
        try:
            with open(sp, "r") as f:  # read existing shapefile
                s = [x.split() for x in f.read().splitlines()]
                # 判断现有的shape文件中的行数(图像个数)是否与当前数据集中图像个数相等
                # 如果不相等则认为是不同的数据集,故重新生成shape文件
                assert len(s) == n, "shapefile out of aync"
        except Exception as e:
            # 重新生成shapes文件
            # print("read {} failed [{}], rebuild {}.".format(sp, e, sp))
            # tqdm库会显示处理的进度
            # 读取每张图片的size信息 重新生成shapes文件
            if rank in [-1, 0]:
                image_files = tqdm(self.img_files, desc="Reading image shapes")
            else:
                image_files = self.img_files
            s = [exif_size(Image.open(f)) for f in image_files]  # 打开所有图像获取shape信息
            # 将所有图片的shape信息保存在.shape文件中
            np.savetxt(sp, s, fmt="%g")  # overwrite existing (if any) 重写shape文件

        # 记录每张图像的原始尺寸
        self.shapes = np.array(s, dtype=np.float64)

        # ================================ 4、矩形训练设置 ==============================
        # Rectangular Training https://github.com/ultralytics/yolov3/issues/232
        # 只在验证时候开启 训练时候关闭
        # 如果为ture,训练网络时,会使用类似原图像比例的矩形(让最长边为img_size),而不是img_size x img_size
        # 注意: 开启rect后,mosaic就默认关闭
        if self.rect:
            # Sort by aspect ratio
            s = self.shapes  # wh 获取图片的长宽
            # 计算每个图片的高/宽比
            ar = s[:, 1] / s[:, 0]  # aspect ratio
            # argsort函数返回的是数组值从小到大的索引值
            # 按照高宽比例进行排序,这样后面划分的每个batch中的图像就拥有类似的高宽比
            irect = ar.argsort()
            # 根据排序后的顺序重新设置图像顺序、标签顺序以及shape顺序
            self.img_files = [self.img_files[i] for i in irect]
            self.label_files = [self.label_files[i] for i in irect]
            self.shapes = s[irect]  # wh
            ar = ar[irect]

            # set training image shapes
            # 计算每个batch采用的统一尺度
            shapes = [[1, 1]] * nb  # nb: number of batches
            for i in range(nb):
                ari = ar[bi == i]  # bi: batch index
                # 获取第i个batch中,最小和最大高宽比
                mini, maxi = ari.min(), ari.max()

                # 如果高/宽小于1(w > h),将w设为img_size(保证原图像尺度不变进行缩放)
                if maxi < 1:
                    shapes[i] = [maxi, 1]  # maxi: h相对指定尺度的比例  1: w相对指定尺度的比例
                # 如果高/宽大于1(w < h),将h设置为img_size(保证原图像尺度不变进行缩放)
                elif mini > 1:
                    shapes[i] = [1, 1 / mini]  # 1: h相对指定尺度的比例  1 / mini: w相对指定尺度的比例
            # 计算每个batch输入网络的shape值(向上设置为32的整数倍)
            # 要求每个batch_shapes的高宽都是32的整数倍,所以要先除以32,取整再乘以32(不过img_size如果是32倍数这里就没必要了)
            self.batch_shapes = np.ceil(np.array(shapes) * img_size / 32.).astype(np.int) * 32

        # ============================ 5、cache labels,并统计nm,nf,ne,nd ==============================
        self.imgs = [None] * n  # n为图像总数
        # label: [class, x, y, w, h] 其中的xywh都为相对值
        self.labels = [np.zeros((0, 5), dtype=np.float32)] * n
        labels_loaded = False
        nm, nf, ne, nd = 0, 0, 0, 0  # number mission, found, empty, duplicate
        # 这里分别命名是为了防止出现rect为False/True时混用导致计算的mAP错误
        # 当rect为True时会对self.images和self.labels进行重新排序
        # 这里是一个坑
        # 在dataset/train或dataset/val中生成label的numpy缓存文件  cache labels
        if rect is True:
            np_labels_path = str(Path(self.label_files[0]).parent) + ".rect.npy"  # saved labels in *.npy file
        else:
            np_labels_path = str(Path(self.label_files[0]).parent) + ".norect.npy"

        if os.path.isfile(np_labels_path):  # 如果缓存数据是一个文件就将文件中的标签信息载入self.labels中
            x = np.load(np_labels_path, allow_pickle=True)
            if len(x) == n:
                # 如果载入的缓存标签个数与当前计算的图像数目相同则认为是同一数据集,直接读缓存
                self.labels = x
                labels_loaded = True

        # 处理进度条只在第一个进程中显示
        if rank in [-1, 0]:
            pbar = tqdm(self.label_files)
        else:
            pbar = self.label_files

        for i, file in enumerate(pbar):
            # 如果labels_loaded=Treu  直接从cache中读取标签
            if labels_loaded is True:
                # 如果存在缓存直接从缓存读取
                l = self.labels[i]
            else:
                # 否则, 从文件读取标签信息
                try:
                    with open(file, "r") as f:
                        # 读取每个文件的每一行label,并按空格划分数据
                        l = np.array([x.split() for x in f.read().splitlines()], dtype=np.float32)
                except Exception as e:
                    print("An error occurred while loading the file {}: {}".format(file, e))
                    nm += 1  # file missing
                    continue

            # 如果该标签文件标注信息不为空的话
            if l.shape[0]:
                # 标签信息每行必须是五个值[class, x, y, w, h]
                assert l.shape[1] == 5, "> 5 label columns: %s" % file
                assert (l >= 0).all(), "negative labels: %s" % file
                assert (l[:, 1:] <= 1).all(), "non-normalized or out of bounds coordinate labels: %s" % file

                # 检查每一行,看是否有重复信息
                if np.unique(l, axis=0).shape[0] < l.shape[0]:  # duplicate rows
                    nd += 1

                self.labels[i] = l
                nf += 1  # file found

            else:
                ne += 1  # file empty

            # 处理进度条只在主进程中显示
            if rank in [-1, 0]:
                # 更新进度条描述信息
                pbar.desc = "Caching labels (%g found, %g missing, %g empty, %g duplicate, for %g images)" % (
                    nf, nm, ne, nd, n)
        assert nf > 0, "No labels found in %s." % os.path.dirname(self.label_files[0]) + os.sep

        # 如果标签信息没有被保存成numpy的格式,且训练样本数大于1000则将标签信息保存成numpy的格式
        # 保存标签的缓存信息 下次训练可以直接从缓存中取标签信息不用再到文件中拿(太慢)
        if not labels_loaded and n > 1000:
            print("Saving labels to %s for faster future loading" % np_labels_path)
            np.save(np_labels_path, self.labels)  # save for next time
\qquad 这部分总体还是比较简单的,相对比较难的地方在于self.rect相关代码,其他的部分代码比较简单,大家看下我写的详细的注释应该能看懂。下面着重的解释下self.rect部分的代码(对应上面代码的第四部分 if self.rect:…)
\qquad 矩形推理具体过程:将较长边设定为目标尺寸416/512…(必须是32的倍数),短边按比例缩放,再对短边进行较少填充使短边满足32的倍数。更具体的介绍可以看我的另一篇博客 【trick 7】Rect矩形推理 —— 显著的减少推理时间.
\qquad 这部分代码其实并不涉及矩形推理的实现过程,在init函数中的矩形推理部分主要是在为后面的实现做准备。这里做的准备是在重新定义self.shape,因为矩形训练的时候会改变图片的顺序和大小,所以需要重新定义self.shape。
\qquad 在正常训练的时候只需要将各个图片的照片的shape依次保存好即可(因为训练时是使用mosaic增强的,所以不需要管每张原图的shape是否是不一样的,它可以通过mosaic增强让每张图片的shape统一到一个尺度,使得一个batch的图片shape相同);
\qquad 但是当测试或推理时,他也需要每个batch的的图片都统一成一个shape,而测试或推理时一般又不使用mosaic增强,那么这时候怎么办呢?作者这里使用的是矩形推理(self.rect=True)。具体的过程等下实现再讲,这里就讲下在 init 函数中需要为矩形推理做什么准备:
1、矩形推理需要将长宽比相近的部分放在同一个batch中,方便统一待会统一成一个尺寸。所以这里要对每张图片的信息(self.img_files、self.label_files、self.shapes)重新排序,对应的就是这部分代码:
       # ================================ 4、矩形训练设置 ==============================
        # Rectangular Training https://github.com/ultralytics/yolov3/issues/232
        # 只在验证时候开启 训练时候关闭
        # 如果为ture,训练网络时,会使用类似原图像比例的矩形(让最长边为img_size),而不是img_size x img_size
        # 注意: 开启rect后,mosaic就默认关闭
        if self.rect:
            # Sort by aspect ratio
            s = self.shapes  # wh 获取图片的长宽
            # 计算每个图片的高/宽比
            ar = s[:, 1] / s[:, 0]  # aspect ratio
            # argsort函数返回的是数组值从小到大的索引值
            # 按照高宽比例进行排序,这样后面划分的每个batch中的图像就拥有类似的高宽比
            irect = ar.argsort()
            # 根据排序后的顺序重新设置图像顺序、标签顺序以及shape顺序
            self.img_files = [self.img_files[i] for i in irect]
            self.label_files = [self.label_files[i] for i in irect]
            self.shapes = s[irect]  # wh
            ar = ar[irect]
2、计算每个batch所采用的统一尺度(计算每一个batch的shape),对应这部分代码:
            # set training image shapes
            # 计算每个batch采用的统一尺度
            shapes = [[1, 1]] * nb  # nb: number of batches
            for i in range(nb):
                ari = ar[bi == i]  # bi: batch index
                # 获取第i个batch中,最小和最大高宽比
                mini, maxi = ari.min(), ari.max()

                # 如果高/宽小于1(w > h),将w设为img_size(保证原图像尺度不变进行缩放)
                if maxi < 1:
                    shapes[i] = [maxi, 1]  # maxi: h相对指定尺度的比例  1: w相对指定尺度的比例
                # 如果高/宽大于1(w < h),将h设置为img_size(保证原图像尺度不变进行缩放)
                elif mini > 1:
                    shapes[i] = [1, 1 / mini]  # 1: h相对指定尺度的比例  1 / mini: w相对指定尺度的比例
            # 计算每个batch输入网络的shape值(向上设置为32的整数倍)
            # 要求每个batch_shapes的高宽都是32的整数倍,所以要先除以32,取整再乘以32(不过img_size如果是32倍数这里就没必要了)
            self.batch_shapes = np.ceil(np.array(shapes) * img_size / 32.).astype(np.int) * 32
\qquad 这段代码是比较难理解的,下面根据 霹雳吧啦Wz的视频: 自定义数据集(上),解释下这部分是做了什么?
分三种情况:
- 一种是 maxi < 1,即最大的高宽比都小于1,如下图所示:

这个时候我们让这个batch的所有图片的shapes=[maxi, 1] = [0.75, 1],最后再乘以img_size(要求最后的高宽都是32的整数倍) => [385, 512] - 在一种是 mini>1, 即最小的高宽比都大于1,如下图所示:

这时候我们让这个batch的所有照片的shapes=[1, mini] = [1, 0.75],最后再乘以img_size(要求最后的高宽都是32的整数倍) => [512, 384] - 最后一种情况比较简单,当这个batch中的所有照片的高宽比既有大于1的,又有小于1的,那么我们将这个batch的所有照片的shapes = [1, 1] (其实什么也不用操作),最后再乘以img_size(要求最后的高宽都是32的整数倍) => [512, 512]。不过这种情况一般一个数据集只会发生一次。
二、数据增强实现:getitem函数
getitem代码:
       def __getitem__(self, index):
        """
        一般一次性执行batch_size次
        Args:
            self: self.img_files: 存放每张照片的地址
                  self.label_files: 存放每张照片的label的地址
                  self.imgs=[None] * n  cache image 恐怕没那么大的显存
                  self.labels: 存放每4张图片的label值 [cls+xywh] xywh都是相对值 cache label
                               并在cache label过程中统计nm, nf, ne, nd等4个变量
                  self.batch: 存放每张图片属于哪个batch  self.shape: 存放每张图片原始的shape
                  self.n: 总的图片数量     self.hyp  self.img_size
                  数据增强相关变量: self.augment; self.rect; self.mosaic
                  rect=True: 会生成self.batch_shapes 每个batch的所有图片统一输入网络的shape
            index: 传入要index再从datasets中随机抽3张图片进行mosaic增强以及一系列其他的增强,且label同时也要变换
        Returns:
            torch.from_numpy(img): 返回一张增强后的图片(tensor格式)
            labels_out: 这张图片对应的label (class, x, y, w, h) tensor格式
            self.img_files[index]: 当前这张图片所在的路径地址
            shapes: train=None  val=(原图hw),(缩放比例),(pad wh) 计算coco map时要用
            index: 当前这张图片的在self.中的index
        """

        hyp = self.hyp

        # mosaic增强 对图像进行4张图拼接训练
        if self.mosaic:
            # load mosaic
            img, labels = load_mosaic(self, index)
            shapes = None
        # 否则进行letterbox
        else:
            # 载入图片  载入图片后还会进行一次resize  将当前图片的最长边缩放到指定的大小(512), 较小边同比例缩放
            # load image img=(343, 512, 3)=(h, w, c)  (h0, w0)=(335, 500)  numpy  index=4
            # img: resize后的图片   (h0, w0): 原始图片的hw  (h, w): resize后的图片的hw
            # 这一步是将(335, 500, 3) resize-> (343, 512, 3)
            img, (h0, w0), (h, w) = load_image(self, index)

            # letterboxed shape=(384, 512)  numpy final
            shape = self.batch_shapes[self.batch[index]] if self.rect else self.img_size
            # letterbox 这一步将第一步缩放得到的图片再缩放到当前batch所需要的尺度 (343, 512, 3) pad-> (384, 512, 3)
            # (矩形推理需要一个batch的所有图片的shape必须相同,而这个shape在init函数中保持在self.batch_shapes中)
            # 这里没有缩放操作,所以这里的ratio永远都是(1.0, 1.0)  pad=(0.0, 20.5)
            img, ratio, pad = letterbox(img, shape, auto=False, scale_up=self.augment)

            # for COCO mAP rescaling  shape=(原图hw),(缩放比例),(pad wh) 计算coco map时要用
            shapes = (h0, w0), ((h / h0, w / w0), pad)

            # load labels
            # 这里是将label从相对原图尺寸(335, 500, 3)缩放到相对letterbox后的图片尺寸(384, 512, 3)
            # 且还将label: class, x, y, w, h => class, x1, y1, x2, y2  其中(x1, y1)为左下角 (x2, y2)为右上角
            labels = []
            x = self.labels[index]
            if x.size > 0:  # 当前图片的label中的目标个数>0
                labels = x.copy()  # label: class, x, y, w, h
                # 以左上角x坐标的转换为例(其他是类似的,自己可以画个图表示下)
                # x[:, 1] - x[:, 3] / 2 在原图上(335, 500, 3)左上角x的坐标
                # 再乘以ratio[0] * w就是相对resize后的图片(343, 512, 3)的左上角x的坐标
                # 再加上pad[0]就是相对letterbox pad后的图片(384, 512, 3)的左上角x的坐标
                labels[:, 1] = ratio[0] * w * (x[:, 1] - x[:, 3] / 2) + pad[0]
                labels[:, 2] = ratio[1] * h * (x[:, 2] - x[:, 4] / 2) + pad[1]
                labels[:, 3] = ratio[0] * w * (x[:, 1] + x[:, 3] / 2) + pad[0]
                labels[:, 4] = ratio[1] * h * (x[:, 2] + x[:, 4] / 2) + pad[1]

        # 对图像进行hsv增强训练
        if self.augment:
            # Augment imagespace
            if not self.mosaic:
                img, labels = random_affine(img, labels,
                                            degrees=hyp["degrees"],
                                            translate=hyp["translate"],
                                            scale=hyp["scale"],
                                            shear=hyp["shear"])

            # Augment colorspace
            augment_hsv(img, h_gain=hyp["hsv_h"], s_gain=hyp["hsv_s"], v_gain=hyp["hsv_v"])


        # covert labels + labels归一化
        nL = len(labels)  # number of labels/objects
        if nL:
            # convert labels xyxy to xywh
            labels[:, 1:5] = xyxy2xywh(labels[:, 1:5])

            # Normalize coordinates 0-1 归一化
            labels[:, [2, 4]] /= img.shape[0]  # height
            labels[:, [1, 3]] /= img.shape[1]  # width


        # 平移增强 随机左右翻转 + 随机上下翻转
        if self.augment:
            # 随机左右翻转
            # random left-right flip
            lr_flip = True
            # random.random() 生成一个[0,1]的随机数
            if lr_flip and random.random() < 0.5:
                img = np.fliplr(img)  # np.fliplr 将数组在左右方向翻转
                if nL:
                    labels[:, 1] = 1 - labels[:, 1]  # 1 - x_center  label也要映射

            # 随机上下翻转
            # random up-down flip
            ud_flip = False
            if ud_flip and random.random() < 0.5:
                img = np.flipud(img)  # np.flipud 将数组在上下方向翻转。
                if nL:
                    labels[:, 2] = 1 - labels[:, 2]  # 1 - y_center  label也要映射

            # # 测试平移增强
            # img = img[:, :, ::-1]  # BGR -> RGB
            # plt.imshow(img)
            # plt.show()

        # 将labels_out <- labels 并转化为Tensor格式
        labels_out = torch.zeros((nL, 6))  # nL: number of labels
        if nL:
            # labels_out[:, 0] = index
            labels_out[:, 1:] = torch.from_numpy(labels)


        # Convert BGR to RGB, and HWC to CHW(3x512x512)
        img = img[:, :, ::-1].transpose(2, 0, 1)
        img = np.ascontiguousarray(img)  # 加快运算 没什么用

        return torch.from_numpy(img), labels_out, self.img_files[index], shapes, index
\qquad 数据增强的 getitem 可以分为 train 和 val 两种方式,因为一般来说这两种方式的数据增强的方法是不相同的,这里我们分别来说说。
2.1、val
val 阶段进入getitem 函数的入口:
evaluate函数
   # 这里调用一次datasets.__len__; batch_size次datasets.__getitem__; 再执行1次datasets.collate_fn
    # 调用__len__将dataset分为batch个批次; 再调用__getitem__取出(增强后)当前批次的每一张图片(batch_size张);
    # 最后调用collate_fn函数将当前整个批次的batch_size张图片(增强过的)打包成一个batch, 方便送入网络进行前向传播
    for imgs, targets, paths, shapes, img_index in metric_logger.log_every(data_loader, 1, header):
\qquad 进入getitem函数后,先载入当前index的图片,再对当前这张图片进行处理,具体的流程:
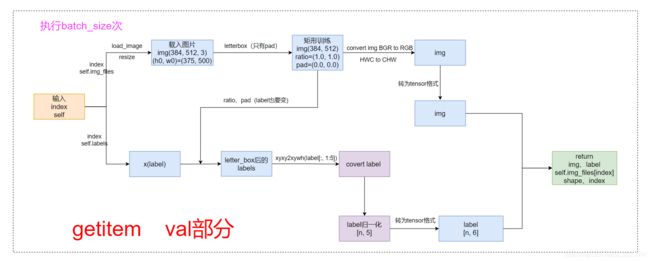
\qquad 可以看到在val部分并没有任何的数据增强操作,只有一个letterbox矩形推理的内容,其他的内容都是对img和label进行一些基本的转换操作,比较简单。所以这里就简单介绍一下其中的load_image和letterbox部分。
2.1.1、load_image
\qquad 导入原图,并对原图进行第一层resize, 使最长边和self.img_size(当前batch的所有图片尺度)相同,而较短边同比例缩放。
def load_image(self, index):
    """
    loads one image from dataset, returns img, original hw, resized hw
    :param self:
    :param index: 当前图片的index
    :return: img: resize后的图片
            (h0, w0): hw_original  原图的hw
            img.shape[:2]: hw_resized resize后的图片hw
    """
    # 按index从self.imgs中载入当前图片,但是由于缓存的内容一般会不够,所以我们一般不会用self.imgs(cache)保存所有的图片
    # 也就是说这里的img一般都是None
    img = self.imgs[index]
    if img is None:  # not cached 一般都不会使用cache缓存到self.imgs中
        path = self.img_files[index]  # 所以这里我们一般都是直接从文件中读取img  path: 当前图片的路径
        img = cv2.imread(path)  # BGR  (335, 500, 3) HWC
        assert img is not None, "Image Not Found " + path
        h0, w0 = img.shape[:2]  # orig hw  h0=335  w0=500
        # img_size 设置的是预处理后输出的图片尺寸   r=缩放比例
        r = self.img_size / max(h0, w0)  # resize image to img_size
        if r != 1:  # always resize down, only resize up if training with augmentation
            # cv2.INTER_AREA: 基于区域像素关系的一种重采样或者插值方式.该方法是图像抽取的首选方法, 它可以产生更少的波纹
            # cv2.INTER_LINEAR: 双线性插值,默认情况下使用该方式进行插值
            interp = cv2.INTER_AREA if r < 1 and not self.augment else cv2.INTER_LINEAR
            img = cv2.resize(img, (int(w0 * r), int(h0 * r)), interpolation=interp)
        return img, (h0, w0), img.shape[:2]  # img, hw_original, hw_resized
    else:
        return self.imgs[index], self.img_hw0[index], self.img_hw[index]  # img, hw_original, hw_resized
2.1.2、letterbox
letterbox 的img转换部分
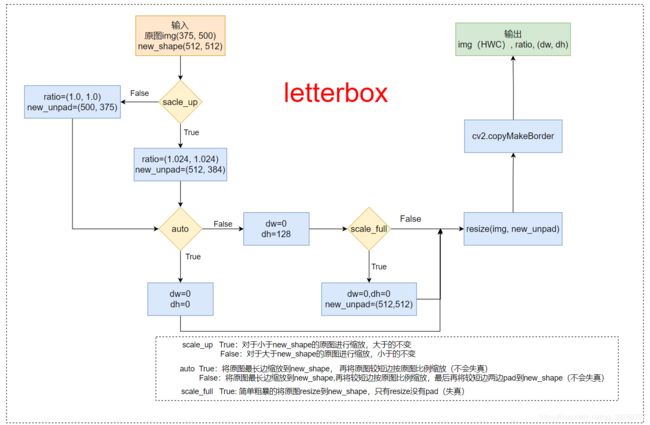
\qquad 此时:auto=False(需要pad), scale_fill=False, scale_up=False
\qquad 显然, 这部分不需要缩放,因为在这之前的load_image部分已经缩放过了(最长边等于指定大小,较短边等比例缩放),那么在letterbox只需要计算出较小边需要填充的pad, 再将较小边两边pad到相应大小(每个batch需要每张图片的大小,这个大小是不相同的)即可。
def letterbox(img: np.ndarray, new_shape=(416, 416), color=(114, 114, 114),
              auto=True, scale_fill=False, scale_up=True):
    """
    将图片缩放调整到指定大小
    :param img: 原图 hwc
    :param new_shape: 缩放后的最长边大小
    :param color: pad的颜色
    :param auto: True 保证缩放后的图片保持原图的比例 即 将原图最长边缩放到指定大小,再将原图较短边按原图比例缩放(不会失真)
                 False 将原图最长边缩放到指定大小,再将原图较短边按原图比例缩放,最后将较短边两边pad操作缩放到最长边大小(不会失真)
    :param scale_fill: True 简单粗暴的将原图resize到指定的大小 相当于就是resize 没有pad操作(失真)
    :param scale_up: True  对于小于new_shape的原图进行缩放,大于的不变
                     False 对于大于new_shape的原图进行缩放,小于的不变
    :return: img: letterbox后的图片 HWC
             ratio: wh ratios
             (dw, dh): w和h的pad
    """
    shape = img.shape[:2]  # 第一层resize后图片大小[h, w] = [343, 512]
    if isinstance(new_shape, int):
        new_shape = (new_shape, new_shape)  # (512, 512)

    # scale ratio (new / old)   1.024   new_shape=(384, 512)
    r = min(new_shape[0] / shape[0], new_shape[1] / shape[1])  # r=1
    if not scale_up:  # (for better test mAP) scale_up = False 对于大于new_shape(r<1)的原图进行缩放,小于new_shape(r>1)的不变
        r = min(r, 1.0)

    # compute padding
    ratio = r, r  # width, height ratios  (1, 1)
    new_unpad = int(round(shape[1] * r)), int(round(shape[0] * r))  # wh(512, 343) 保证缩放后图像比例不变
    dw, dh = new_shape[1] - new_unpad[0], new_shape[0] - new_unpad[1]  # wh padding dw=0 dh=41
    if auto:  # minimun rectangle 保证原图比例不变,将图像最大边缩放到指定大小
        # 这里的取余操作可以保证padding后的图片是32的整数倍(416x416),如果是(512x512)可以保证是64的整数倍
        dw, dh = np.mod(dw, 64), np.mod(dh, 64)  # wh padding dw=0 dh=0
    elif scale_fill:  # stretch 简单粗暴的将图片缩放到指定尺寸
        dw, dh = 0, 0
        new_unpad = new_shape
        ratio = new_shape[0] / shape[1], new_shape[1] / shape[0]  # wh ratios
    # 在较小边的两侧进行pad, 而不是在一侧pad
    dw /= 2  # divide padding into 2 sides 将padding分到上下,左右两侧  dw=0
    dh /= 2                                                       # dh=20.5

    # shape:[h, w]  new_unpad:[w, h]
    if shape[::-1] != new_unpad:  # 将原图resize到new_unpad(长边相同,比例相同的新图)
        img = cv2.resize(img, new_unpad, interpolation=cv2.INTER_LINEAR)
    top, bottom = int(round(dh - 0.1)), int(round(dh + 0.1))  # 计算上下两侧的padding  # top=20 bottom=21
    left, right = int(round(dw - 0.1)), int(round(dw + 0.1))  # 计算左右两侧的padding  # left=0 right=0

    # add border/pad
    img = cv2.copyMakeBorder(img, top, bottom, left, right, cv2.BORDER_CONSTANT, value=color)

    # img: (384, 512, 3) ratio=(1.0,1.0) 这里没有缩放操作  (dw,dh)=(0.0, 20.5)
    return img, ratio, (dw, dh)
2.1.3、label转换
            # load labels
            # 这里是将label从相对原图尺寸(335, 500, 3)缩放到相对letterbox后的图片尺寸(384, 512, 3)
            # 且还将label: class, x, y, w, h => class, x1, y1, x2, y2  其中(x1, y1)为左下角 (x2, y2)为右上角
            labels = []
            x = self.labels[index]
            if x.size > 0:  # 当前图片的label中的目标个数>0
                labels = x.copy()  # label: class, x, y, w, h
                # 以左上角x坐标的转换为例(其他是类似的,自己可以画个图表示下)
                # x[:, 1] - x[:, 3] / 2 在原图上(335, 500, 3)左上角x的坐标
                # 再乘以ratio[0] * w就是相对resize后的图片(343, 512, 3)的左上角x的坐标
                # 再加上pad[0]就是相对letterbox pad后的图片(384, 512, 3)的左上角x的坐标
                labels[:, 1] = ratio[0] * w * (x[:, 1] - x[:, 3] / 2) + pad[0]
                labels[:, 2] = ratio[1] * h * (x[:, 2] - x[:, 4] / 2) + pad[1]
                labels[:, 3] = ratio[0] * w * (x[:, 1] + x[:, 3] / 2) + pad[0]
                labels[:, 4] = ratio[1] * h * (x[:, 2] + x[:, 4] / 2) + pad[1]
总结下
val部分主要是做了三件事:
1、load_image将图片从文件中加载出来,并resize到相应的尺寸(最长边等于我们需要的尺寸,最短边等比例缩放);
2、letterbox将之前resize后的图片再pad到我们所需要的放到dataloader中(collate_fn函数)的尺寸(矩形训练要求同一个batch中的图片的尺寸必须保持一致);
3、将label从相对原图尺寸(原文件中图片尺寸)缩放到相对letterbox pad后的图片尺寸。因为前两部分的图片尺寸发生了变化,同样的我们的label也需要发生相应的变化。
2.2、train
train 阶段进入getitem 函数的入口:
train_one_epoch函数
    # 这里调用一次datasets.__len__; batch_size次datasets.__getitem__; 再执行1次datasets.collate_fn
    # 调用__len__将dataset分为batch个批次; 再调用__getitem__取出(增强后)当前批次的每一张图片(batch_size张);
    # 最后调用collate_fn函数将当前整个批次的batch_size张图片(增强过的)打包成一个batch, 方便送入网络进行前向传播
    for i, (imgs, targets, paths, _, _) in enumerate(metric_logger.log_every(data_loader, print_freq, header)):
\qquad 进入getitem函数后,先载入当前index的图片,再对当前这张图片进行处理,具体的流程:
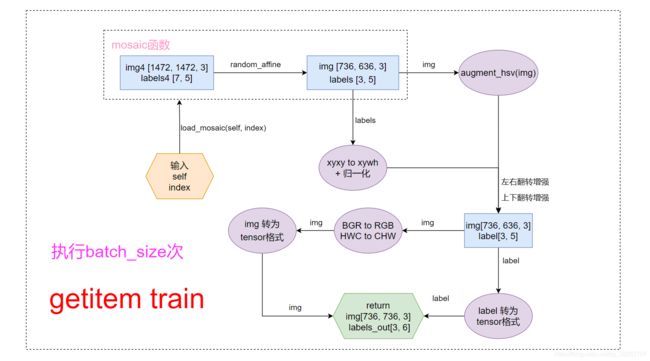
train部分比较复杂,因为train的过程中,添加了很多的数据增强操作,而有些数据增强操作不仅需要改变img的尺度,还需要改变其对应label的值。这里我我就几种增强方法:mosaic(最重要,用的最多)、仿射增强random_affine、色域hsv增强、平移增强 作详细说明。
2.2.1、mosaic增强
def load_mosaic(self, index):
    """
    将四张图片拼接在一张马赛克图像中
    :param self:
    :param index: 需要获取的图像索引
    :return: img4: mosaic和仿射增强后的一张图片
             labels4: img4对应的target
    """
    # loads images in a mosaic
    labels4 = []  # 用于存放拼接图像(4张图拼成一张)的label信息
    s = self.img_size  # s=736
    # 随机初始化拼接图像的中心点坐标  [s*0.5, s*1.5]之间随机取2个数作为拼接图像的中心坐标
    xc, yc = [int(random.uniform(s * 0.5, s * 1.5)) for _ in range(2)]  # mosaic center x, y  (xc, yc)=(989, 925)
    # 从dataset中随机寻找三张图像进行拼接 [14, 26, 2, 16] 再随机选三张图片的index
    indices = [index] + [random.randint(0, len(self.labels) - 1) for _ in range(3)]  # 3 additional image indices
    # 遍历四张图像进行拼接 4张不同大小的图像 => 1张[1472, 1472, 3]的图像
    for i, index in enumerate(indices):
        # load image   # 每次拿一张图片 并将这张图片resize到self.size(h,w)
        img, _, (h, w) = load_image(self, index)
        # place img in img4
        if i == 0:  # top left   原图[375, 500, 3] load_image->[552, 736, 3]   hwc
            # 创建马赛克图像 [1472, 1472, 3]=[h, w, c]
            img4 = np.full((s * 2, s * 2, img.shape[2]), 114, dtype=np.uint8)  # only_yolov3 image with 4 tiles
            # 计算马赛克图像中的坐标信息(将图像填充到马赛克图像中)   w=736  h = 552  马赛克图像:(x1a,y1a)左上角 (x2a,y2a)右下角
            x1a, y1a, x2a, y2a = max(xc - w, 0), max(yc - h, 0), xc, yc  # xmin, ymin, xmax, ymax (large image)
            # 计算截取的图像区域信息(以xc,yc为第一张图像的右下角坐标填充到马赛克图像中,丢弃越界的区域)  图像:(x1b,y1b)左上角 (x2b,y2b)右下角
            x1b, y1b, x2b, y2b = w - (x2a - x1a), h - (y2a - y1a), w, h  # xmin, ymin, xmax, ymax (small image)
        elif i == 1:  # top right
            # 计算马赛克图像中的坐标信息(将图像填充到马赛克图像中)
            x1a, y1a, x2a, y2a = xc, max(yc - h, 0), min(xc + w, s * 2), yc
            # 计算截取的图像区域信息(以xc,yc为第二张图像的左下角坐标填充到马赛克图像中,丢弃越界的区域)
            x1b, y1b, x2b, y2b = 0, h - (y2a - y1a), min(w, x2a - x1a), h
        elif i == 2:  # bottom left
            # 计算马赛克图像中的坐标信息(将图像填充到马赛克图像中)
            x1a, y1a, x2a, y2a = max(xc - w, 0), yc, xc, min(s * 2, yc + h)
            # 计算截取的图像区域信息(以xc,yc为第三张图像的右上角坐标填充到马赛克图像中,丢弃越界的区域)
            x1b, y1b, x2b, y2b = w - (x2a - x1a), 0, max(xc, w), min(y2a - y1a, h)
        elif i == 3:  # bottom right
            # 计算马赛克图像中的坐标信息(将图像填充到马赛克图像中)
            x1a, y1a, x2a, y2a = xc, yc, min(xc + w, s * 2), min(s * 2, yc + h)
            # 计算截取的图像区域信息(以xc,yc为第四张图像的左上角坐标填充到马赛克图像中,丢弃越界的区域)
            x1b, y1b, x2b, y2b = 0, 0, min(w, x2a - x1a), min(y2a - y1a, h)

        # 将截取的图像区域填充到马赛克图像的相应位置   img4[h, w, c]
        # 将图像img的【(x1b,y1b)左上角 (x2b,y2b)右下角】区域截取出来填充到马赛克图像的【(x1a,y1a)左上角 (x2a,y2a)右下角】区域
        img4[y1a:y2a, x1a:x2a] = img[y1b:y2b, x1b:x2b]  # img4[ymin:ymax, xmin:xmax]
        # 计算pad(当前图像边界与马赛克边界的距离,越界的情况padw/padh为负值)  用于后面的label映射
        padw = x1a - x1b  # 当前图像与马赛克图像在w维度上相差多少
        padh = y1a - y1b  # 当前图像与马赛克图像在h维度上相差多少

        # Labels 获取对应拼接图像的labels信息
        x = self.labels[index]
        labels = x.copy()  # 深拷贝,防止修改原数据
        if x.size > 0:  # Normalized xywh to pixel xyxy format
            # 计算标注数据在马赛克图像中的
            # w * (x[:, 1] - x[:, 3] / 2): 将相对原图片(375, 500, 3)的label映射到load_image函数resize后的图片(552, 736, 3)上
            # w * (x[:, 1] - x[:, 3] / 2) + padw: 将相对resize后图片(552, 736, 3)的label映射到相对img4的图片(1472, 1472, 3)上
            labels[:, 1] = w * (x[:, 1] - x[:, 3] / 2) + padw
            labels[:, 2] = h * (x[:, 2] - x[:, 4] / 2) + padh
            labels[:, 3] = w * (x[:, 1] + x[:, 3] / 2) + padw
            labels[:, 4] = h * (x[:, 2] + x[:, 4] / 2) + padh
        labels4.append(labels)

    # Concat/clip labels4 把labels4([(2, 5), (1, 5), (3, 5), (1, 5)] => (7, 5))压缩到一起
    if len(labels4):
        labels4 = np.concatenate(labels4, 0)
        # label[:, 1:]中的所有元素的值(位置信息)必须在[0, 2*s]之间,小于0就令其等于0,大于2*s就等于2*s   out: 返回
        np.clip(labels4[:, 1:], 0, 2 * s, out=labels4[:, 1:])  # use with clip 防止越界

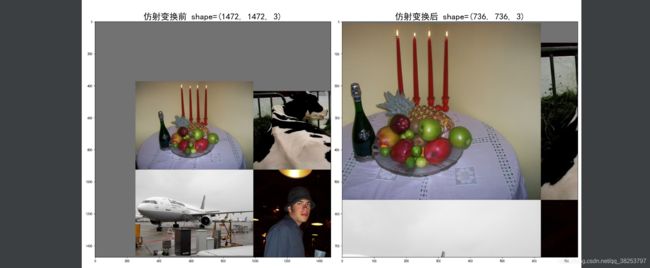
    # 测试代码  测试前面的mosaic效果
    # plt.figure(figsize=(20, 16))
    # img4 = img4[:, :, ::-1]  # BGR -> RGB
    # plt.subplot(1, 2, 1)
    # plt.imshow(img4)
    # plt.title('仿射变换前 shape={}'.format(img4.shape), fontsize=25)


    # affine Augment  随机仿射变换 [1472, 1472, 3] => [736, 736, 3]
    # img4 = img4[s // 2: int(s * 1.5), s // 2:int(s * 1.5)]  # center crop (WARNING, requires box pruning)
    img4, labels4 = random_affine(img4, labels4,
                                  degrees=self.hyp['degrees'],
                                  translate=self.hyp['translate'],
                                  scale=self.hyp['scale'],
                                  shear=self.hyp['shear'],
                                  border=-s // 2)  # border to remove

    # 测试代码 测试random_affine随机仿射变换效果
    # plt.subplot(1, 2, 2)
    # plt.imshow(img4)
    # plt.title('仿射变换后 shape={}'.format(img4.shape), fontsize=25)
    # plt.show()

    return img4, labels4
\qquad 这里的代码是数据增强里面最难的, 也是最有价值的,mosaic是非常非常有用的数据增强trick, 一定要熟练掌握。
mosaic算法步骤:
1、在 [img_size x 0.5 : img_size x 1.5] 之间随机选择一个拼接中心的坐标(xc, yc)。需要注意的是这里的img_size是我们需要的图片的大小, 而mosaic初步增强得到的图片的shape应该是2倍的img_size.
2、从 [0, len(label)-1] 之间随机选择3张图片的index, 与传入的图片index共同组成4张照片的集合indices.
-------------------------------------------------------------开始剪切img4---------------------------------------------------------------------
3、for 4张图片:
3.0)、如果是第一张图片,就初始化mosaic图片img4
3.1)、 得到mosaic图片的坐标信息(这个坐标区域是用来填充图像的):左上角(x1a, y1a), (x2a, y2a)右下角
3.2)、得到截取的图像区域的坐标信息:(x1b,y1b)左上角 (x2b,y2b)右下角
3.3)、将图像img的【(x1b,y1b)左上角 (x2b,y2b)右下角】区域截取出来填充到马赛克图像的【(x1a,y1a)左上角 (x2a,y2a)右下角】 注:这里的填充有三种可能的情况,后面会仔细的讨论。
3.4)、计算当前图像边界与马赛克边界的距离,用于后面的label映射
3.5)、拼接4张图像的labels信息为一张labels4
--------------------------------------------到这里就得到了img4[2 x img_size, 2 x img_size, 3]--------------------------------------
4、Concat labels4
5、clip labels4, 防止越界
-------------------------------------------到这里又得到了labels4(相对img4的)---------------------------------------------------------
6、random_affine仿射变换(affine Augment),将img4[2 x img_size, 2 x img_size, 3]=>img4 [img_size, img_size, 3]. 这里我就不仔细的介绍仿射变换了,下一节会详细介绍的。
--------------------------------------------------到这里就得到了img4[img_size, img_size, 3]--------------------------------------------
7、最后retrun img4[img_size, img_size, 3] 和 labels4(相对img4的)
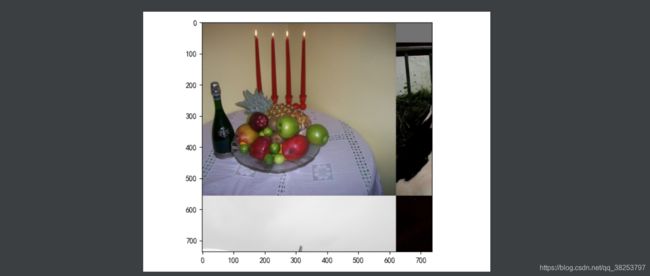
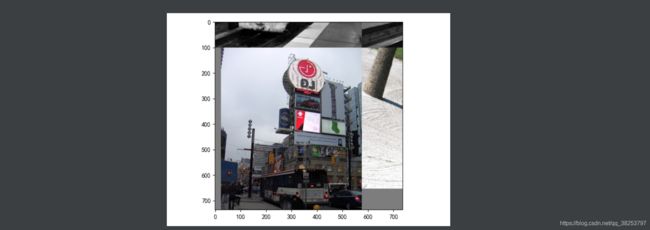
4张图片进行拼接的时候,通常会出现如下三种情况:
![]()
![]()
![]()
效果显示:
注意: 这个效果是在仿射变换之后的。详解的效果也已看下节,可以更加清楚mosaic和random_affine仿射变化的区别。
2.2.2、random_affine增强
1、何为仿射变换random_affine?
\qquad Affine Transformation 是一种二维坐标到二维坐标之间的线性变换,保持二维图形的 “平直性”(译注:straightness,即变换后直线还是直线不会打弯,圆弧还是圆弧)和 “平行性”(译注:parallelness,其实是指保二维图形间的相对位置关系不变,平行线还是平行线,相交直线的交角不变)。
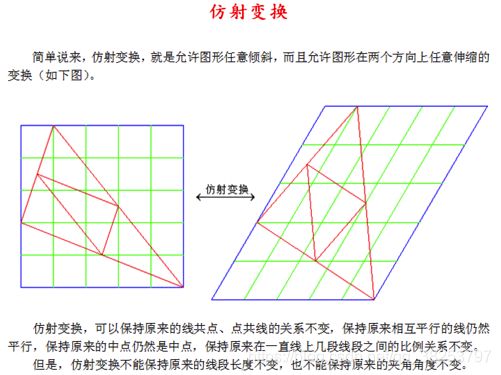
\qquad 仿射变换还可以通过一系列的原子变换的复合来实现,包括: 旋转(Rotation)、缩放(Scale)、平移(Translation)和剪切(Shear)。翻转(Flip)操作不在这个函数中,放在了函数外面。
2、代码实现
\qquad 这里的仿射变换参数是来自于hyp.yaml超参文件:
....
degrees: 0.  # image rotation (+/- deg)
translate: 0.  # image translation (+/- fraction)
scale: 0.  # image scale (+/- gain)
shear: 0.  # image shear (+/- deg)
....
\qquad 在代码中仿射变化是接在mosaic变化后面作为mosaic的一部分的,这里我们就接着mosaic操作取得img4[2 x img_size, 2 x img_size, 3] 和labels4(相对img4的 class+xyxy)往后看。
def random_affine(img, targets=(), degrees=10,
                  translate=.1, scale=.1, shear=10, border=0):
    """
    仿射变换 增强
    torchvision.transforms.RandomAffine(degrees=(-10, 10), translate=(.1, .1), scale=(.9, 1.1), shear=(-10, 10))
    https://medium.com/uruvideo/dataset-augmentation-with-random-homographies-a8f4b44830d4
    :param img: img4  [2 x img_size, 2 x img_size, 3]=[1472, 1472, 3]  img_size为我们指定的图片大小
    :param targets: labels4 [:, cls+x1y1x2y2]=[7, 5]  相对img4的   (x1,y1)左下角  (x2,y2)右上角
    :param degrees: 旋转角度  0
    :param translate: 水平或者垂直移动的范围  0
    :param scale: 放缩尺度因子  0
    :param shear: 裁剪因子 0
    :param border: -368  图像每条边需要裁剪的宽度  也可以理解为裁剪后的图像与裁剪前的图像的border
    :return: img: 经过仿射变换后的图像 img [img_size, img_size, 3]
             targets=[3, 5] 相对仿射变换后的图像img的target 之所以这里的target少了,是因为仿射变换使得一些target消失或者变得极小了
    """
    # 设定输出图片的 H W
    # border=-s // 2 = -368 所以最后图片的大小直接减半 [img_size, img_size, 3]
    height = img.shape[0] + border * 2  # 最终输出图像的H
    width = img.shape[1] + border * 2   # 最终输出图像的W

    # ============================开始仿射变化=============================
    # 需要注意的是,其实opencv是实现了仿射变换的, 不过我们要先生成仿射变换矩阵M
    # 旋转Rotation and 缩放Scale
    R = np.eye(3)  # 初始化R = [[1,0,0], [0,1,0], [0,0,1]]    (3, 3)
    # a: 随机生成旋转角度 范围在(-degrees, degrees)
    # a += random.choice([-180, -90, 0, 90])  # add 90deg rotations to small rotations
    a = random.uniform(-degrees, degrees)
    # s: 随机生成旋转后图像的缩放比例 范围在(1 - scale, 1 + scale)
    # s = 2 ** random.uniform(-scale, scale)
    s = random.uniform(1 - scale, 1 + scale)
    # cv2.getRotationMatrix2D: 二维旋转缩放函数
    # 参数 angle:旋转角度  center: 旋转中心(默认就是图像的中心)  scale: 旋转后图像的缩放比例
    R[:2] = cv2.getRotationMatrix2D(angle=a, center=(img.shape[1] / 2, img.shape[0] / 2), scale=s)

    # 平移Translation
    T = np.eye(3)  # 初始化T = [[1,0,0], [0,1,0], [0,0,1]]    (3, 3)
    T[0, 2] = random.uniform(-translate, translate) * img.shape[0] + border  # x translation (pixels)
    T[1, 2] = random.uniform(-translate, translate) * img.shape[1] + border  # y translation (pixels)

    # 剪切Shear
    S = np.eye(3)  # 初始化T = [[1,0,0], [0,1,0], [0,0,1]]
    S[0, 1] = math.tan(random.uniform(-shear, shear) * math.pi / 180)  # x shear (deg)
    S[1, 0] = math.tan(random.uniform(-shear, shear) * math.pi / 180)  # y shear (deg)

    # Combined rotation matrix  @ 表示矩阵乘法
    M = S @ T @ R  # ORDER IS IMPORTANT HERE!! 生成仿射变换矩阵M
    if (border != 0) or (M != np.eye(3)).any():
        # image changed  img  [1472, 1472, 3] => [736, 736, 3]
        # cv2.warpAffine: opencv实现的仿射变换函数
        # 参数: img: 需要变化的图像   M: 变换矩阵  dsize: 输出图像的大小  flags: 插值方法的组合(int 类型!)
        #       borderValue: (重点!)边界填充值  默认情况下,它为0。
        img = cv2.warpAffine(img, M[:2], dsize=(width, height), flags=cv2.INTER_LINEAR, borderValue=(114, 114, 114))

    # 同时label也需要变换  同样的也是使用矩阵操作变换
    n = len(targets)  # n=7
    if n:
        # warp points
        xy = np.ones((n * 4, 3))  # xy=(28, 3)  全是1
        # 前两个数存放位置信息 第三位置为1  每4行存放一个target的位置信息,分别是左上角(x1,y1) 右下角(x2,y2) 左上角(x1,y2) 右下角(x2,y1)
        xy[:, :2] = targets[:, [1, 2, 3, 4, 1, 4, 3, 2]].reshape(n * 4, 2)
        # [4*n, 3] -> [n, 8]  8=[x1,y1, x2,y2, x1,y2, x2,y1]=[左上角 右下角 左上角 右下角]
        xy = (xy @ M.T)[:, :2].reshape(n, 8)

        # create new boxes
        x = xy[:, [0, 2, 4, 6]]  # [n, 4] [n, x1+x2+x1+x2]
        y = xy[:, [1, 3, 5, 7]]  # [n, 4] [n, y1+y2+y1+y2]
        # xy: [n, 4]=[n, x1y1x2y2]   (x1,y1)左下角 (x2,y2)右下角
        xy = np.concatenate((x.min(1), y.min(1), x.max(1), y.max(1))).reshape(4, n).T

        # # apply angle-based reduction of bounding boxes
        # radians = a * math.pi / 180
        # reduction = max(abs(math.sin(radians)), abs(math.cos(radians))) ** 0.5
        # x = (xy[:, 2] + xy[:, 0]) / 2
        # y = (xy[:, 3] + xy[:, 1]) / 2
        # w = (xy[:, 2] - xy[:, 0]) * reduction
        # h = (xy[:, 3] - xy[:, 1]) * reduction
        # xy = np.concatenate((x - w / 2, y - h / 2, x + w / 2, y + h / 2)).reshape(4, n).T

        # reject warped points outside of image
        # 对坐标进行裁剪,防止越界
        xy[:, [0, 2]] = xy[:, [0, 2]].clip(0, width)   # x方向检查防止越界
        xy[:, [1, 3]] = xy[:, [1, 3]].clip(0, height)  # y方向检查防止越界
        w = xy[:, 2] - xy[:, 0]  # 求出targets的w
        h = xy[:, 3] - xy[:, 1]  # 求出targets的h

        # 计算调整后的每个box的面积
        area = w * h
        # 计算调整前的每个box的面积
        area0 = (targets[:, 3] - targets[:, 1]) * (targets[:, 4] - targets[:, 2])
        # 计算每个box的比例
        ar = np.maximum(w / (h + 1e-16), h / (w + 1e-16))  # aspect ratio
        # 选取长宽大于4个像素,且调整前后面积比例大于0.2,且比例小于10的box
        # 之所以这里要用这些指标来筛选target,因为原图的targets有可能经过一系列的平移翻转剪切等操作,
        # target没了或者变得很小很小了,所以这里的target也可能要发生很大的变化,要重新生成新图img对应的target
        i = (w > 4) & (h > 4) & (area / (area0 * s + 1e-16) > 0.2) & (ar < 10)

        targets = targets[i]     # 根据i删除掉由于仿射变换而消失或极小的targets
        targets[:, 1:5] = xy[i]  # 生成最终的target(相对仿射变换生成的img)

    return img, targets
\qquad 注意:这里的仿射增强是放在mosaic后面的,其实只起到了平移缩放的作用,但是放射变换实质在远远不止如此,还有很多都没用上,详细要修改的话就需要改上面hyp.cfg的参数值了。
2.2.3、augment_hsv增强
\quad 色域增强图片并不发生移动,所有不需要改变label,只需要 img 增强即可。
\quad 还要注意的是这个hsv增强是随机生成各个色域参数的,所以每次增强的效果都是不同的。
def augment_hsv(img, h_gain=0.5, s_gain=0.5, v_gain=0.5):
    """
    hsv增强  处理图像hsv,不对label进行任何处理
    :param img: 待处理图片  BGR [736, 736]
    :param h_gain: h通道色域参数 用于生成新的h通道
    :param s_gain: h通道色域参数 用于生成新的s通道
    :param v_gain: h通道色域参数 用于生成新的v通道
    :return: 返回hsv增强后的图片 img
    """
    r = np.random.uniform(-1, 1, 3) * [h_gain, s_gain, v_gain] + 1  # random gains
    hue, sat, val = cv2.split(cv2.cvtColor(img, cv2.COLOR_BGR2HSV))  # 图像的通道拆分 h s v
    dtype = img.dtype  # uint8

    x = np.arange(0, 256, dtype=np.int16)
    lut_hue = ((x * r[0]) % 180).astype(dtype)         # 生成新的h通道
    lut_sat = np.clip(x * r[1], 0, 255).astype(dtype)  # 生成新的s通道
    lut_val = np.clip(x * r[2], 0, 255).astype(dtype)  # 生成新的v通道

    # 图像的通道合并 img_hsv=h+s+v
    # cv2.LUT(hue, lut_hue)   通道色域变换 输入变换前通道hue 和变换后通道lut_hue
    img_hsv = cv2.merge((cv2.LUT(hue, lut_hue), cv2.LUT(sat, lut_sat), cv2.LUT(val, lut_val))).astype(dtype)
    # no return needed  dst:输出图像
    cv2.cvtColor(img_hsv, cv2.COLOR_HSV2BGR, dst=img)

    # Histogram equalization  直方图均衡化 这里暂时用不到
    # if random.random() < 0.2:
    #     for i in range(3):
    #         img[:, :, i] = cv2.equalizeHist(img[:, :, i])
涉及到的三个变量来自hyp.yaml超参文件:
....
hsv_h: 0.0138  # image HSV-Hue augmentation (fraction)
hsv_s: 0.678  # image HSV-Saturation augmentation (fraction)
hsv_v: 0.36  # image HSV-Value augmentation (fraction)
....
效果显示:
变亮
变暗
2.2.4、左右上下翻转增强
这部分比较简单,直接上代码:
        # 平移增强 随机左右翻转 + 随机上下翻转
        if self.augment:
            # 随机左右翻转
            # random left-right flip
            lr_flip = True
            # random.random() 生成一个[0,1]的随机数
            if lr_flip and random.random() < 0.5:
                img = np.fliplr(img)  # np.fliplr 将数组在左右方向翻转
                if nL:
                    labels[:, 1] = 1 - labels[:, 1]  # 1 - x_center  label也要映射

            # 随机上下翻转
            # random up-down flip
            ud_flip = False
            if ud_flip and random.random() < 0.5:
                img = np.flipud(img)  # np.flipud 将数组在上下方向翻转。
                if nL:
                    labels[:, 2] = 1 - labels[:, 2]  # 1 - y_center  label也要映射
三、数据打包collate_fn函数
\qquad 很多人以为写完 init 和 getitem 函数数据增强就做完了,我们在分类任务中的确写完这两个函数就可以了,因为系统中是给我们写好了一个collate_fn函数的,但是在目标检测中我们却需要重写collate_fn函数,下面我会仔细的讲解这样做的原因(代码中注释)。
1、调用接口:
train.py
    # dataloader
    # nw = min([os.cpu_count(), batch_size if batch_size > 1 else 0, 8])  # number of workers
    # 这里调用LoadImagesAndLabels.__len__ 将train_dataset按batch_size分成batch份
    train_dataloader = torch.utils.data.DataLoader(train_dataset,
                                                   batch_size=batch_size,
                                                   num_workers=0,  # win一般设为0
                                                   shuffle=not rect,
                                                   # Shuffle=True unless rectangular training is used
                                                   pin_memory=True,
                                                   collate_fn=train_dataset.collate_fn)

    val_datasetloader = torch.utils.data.DataLoader(val_dataset,
                                                    batch_size=batch_size,
                                                    num_workers=0,
                                                    pin_memory=True,
                                                    collate_fn=val_dataset.collate_fn)
2、函数代码:
@staticmethod
    def collate_fn(batch):
        """
        :param batch: 里面有batch_size个元组 对应的是调用了batch_size次getitem函数的返回值
        :return: img=[batch_size, 3, 736, 736]
                 label=[target_sums, 6]  6:表示当前target属于哪一张图+class+x+y+w+h
                 path     shapes      index
        """
        # img: 一个tuple 由batch_size个tensor组成 每个tensor表示一张图片
        # label: 一个tuple 由batch_size个tensor组成 每个tensor存放一张图片的所有的target信息
        #        label[6, object_num] 6中的第一个数代表一个batch中的第几张图
        # path: 一个tuple 由4个str组成, 每个str对应一张图片的地址信息
        # index: 一个tuple (index1, index2, index3...) 存放着当前batch中每张图片的index
        img, label, path, shapes, index = zip(*batch)  # transposed
        for i, l in enumerate(label):
            l[:, 0] = i  # add target image index for build_targets()

        # 返回的img=[batch_size, 3, 736, 736]
        #      torch.stack(img, 0): 将batch_size个[3, 736, 736]的矩阵拼成一个[batch_size, 3, 736, 736]
        # label=[target_sums, 6]  6:表示当前target属于哪一张图+class+x+y+w+h
        #      torch.cat(label, 0): 将[n1,6]、[n2,6]、[n3,6]...拼接成[n1+n2+n3+..., 6]
        # 这里之所以拼接的方式不同是因为img拼接的时候它的每个部分的形状是相同的,都是[3, 736, 736]
        # 而我label的每个部分的形状是不一定相同的,每张图的目标个数是不一定相同的(label肯定也希望用stack,更方便,但是不能那样拼)
        # 如果每张图的目标个数是相同的,那我们就可能不需要重写collate_fn函数了
        return torch.stack(img, 0), torch.cat(label, 0), path, shapes, index
注意:这个函数一般是当调用了batch_size次 getitem 函数后才会调用一次这个函数,对batch_size张图片和对应的label进行打包。
四、coco_index
这个函数为了后面方便计算mAP用的,就不过多解释了,感兴趣的看下代码(反正我没看)。
 def coco_index(self, index):
        """方便后面计算MAP用  该方法是专门为cocotools统计标签信息准备,不对图像和标签作任何处理"""
        # load image
        # path = self.img_files[index]
        # img = cv2.imread(path)  # BGR
        # import matplotlib.pyplot as plt
        # plt.imshow(img[:, :, ::-1])
        # plt.show()

        # assert img is not None, "Image Not Found " + path
        # o_shapes = img.shape[:2]  # orig hw
        o_shapes = self.shapes[index][::-1]  # wh to hw

        # Convert BGR to RGB, and HWC to CHW(3x512x512)
        # img = img[:, :, ::-1].transpose(2, 0, 1)
        # img = np.ascontiguousarray(img)

        # load labels
        labels = []
        x = self.labels[index]
        if x.size > 0:
            labels = x.copy()  # label: class, x, y, w, h
        return torch.from_numpy(labels), o_shapes
Reference
b站大佬1 霹雳吧啦Wz: YOLOv3 SPP源码解析(Pytorch版)
b站大佬2 比飞鸟贵重的多_HKL: 基于深度学习的目标检测算法
