Nginx 反向代理
最近web服务器因需要增加安全防护开通了web防火墙。但是防火墙支持80,8080(也有跟多端口的,但是它贵啊,它贵啊),没办法,只能修改结构了。
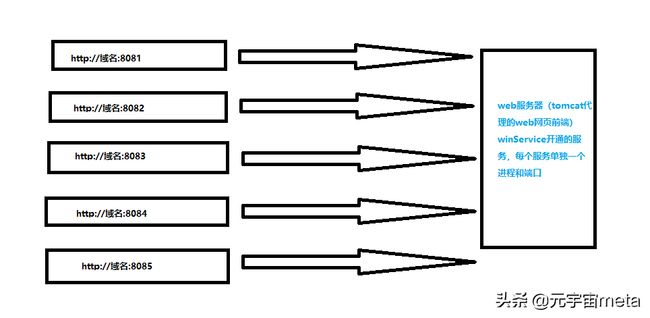
最初的服务架构:1对1 服务。及时增加服务,tomcat也不用重启,因为只用它运行了web前端。
图片来源我的头条号:

第一步:准备nginx 我这里服务器是server2019
下载win nginx 最新版本 nginx-1.20.2 安装到一个可靠目录
进入nginx 的目录html目录下。分别创建zhangsan、lisi 文件夹。每个文件夹下方一个index网页。
index网页内容如下:
注意两个网页不同地方就在请求的域名后跟的路由不同一个是zhangsan、一个是lisi
Document
ceshi_1
Document
ceshi_1

接下来配置nginx
进入nginx conf 目录下找到 nginx.conf文件,编辑
#user  nobody;
worker_processes  1;

#error_log  logs/error.log;
#error_log  logs/error.log  notice;
#error_log  logs/error.log  info;

#pid        logs/nginx.pid;


events {
    worker_connections  1024;
}


http {
    include       mime.types;
    default_type  application/octet-stream;

    #log_format  main  '$remote_addr - $remote_user [$time_local] "$request" '
    #                  '$status $body_bytes_sent "$http_referer" '
    #                  '"$http_user_agent" "$http_x_forwarded_for"';

    #access_log  logs/access.log  main;

    sendfile        on;
    #tcp_nopush     on;

    #keepalive_timeout  0;
    keepalive_timeout  65;

    #gzip  on;

    server {
        listen       8888;
        server_name  localhost;

        #charset koi8-r;

        #access_log  logs/host.access.log  main;
        root html;
        #location / {
         #   root   html/mine_ceshi1;
         #   index  index.html index.htm;
        #}
        location ^~/zhangsan/v1/{
            index  index.html index.htm;
            proxy_pass	http://127.0.0.1:9001/v1/;
        }
        location ^~/lisi/v1/{
	add_header 'Access-Control-Allow-Origin' $http_origin;
	add_header 'Access-Control-Allow-Credentials' 'true';
	add_header 'Access-Control-Allow-Methods' 'GET, POST, OPTIONS';
	add_header 'Access-Control-Allow-Headers' 'DNT,web-token,app-token,Authorization,Accept,Origin,Keep-Alive,User-Agent,X-Mx-ReqToken,X-Data-Type,X-Auth-Token,X-Requested-With,If-Modified-Since,Cache-Control,Content-Type,Range';
	add_header 'Access-Control-Expose-Headers' 'Content-Length,Content-Range';
	if ($request_method = 'OPTIONS') {
		add_header 'Access-Control-Max-Age' 1728000;
		add_header 'Content-Type' 'text/plain; charset=utf-8';
		add_header 'Content-Length' 0;
		return 204;
	}
            root   html/mine_ceshi2;
            index  index.html index.htm;
            proxy_pass	http://12.7.0.0.1:12002/v1/;
        }

        #error_page  404              /404.html;

        # redirect server error pages to the static page /50x.html
        #
        error_page   500 502 503 504  /50x.html;
        location = /50x.html {
              root   html;
        }

        # proxy the PHP scripts to Apache listening on 127.0.0.1:80
        #
        #location ~ \.php$ {
        #    proxy_pass   http://127.0.0.1;
        #}

        # pass the PHP scripts to FastCGI server listening on 127.0.0.1:9000
        #
        #location ~ \.php$ {
        #    root           html;
        #    fastcgi_pass   127.0.0.1:9000;
        #    fastcgi_index  index.php;
        #    fastcgi_param  SCRIPT_FILENAME  /scripts$fastcgi_script_name;
        #    include        fastcgi_params;
        #}

        # deny access to .htaccess files, if Apache's document root
        # concurs with nginx's one
        #
        #location ~ /\.ht {
        #    deny  all;
        #}
    }


    # another virtual host using mix of IP-, name-, and port-based configuration
    #
    #server {
    #    listen       8000;
    #    listen       somename:8080;
    #    server_name  somename  alias  another.alias;

    #    location / {
    #        root   html;
    #        index  index.html index.htm;
    #    }
    #}


    # HTTPS server
    #
    #server {
    #    listen       443 ssl;
    #    server_name  localhost;

    #    ssl_certificate      cert.pem;
    #    ssl_certificate_key  cert.key;

    #    ssl_session_cache    shared:SSL:1m;
    #    ssl_session_timeout  5m;

    #    ssl_ciphers  HIGH:!aNULL:!MD5;
    #    ssl_prefer_server_ciphers  on;

    #    location / {
    #        root   html;
    #        index  index.html index.htm;
    #    }
    #}

}
说明:1. location ^~/zhangsan/v1/ 配置说明张三请求的proxy 端口9001
2. location ^~/lisi/v1/ 配置说明张三请求的proxy 端口12002
至此配置启动完成。
启动nginx 双击ngInx.exe即可
如果需要重新生效配置文件 ngInx -s reload 即可
这个时候分别访问
注意这里为了和现有的80 重复分开我的nginx 用了8888 端口
localhost:8888/zhangsan
localhost:8888/lisi
查看网页数据返回是不是不同了?
哈哈 ,有兴趣的小伙伴试下吧。有问题留言。
下一篇文章: nginx 负载均衡配置
欢迎关注。