Windows服务的制作、安装可以参考这篇:
C#.NET 操作Windows服务(安装、卸载) - runliuv - 博客园 (cnblogs.com)
本篇会在这个解决方案基础上,继续修改。
一、制作WCF
我们在原有解决方案上添加一个“WCF 服务库”,为名“WcfYeah”。
在WcfYeah中额外引用System.ServiceModel.Web.dll程序集。
修改IService1.cs:
using System.Runtime.Serialization;
using System.ServiceModel;
using System.ServiceModel.Web;

namespace WcfYeah
{
    // 注意: 使用“重构”菜单上的“重命名”命令,可以同时更改代码和配置文件中的接口名“IService1”。
    [ServiceContract]
    public interface IService1
    {
        [OperationContract]
        [WebInvoke(ResponseFormat = WebMessageFormat.Json, RequestFormat = WebMessageFormat.Json)]
        CompositeType geta(CompositeType composite);
    }

    // 使用下面示例中说明的数据约定将复合类型添加到服务操作。
    // 可以将 XSD 文件添加到项目中。在生成项目后,可以通过命名空间“WcfYeah.ContractType”直接使用其中定义的数据类型。
    [DataContract]
    public class CompositeType
    {
        bool boolValue = true;
        string stringValue = "Hello ";

        [DataMember]
        public bool BoolValue
        {
            get { return boolValue; }
            set { boolValue = value; }
        }

        [DataMember]
        public string StringValue
        {
            get { return stringValue; }
            set { stringValue = value; }
        }
    }
}
修改Service1.cs:
using System;
using System.ServiceModel;

namespace WcfYeah
{
    // 调整 ServiceBehavior,使其支持并发
    [ServiceBehavior(ConcurrencyMode = ConcurrencyMode.Multiple, InstanceContextMode = InstanceContextMode.PerCall, UseSynchronizationContext = false)]
    public class Service1 : IService1
    {
        public CompositeType geta(CompositeType composite)
        {
            CompositeType myret = new CompositeType();
            try
            {
                if(composite==null)
                    myret.StringValue = "[0]输入实体为空:" + DateTime.Now.ToString();
                else
                    myret.StringValue = "[1]输入实体不为空:" + DateTime.Now.ToString();
            }
            catch (Exception ex)
            {
                myret.StringValue = "发生异常:" + ex.Message;
            }
            return myret;
        }

    }
}
增加一个WCFServer.cs:
using System.Net;
using System.ServiceModel.Web;
using System.Threading;

namespace WcfYeah
{
    public class WCFServer
    {
        public WebServiceHost host = null;

        public WCFServer()
        {
            #region 优化调整
            //对外连接数,根据实际情况加大
            if (ServicePointManager.DefaultConnectionLimit < 100)
                System.Net.ServicePointManager.DefaultConnectionLimit = 100;

            int workerThreads;//工作线程数
            int completePortsThreads; //异步I/O 线程数
            ThreadPool.GetMinThreads(out workerThreads, out completePortsThreads);

            int blogCnt = 100;
            if (workerThreads < blogCnt)
            {
                // MinThreads 值不要超过 (max_thread /2  ),否则会不生效。要不然就同时加大max_thread
                ThreadPool.SetMinThreads(blogCnt, blogCnt);
            }
            #endregion

            //注意:这里是实现类,不是接口,否则会报:ServiceHost 仅支持类服务类型。
            host = new WebServiceHost( typeof(WcfYeah.Service1));
        }


        public void Start()
        {
            host.Open();
        }

        public void Close()
        {
            if (host != null)
            {
                host.Close();
            }
        }
    }
}
二、在Windows服务中调用WCF
在windows服务库中引用WcfYeah这个项目,再引用System.ServiceModel.dll 和System.ServiceModel.Web.dll程序集。
修改windows服务的OnStart和OnStop方法,完整内容如下:
using CommonUtils;
using System;
using System.ServiceModel;
using System.ServiceProcess;
using WcfYeah;

namespace ADemoWinSvc
{
    public partial class Service1 : ServiceBase
    {
        WCFServer aw = null;
        public Service1()
        {
            InitializeComponent();
        }

        protected override void OnStart(string[] args)
        {
            try
            {
                if (aw == null)
                {
                    aw = new WCFServer();
                }
                if (aw.host.State == CommunicationState.Opening || aw.host.State == CommunicationState.Opened)
                {
                    GLog.WLog("[1]服务已启动。");
                    return;
                }

                aw.Start();

                GLog.WLog("[2]服务已启动");
            }
            catch (Exception ex)
            {
                GLog.WLog("OnStart ex:" + ex.Message);
            }
        }

        protected override void OnStop()
        {
            try
            {
                aw.Close();

                GLog.WLog("服务已停止");
            }
            catch (Exception ex)
            {
                GLog.WLog("OnStop ex:" + ex.Message);
            }
        }
    }
}
在windows服务库中添加一个应用配置文件(App.config),用来配置WCF服务,内容如下:
xml version="1.0" encoding="utf-8" ?>
<configuration>

  <system.serviceModel>
    <services>
      <service name="WcfYeah.Service1" behaviorConfiguration="behaviorThrottled">
        <host>
          <baseAddresses>
            <add baseAddress = "http://localhost:16110/myapi/" />
          baseAddresses>
        host>


        <endpoint address="" binding="webHttpBinding" contract="WcfYeah.IService1" bindingConfiguration="WebHttpBinding_IService">
        endpoint>
      service>
    services>
    <bindings>
      <webHttpBinding>
        <binding name="WebHttpBinding_IService"  maxBufferSize="2147483647" maxReceivedMessageSize="2147483647" maxBufferPoolSize="2147483647">
          <readerQuotas maxDepth="2147483647" maxStringContentLength="2147483647" maxArrayLength="2147483647" maxBytesPerRead="2147483647"
                maxNameTableCharCount="2147483647"/>
        binding>
      webHttpBinding>
    bindings>
    <behaviors>
      <serviceBehaviors>
        <behavior name="behaviorThrottled">
          <serviceThrottling
            maxConcurrentCalls="96"
            maxConcurrentSessions="600"
            maxConcurrentInstances="696"
          />

          <serviceMetadata httpGetEnabled="False" httpsGetEnabled="False"/>

          <serviceDebug includeExceptionDetailInFaults="False" />
        behavior>
      serviceBehaviors>
    behaviors>
  system.serviceModel>

configuration>
编译ADemoWinSvc项目,将编译好的ADemoWinSvc.exe、ADemoWinSvc.exe.config和WcfYeah.dll这3个文件复制到WINFORM程序编译输出目录,与Windows服务操作.exe文件放在一起。
用管理员权限启动Windows服务操作.exe,点击安装按钮。
进入Logs文件夹,查看Logs文件,如果显示“[2]服务已启动”,说明windows服务安装成功,WCF正常启动。
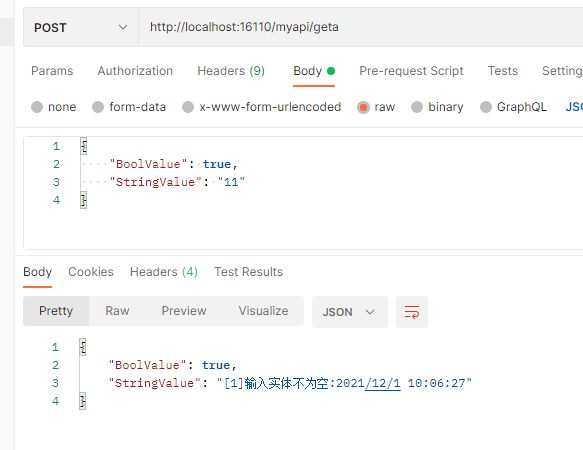
使用POSTMAN调用。
地址:http://localhost:16110/myapi/geta
方法:POST
请求报文:


