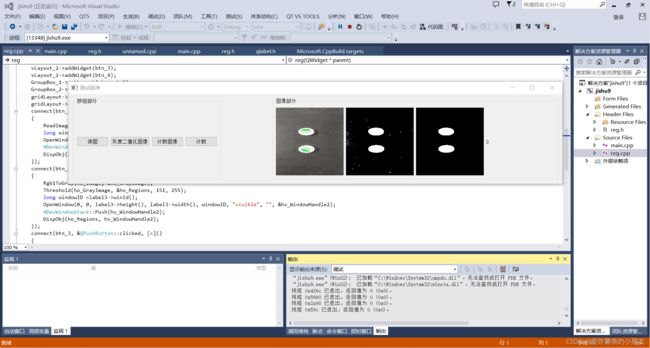
基于vs,qt项目实现基于halcon的对图像的处理
#ifndef REG_H
#define REG_H
#include main.cpp
#include "reg.h"
#include reg.cpp
#include "reg.h"

reg::reg(QWidget *parent)
: QWidget(parent)
{

	ui设计
	QGridLayout *gridLayout = new QGridLayout(this);
	gridLayout->setSpacing(100);
	gridLayout->setSpacing(150);
	QHBoxLayout *vLayout_1 = new QHBoxLayout;
	QHBoxLayout *vLayout_2 = new QHBoxLayout;
	QGroupBox *GroupBox_1 = new QGroupBox(QStringLiteral("图像部分"));
	QGroupBox *GroupBox_2 = new QGroupBox(QStringLiteral("按钮部分"));
	QPushButton *btn_1 = new QPushButton(QStringLiteral("读图"));
	QPushButton *btn_2 = new QPushButton(QStringLiteral("灰度二值化图像"));
	QPushButton *btn_3 = new QPushButton(QStringLiteral("计数图像"));
	QPushButton *btn_4 = new QPushButton(QStringLiteral("计数"));
	label2 = new QLabel(QString::fromLocal8Bit("初始图像"));
	label2->setFixedSize(200, 200);
	label3 = new QLabel(QString::fromLocal8Bit("灰度二值化图像"));
	label3->setFixedSize(200, 200);
	label4 = new QLabel(QString::fromLocal8Bit("计数图像"));
	label4->setFixedSize(200, 200);
	label = new QLabel(QStringLiteral("计数"));
	label->setFixedSize(200, 200);
	vLayout_1->addWidget(label2);
	vLayout_1->addWidget(label3);
	vLayout_1->addWidget(label4);
	vLayout_1->addWidget(label);
	vLayout_2->addWidget(btn_1);
	vLayout_2->addWidget(btn_2);
	vLayout_2->addWidget(btn_3);
	vLayout_2->addWidget(btn_4);
	GroupBox_1->setLayout(vLayout_1);
	GroupBox_2->setLayout(vLayout_2);
	gridLayout->addWidget(GroupBox_2, 0, 0);
	gridLayout->addWidget(GroupBox_1, 0, 1);
	/****************************************************************************/
	connect(btn_1, &QPushButton::clicked,  [=]()//点击按钮读图
	{

		ReadImage(&ho_Image, "D:\\shijue\\2gepinggai.jpg");
		///
		long windowID2 = label2->winId();
		OpenWindow(0, 0, label2->height(), label2->width(), windowID2, "visible", "", &hv_WindowHandle);
		HDevWindowStack::Push(hv_WindowHandle);
		DispObj(ho_Image, hv_WindowHandle);
	});
	connect(btn_2, &QPushButton::clicked, [=]()//点击图像进行灰度二值化
	{

		Rgb1ToGray(ho_Image, &ho_GrayImage);
		Threshold(ho_GrayImage, &ho_Regions, 151, 255);
		//
		long windowID =label3->winId();
		OpenWindow(0, 0, label3->height(), label3->width(), windowID, "visible", "", &hv_WindowHandle2);
		HDevWindowStack::Push(hv_WindowHandle2);
		DispObj(ho_Regions, hv_WindowHandle2);
	});
	connect(btn_3, &QPushButton::clicked, [=]()//点击,腐蚀颜色分割。
	{

		OpeningCircle(ho_Regions, &ho_RegionOpening, 8);
		Connection(ho_RegionOpening, &ho_ConnectedRegions);
		//
		long windowID3 = label4->winId();
		OpenWindow(0, 0, label4->height(), label4->width(), windowID3, "visible", "", &hv_WindowHandle3);
		DispObj(ho_ConnectedRegions, hv_WindowHandle3);
	});
	connect(btn_4, &QPushButton::clicked, [=]()//计数
	{

		CountObj(ho_ConnectedRegions, &hv_Number);
		//
		int a = hv_Number;
		label->setText(QString::number(a));
	});
}
reg::~reg()
{

}
其实这个用法更多是在qt项目里面调用halcon而已,总体更多是halcon绑定qt中的label窗口的难题,现在我暂时没有解决将label自适应化图片这个功能,不过也是受制于相机的图像一般都是正方形的原因,其实这个问题并不是很重要,但是遇到很多问题,我现在仍然没有解决,如果我能解决的话我在发一份原创博客吧。不过我不知道几时可以解决,这些问题确实麻烦。
