利用Mediapipe和DGL实现火影结印识别与追踪---特殊手势识别
目录
1.DGl概述
2.DGL安装
3.DGL实操
4.图卷积神经网络模块
5.模型(转载于恩培大佬)
还记得曾经日思夜想也要追番的火影吗?
曾经的招式还可以依稀回忆起来吗?
今天我们来用图卷积神经网络GCN+DGL+Mediapipe的方式实现火影结印识别!!!
听起来是不是特别有意思呢??
先看一段演示视频:
利用Mediapipe和DGL实现特殊手势识别---【火影结印识别】
雀氏有点意思!!!!!
接下来咱们细细道来!!!
首先从DGL说起·······
1.DGl概述
Deep Graph Library (DGL) 是一个在图上做深度学习的框架。在0.3.1版本中,DGL支持了基于PyTorch的化学模型库。
官方网址:
Welcome to Deep Graph Library Tutorials and Documentation — DGL 0.7.2 documentation
官方文档里边实现了目前常见的图神经网络模型,直接搭积木一样构造网络,然后构造好数据就可以了。
2.DGL安装
pip install dgl3.DGL实操
3.1用DGL构造图
import dgl
import numpy as np
def build_karate_club_graph():
# All 78 edges are stored in two numpy arrays. One for source endpoints
# while the other for destination endpoints.
src = np.array([1, 2, 2, 3, 3, 3, 4, 5, 6, 6, 6, 7, 7, 7, 7, 8, 8, 9, 10, 10,
10, 11, 12, 12, 13, 13, 13, 13, 16, 16, 17, 17, 19, 19, 21, 21,
25, 25, 27, 27, 27, 28, 29, 29, 30, 30, 31, 31, 31, 31, 32, 32,
32, 32, 32, 32, 32, 32, 32, 32, 32, 33, 33, 33, 33, 33, 33, 33,
33, 33, 33, 33, 33, 33, 33, 33, 33, 33])
dst = np.array([0, 0, 1, 0, 1, 2, 0, 0, 0, 4, 5, 0, 1, 2, 3, 0, 2, 2, 0, 4,
5, 0, 0, 3, 0, 1, 2, 3, 5, 6, 0, 1, 0, 1, 0, 1, 23, 24, 2, 23,
24, 2, 23, 26, 1, 8, 0, 24, 25, 28, 2, 8, 14, 15, 18, 20, 22, 23,
29, 30, 31, 8, 9, 13, 14, 15, 18, 19, 20, 22, 23, 26, 27, 28, 29, 30,
31, 32])
# Edges are directional in DGL; Make them bi-directional.
u = np.concatenate([src, dst])
print(u)
v = np.concatenate([dst, src])
# Construct a DGLGraph
return dgl.DGLGraph((u, v))
G = build_karate_club_graph()
print('We have %d nodes.' % G.number_of_nodes())
print('We have %d edges.' % G.number_of_edges())
可以看出dgl.DGLGraph((u,v))中,u为头节点,v为尾节点。DGL的边是有向边,但这里社交链接关系是双向的,所以既需要头节点指向尾节点的边,也需要尾节点指向头节点的边,于是将节点间的链接关系拆分为头节点和尾节点,分别存储在两个数组(src和dst),然后再按两种顺序拼接起来,让u前半部分是头节点,后半部分是尾节点,v则相反,以此实现双向的边。
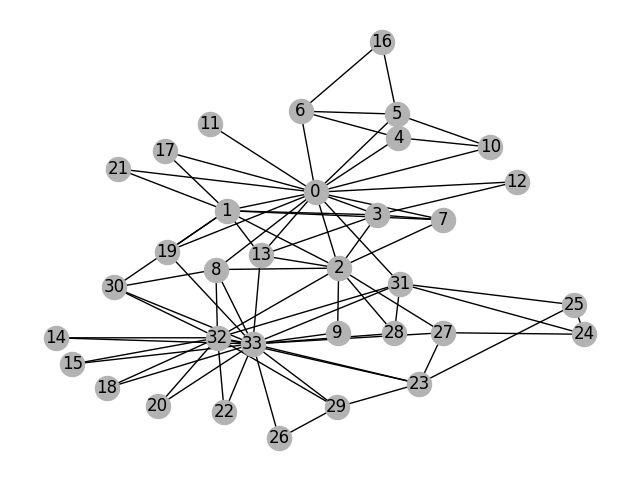
3.2利用matplotlib库实现可视化
除了matplotlib库之外,还是用了networkx工具,因为先让刚才用DGLGraph构建的图转为networkx格式的无向图,然后使用nx.draw()画图。(注意:当要显示图还需要plt.show())
import networkx as nx
import matplotlib.pyplot as plt
# Since the actual graph is undirected, we convert it for visualization
# purpose.
nx_G = G.to_networkx().to_undirected()
# Kamada-Kawaii layout usually looks pretty for arbitrary graphs
pos = nx.kamada_kawai_layout(nx_G)
nx.draw(nx_G, pos, with_labels=True, node_color=[[.7, .7, .7]])
plt.show()
这里的’nx.kamada_kawai_layout’为布局设置,即画风。还有以下几种可选择:
circular_layout:节点在一个圆环上均匀分布
random_layout:节点随机分布
shell_layout:节点在同心圆上分布
spring_layout: 用Fruchterman-Reingold算法排列节点(样子类似多中心放射状)
spectral_layout:根据图的拉普拉斯特征向量排列节点
4.图卷积神经网络模块
class GCN(nn.Module):
def __init__(self, in_feats, h_feats, num_classes):
super(GCN, self).__init__()
self.conv1 = GraphConv(in_feats, h_feats)
self.conv2 = GraphConv(h_feats, num_classes)
def forward(self, g, in_feat):
h = self.conv1(g, in_feat)
h = F.relu(h)
h = self.conv2(g, h)
g.ndata['h'] = h
return dgl.mean_nodes(g, 'h')
5.实现的主干代码(部分转载恩培大佬)
import sys
import os
import os.path as osp
import numpy as np
import cv2
import torch
import torch.nn as nn
import torch.nn.functional as F
import torchvision.transforms as transforms
from torch.nn.parallel.data_parallel import DataParallel
import torch.backends.cudnn as cudnn
import json
from matplotlib import pyplot as plt
from mpl_toolkits.mplot3d import Axes3D
import time
import dgl
from dgl.nn import GraphConv
import mediapipe as mp
import glob
import math
sys.path.insert(0, osp.join('..', 'main'))
sys.path.insert(0, osp.join('..', 'data'))
sys.path.insert(0, osp.join('..', 'common'))
# 图卷积神经网络模型
class GCN(nn.Module):
def __init__(self, in_feats, h_feats, num_classes):
super(GCN, self).__init__()
self.conv1 = GraphConv(in_feats, h_feats)
self.conv2 = GraphConv(h_feats, num_classes)
def forward(self, g, in_feat):
h = self.conv1(g, in_feat)
h = F.relu(h)
h = self.conv2(g, h)
g.ndata['h'] = h
return dgl.mean_nodes(g, 'h')
# 输入一个手部图片,返回3D坐标
class HandPose:
def __init__(self):
cfg.set_args('0')
cudnn.benchmark = True
# joint set information is in annotations/skeleton.txt
self.joint_num = 21 # single hand
self.joint_type = {'right': np.arange(0,self.joint_num), 'left': np.arange(self.joint_num,self.joint_num*2)}
# snapshot load
model_path = './snapshot_19.pth.tar'
assert osp.exists(model_path), 'Cannot find self.hand_pose_model at ' + model_path
print('Load checkpoint from {}'.format(model_path))
self.hand_pose_model = get_model('test', self.joint_num)
# self.hand_pose_model = DataParallel(self.hand_pose_model).cuda()
self.hand_pose_model = DataParallel(self.hand_pose_model, device_ids='cpu')
# ckpt = torch.load(model_path, map_location='cpu')
ckpt = torch.load(model_path, map_location='cpu')
self.hand_pose_model.load_state_dict(ckpt['network'], strict=False)
self.hand_pose_model.eval()
# prepare input image
self.transform = transforms.ToTensor()
def get3Dpoint(self,x_t_l, y_t_l, cam_w, cam_h,original_img):
bbox = [x_t_l, y_t_l, cam_w, cam_h] # xmin, ymin, width, height
original_img_height, original_img_width = original_img.shape[:2]
bbox = process_bbox(bbox, (original_img_height, original_img_width, original_img_height))
img, trans, inv_trans = generate_patch_image(original_img, bbox, False, 1.0, 0.0, cfg.input_img_shape)
img = self.transform(img.astype(np.float32))/255
# img = img.cuda()[None,:,:,:]
img = img.cpu()[None, :, :, :]
# forward
inputs = {'img': img}
targets = {}
meta_info = {}
with torch.no_grad():
out = self.hand_pose_model(inputs, targets, meta_info, 'test')
img = img[0].cpu().numpy().transpose(1,2,0) # cfg.input_img_shape[1], cfg.input_img_shape[0], 3
joint_coord = out['joint_coord'][0].cpu().numpy() # x,y pixel, z root-relative discretized depth
rel_root_depth = out['rel_root_depth'][0].cpu().numpy() # discretized depth
hand_type = out['hand_type'][0].cpu().numpy() # handedness probability
# restore joint coord to original image space and continuous depth space
joint_coord[:,0] = joint_coord[:,0] / cfg.output_hm_shape[2] * cfg.input_img_shape[1]
joint_coord[:,1] = joint_coord[:,1] / cfg.output_hm_shape[1] * cfg.input_img_shape[0]
joint_coord[:,:2] = np.dot(inv_trans, np.concatenate((joint_coord[:,:2], np.ones_like(joint_coord[:,:1])),1).transpose(1,0)).transpose(1,0)
joint_coord[:,2] = (joint_coord[:,2]/cfg.output_hm_shape[0] * 2 - 1) * (cfg.bbox_3d_size/2)
# restore right hand-relative left hand depth to continuous depth space
rel_root_depth = (rel_root_depth/cfg.output_root_hm_shape * 2 - 1) * (cfg.bbox_3d_size_root/2)
# right hand root depth == 0, left hand root depth == rel_root_depth
joint_coord[self.joint_type['left'],2] += rel_root_depth
# 3D节点信息
return joint_coord
# map_location = torch.device('cpu')
# 动作识别类
class HandRecognize:
def __init__(self):
self.modelGCN = GCN(3, 16, 6)
self.modelGCN.load_state_dict(torch.load('./saveModel/handsModel.pth', map_location='cpu'))
self.modelGCN.eval()
self.handPose = HandPose()
self.mp_hands = mp.solutions.hands
# 中指与矩形左上角点的距离
self.L1 = 0
self.L2 = 0
# image实例,以便另一个类调用
self.image=None
self.overlay_list = self.init_overlay_list()
self.overlay_list_last_type = 0
# 初始化,获取动作对应图片
def init_overlay_list(self):
overlay_list = []
img_list = glob.glob('./actionImage/*')
for img_file in img_list:
overlay = cv2.imread(img_file,cv2.COLOR_RGB2BGR)
overlay = cv2.resize(overlay,(0,0), fx=0.5, fy=0.5)
overlay_list.append(overlay)
return overlay_list
# 计算相对坐标
def relativeMiddleCor(self,x_list, y_list,z_list):
# 计算相对于几何中心的坐标
# 计算几何中心坐标
min_x = min(x_list)
max_x = max(x_list)
min_y = min(y_list)
max_y = max(y_list)
min_z = min(z_list)
max_z = max(z_list)
middle_p_x = min_x+ 0.5*(max_x-min_x)
middle_p_y = min_y+ 0.5*(max_y-min_y)
middle_p_z = min_z+ 0.5*(max_z-min_z)
# p(相对) = (x原始 - Px(重心), y原始 - Py(重心))
x_list = np.array(x_list) - middle_p_x
y_list = np.array(y_list) - middle_p_y
z_list = np.array(z_list) - middle_p_z
x_y_z_column = np.column_stack((x_list, y_list,z_list))
return x_y_z_column
# 预测动作
def predictAction(self,joint_coord):
# 验证模式
x_list = joint_coord[:,0].tolist()
y_list = joint_coord[:,1].tolist()
z_list = joint_coord[:,2].tolist()
# 构造图以及特征
u,v = torch.tensor([[0,0,0,0,0,4,3,2,8,7,6,12,11,10,16,15,14,20,19,18,0,21,21,21,21,21,25,24,23,29,28,27,33,32,31,37,36,35,41,40,39],
[4,8,12,16,20,3,2,1,7,6,5,11,10,9,15,14,13,19,18,17,21,25,29,33,37,41,24,23,22,28,27,26,32,31,30,36,35,34,40,39,38]])
g = dgl.graph((u,v))
# 无向处理
bg = dgl.to_bidirected(g)
x_y_z_column = self.relativeMiddleCor(x_list, y_list,z_list)
# 添加特征
bg.ndata['feat'] =torch.tensor( x_y_z_column ) # x,y,z坐标
# 测试模型
# device = torch.device("cuda:0")
device = torch.device("cpu")
bg = bg.to(device)
self.modelGCN = self.modelGCN.to(device)
pred = self.modelGCN(bg, bg.ndata['feat'].float())
pred_type =pred.argmax(1).item()
return pred_type
# 采集训练数据
def getTrainningData(self,task_type = '-1',type_num = 100):
start_time=time.time()
# 从摄像头采集:
cap = cv2.VideoCapture(0)
# 计算刷新率
fpsTime = time.time()
while cap.isOpened():
success,original_img = cap.read()
original_img = cv2.flip(original_img, 1)
if not success:
print("空帧.")
continue
# prepare bbox
x_t_l = 200
y_t_l = 150
cam_w = 300
cam_h = 300
joint_coord = self.handPose.get3Dpoint(x_t_l, y_t_l, cam_w, cam_h,original_img)
duration = time.time() -start_time
cv2.imshow('data',original_img)
# 存储训练数据
if task_type != '-1':
if duration < 30:
print('等等')
continue
action_dir = './trainingData/'+task_type
if not os.path.exists(action_dir):
os.makedirs(action_dir)
# 文件夹不存在的话创建文件夹
path, dirs, files = next(os.walk(action_dir))
file_count = len(files)
# 判断数据采集是否达标
if file_count > int(type_num):
print('采集完毕')
break
# Data to be written
dictionary ={
"action_type" : task_type,
"x_list" : joint_coord[:,0].tolist(),
"y_list" : joint_coord[:,1].tolist(),
"z_list" : joint_coord[:,2].tolist()
}
# Serializing json
json_object = json.dumps(dictionary, indent = 4)
json_fileName = action_dir +'./'+task_type+'-'+str(time.time()) +'.json'
# Writing to .json
with open(json_fileName, "w") as outfile:
outfile.write(json_object)
print(str(file_count)+'-采集并写入:'+json_fileName )
# 文件名:action_type + time.time()
if cv2.waitKey(5) & 0xFF == 27:
break
cap.release()
# 主函数
def recognize(self):
# 计算刷新率
fpsTime = time.time()
# OpenCV读取视频流
cap = cv2.VideoCapture(0)
# 视频分辨率
resize_w = 960
resize_h = 720
fps = cap.get(cv2.CAP_PROP_FPS)
videoWriter = cv2.VideoWriter('./video/oto_other.mp4', cv2.VideoWriter_fourcc(*'H264'), 10, (resize_w,resize_h))
# load the overlay image. size should be smaller than video frame size
overlay = cv2.imread('./actionImage/text_0.png',cv2.COLOR_RGB2BGR)
overlay = cv2.resize(overlay,(0,0), fx=0.5, fy=0.5)
overlay_rows,overlay_cols,channels = overlay.shape
with self.mp_hands.Hands(min_detection_confidence=0.7,
min_tracking_confidence=0.5,
max_num_hands=2) as hands:
while cap.isOpened():
# 初始化矩形
success, self.image = cap.read()
self.image = cv2.resize(self.image, (resize_w, resize_h))
if not success:
print("空帧.")
continue
# 提高性能
self.image.flags.writeable = False
# 转为RGB
self.image = cv2.cvtColor(self.image, cv2.COLOR_BGR2RGB)
# 镜像
self.image = cv2.flip(self.image, 1)
# mediapipe模型处理
results = hands.process(self.image)
self.image.flags.writeable = True
self.image = cv2.cvtColor(self.image, cv2.COLOR_RGB2BGR)
# 判断是否有手掌
if results.multi_hand_landmarks:
# 遍历每个手掌
# 用来存储手掌范围的矩形坐标
paw_x_list = []
paw_y_list = []
for hand_landmarks in results.multi_hand_landmarks:
# 在画面标注手指
# self.mp_drawing.draw_landmarks(
# self.image,
# hand_landmarks,
# self.mp_hands.HAND_CONNECTIONS,
# self.mp_drawing_styles.get_default_hand_landmarks_style(),
# self.mp_drawing_styles.get_default_hand_connections_style())
# 解析手指,存入各个手指坐标
landmark_list = []
for landmark_id, finger_axis in enumerate(
hand_landmarks.landmark):
landmark_list.append([
landmark_id, finger_axis.x, finger_axis.y,
finger_axis.z
])
paw_x_list.append(finger_axis.x)
paw_y_list.append(finger_axis.y)
if len(paw_x_list) > 0:
# 比例缩放到像素
ratio_x_to_pixel = lambda x: math.ceil(x * resize_w)
ratio_y_to_pixel = lambda y: math.ceil(y * resize_h)
# 设计手掌左上角、右下角坐标
paw_left_top_x, paw_right_bottom_x = map(ratio_x_to_pixel,[min(paw_x_list),max(paw_x_list)])
paw_left_top_y, paw_right_bottom_y = map(ratio_y_to_pixel,[min(paw_y_list),max(paw_y_list)])
# 计算模型
# prepare bbox
x_t_l = paw_left_top_x-100
y_t_l = paw_left_top_y-100
cam_w = (paw_right_bottom_x-paw_left_top_x)+200
cam_h = (paw_right_bottom_y -paw_left_top_y )+200
# cv2.rectangle(self.image, (x_t_l, y_t_l), ((x_t_l+cam_w), (y_t_l+cam_h)), (255, 0, 255), 2)
joint_coord = self.handPose.get3Dpoint(x_t_l, y_t_l, cam_w, cam_h,self.image)
pred_type = self.predictAction(joint_coord)
print("action: " + str(pred_type))
# # 比例缩放到像素
# ratio_x_to_pixel = lambda x: math.ceil(x * resize_w)
# ratio_y_to_pixel = lambda y: math.ceil(y * resize_h)
# # 设计手掌左上角、右下角坐标
# paw_left_top_x, paw_right_bottom_x = map(ratio_x_to_pixel,[min(paw_x_list),max(paw_x_list)])
# paw_left_top_y, paw_right_bottom_y = map(ratio_y_to_pixel,[min(paw_y_list),max(paw_y_list)])
# 给手掌画框框
cv2.rectangle(self.image,(paw_left_top_x-50,paw_left_top_y-50),(paw_right_bottom_x+50,paw_right_bottom_y+50),(0, 255,0),2)
# 模型计算后的动作
action_type = int(pred_type)
overlay = self.overlay_list[action_type]
overlay_rows,overlay_cols,channels = overlay.shape
action_text_lx = paw_left_top_x-overlay_cols
action_text_ly = paw_left_top_y-overlay_rows
self.overlay_list_last_type = action_type
if (action_text_ly )> 0 and (action_text_lx > 0):
overlay_copy=cv2.addWeighted(self.image[action_text_ly:paw_left_top_y, action_text_lx:paw_left_top_x ],1,overlay,20,0)
self.image[action_text_ly:paw_left_top_y, action_text_lx:paw_left_top_x ] = overlay_copy
# 显示刷新率FPS
cTime = time.time()
fps_text = 1/(cTime-fpsTime)
fpsTime = cTime
cv2.putText(self.image, "FPS: " + str(int(fps_text)), (10, 70),
cv2.FONT_HERSHEY_PLAIN, 3, (0, 255, 0), 3)
cv2.putText(self.image, "Action: "+str(self.overlay_list_last_type) , (10, 120),cv2.FONT_HERSHEY_PLAIN, 3, (0, 255, 0), 3)
# 显示画面
# self.image = cv2.resize(self.image, (resize_w//2, resize_h//2))
cv2.imshow('Enpei test', self.image)
videoWriter.write(self.image)
if cv2.waitKey(5) & 0xFF == 27:
break
cap.release()
videoWriter.release()
handRecognize = HandRecognize()
handRecognize.recognize()注:此处代码用的是cpu版,当然如果有卡可以用gpu跑,支持的gpu配置如下:
pytorch:1.5.0以上
torchvision:0.6.0以上
python:3.7以上
具体的torch、torchvision和cuda版本对应可以参考我的另一篇博客:cuda、torch、torchvision对应版本以及安装_心之所向521的博客-CSDN博客
我的主干代码GitHub地址:aaalds/-: DGL+Mediapipe+GCN实现特殊手势识别及追踪 (github.com)
权值文件由于较大,所以放在了百度网盘里
权值文件地址(snapshot_19.pth.tar):
链接:百度网盘 请输入提取码 提取码:8888
5.模型(转载于恩培大佬)
# Copyright (c) Facebook, Inc. and its affiliates.
# All rights reserved.
#
# This source code is licensed under the license found in the
# LICENSE file in the root directory of this source tree.
#
import torch
import torch.nn as nn
import torch.nn.functional as F
from nets.module import BackboneNet, PoseNet
from nets.loss import JointHeatmapLoss, HandTypeLoss, RelRootDepthLoss
from config import cfg
import math
class Model(nn.Module):
def __init__(self, backbone_net, pose_net):
super(Model, self).__init__()
# modules
self.backbone_net = backbone_net
self.pose_net = pose_net
# loss functions
self.joint_heatmap_loss = JointHeatmapLoss()
self.rel_root_depth_loss = RelRootDepthLoss()
self.hand_type_loss = HandTypeLoss()
def render_gaussian_heatmap(self, joint_coord):
x = torch.arange(cfg.output_hm_shape[2])
y = torch.arange(cfg.output_hm_shape[1])
z = torch.arange(cfg.output_hm_shape[0])
zz,yy,xx = torch.meshgrid(z,y,x)
xx = xx[None,None,:,:,:].cuda().float(); yy = yy[None,None,:,:,:].cuda().float(); zz = zz[None,None,:,:,:].cuda().float();
x = joint_coord[:,:,0,None,None,None]; y = joint_coord[:,:,1,None,None,None]; z = joint_coord[:,:,2,None,None,None];
heatmap = torch.exp(-(((xx-x)/cfg.sigma)**2)/2 -(((yy-y)/cfg.sigma)**2)/2 - (((zz-z)/cfg.sigma)**2)/2)
heatmap = heatmap * 255
return heatmap
def forward(self, inputs, targets, meta_info, mode):
input_img = inputs['img']
batch_size = input_img.shape[0]
img_feat = self.backbone_net(input_img)
joint_heatmap_out, rel_root_depth_out, hand_type = self.pose_net(img_feat)
if mode == 'train':
target_joint_heatmap = self.render_gaussian_heatmap(targets['joint_coord'])
loss = {}
loss['joint_heatmap'] = self.joint_heatmap_loss(joint_heatmap_out, target_joint_heatmap, meta_info['joint_valid'])
loss['rel_root_depth'] = self.rel_root_depth_loss(rel_root_depth_out, targets['rel_root_depth'], meta_info['root_valid'])
loss['hand_type'] = self.hand_type_loss(hand_type, targets['hand_type'], meta_info['hand_type_valid'])
return loss
elif mode == 'test':
out = {}
val_z, idx_z = torch.max(joint_heatmap_out,2)
val_zy, idx_zy = torch.max(val_z,2)
val_zyx, joint_x = torch.max(val_zy,2)
joint_x = joint_x[:,:,None]
joint_y = torch.gather(idx_zy, 2, joint_x)
joint_z = torch.gather(idx_z, 2, joint_y[:,:,:,None].repeat(1,1,1,cfg.output_hm_shape[1]))[:,:,0,:]
joint_z = torch.gather(joint_z, 2, joint_x)
joint_coord_out = torch.cat((joint_x, joint_y, joint_z),2).float()
out['joint_coord'] = joint_coord_out
out['rel_root_depth'] = rel_root_depth_out
out['hand_type'] = hand_type
if 'inv_trans' in meta_info:
out['inv_trans'] = meta_info['inv_trans']
if 'joint_coord' in targets:
out['target_joint'] = targets['joint_coord']
if 'joint_valid' in meta_info:
out['joint_valid'] = meta_info['joint_valid']
if 'hand_type_valid' in meta_info:
out['hand_type_valid'] = meta_info['hand_type_valid']
return out
def init_weights(m):
if type(m) == nn.ConvTranspose2d:
nn.init.normal_(m.weight,std=0.001)
elif type(m) == nn.Conv2d:
nn.init.normal_(m.weight,std=0.001)
nn.init.constant_(m.bias, 0)
elif type(m) == nn.BatchNorm2d:
nn.init.constant_(m.weight,1)
nn.init.constant_(m.bias,0)
elif type(m) == nn.Linear:
nn.init.normal_(m.weight,std=0.01)
nn.init.constant_(m.bias,0)
def get_model(mode, joint_num):
backbone_net = BackboneNet()
pose_net = PoseNet(joint_num)
if mode == 'train':
backbone_net.init_weights()
pose_net.apply(init_weights)
model = Model(backbone_net, pose_net)
return model
是不是很有意思!!!
快去试试吧!!!
转载的恩培大佬GitHub地址:enpeizhao/CVprojects: computer vision projects | 计算机视觉等好玩的AI项目 (github.com)
比较齐全的官方权值文件地址:Release InterHand2.6M release · facebookresearch/InterHand2.6M (github.com)


