Docker 私有仓库与 Harbor 部署使用
目录
前言
一、本地私有仓库
1、拉取仓库镜像
2、在 daemon.json 文件中添加私有镜像仓库地址
3、运行 registry 容器
4、 Docker 容器的重启策略如下
5、为镜像打标签
6、上传到私有仓库
7、列出私有仓库的所有镜像
8、列出私有仓库的 centos 镜像有哪些 tag
9、删除原有 centos 镜像,测试私有仓库下载
二、Harbor
1、harbor介绍
2、Harbor功能介绍
3、Harbor组成
4、Harbor的误区
三、Harbor 部署
1、下载harbor安装包
2、配置harbor
2.1 解压harbor
2.2 编辑配置文件
2.3 运行安装脚本
2.4 验证安装镜像
2.5 查看本地端口
3、web访问harbor管理界面
四、配置Harbor开机启动
1、配置harbor.service文件
2、Harbor开机启动
五、配置docker使用harbor仓库
1、配置docker
1.1 配置daemon.json
1.2 重启docker
1.3 命令行登录harbor
2、创建harbor项目
3、测试上传镜像
4、harbor界面验证镜像
5、验证镜像信息
6、测试下载镜像
6.1 删除存在的镜像
6.2 拉取镜像
6.3 从镜像启动容器并验证
6.4 验证端口
总结
前言
在 Docker 中,当我们执行 docker pull xxx 的时候 ,它实际上是从 registry.hub.docker.com 这个地址去查找,这就是Docker公司为我们提供的公共仓库。在工作中,我们不可能把企业项目push到公有仓库进行管理。所以为了更好的管理镜像,Docker不仅提供了一个中央仓库,同时也允许我们搭建本地私有仓库。这一篇介绍registry、harbor两种私有仓库搭建。
一、本地私有仓库
1、拉取仓库镜像
[root@c7-1 ~]#docker pull registry
......
[root@c7-1 ~]#docker images
REPOSITORY   TAG       IMAGE ID       CREATED        SIZE
nginx        latest    ea335eea17ab   2 weeks ago    141MB
registry     latest    b8604a3fe854   2 weeks ago    26.2MB
centos       7         eeb6ee3f44bd   2 months ago   204MB
2、在 daemon.json 文件中添加私有镜像仓库地址
[root@c7-1 ~]#cat /etc/docker/daemon.json
{
"insecure-registries": ["192.168.10.20:5000"],
"registry-mirrors": ["https://4iv7219l.mirror.aliyuncs.com"]
}

[root@c7-1 ~]#systemctl restart docker.service
3、运行 registry 容器
[root@c7-1 ~]#docker images
REPOSITORY   TAG       IMAGE ID       CREATED        SIZE
nginx        latest    ea335eea17ab   2 weeks ago    141MB
registry     latest    b8604a3fe854   2 weeks ago    26.2MB
centos       7         eeb6ee3f44bd   2 months ago   204MB
[root@c7-1 ~]#docker run -itd -v /data/registry:/var/lib/registry -p 5000:5000 --restart=always --name registry registry:latest
465355484f317cf31c4df4d2d90edf078bc6063cca7bd175b80c3abdb83a03ca
[root@c7-1 ~]#docker ps -a
CONTAINER ID   IMAGE             COMMAND                  CREATED         STATUS         PORTS                                       NAMES
465355484f31   registry:latest   "/entrypoint.sh /etc…"   9 seconds ago   Up 8 seconds   0.0.0.0:5000->5000/tcp, :::5000->5000/tcp   registry
[root@c7-1 ~]#docker exec -it 465355484f31 /bin/sh
/ # ls
bin            etc            media          proc           sbin           tmp
dev            home           mnt            root           srv            usr
entrypoint.sh  lib            opt            run            sys            var
-itd --- 在容器中打开一个伪终端进行交互操作,并在后台运行
-v --- 把宿主机的 /data/registry 目录挂载到容器内(这个目录是 registry 容器中存放镜像文件的目录),来实现数据的持久化
-p --- 映射端口,访问宿主机的 5000 端口就访问到 registry 容器的服务了
--restart=always --- 这是重启的策略,在容器退出时总是重启容器
--name registry --- 创建容器命名为 registry
registry:latest --- 这个是刚才 pull 下来的镜像
4、 Docker 容器的重启策略如下
no --- 默认策略,在容器退出时不重启容器。
no-failure --- 在容器非正常退出时(退出状态非0),才会重启容器。
no-failure:3 --- 在容器非正常退出时重启容器,最多重启 3 次。
always --- 在容器退出时总是重启容器。
unless-stopped --- 在容器退出时总是重启容器,但是不考虑在 Docker 守护进程启动时就已经停止了的容器。
5、为镜像打标签
[root@c7-1 ~]#docker images
REPOSITORY   TAG       IMAGE ID       CREATED        SIZE
nginx        latest    ea335eea17ab   2 weeks ago    141MB
registry     latest    b8604a3fe854   2 weeks ago    26.2MB
centos       7         eeb6ee3f44bd   2 months ago   204MB
[root@c7-1 ~]#docker tag centos:7 192.168.10.20:5000/centos:test1
[root@c7-1 ~]#docker images
REPOSITORY                  TAG       IMAGE ID       CREATED        SIZE
nginx                       latest    ea335eea17ab   2 weeks ago    141MB
registry                    latest    b8604a3fe854   2 weeks ago    26.2MB
centos                      7         eeb6ee3f44bd   2 months ago   204MB
192.168.10.20:5000/centos   test1     eeb6ee3f44bd   2 months ago   204MB
6、上传到私有仓库
[root@c7-1 ~]#docker push 192.168.10.20:5000/centos:test1
The push refers to repository [192.168.10.20:5000/centos]
174f56854903: Pushed
test1: digest: sha256:dead07b4d8ed7e29e98de0f4504d87e8880d4347859d839686a31da35a3b532f size: 529
7、列出私有仓库的所有镜像
[root@c7-1 ~]#curl -XGET http://192.168.10.20:5000/v2/_catalog
{"repositories":["centos"]}
8、列出私有仓库的 centos 镜像有哪些 tag
root@c7-1 ~]#curl -XGET http://192.168.10.20:5000/v2/centos/tags/list
{"name":"centos","tags":["test1"]}
9、删除原有 centos 镜像,测试私有仓库下载
[root@c7-1 ~]#docker images
REPOSITORY                  TAG       IMAGE ID       CREATED        SIZE
nginx                       latest    ea335eea17ab   2 weeks ago    141MB
registry                    latest    b8604a3fe854   2 weeks ago    26.2MB
192.168.10.20:5000/centos   test1     eeb6ee3f44bd   2 months ago   204MB
centos                      7         eeb6ee3f44bd   2 months ago   204MB
[root@c7-1 ~]#docker rmi -f 192.168.10.20:5000/centos:test1 centos:7 &> /dev/null
[root@c7-1 ~]#docker images
REPOSITORY   TAG       IMAGE ID       CREATED       SIZE
nginx        latest    ea335eea17ab   2 weeks ago   141MB
registry     latest    b8604a3fe854   2 weeks ago   26.2MB
[root@c7-1 ~]#docker pull 192.168.10.20:5000/centos:test1 &> /dev/null
[root@c7-1 ~]#docker images
REPOSITORY                  TAG       IMAGE ID       CREATED        SIZE
nginx                       latest    ea335eea17ab   2 weeks ago    141MB
registry                    latest    b8604a3fe854   2 weeks ago    26.2MB
192.168.10.20:5000/centos   test1     eeb6ee3f44bd   2 months ago   204MB
二、Harbor
1、harbor介绍
Harbor是一个用于存储和分发docker镜像的企业级Registry服务器,由VMware开源,其通过添加一些企业必需的功能特性,例如安全、标识和管理等,扩展了开源Docker Distrubution,作为一个企业级私有Registry服务器,Harbor提供了更好的性能和安全。提升了用户使用Registry构建和运行环境传输镜像的效率。Harbor支持安装在多个Registry节点的镜像资源复制,镜像全部保存在私有Registry中,确保数据和知识产权在公司内部网络中管理,另外,Harbor也提供了高级的安全特性,诸如用户管理,访问控制和活动审计等。
因为是vmware出品的,所以支持下面几种部署方式
- 在线安装
- 离线安装
- ova安装,这个直接在vcenter上导入就可以了
官方最小配置
- 2个cpu
- 4g内存
- 40g硬盘,因为是存储镜像的所以推荐硬盘大点
2、Harbor功能介绍
- 基于角色的访问控制:用户与docker镜像仓库通过项目进行组织管理,一个用户可以对多个镜像仓库在同一命名空间里有不同的权限。
- 镜像复制:镜像可在多个Registry实例中复制。尤其适合负载均衡,高可用,混合云和多云场景。
- 图形化用户界面:用户可以通过浏览器来浏览,检索当前Docker镜像仓库,管理项目和命名空间。
- AD/LDAP支持:Harbor可以集成企业内部已有的AD/LDAP,用于鉴权认证管理。
- 审计管理:所有针对镜像仓库的操作都可以被记录追溯,用于审计管理。
- 国际化:已拥有英文。中文、德文、日文和俄文的本地化版本。更多的语言将会添加进来。
- RESTful API:提供给管理员对于Harbor更多的操控,使得与其它管理软件集成变得更容易。
- 部署简单:提供在线和离线两种安装工具,也可以安装到vSphere平台虚拟设备。
3、Harbor组成
- proxy:对应启动组件nginx。它是一个nginx反向代理,代理Notary client(镜像认证)、docker client(镜像上传下载)和浏览器的访问请求(Core Service)给后端的各服务器。
- UI(Core Service):对应启动组件harbor-ui。底层数据存储使用mysql数据库,主要提供了四个子功能。
- UI:一个web管理页面ui
- API:Harbor暴露的API服务。
- Auth:用户认证服务,decode后的token中的用户信息在这里进行认证;auth后端可以接db、ldap、uaa三种认证实现。
- Token服务:负责根据用户在每个project中的role来为每个docker push/pull 命令发布一个token,如果docker client发送给registry的请求没有带token,registry会重定向请求到token服务创建token。
- Registry:对应启动组件registry。负责存储镜像文件和处理镜像的pull/push命令。Harbor对镜像进行强制的访问控制,Registry会将每个客户端的每个pull/push请求转发到token服务来获取有效的token。
- Admin Service:对应启动组件harbor-admin server。是系统的配置管理中心附带检查存储用量,ui和jobserver启动时需要加载adminserver配置。
- job server:对应启动组件harbor-jobservice。负责镜像复制工作,塔河Registry通信。从一个Registry pull镜像然后push到另一个Registry,并记录job_log.
- Log Collector:对应启动组件harbor-log。日志汇总组件,通过docker的log-driver把日志汇总到一起。
- DB:对应启动组件harbor-db,负责存储project、user、role、replication、image_scan、access等的metadata数据。
4、Harbor的误区
误区一: Harbor是负责存储容器镜像的 (Harbor是镜像仓库,那么它就应当是存储镜像的)
其实关于镜像的存储,Harbor使用的是官方的docker registry服务去完成,至于registry是用本地存储或者s3都是可以的,Harbor的功能是在此之上提供用户权限管理、镜像复制等功能,提高使用的registry的效率。
误区二:Harbor镜像复制是存储直接复制 (镜像的复制,很多人以为应该是镜像分层文件的直接拷贝)
其实Harbor镜像复制采用了一个更加通用、高屋建瓴的做法,通过docker registry 的API去拷贝,这不是省事,这种做法屏蔽了繁琐的底层文件操作、不仅可以利用现有docker registry功能不必重复造轮子,而且可以解决冲突和一致性的问题。
三、Harbor 部署
1、下载harbor安装包
方法1:下载离线安装包
推荐使用离线安装包

root@node01:~# cd /opt/
root@node01:/opt# wget https://github.com/goharbor/harbor/releases/download/v1.10.9/harbor-offline-installer-v1.10.9.tgz

方法2:下载在线安装包
不推荐在线安装

root@node01:~# cd /opt/
root@node01:/opt# wet https://github.com/goharbor/harbor/releases/download/v1.10.9/harbor-online-installer-v1.10.9.tgz
2、配置harbor
2.1 解压harbor
root@node01:/opt# tar xf harbor-offline-installer-v1.10.9.tgz -C /usr/local/
root@node01:~# ls -l /usr/local/harbor/
total 585880
-rw-r--r-- 1 root root     11347 Oct 28 13:24 LICENSE
-rw-r--r-- 1 root root      3398 Oct 28 13:24 common.sh
-rw-r--r-- 1 root root 599900167 Oct 28 13:25 harbor.v1.10.9.tar.gz
-rw-r--r-- 1 root root      5882 Oct 28 13:24 harbor.yml
-rwxr-xr-x 1 root root      2284 Oct 28 13:24 install.sh
-rwxr-xr-x 1 root root      1749 Oct 28 13:24 prepare
2.2 编辑配置文件
root@node01:~# vim /usr/local/harbor/harbor.yml
hostname: 192.168.75.157    #修改此行,指向当前主机IP或FQDN
http:
  # port for http, default is 80. If https enabled, this port will redirect to https port
  port: 80

.....
2.3 运行安装脚本
root@node01:~# mkdir -pv /data/harbor
root@node01:~# mkdir -pv /var/log/harbor
root@node01:~# /usr/local/harbor/install.sh  --with-clair --with-chartmuseum


[Step 0]: checking if docker is installed ...


Note: docker version: 20.10.10


[Step 1]: checking docker-compose is installed ...


Note: docker-compose version: 2.1.0


[Step 2]: loading Harbor images ...

Loaded image: goharbor/harbor-core:v1.10.9

Loaded image: goharbor/harbor-jobservice:v1.10.9

Loaded image: goharbor/notary-signer-photon:v1.10.9

Loaded image: goharbor/nginx-photon:v1.10.9

Loaded image: goharbor/chartmuseum-photon:v1.10.9

Loaded image: goharbor/registry-photon:v1.10.9

....

✔ ----Harbor has been installed and started successfully.----
2.4 验证安装镜像
root@node01:~# docker ps
CONTAINER ID   IMAGE                                   COMMAND                  CREATED          STATUS                    PORTS                                   NAMES
9aaeebfffd29   goharbor/harbor-jobservice:v1.10.9      "/harbor/harbor_jobs…"   11 minutes ago   Up 11 minutes (healthy)                                           harbor-jobservice
d535d03c98c7   goharbor/nginx-photon:v1.10.9           "nginx -g 'daemon of…"   11 minutes ago   Up 11 minutes (healthy)   0.0.0.0:80->8080/tcp, :::80->8080/tcp   nginx
0c783b6ffbe7   goharbor/clair-adapter-photon:v1.10.9   "/clair-adapter/clai…"   11 minutes ago   Up 11 minutes (healthy)   8080/tcp                                clair-adapter
106983da168c   goharbor/harbor-core:v1.10.9            "/harbor/harbor_core"    11 minutes ago   Up 11 minutes (healthy)                                           harbor-core
51b0af17bd82   goharbor/clair-photon:v1.10.9           "./docker-entrypoint…"   11 minutes ago   Up 11 minutes (healthy)   6060-6061/tcp                           clair
ad892f1ec253   goharbor/chartmuseum-photon:v1.10.9     "./docker-entrypoint…"   11 minutes ago   Up 11 minutes (healthy)   9999/tcp                                chartmuseum
8b2790876a6c   goharbor/harbor-portal:v1.10.9          "nginx -g 'daemon of…"   11 minutes ago   Up 11 minutes (healthy)   8080/tcp                                harbor-portal
55ed41a08594   goharbor/harbor-registryctl:v1.10.9     "/home/harbor/start.…"   11 minutes ago   Up 11 minutes (healthy)                                           registryctl
41a01a51d5c5   goharbor/redis-photon:v1.10.9           "redis-server /etc/r…"   11 minutes ago   Up 11 minutes (healthy)   6379/tcp                                redis
dd15258fae36   goharbor/harbor-db:v1.10.9              "/docker-entrypoint.…"   11 minutes ago   Up 11 minutes (healthy)   5432/tcp                                harbor-db
1fb1d2af58a7   goharbor/registry-photon:v1.10.9        "/home/harbor/entryp…"   11 minutes ago   Up 11 minutes (healthy)   5000/tcp                                registry
13a5b9359121   goharbor/harbor-log:v1.10.9             "/bin/sh -c /usr/loc…"   11 minutes ago   Up 11 minutes (healthy)   127.0.0.1:1514->10514/tcp               harbor-log
2.5 查看本地端口
root@node01:~# ss -tnlp
State             Recv-Q            Send-Q                       Local Address:Port                         Peer Address:Port            Process
LISTEN            0                 4096                             127.0.0.1:1514                              0.0.0.0:*                users:(("docker-proxy",pid=33987,fd=4))
LISTEN            0                 4096                               0.0.0.0:80                                0.0.0.0:*                users:(("docker-proxy",pid=34824,fd=4))
LISTEN            0                 4096                         127.0.0.53%lo:53                                0.0.0.0:*                users:(("systemd-resolve",pid=791,fd=13))
LISTEN            0                 128                                0.0.0.0:22                                0.0.0.0:*                users:(("sshd",pid=881,fd=3))
LISTEN            0                 128                              127.0.0.1:6010                              0.0.0.0:*                users:(("sshd",pid=1036,fd=10))
LISTEN            0                 128                              127.0.0.1:6011                              0.0.0.0:*                users:(("sshd",pid=11675,fd=10))
LISTEN            0                 4096                                  [::]:80                                   [::]:*                users:(("docker-proxy",pid=34830,fd=4))
LISTEN            0                 128                                   [::]:22                                   [::]:*                users:(("sshd",pid=881,fd=4))
LISTEN            0                 128                                  [::1]:6010                                 [::]:*                users:(("sshd",pid=1036,fd=9))
LISTEN            0                 128                                  [::1]:6011                                 [::]:*                users:(("sshd",pid=11675,fd=9))
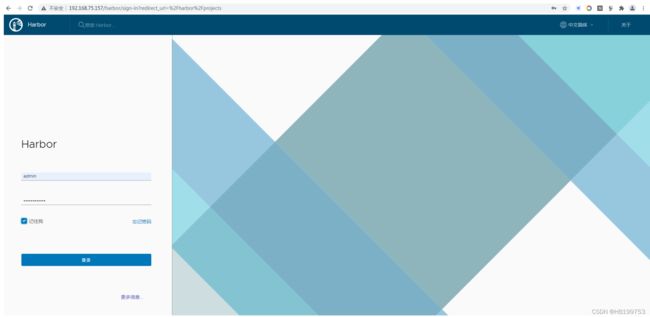
3、web访问harbor管理界面
默认管理员admin ;密码 Harbor12345
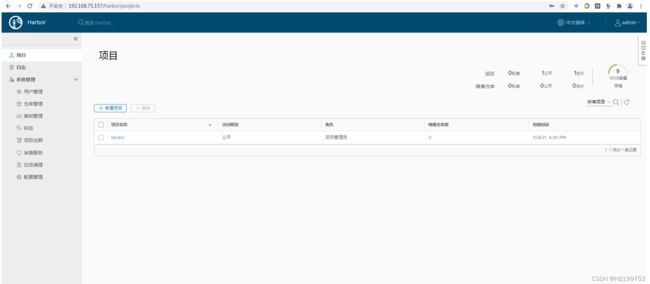
登录成功界面
四、配置Harbor开机启动
1、配置harbor.service文件
root@node01:~# cat /lib/systemd/system/harbor.service
[Unit]
Description=Harbor
after=docker.service systemd-networkd.service systemd-resolved.service
Requires=docker.service
Documentation=https://goharbor.io/


[Service]

Type=simple

Restart=on-failure

ExecStart=/usr/local/sbin/docker-compose -f /usr/local/harbor/docker-compose.yml up

ExecStop=/usr/local/sbin/docker-compose -f /usr/local/harbor/docker-compose.yml down
2、Harbor开机启动
root@node01:~# systemctl enable harbor
Created symlink /etc/systemd/system/multi-user.target.wants/harbor.service → /lib/systemd/system/harbor.service.
root@node01:~# systemctl restart harbor
root@node01:~# systemctl status harbor
● harbor.service - Harbor
     Loaded: loaded (/lib/systemd/system/harbor.service; enabled; vendor preset: enabled)
     Active: active (running) since Thu 2021-11-04 17:01:19 CST; 4s ago
       Docs: https://goharbor.io/
   Main PID: 31151 (docker-compose)
      Tasks: 6 (limit: 2245)
     Memory: 8.1M
     CGroup: /system.slice/harbor.service
             └─31151 /usr/local/sbin/docker-compose -f /usr/local/harbor/docker-compose.yml up
Nov 04 17:01:20 node01 docker-compose[31151]: Container registryctl  Running

Nov 04 17:01:20 node01 docker-compose[31151]: Container registry  Running

Nov 04 17:01:20 node01 docker-compose[31151]: Container harbor-core  Running

Nov 04 17:01:20 node01 docker-compose[31151]: Container harbor-jobservice  Running

Nov 04 17:01:20 node01 docker-compose[31151]: Container nginx  Running

Nov 04 17:01:20 node01 docker-compose[31151]: Attaching to harbor-core, harbor-db, harbor-jobservice, harbor-log, harbor-portal,>

Nov 04 17:01:21 node01 docker-compose[31151]: harbor-portal      | 172.18.0.8 - - [04/Nov/2021:09:01:21 +0000] "GET / HTTP/1.1" >

Nov 04 17:01:21 node01 docker-compose[31151]: registry           | 172.18.0.8 - - [04/Nov/2021:09:01:21 +0000] "GET / HTTP/1.1" >

Nov 04 17:01:21 node01 docker-compose[31151]: registryctl        | 172.18.0.8 - - [04/Nov/2021:09:01:21 +0000] "GET /api/health >

Nov 04 17:01:22 node01 docker-compose[31151]: registry           | 127.0.0.1 - - [04/Nov/2021:09:01:22 +0000] "GET / HTTP/1.1" 2>
五、配置docker使用harbor仓库
1、配置docker
1.1 配置daemon.json
root@node01:~# cat /etc/docker/daemon.json
{
	"insecure-registries" : ["192.168.75.157"]
}
1.2 重启docker
root@node01:~# systemctl restart docker1.3 命令行登录harbor
root@node01:~# docker login 192.168.75.157
Username: admin
Password:
WARNING! Your password will be stored unencrypted in /root/.docker/config.json.
Configure a credential helper to remove this warning. See
https://docs.docker.com/engine/reference/commandline/login/#credentials-store
Login Succeeded
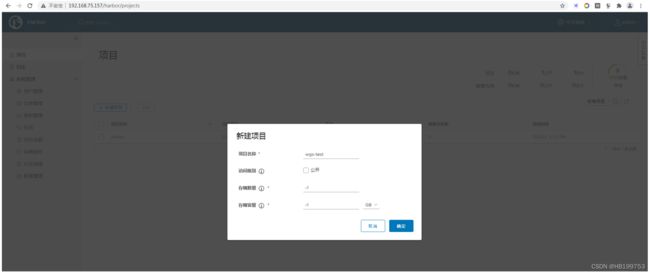
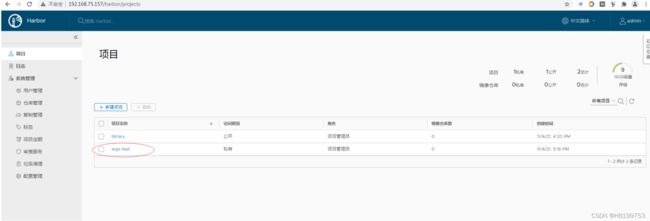
2、创建harbor项目
3、测试上传镜像
准备镜像
root@node01:~# docker pull nginx
镜像打tag
root@node01:~# docker tag nginx:latest 192.168.75.157/wgs-test/nginx:v1
镜像上传
root@node01:~# docker push 192.168.75.157/wgs-test/nginx:v1
The push refers to repository [192.168.75.157/wgs-test/nginx]
9959a332cf6e: Pushed
f7e00b807643: Pushed
f8e880dfc4ef: Pushed
788e89a4d186: Pushed
43f4e41372e4: Pushed
e81bff2725db: Pushed
v1: digest: sha256:7250923ba3543110040462388756ef099331822c6172a050b12c7a38361ea46f size: 1570
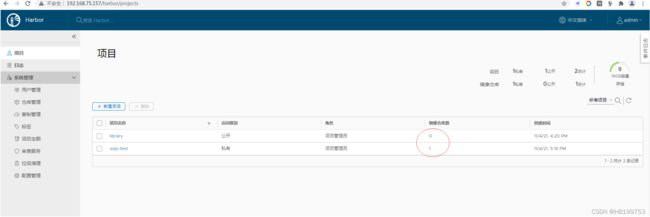
4、harbor界面验证镜像
5、验证镜像信息
6、测试下载镜像
6.1 删除存在的镜像
root@node01:~# docker rmi nginx
Untagged: nginx:latest
Untagged: nginx@sha256:644a70516a26004c97d0d85c7fe1d0c3a67ea8ab7ddf4aff193d9f301670cf36
root@node01:~# docker rmi 192.168.75.157/wgs-test/nginx:v1
Untagged: 192.168.75.157/wgs-test/nginx:v1
Untagged: 192.168.75.157/wgs-test/nginx@sha256:7250923ba3543110040462388756ef099331822c6172a050b12c7a38361ea46f
Deleted: sha256:87a94228f133e2da99cb16d653cd1373c5b4e8689956386c1c12b60a20421a02
Deleted: sha256:55b6972054b24c53054322a52748324df5797eefbb6dc374e41522a91d532dd5
Deleted: sha256:6b88aa6f4485486bfc779cccfbe4a7a47a502a7cff2cd70be89c59dcd0db12a8
Deleted: sha256:472c64059965c7b6b1b534ba07374c1d034b17c99acb3cf4534fe78abed41101
Deleted: sha256:788a5cf1e4599312b5923694f53e556ba0e2eb4a6bbb51958e0ec2b510345a49
Deleted: sha256:410f31f9ae37c62af85e8f9575c5f4d75542be1739ac1ca5982cf461be0b13bc
Deleted: sha256:e81bff2725dbc0bf2003db10272fef362e882eb96353055778a66cda430cf81b
6.2 拉取镜像
root@node01:~# docker pull 192.168.75.157/wgs-test/nginx:v1
v1: Pulling from wgs-test/nginx
b380bbd43752: Pull complete
fca7e12d1754: Pull complete
745ab57616cb: Pull complete
a4723e260b6f: Pull complete
1c84ebdff681: Pull complete
858292fd2e56: Pull complete
Digest: sha256:7250923ba3543110040462388756ef099331822c6172a050b12c7a38361ea46f
Status: Downloaded newer image for 192.168.75.157/wgs-test/nginx:v1
192.168.75.157/wgs-test/nginx:v1
6.3 从镜像启动容器并验证
root@node01:~# docker run -d -p 8080:80 192.168.75.157/wgs-test/nginx:v1
703e032825acc8f5042e834d989c229b79d3f4be1588b993b953e8c60d69be68
6.4 验证端口
root@node01:~# ss -tnlp
State             Recv-Q            Send-Q                       Local Address:Port                         Peer Address:Port            Process
LISTEN            0                 4096                             127.0.0.1:1514                              0.0.0.0:*                users:(("docker-proxy",pid=33987,fd=4))
LISTEN            0                 4096                               0.0.0.0:80                                0.0.0.0:*                users:(("docker-proxy",pid=34824,fd=4))
LISTEN            0                 4096                         127.0.0.53%lo:53                                0.0.0.0:*                users:(("systemd-resolve",pid=791,fd=13))
LISTEN            0                 128                                0.0.0.0:22                                0.0.0.0:*                users:(("sshd",pid=881,fd=3))
LISTEN            0                 128                              127.0.0.1:6010                              0.0.0.0:*                users:(("sshd",pid=1036,fd=10))
LISTEN            0                 128                              127.0.0.1:6011                              0.0.0.0:*                users:(("sshd",pid=11675,fd=10))
LISTEN            0                 4096                                  [::]:80                                   [::]:*                users:(("docker-proxy",pid=34830,fd=4))
LISTEN            0                 128                                   [::]:22                                   [::]:*                users:(("sshd",pid=881,fd=4))
LISTEN            0                 128                                  [::1]:6010                                 [::]:*                users:(("sshd",pid=1036,fd=9))
LISTEN            0                 128                                  [::1]:6011                                 [::]:*                users:(("sshd",pid=11675,fd=9))
root@node01:~# lsof -i:8090

COMMAND     PID USER   FD   TYPE DEVICE SIZE/OFF NODE NAME

docker-pr 20902 root    4u  IPv4 190561      0t0  TCP *:http-alt (LISTEN)
6.5 验证web访问
总结
通过本文的总结,对harbor的部署和镜像应用,有了清晰的认识,harbor能批量管理镜像,在企业中起到很大作用。
