WEB服务器-部署Nginx+Apache动静分离
文章目录
- 一:部署Nginx+Apache动静分离
-
- 1.1:什么是Nginx动静分离?
- 1.2:反向代理的原理是什么?
- 二. 具体动静分离实验配置
-
- 2.1 环境搭建:
- 2.2. apache 服务器的安装
- 2.3 配置防火墙
- 2.4 安装数据库软件
- 2.5 安全配置数据库
- 2.6建立php 和 mysql 关联
- 2.7 编写首页文件及测试数据库
- 2.8 配置另一台nginx服务器
- 2.8.1 源码编译安装nginx
-
- 2.8.2 将软件交给 systemctl 管理
- 2.8.3 elinks查看服务启动
- 2.8.4 配置nginx 核心文件
- 2.9 浏览器访问测试
一:部署Nginx+Apache动静分离
1.1:什么是Nginx动静分离?
Nginx的静态处理能力很强,但是动态处理能力不足,因此,在企业中常用动静分离技术
针对PHP的动静分离
静态页面交给 Nginx处理
动态页面交给 PHP-FPM模块或 Apache处理
在 Nginx的配置中,是通过 ocation配置段配合正则匹配实现静态与动态页面的不同处理方式
1.2:反向代理的原理是什么?
Nginx不仅能作为Web服务器,还具有反向代理、负载均衡和缓存的功能
Nginx通过 proxy模块实现将客户端的请求代理至上游服务器,此时ngInx与上游服务器的连接是通过http协议进行的
Nginx在实现反向代理功能时的最重要指令为proxy pass,它能够并能够根据UR、客户端参数或其它的处理逻辑将用户请求调度至上游服务器
二. 具体动静分离实验配置
根据需要,将配置 Nginx实现动静分离,对php页面的请求转发给LAMP处理,而静态页面交给Nginx处理,以实现动静分离
2.1 环境搭建:
               一台apache 服务器解析 动态   192.168.100.50
               一台nginx 服务器解析 静态  192,168.100.48
2.2. apache 服务器的安装
yum 安装httpd
[root@sha ~]# yum install httpd httpd-devel -y
[root@sha ~]# systemctl start httpd.service
2.3 配置防火墙
[root@sha ~]# firewall-cmd --permanent --zone=public --add-service=http
success
[root@sha ~]# firewall-cmd --permanent --zone=public --add-service=https
Success
[root@sha ~]# firewall-cmd --reload
success
2.4 安装数据库软件
[root@sha ~]# yum install mariadb-server mariadb-libs mariadb-devel -y
[root@sha ~]# systemctl start mariadb.service
2.5 安全配置数据库
[root@sha ~]# mysql_secure_installation
NOTE: RUNNING ALL PARTS OF THIS SCRIPT IS RECOMMENDED FOR ALL MariaDB
      SERVERS IN PRODUCTION USE!  PLEASE READ EACH STEP CAREFULLY!

In order to log into MariaDB to secure it, we'll need the current
password for the root user.  If you've just installed MariaDB, and
you haven't set the root password yet, the password will be blank,
so you should just press enter here.

Enter current password for root (enter for none):

Setting the root password ensures that nobody can log into the MariaDB
root user without the proper authorisation.

You already have a root password set, so you can safely answer 'n'.

Change the root password? [Y/n] y  //是否修改ROOT密码
New password:
Re-enter new password:
Password updated successfully!
Reloading privilege tables..
 ... Success!


By default, a MariaDB installation has an anonymous user, allowing anyone
to log into MariaDB without having to have a user account created for
them.  This is intended only for testing, and to make the installation
go a bit smoother.  You should remove them before moving into a
production environment.

Remove anonymous users? [Y/n] n       //是否删除匿名用户
 ... skipping.

Normally, root should only be allowed to connect from 'localhost'.  This
ensures that someone cannot guess at the root password from the network.

Disallow root login remotely? [Y/n] n     //是否拒绝ROOT 用户远程登录
 ... skipping.

By default, MariaDB comes with a database named 'test' that anyone can
access.  This is also intended only for testing, and should be removed
before moving into a production environment.

Remove test database and access to it? [Y/n] n    //是否删除测试数据库
... skipping.

Reloading the privilege tables will ensure that all changes made so far
will take effect immediately.

Reload privilege tables now? [Y/n] y         //是否加载里面的全新列表
 ... Success!

Cleaning up...

All done!  If you've completed all of the above steps, your MariaDB
installation should now be secure.
2.6建立php 和 mysql 关联
[root@sha ~]# yum install php -y
[root@sha ~]# yum install php-mysql -y
安装PHP插件
[root@sha ~]# yum install -y php-gd php-ldap php-odbc php-pear php-xml php-xmlrpc php-mbstring php-snmp php-soap curl curl-devel php-bcmath
2.7 编写首页文件及测试数据库
[root@sha ~]# cd /var/www
[root@sha www]# ls
cgi-bin  html
[root@sha www]# cd html/
[root@sha html]# vi index.php
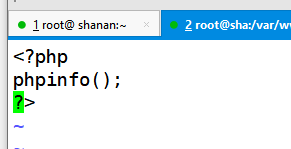
<?php
phpinfo();
?>
~
~
[root@sha www]# systemctl restart httpd.service
[root@sha html]# vi index.php
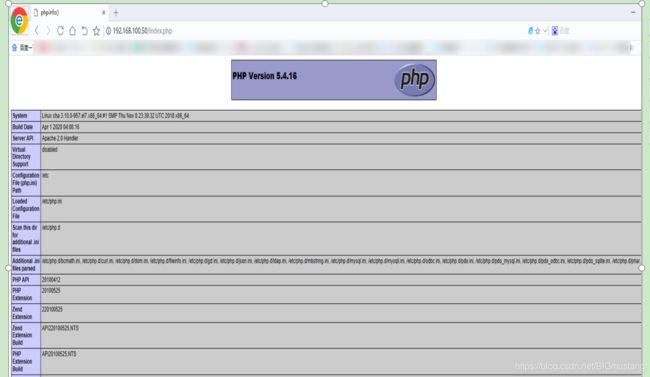
 浏览器访问测试
2.8 配置另一台nginx服务器
2.8.1 源码编译安装nginx
创建程序账户
useradd -M -s /sbin/nologin nginx
安装nginx 环境软件
yum -y install gcc \
gcc-c++ \
make \
pcre-devel \
expat-devel \
perl \
zlib-devel \
pcre
编译安装
[root@sha nginx-1.12.2]# ./configure \
> --prefix=/usr/local/nginx \
> --user=nginx \
> --group=nginx \
> --with-http_stub_status_module
2.8.2 将软件交给 systemctl 管理
[root@sha nginx-1.12.2]#  ln -s /usr/local/nginx/sbin/nginx /usr/local/sbin/
[root@sha nginx-1.12.2]# cd /usr/local/sbin

[root@localhost nginx-1.12.2]# ln -s /usr/local/nginx/sbin/nginx /usr/local/sbin/
cd /usr/local/sbin
ls
cd /opt/nginx-1.12.2/
yum install vim -y
[root@localhost nginx-1.12.2]# vim /lib/systemd/system/nginx.service
[Unit]!
Description=nginx
After=network.target


[Service]
Type=forking
PIDFile =/usr/local/nginx/logs/nginx.pid
ExecStart=/usr/local/nginx/sbin/nginx
ExecReload=/usr/bin/kill -S HUP $MAINPID
ExecStop=/usr/bin/kill -S QUIT $MAINPID
PrivateTmp=true
[Install]
WantedBy=multi-user.target


Systemsctl  stop httpd
Systemsctl  start  nginx
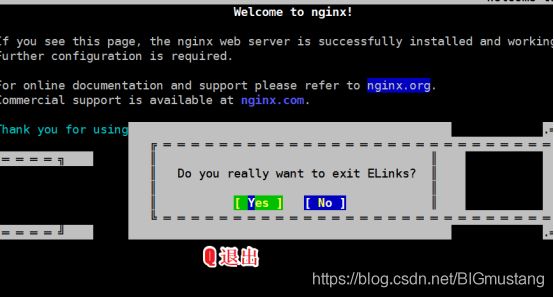
[root@sha sbin]# yum install elinks
2.8.3 elinks查看服务启动
[root@sha sbin]# netstat -natp | grep 80
tcp        0      0 0.0.0.0:80              0.0.0.0:*               LISTEN      19041/nginx: master
tcp        0      0 192.168.100.48:37568    36.156.207.240:80       TIME_WAIT   -
tcp        0      0 192.168.100.48:59348    36.156.207.236:80       TIME_WAIT   -
[root@sha sbin]# elinks http://192.168.100.48

2.8.4 配置nginx 核心文件
[root@sha sbin]# vim /usr/local/nginx/conf/nginx.conf
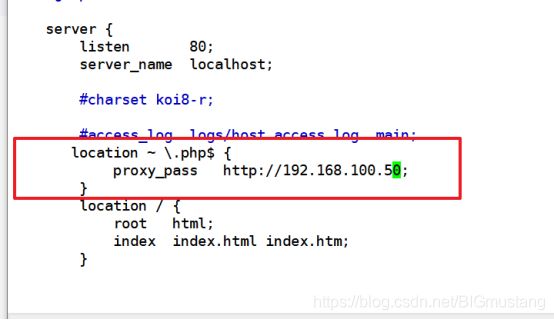 proxy_pass 反向代理
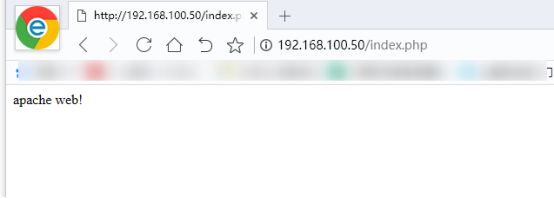
2.9 浏览器访问测试
访问动态 192.168.100.48/index.html

访问静态 192.168.100.48/index.php
