Vue实战开发二(个人中心实现)
文章目录
- 前言
- 效果预览
- 项目结构
- 个人页面框架
- 总结
前言
本来是想要说一下那个如何整合那个vue的Markdown编辑器的,但是由于这个后端没有搭建起来,所以图片上传做不了,所以先不介绍,后面在介绍怎么搞,值得一提的是在vue里面使用Markdown是真的简单,后面vue的Markdown组件可以直接把Markdown文档变成html文件,后面我存到服务器然后(存路径数据库)然后给前端直接渲染就好了。不像那个Django里面,用MVT模式开发的时候,还要自己整合 edit.md 而且网上的教程垃圾的一批还是我自己整合了一下(这里关于那篇文章本来是免费观看的,但是收藏了连赞都不给一下我真的是有点气不过,所以我选择了VIP可见,这里要是有想要的留个言我把Markdown文档给出来)
效果预览
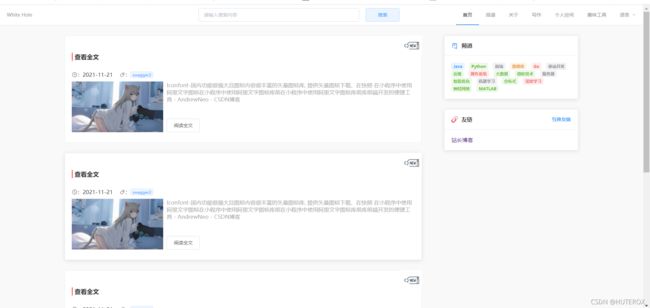
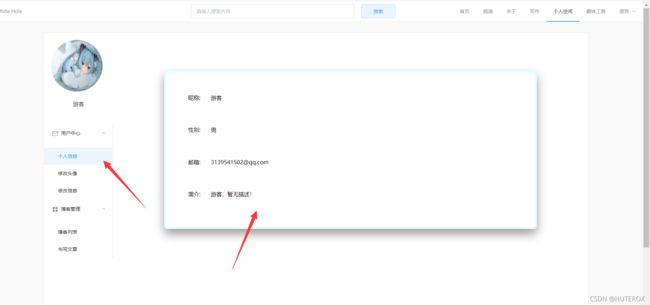
这边要说明的是,我还没有完全做完,只是给了架子,说实话个人页面确实是比较难做的,而且这里面也是要做用户验证的,分为本用户访问自己的主页和别人访问自己的主页。
项目结构
{

    path: '/space',
    name: 'space',
    component: Space,
    children:[
      {

        path: 'bokelist',
        name: 'bokelist',
        component: BokeList,
      },
      {

        path: "changeinfo",
        name: 'changeinfo',
        component: Changeinfo,
      },
      {

        path: "changepic",
        name: "changepic",
        component: Changpic
      },
      {

        path: "spaceinfo",
        name: "spaceinfo",
        component: Spaceinfo,
      },
      {

        path: "wirterboke",
        name: "wirterboke",
        component: Wirterboke
      }
    ]
}
个人页面框架
这里的话是用element ui 做的
<template>
<div style="background-color: white">

  <el-container style="height: 800px; border: 1px solid #eee;">

    <el-aside width="200px" style="margin-top: 1%" >
      <div style="width: 190px;background-color: white;padding: 5px;margin: auto">
        <img v-model="user.userpic" v-bind:src="user.userpic" width="150px" height="150px" style="border-radius: 300px;margin-left: 8%">
        <br>
        <br>
        <p style="margin:0 auto;text-align: center" v-model="user.username">{
     {
     user.username}}</p>
      </div>

      <br>
      <br>
      <el-menu :default-openeds="['1','2']">
        <el-submenu index="1">
          <template slot="title"><i class="el-icon-message"></i>用户中心</template>
          <el-menu-item-group>

            <router-link class="alink" to="/space/spaceinfo"><el-menu-item index="1-1">个人信息</el-menu-item></router-link>
            <router-link class="alink" to="/space/changepic"><el-menu-item index="1-2">修改头像</el-menu-item></router-link>
            <router-link class="alink" to="/space/changeinfo"><el-menu-item index="1-3">修改信息</el-menu-item></router-link>
          </el-menu-item-group>

        </el-submenu>
        <el-submenu index="2">
          <template slot="title"><i class="el-icon-menu"></i>博客管理</template>
          <el-menu-item-group>
            <router-link class="alink" to="/space/bokelist"><el-menu-item index="2-1">博客列表</el-menu-item></router-link>
            <router-link class="alink" to="/space/wirterboke"><el-menu-item index="2-2">书写文章</el-menu-item></router-link>
          </el-menu-item-group>

        </el-submenu>


      </el-menu>
    </el-aside>


    <el-container style="background-color: white">
      <el-main>
        <router-view/>
      </el-main>
    </el-container>


  </el-container>

</div>
</template>

<script>
export default {

  name: "Space",
  beforeRouteEnter: (to, from, next) => {

    console.log("准备进入个人信息页");
    let islogin = sessionStorage.getItem("isLogin")
    if(!islogin){

      next({
     path:'/login'});
    }
    next();
  },
  data() {


    return {

      user:{

        userpic :"static/userpic/userpic.jpg",
        username: '游客'
      }
    }
  },

}
</script>

<style scoped>
.el-header {

  background-color: #B3C0D1;
  color: #333;
  line-height: 60px;
}

.el-aside {

  color: #333;
}
.alink{


  text-decoration: none;
}
</style>
这里再给出信息展示的代码
<template>
<div>
  <div class="show">
    <p v-model="userinfo" style="margin-left:6%;margin-top: 5%">昵称:<span style="margin-left: 3%;line-height:40px">{
     {
     userinfo.username}}</span></p>
    <p v-model="userinfo" style="margin-left:6%;margin-top: 5%">性别:<span style="margin-left: 3%;line-height:40px">{
     {
     userinfo.usersex}}</span></p>
    <p v-model="userinfo" style="margin-left:6%;margin-top: 5%">邮箱:<span style="margin-left: 3%;line-height:40px">{
     {
     userinfo.useremail}}</span></p>
    <p v-model="userinfo" style="margin-left:6%;margin-top: 5%">简介:<span style="margin-left: 3%;line-height:40px">{
     {
     userinfo.userjianjie}}</span></p>
  </div>
</div>
</template>

<script>
//还是等跳转到这里的时候再来加载数据好一点
import {
     userinfo} from "../../userinfo/userinfo"
export default {


  name: "spaceinfo",
  data(){

    return{

      userinfo: userinfo

    }
  }
}
</script>

<style scoped>
.show{

  margin: 100px auto;
  width: 80%;
  height: 450px;
  border: 5px solid lightcyan;
  transition: all 0.9s;
  border-radius: 10px;

}

.show:hover{

  box-shadow: 0px 15px 30px rgba(0, 0, 0, 0.4);
  margin-top: 90px;
}
</style>
总结
这里还是只能给出大体的框架,如果有需要的话还是说要自己根据那个结构去改,没有办法直接拿过来用。
那么目前的进度也是不错的。


之后尽量本周完成大部分工作,然后开源,那么下个礼拜我就可以开始进行后端开发了。


