曾经的你我高攀不起,现在的我只想注解和配置
小 木 来 了 \textcolor{Orange}{小木来了} 小木来了
了 解 了 一 下 S p r i n g M V C 的 原 理 , 那 么 就 去 深 入 看 一 下 \textcolor{green}{了解了一下SpringMVC的原理,那么就去深入看一下} 了解了一下SpringMVC的原理,那么就去深入看一下
今 天 的 目 标 是 注 解 开 发 和 如 何 使 用 @ C o n t r o l l e r \textcolor{green}{今天的目标是注解开发和如何使用@Controller} 今天的目标是注解开发和如何使用@Controller
博 主 也 在 学 习 阶 段 , 如 若 发 现 问 题 , 请 告 知 , 非 常 感 谢 \textcolor{Orange}{博主也在学习阶段,如若发现问题,请告知,非常感谢} 博主也在学习阶段,如若发现问题,请告知,非常感谢
所用到的代码都可以在这里找到
注解开发及配置
-
- 三、Annotation注解开发
-
- 1. 步骤
- 2. 总结
- 四、Controller配置总结
-
- 实现Controller接口
- 使用注解开发@Controller
三、Annotation注解开发
1. 步骤
− − > \textcolor{orange}{-->} −−>创建Module,
− − > \textcolor{orange}{-->} −−>添加web支持,
− − > \textcolor{orange}{-->} −−>导入依赖(主要有Spring框架核心库,SpringMVC, servlet,JSTL等),
− − > \textcolor{orange}{-->} −−>配置web.xml:注意,web.xml版本要最新版4.0;artifacts的lib目录添加;注册DispatcherServlet;关联SpringMVC的配置文件;启动级别为1;映射路径为/
<web-app xmlns="http://xmlns.jcp.org/xml/ns/javaee"
         xmlns:xsi="http://www.w3.org/2001/XMLSchema-instance"
         xsi:schemaLocation="http://xmlns.jcp.org/xml/ns/javaee http://xmlns.jcp.org/xml/ns/javaee/web-app_4_0.xsd"
         version="4.0">


    <servlet>
        <servlet-name>springmvcservlet-name>
        <servlet-class>org.springframework.web.servlet.DispatcherServletservlet-class>

        <init-param>
            <param-name>contextConfigLocationparam-name>

            <param-value>classpath:springmvc-servlet.xmlparam-value>
        init-param>

        <load-on-startup>1load-on-startup>
    servlet>

    <servlet-mapping>
        <servlet-name>springmvcservlet-name>
        <url-pattern>/url-pattern>
    servlet-mapping>

web-app>
− − > \textcolor{orange}{-->} −−>创建springmvc配置文件
<beans xmlns="http://www.springframework.org/schema/beans"
       xmlns:xsi="http://www.w3.org/2001/XMLSchema-instance"
       xmlns:context="http://www.springframework.org/schema/context"
       xmlns:mvc="http://www.springframework.org/schema/mvc"
       xsi:schemaLocation="http://www.springframework.org/schema/beans
        http://www.springframework.org/schema/beans/spring-beans.xsd http://www.springframework.org/schema/context https://www.springframework.org/schema/context/spring-context.xsd http://www.springframework.org/schema/mvc https://www.springframework.org/schema/mvc/spring-mvc.xsd">


    <context:component-scan base-package="com.hxl.controller"/>

    <mvc:default-servlet-handler/>

    <mvc:annotation-driven/>

    <bean class="org.springframework.web.servlet.view.InternalResourceViewResolver" id="internalResourceViewResolver">

        <property name="prefix" value="/WEB-INF/jsp/"/>
        <property name="suffix" value=".jsp"/>
    bean>

beans>
− − > \textcolor{orange}{-->} −−>注意点: 在视图解析器中我们把所有的视图都放在/WEB-INF/目录下,这样可以保证视图安全,因为这个目录下的文件,客户端不能直接访问
− − > \textcolor{orange}{-->} −−>创建Controller
package com.hxl.controller;

import org.springframework.stereotype.Controller;
import org.springframework.ui.Model;
import org.springframework.web.bind.annotation.RequestMapping;

@Controller
@RequestMapping("/HelloController")
public class HelloController {

    //真实访问地址:项目名/HelloController/hello
    @RequestMapping("/hello")
    public String hello(Model model){

        //封装数据,向模型中添加属性msg与值,可以在jsp页面中取出并渲染
        model.addAttribute("msg","Hello,SpringMVCAnnotation。老铁们");
        // WEB-INF/jsp/hello.jsp
        return "hello"; //会被视图解析器处理
    }
}
- @Controller是为了让Spring IOC容器初始化时自动扫描到
- @RequestMapping是为了映射请求路径,这里因为类与方法上都有映射,所以访问时应该是/HelloController/hello
- 方法中声明Model类型的参数是为了把Action中的数据带到视图中
- 方法返回的结构是视图的名称hello,加上配置文件中的前后缀,变成、/WEB-INF/jsp/hello.jsp
− − > \textcolor{orange}{-->} −−>创建视图层
− − > \textcolor{orange}{-->} −−>在WEB-INF/jsp目录中创建hello.jsp。视图可以取出并展示从Controller带回的信息;可以通过EL取出Model中存放的值(对象)
<%@ page contentType="text/html;charset=UTF-8" language="java" %>
<html>
<head>
    <title>Titletitle>
head>
<body>
${msg}
body>
html>
− − > \textcolor{orange}{-->} −−>配置Tomcat 访问
这里不再赘述,有需要可以查看之前的博客
2. 总结
- 新建一个web项目
- 导入jar包
- 编写web.xml,注册DispatcherServlet
- 编写springmvc配置文件
- 创建对应的控制类controller
- 完善前端视图与controller之间的对应
- 测试运行
使用SpringMVC必须配置三大核心:处理器映射器、处理器适配器、视图解析器
在我们开发中只需要手动配置视图解析器,而处理器映射器和处理器适配器只需要开启注解驱动就可以了。
四、Controller配置总结
控制器Controller
- 控制器复杂体统访问应用程序的行为,通常通过接口定义或注解定义两种方法实现。
- 控制器负责解析用户的请求,并将其转换为一个模型
- 在SpringMVC中一个控制器类可以包含多个方法
- 在SpringMVC中,对于Controller的配置方法由很多种
实现Controller接口
import org.springframework.web.servlet.ModelAndView;
import org.springframework.web.servlet.mvc.Controller;

import javax.servlet.http.HttpServletRequest;
import javax.servlet.http.HttpServletResponse;

//只要实现了Controller接口的类,说明着就是一个控制器
public class ControllerTest1 implements Controller {

    public ModelAndView handleRequest(HttpServletRequest httpServletRequest, HttpServletResponse httpServletResponse) throws Exception {

        ModelAndView modelAndView = new ModelAndView();
        modelAndView.addObject("msg","ControllerTest1");
        modelAndView.setViewName("test");
        return modelAndView;
    }
}
− − > \textcolor{orange}{-->} −−>在springmvc-servlet.xml,spring配置文件中注册bean;name对应请i求路径,class对应处理请求的类
<beans xmlns="http://www.springframework.org/schema/beans"
       xmlns:xsi="http://www.w3.org/2001/XMLSchema-instance"
       xmlns:context="http://www.springframework.org/schema/context"
       xmlns:mvc="http://www.springframework.org/schema/mvc"
       xsi:schemaLocation="http://www.springframework.org/schema/beans
        http://www.springframework.org/schema/beans/spring-beans.xsd http://www.springframework.org/schema/context https://www.springframework.org/schema/context/spring-context.xsd http://www.springframework.org/schema/mvc https://www.springframework.org/schema/mvc/spring-mvc.xsd">


    <bean class="org.springframework.web.servlet.view.InternalResourceViewResolver" id="internalResourceViewResolver">

        <property name="prefix" value="/WEB-INF/jsp/"/>
        <property name="suffix" value=".jsp"/>
    bean>

    <bean name="/t1" class="com.hxl.controller.ControllerTest1"/>

beans>
− − > \textcolor{orange}{-->} −−>此处实现controller接口有缺点:一个控制器中只有一个方法,如果要多个方法则需要定义多个Controller;定义的方式比较麻烦;
使用注解开发@Controller
-
@Controller注解类型用于声明Spring类的实例是一个控制器(@Component(组件),@Service(servie)、@Controller(controller)、@Respository(dao))
-
Spring可以使用扫描机制来找到应用程序中所有基于注解的控制器类,为了保证Spring能找到你的控制器,需要在配置文件中声明组件扫描。
<beans xmlns="http://www.springframework.org/schema/beans"
       xmlns:xsi="http://www.w3.org/2001/XMLSchema-instance"
       xmlns:context="http://www.springframework.org/schema/context"
       xmlns:mvc="http://www.springframework.org/schema/mvc"
       xsi:schemaLocation="http://www.springframework.org/schema/beans
        http://www.springframework.org/schema/beans/spring-beans.xsd http://www.springframework.org/schema/context https://www.springframework.org/schema/context/spring-context.xsd http://www.springframework.org/schema/mvc https://www.springframework.org/schema/mvc/spring-mvc.xsd">


    <context:component-scan base-package="com.hxl.controller"/>


    <bean class="org.springframework.web.servlet.view.InternalResourceViewResolver" id="internalResourceViewResolver">

        <property name="prefix" value="/WEB-INF/jsp/"/>
        <property name="suffix" value=".jsp"/>
    bean>


beans>
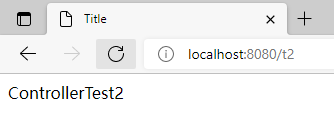
− − > \textcolor{orange}{-->} −−>ControllerTest2
package com.hxl.controller;

import org.springframework.stereotype.Controller;
import org.springframework.ui.Model;
import org.springframework.web.bind.annotation.RequestMapping;

//代表这个类会被spring接管,这个注解的类种的所有方法,如果返回值是String并且有具体的页面可以跳转,那么就会被视图解析器解析
@Controller
public class ControllerTest2 {

  @RequestMapping("/t2")
  public String test(Model model){

      model.addAttribute("msg", "ControllerTest2");
      return "test";
  }
}
小技巧:
- 只要改了java的代码就要reload一下
- 只要改了配置文件,就要重新启动tomcat
- 如果只改了前端页面,刷新一下就欧克
注意: 两个请求都可以指向一个视图,但是页面结果的结果是不一样的,从这里可以看出视图是被复用的,而控制器与视图之间是弱偶合关系。
比说说:点击一个多选(有增加有修改),有很多不同的页面,但是不一定有这么多的jsp页面,只是换了个模板,把里面的数据交换一下。如果有相关的开发经验会

