一、前言
我们已经学习了 CocoaPods 的使用和基本原理知识,我们在项目开发中,不可避免的要工程化与组件化,因此,需要开发自己的 pod 组件,本文将带领大家如何创建自己的 pod 库,并发布至 pod trunk。
二、自定义 pod 库
2.1、创建 pod 库
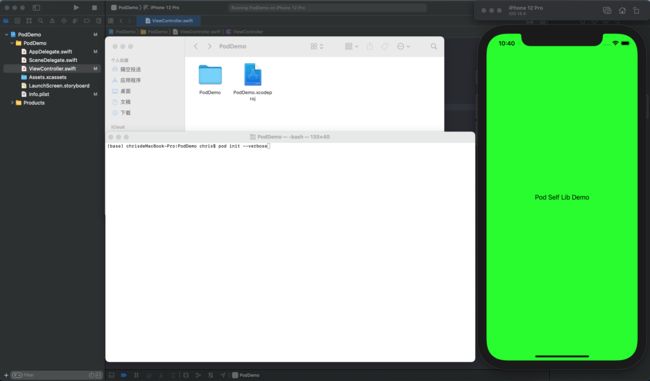
- 先初始化 Pod
- 然后再 pod install ,最终结果如下:
- 创建自定义 Pod 库::
// 命令行
$ pod lib create XXX
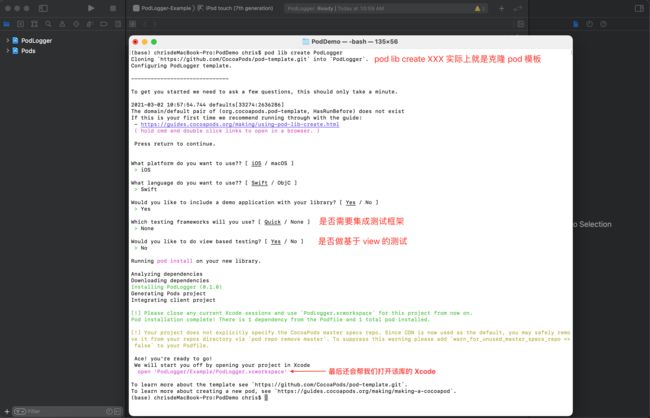
整个创建过程如下图:
2.2、pod template 分析
上图标示的非常清楚了:
- 我们虽然是创建 pod lib,实现是下载 pod template;
- 根据我们的输入选项,最终生成一个自带『工程』+『Pod Library』的完整项目;
- 左侧 Xcode 目录区就展示是『工程』如何引用『Pod lib』;
2.3、Example 的 Podfile 分析
一目了然,pod 只需要指明 path,如果不给 path,pod 会自动从 pod repo 中去寻找,这里,我们给定一个本地的 path,pod 就知道了;后面,我们会重新调整这个目录结构。
2.4、podspec 文件
我们先来看一下 podspec 文件内容
重点是1、2两个区域,其它信息,都是根据你的 git 的 config 读取的信息默认生成的,并不准确,后面上传至 git 时,会修改这里,如果仅是本地使用,这可以无视。
三、调整目录 & 引入项目
3.1、调整 pod lib 目录
删除如下,只留我们需要的文件和目录:
3.2、修改 podspec
Pod::Spec.new do |s|
  s.name             = 'PodLogger'
  s.version          = '1.0.0'
  s.summary          = 'A pod library demo'

  s.description      = <<-DESC
  TODO: Add long description of the pod here.
  DESC

  # 先修改为之后要提交到 github 上的地址
  s.homepage         = 'https://github.com/qingye/PodLogger'
  s.license          = { :type => 'MIT', :file => 'LICENSE' }
  s.author           = { '青叶小小' => '[email protected]' }
  s.source           = { :git => 'https://github.com/qingye/PodLogger.git', :tag => s.version.to_s }

  s.ios.deployment_target = '10.0'
  s.source_files = 'PodLogger/**/*'

end
3.3、本地工程引入
接下来,我们在主工程下 pod install --verbose 一下,结果如下图:
3.4、实现 Logger.swift
public struct Logger {
    var DEBUG: Bool = false

    public init(_ DEBUG: Bool) {
        self.DEBUG = DEBUG
    }

    public func log(_ msg: String) {
        print("Pod..Logger => \(msg)")
    }
}
3.5、测试 pod lib
四、上云( github )
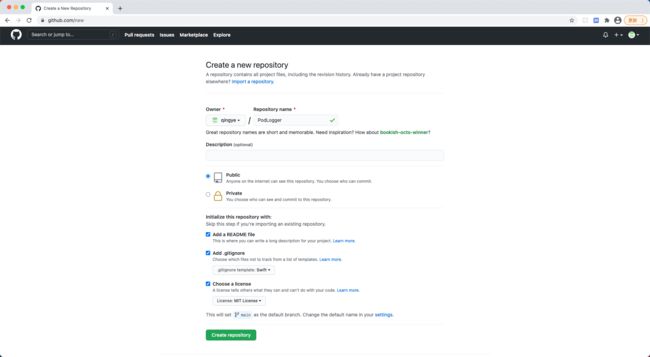
4.1、创建 github 仓库
4.2、提交 & tag
操作步骤如下:
- git add .
- git commit -m “xxx"
$ git add .
$ git commit -m "pod lib for demo"
[master 7256090] pod lib for demo
 19 files changed, 38 insertions(+), 1050 deletions(-)
 delete mode 100644 Example/PodLogger.xcodeproj/project.pbxproj
 delete mode 100644 Example/PodLogger.xcodeproj/project.xcworkspace/contents.xcworkspacedata
 delete mode 100644 Example/PodLogger.xcodeproj/xcshareddata/xcschemes/PodLogger-Example.xcscheme
 delete mode 100644 Example/PodLogger/AppDelegate.swift
 delete mode 100644 Example/PodLogger/Base.lproj/LaunchScreen.xib
 delete mode 100644 Example/PodLogger/Base.lproj/Main.storyboard
 delete mode 100644 Example/PodLogger/Images.xcassets/AppIcon.appiconset/Contents.json
 delete mode 100644 Example/PodLogger/Info.plist
 delete mode 100644 Example/PodLogger/ViewController.swift
 delete mode 100644 Example/Podfile
 delete mode 100644 Example/Tests/Info.plist
 delete mode 100644 Example/Tests/Tests.swift
 rewrite PodLogger.podspec (73%)
 delete mode 100644 PodLogger/Assets/.gitkeep
 delete mode 100644 PodLogger/Classes/.gitkeep
 delete mode 100644 PodLogger/Classes/ReplaceMe.swift
 create mode 100644 PodLogger/Logger.swift
 delete mode 120000 _Pods.xcodeproj
- git remote add origin 远程代码仓库地址
- git push origin master
$ git remote add origin https://github.com/qingye/PodLogger.git
$ git push origin master
Counting objects: 40, done.
Delta compression using up to 4 threads.
Compressing objects: 100% (33/33), done.
Writing objects: 100% (40/40), 14.39 KiB | 2.05 MiB/s, done.
Total 40 (delta 3), reused 0 (delta 0)
remote: Resolving deltas: 100% (3/3), done.
remote:
remote: Create a pull request for 'master' on GitHub by visiting:
remote:      https://github.com/qingye/PodLogger/pull/new/master
remote:
To https://github.com/qingye/PodLogger.git
 * [new branch]      master -> master
- git tag 版本号 (注:这里的版本号必须和podspec里写的版本号一致)
- git push --tags
$ git tag 1.0.0
$ git push --tags
Total 0 (delta 0), reused 0 (delta 0)
To https://github.com/qingye/PodLogger.git
 * [new tag]         1.0.0 -> 1.0.0
4.3、验证 & 提交至 pod
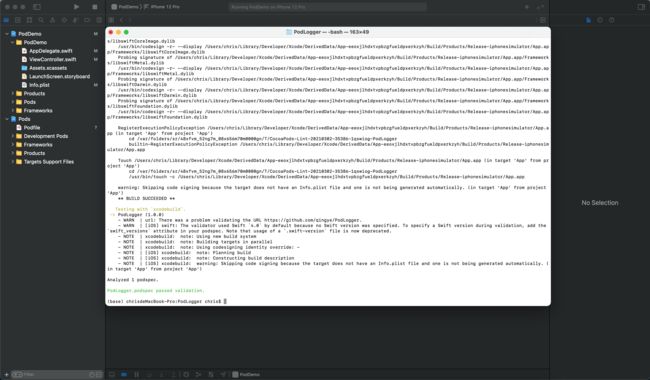
- 验证:pod spec lint --verbose --allow-warnings
- 如果还没有注册过 pod trunk,可以如下注册
$ pod trunk register [email protected] '青叶' --description='Personal PodLib'
[!] Please verify the session by clicking the link in the verification email that has been sent to [email protected]
- 邮箱验证
点击验证链接:
- 命令行查看 pod 账户
$ pod trunk me
  - Name:     青叶
  - Email:    [email protected]
  - Since:    March 2nd, 00:58
  - Pods:     None
  - Sessions:
    - March 2nd, 00:58 - July 8th, 01:05. IP: 203.156.215.154 Description: Personal PodLib
- 提交索引至远程仓库
根据 CocoaPods 官方描述:
公有库发布(全体可见):pod trunk push [NAME.podspec]
私有库发布(自己可见):pod repo push REPO [NAME.podspec]
如果报如下错误,就是没有注册,请回看第2步:
- 公库提交
pod trunk push PodLogger.podspec --verbose --allow-warnings
- 私库提交
pod repo push PodLogger PodLogger.podspec --verbose --allow-warnings
我这里是用『公有库』提交的,提交完结果如下:
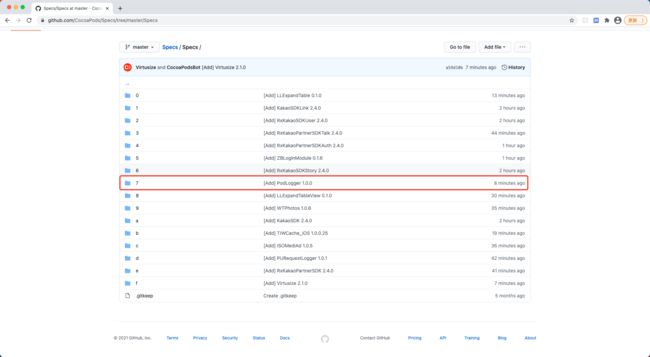
我们可以去 CocoaPods/Specs 中去查看,已经被索引了:
4.4、更新本地 pod repo
如果此时,你直接使用 pod search 会发现找不到自己的库:
$ pod search PodLogger
虽然我们提交至 pod trunk(即 pod specs)成功,但是我们本地还没有,所以,我们需要先更新一下本地的 pod 仓库:
$ pod repo update
Updating spec repo `master`
  $ /usr/local/bin/git -C /Users/chris/.cocoapods/repos/master fetch origin --progress
  remote: Enumerating objects: 15, done.
  remote: Counting objects: 100% (15/15), done.
  remote: Compressing objects: 100% (9/9), done.
  remote: Total 9 (delta 5), reused 0 (delta 0), pack-reused 0
  From https://github.com/CocoaPods/Specs
     ab416c347b51..3bd397424c41  master     -> origin/master
  $ /usr/local/bin/git -C /Users/chris/.cocoapods/repos/master rev-parse --abbrev-ref HEAD
  master
  $ /usr/local/bin/git -C /Users/chris/.cocoapods/repos/master reset --hard origin/master
  HEAD is now at 3bd397424c41 [Add] AudioLibrary 0.7
Updating spec repo `trunk`
如果本地已有(默认如下路径):
~/.cocoapods/repos
但还是搜索不到,那可能需要重建搜索索引(search_index.json),路径在:
~/Library/Caches/CocoaPods
删除该索引文件,然后再执行 search,如下(会提示创建索引中....完成后,就有了):
$ pod search PodLogger
Creating search index for spec repo 'master'.. Done!

-> PodLogger (1.0.0)
   A pod library demo
   pod 'PodLogger', '~> 1.0.0'
   - Homepage: https://github.com/qingye/PodLogger
   - Source:   https://github.com/qingye/PodLogger.git
   - Versions: 1.0.0 [master repo]
4.5、修改主工程
# Uncomment the next line to define a global platform for your project
platform :ios, '10.0'

target 'PodDemo' do
  # Comment the next line if you don't want to use dynamic frameworks
  use_frameworks!

  # 默认使用最新的版本,即 1.0.0
  pod 'PodLogger'

end
然后 pod install --verbose
$ pod install --verbose
Analyzing dependencies
Downloading dependencies
Installing PodLogger (1.0.0)
Generating Pods project
Integrating client project
Pod installation complete! There is 1 dependency from the Podfile and 1 total pod installed.
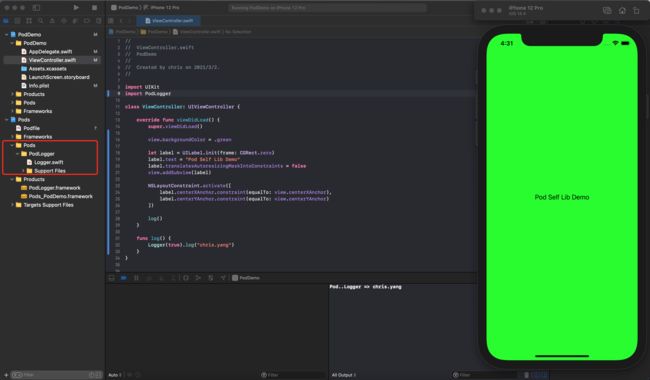
重新编译运行工程,结果如下:
注意:我们的 pod 库发布后,再引入,pod lib 将不再放在『Development Pods』下面,还是在『Pods』下面了!
至此,所有与 CocoaPods 相关的知识我们就分享在这,虽然还有很多其它的知识点,但核心点主要是这些!
