1.官网下载源码http://www.vuethink.com/。
下载完成后,这款后台是前后端分离,基于PHP开发,以及Vuejs。解压后会有frotEnd 和 php 两个安装包。
frontEnd 是前端,php是后端代码。
2.安装前端依赖库
首先需要有nodejs的环境,以前前端依赖库管理工具npm。npm有时候慢,可以用淘宝的cnpm。
进入frontEnd 执行 npm install 完成前端依赖库安装。(安装完成后会出现一些警告,可以不做处理)
3.配置后台数据库
1)php 文件夹下面有 install.sql,先新建数据库 tpvue, 导入 install.sql 语句 。
2)php 文件夹下 config文件夹 database.php 修改数据库名,用户名,密码,端口。
4.运行后端检测是否成功
http://127.0.0.1/vuethink/php (也可以自行配置虚拟主机),后出现 “vuethink接口”。
代表成功了,实现上这个路由缺失(miss)的情况下出现的,对应 application/admin/controller/Base.php 里面 miss() 方法
5.运行前端第一关
进入 frontEnd ,执行 npm run dev,会出现请求超时。造成这个问题,基于前后端分离的情况会出现跨域的问题。前端把frontEnd 当成了根目录,
但是请求的接口就不是在我们的根目录下面,而是在 php/index.php.
猜测,“cannot load http://localhost/admin/base/getConfigs”.
vuethink 的数据交互是用到 Axios,我们找到 main.js,看到“axios.defaults.baseURL=HOST",其中HOST是为 http://localhost:80(webpack.base.conf.js)
我们真正访问的接口应该是在 http://localhost/index.php/,因些我们需要改为 "axios.defaults.baseURL=http://localhost/index.php/".
"windows.HOST =http://localhost/index.php/"
6.进入后台
localhost:8080 输入用户台 admin ,密码123456
7.选择禁用eslint 报错
由于 vuethink 采用了 eslint 严格的机制所以你的代码一旦不按照这个机制写格式,例如你写双引号,空格不按照对齐。
这个时候就会报错,报错。这肯定是受不了。
不需要 eslint 验证机制,webpack.base.conf.js
  loaders: [
  eslint: {
      // configFile: './.eslintrc.json'
    },

    module: {
      preLoaders: [
        // {
        //   test: /\.js$/,
        //   exclude: /node_modules/,
        //   loader: 'eslint'
        // },
        // {
        //   test: /\.vue$/,
        //   exclude: /node_modules/,
        //   loader: 'eslint'
        // }
      ],
8.后端路由设置
后端路由是在php\config\route_admin.php 文件里面。
// +----------------------------------------------------------------------
// | Description: 基础框架路由配置文件
// +----------------------------------------------------------------------
// | Author: linchuangbin [email protected]
// +----------------------------------------------------------------------
return [
      // 定义资源路由
      '__rest__'=>[
          'admin/rules'          =>'admin/rules',
          'admin/groups'         =>'admin/groups',
          'admin/users'          =>'admin/users',
          'admin/menus'          =>'admin/menus',
          'admin/structures'     =>'admin/structures',
          'admin/posts'          =>'admin/posts',
      ],

      // 【基础】登录
      'admin/base/login' => ['admin/base/login', ['method' => 'POST']],
      // 【基础】记住登录
      'admin/base/relogin'    => ['admin/base/relogin', ['method' => 'POST']],
      // 【基础】修改密码
      'admin/base/setInfo' => ['admin/base/setInfo', ['method' => 'POST']],
      // 【基础】退出登录
      'admin/base/logout' => ['admin/base/logout', ['method' => 'POST']],
      // 【基础】获取配置
      'admin/base/getConfigs' => ['admin/base/getConfigs', ['method' => 'POST']],
      // 【基础】获取验证码
      'admin/base/getVerify' => ['admin/base/getVerify', ['method' => 'GET']],
      // 【基础】上传图片
      'admin/upload' => ['admin/upload/index', ['method' => 'POST']],
      // 保存系统配置
      'admin/systemConfigs' => ['admin/systemConfigs/save', ['method' => 'POST']],
      // 【规则】批量删除
      'admin/rules/deletes' => ['admin/rules/deletes', ['method' => 'POST']],
      // 【规则】批量启用/禁用
      'admin/rules/enables' => ['admin/rules/enables', ['method' => 'POST']],
      // 【用户组】批量删除
      'admin/groups/deletes' => ['admin/groups/deletes', ['method' => 'POST']],
      // 【用户组】批量启用/禁用
      'admin/groups/enables' => ['admin/groups/enables', ['method' => 'POST']],
      // 【用户】批量删除
      'admin/users/deletes' => ['admin/users/deletes', ['method' => 'POST']],
      // 【用户】批量启用/禁用
      'admin/users/enables' => ['admin/users/enables', ['method' => 'POST']],
      // 【菜单】批量删除
      'admin/menus/deletes' => ['admin/menus/deletes', ['method' => 'POST']],
      // 【菜单】批量启用/禁用
      'admin/menus/enables' => ['admin/menus/enables', ['method' => 'POST']],
      // 【组织架构】批量删除
      'admin/structures/deletes' => ['admin/structures/deletes', ['method' => 'POST']],
      // 【组织架构】批量启用/禁用
      'admin/structures/enables' => ['admin/structures/enables', ['method' => 'POST']],
      // 【部门】批量删除
      'admin/posts/deletes' => ['admin/posts/deletes', ['method' => 'POST']],
      // 【部门】批量启用/禁用
      'admin/posts/enables' => ['admin/posts/enables', ['method' => 'POST']],

      // MISS路由
      '__miss__'  => 'admin/base/miss',
  ];
我们要新建一个路由,admin/hello/index
'admin/hello/index' => ['admin/hello/index',['method' => 'GET']],
然后在php/application/admin/controller 新建一个Hello类
Hello.php
namespace app\admin\controller;
use app\common\controller\Common;
class Hello extends Common
{
public function index()
{
      echo "Hello Vuethink";
  }
}
Common类只是继承了Controller类是不需要验证的,大部分的类都继承了ApiCommon 是需要验证的。
这里需要注意一点,Common类的初始化方法中已经禁止跨域,所以我们需要把接受任何请求放开才能访问上面的路由。
// header('Access-Control-Allow-Origin:*'); // 可跨域 (这里注释去掉,可以接受所有的访问)。
之后我们访问新写的路由。127.0.0.1/vuethink/php/index.php/admin/hello/index 就可以显示
Hello Vuethink
9.vuethink 项目部署
项目要在vue下面跑起来,一般会用npm run dev,但是不可能每次都要打开cmd跑项目,我们用 npm run build,会在frontEnd文件夹下
出现一个dist文件夹。
这里还会遇到一个问题,由于Vue的特性,导致运行的dist文件,必须是根目录下,必须要提前配置好,如果是以端口号加文件目录的方式,则无法访问。
需要新建虚拟站点。
部署的时候, php文件夹和dist文件夹一起部署,改虚拟目录的路径为dist文件路径,即
D:/wamp/www/vuethink/frontEnd/dist/ 虚拟站点为 http://tpvue.my.com
同时需要将 main.js axios的默认地址改为axios.defaults.baseURL = 'http://127.0.0.1/vuethink/php/index.php/'
还有 window.HOST = 'http://127.0.0.1/vuethink/php/index.php'
这样配置登录后,点进去刷新的时候,即304重定向的时候,会出现404 Not Found.
因为创建好的dist文件后,并没有实际存在的home文件夹或者menu方法,list方法或者html页面都不存在,是js动态生成的,所以实际的地址会报错。
因为vue用的是单页面应用,用的虚拟路由。
添加中间的一段代码
RewriteEngine On 开启重写
RewriteBase /
RewriteRule ^index.html$ - [L]
RewriteCond %{REQUEST_FILENAME} !-f
RewriteCond %{REQUEST_FILENAME} !-d
RewriteRule . /index.html [L]
RewriteCond和紧追的RewriteRule是配合使用的。 RewriteCond是匹配字符串用的,第一个参数是测试的字符串,第二个参数是匹配规则,通过一个正则。
RewriteCond第一个参数基本都是用来匹配$_SERVER里的那堆参数,HTTP_HOST,REQUEST_FILENAME之类的。就是对应浏览器地址栏里输入的那串url进行匹配,
如果url符合这条规则,那么就走下面的这条路由。RewriteCond和RewriteRuel配合使用,路由就是一个转的过程,原来写的是A,经过这个路由之后,就转给B去了。
[L]表示如果匹配的话,这个就是最后一个重写规则。
这里的意思就是如果匹配得到index.html 那么就是最后的重写规则。
如果请求的文件不是文件也不是目录,就重定向到index.html
这样做可避免出现上面的错误 ,但是又有一个缺点,失去了404报错的页面,需要自己额外做一个404页面来跳转。
Apache 配置如下:
ServerAdmin [email protected]
DocumentRoot "D:/wamp/www/vuethink/frontEnd/dist/"
ServerName localhost
ServerAlias tpvue.my.com
RewriteEngine On
RewriteBase /
RewriteRule ^index.html$ - [L]
RewriteCond %{REQUEST_FILENAME} !-f
RewriteCond %{REQUEST_FILENAME} !-d
RewriteRule . /index.html [L]
#Options FollowSymLinks
Options +Indexes +Includes +FollowSymLinks +MultiViews
AllowOverride All
#Order deny,allow
#Require all granted
Require local
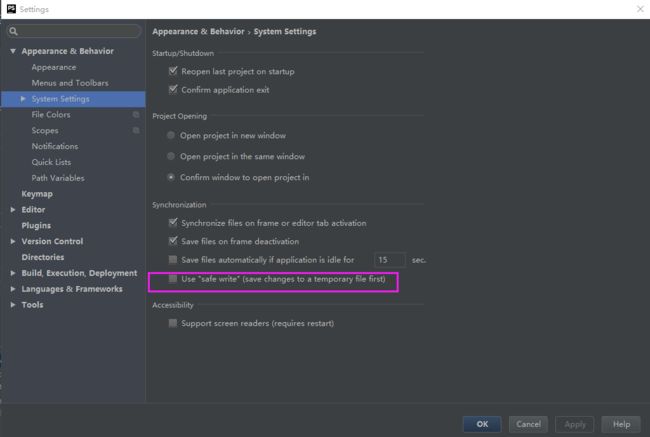
10. webpack-hot-middleware 用 vue_cli 跑项目时,不能热加载。
用的webstrorm,phpstorm,将文件保存在临时文件中,所以不能热加载。
解决方案: File => Settings => Appearance & Behavior => System Settings => Synchronization 最后一项去掉就可以了。
Use "safe write" (save changes to a temporary file first)
