该文章首发于微信公众号:字节流动
FFmpeg 开发系列连载:
FFmpeg 开发(01):FFmpeg 编译和集成
FFmpeg 开发(02):FFmpeg + ANativeWindow 实现视频解码播放
FFmpeg 开发(03):FFmpeg + OpenSLES 实现音频解码播放
FFmpeg 开发(04):FFmpeg + OpenGLES 实现音频可视化播放
FFmpeg 开发(05):FFmpeg + OpenGLES 实现视频解码播放和视频滤镜
FFmpeg 开发(07):FFmpeg + OpenGLES 实现 3D 全景播放器
前文中,我们已经利用 FFmpeg + OpenGLES + OpenSLES 实现了一个多媒体播放器,本文将在视频渲染方面对播放器进行优化。
视频渲染优化
前文中,我们都是将解码的视频帧通过 swscale 库转换为 RGBA 格式,然后在送给 OpenGL 渲染,而视频帧通常的格式是 YUV420P/YUV420SP ,所以大部分情况下都需要 swscale 进行格式转换。
当视频尺寸比较大时,再用 swscale 进行格式转化的话,就会存在性能瓶颈,所以本文将 YUV 到 RGBA 的格式转换放到 shader 里,用 GPU 来实现格式转换,提升渲染效率。
本文视频渲染优化,实质上是对 OpenGLRender 视频渲染器进行改进,使其支持 YUV420P 、 NV21 以及 NV12 这些常用格式图像的渲染。
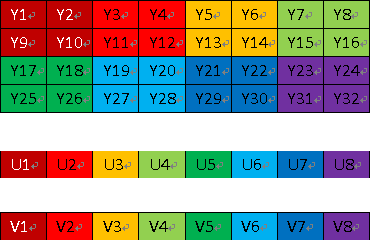
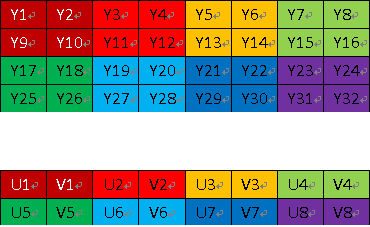
我们在前文一文掌握 YUV 的图像处理中知道,YUV420P 格式的图像在内存中有 3 个平面,YUV420SP (NV21、NV12)格式的图像在内存中有 2 个平面,而 RGBA 格式的图像只有一个平面。
所以,OpenGLRender 视频渲染器要兼容 YUV420P、 YUV420SP 以及 RGBA 格式,需要创建 3 个纹理存储待渲染的数据,渲染 YUV420P 格式的图像需要用到 3 个纹理,渲染 YUV420SP 格式的图像只需用到 2 个纹理即可,而渲染 RGBA 格式图像只需一个纹理。
判断解码后视频帧的格式,AVFrame 是解码后的视频帧。
void VideoDecoder::OnFrameAvailable(AVFrame *frame) {
    LOGCATE("VideoDecoder::OnFrameAvailable frame=%p", frame);
    if(m_VideoRender != nullptr && frame != nullptr) {
        NativeImage image;
        //YUV420P
        if(GetCodecContext()->pix_fmt == AV_PIX_FMT_YUV420P || GetCodecContext()->pix_fmt == AV_PIX_FMT_YUVJ420P) {
            image.format = IMAGE_FORMAT_I420;
            image.width = frame->width;
            image.height = frame->height;
            image.pLineSize[0] = frame->linesize[0];
            image.pLineSize[1] = frame->linesize[1];
            image.pLineSize[2] = frame->linesize[2];
            image.ppPlane[0] = frame->data[0];
            image.ppPlane[1] = frame->data[1];
            image.ppPlane[2] = frame->data[2];
            if(frame->data[0] && frame->data[1] && !frame->data[2] && frame->linesize[0] == frame->linesize[1] && frame->linesize[2] == 0) {
                // on some android device, output of h264 mediacodec decoder is NV12 兼容某些设备可能出现的格式不匹配问题
                image.format = IMAGE_FORMAT_NV12;
            }
        } else if (GetCodecContext()->pix_fmt == AV_PIX_FMT_NV12) { //NV12
            image.format = IMAGE_FORMAT_NV12;
            image.width = frame->width;
            image.height = frame->height;
            image.pLineSize[0] = frame->linesize[0];
            image.pLineSize[1] = frame->linesize[1];
            image.ppPlane[0] = frame->data[0];
            image.ppPlane[1] = frame->data[1];
        } else if (GetCodecContext()->pix_fmt == AV_PIX_FMT_NV21) { //NV21
            image.format = IMAGE_FORMAT_NV21;
            image.width = frame->width;
            image.height = frame->height;
            image.pLineSize[0] = frame->linesize[0];
            image.pLineSize[1] = frame->linesize[1];
            image.ppPlane[0] = frame->data[0];
            image.ppPlane[1] = frame->data[1];
        } else if (GetCodecContext()->pix_fmt == AV_PIX_FMT_RGBA) { //RGBA
            image.format = IMAGE_FORMAT_RGBA;
            image.width = frame->width;
            image.height = frame->height;
            image.pLineSize[0] = frame->linesize[0];
            image.ppPlane[0] = frame->data[0];
        } else {  //其他格式由 swscale 转换为 RGBA
            sws_scale(m_SwsContext, frame->data, frame->linesize, 0,
                      m_VideoHeight, m_RGBAFrame->data, m_RGBAFrame->linesize);
            image.format = IMAGE_FORMAT_RGBA;
            image.width = m_RenderWidth;
            image.height = m_RenderHeight;
            image.ppPlane[0] = m_RGBAFrame->data[0];
        }

        //将图像传递给渲染器进行渲染
        m_VideoRender->RenderVideoFrame(&image);
    }
}
创建 3 个纹理,但是不指定要加载图像的格式。
// TEXTURE_NUM = 3
glGenTextures(TEXTURE_NUM, m_TextureIds);
for (int i = 0; i < TEXTURE_NUM ; ++i) {
    glActiveTexture(GL_TEXTURE0 + i);
    glBindTexture(GL_TEXTURE_2D, m_TextureIds[i]);
    glTexParameterf(GL_TEXTURE_2D, GL_TEXTURE_WRAP_S, GL_CLAMP_TO_EDGE);
    glTexParameterf(GL_TEXTURE_2D, GL_TEXTURE_WRAP_T, GL_CLAMP_TO_EDGE);
    glTexParameteri(GL_TEXTURE_2D, GL_TEXTURE_MIN_FILTER, GL_LINEAR);
    glTexParameteri(GL_TEXTURE_2D, GL_TEXTURE_MAG_FILTER, GL_LINEAR);
    glBindTexture(GL_TEXTURE_2D, GL_NONE);
}
加载不同格式的数据到纹理。
switch (m_RenderImage.format)
{
    //加载 RGBA 类型的数据
    case IMAGE_FORMAT_RGBA:
        glActiveTexture(GL_TEXTURE0);
        glBindTexture(GL_TEXTURE_2D, m_TextureIds[0]);
        glTexImage2D(GL_TEXTURE_2D, 0, GL_RGBA, m_RenderImage.width, m_RenderImage.height, 0, GL_RGBA, GL_UNSIGNED_BYTE, m_RenderImage.ppPlane[0]);
        glBindTexture(GL_TEXTURE_2D, GL_NONE);
        break;
    //加载 YUV420SP 类型的数据
    case IMAGE_FORMAT_NV21:
    case IMAGE_FORMAT_NV12:
        //upload Y plane data
        glActiveTexture(GL_TEXTURE0);
        glBindTexture(GL_TEXTURE_2D, m_TextureIds[0]);
        glTexImage2D(GL_TEXTURE_2D, 0, GL_LUMINANCE, m_RenderImage.width,
                     m_RenderImage.height, 0, GL_LUMINANCE, GL_UNSIGNED_BYTE,
                     m_RenderImage.ppPlane[0]);
        glBindTexture(GL_TEXTURE_2D, GL_NONE);

        //update UV plane data
        glActiveTexture(GL_TEXTURE1);
        glBindTexture(GL_TEXTURE_2D, m_TextureIds[1]);
        glTexImage2D(GL_TEXTURE_2D, 0, GL_LUMINANCE_ALPHA, m_RenderImage.width >> 1,
                     m_RenderImage.height >> 1, 0, GL_LUMINANCE_ALPHA, GL_UNSIGNED_BYTE,
                     m_RenderImage.ppPlane[1]);
        glBindTexture(GL_TEXTURE_2D, GL_NONE);
        break;
    //加载 YUV420P 类型的数据
    case IMAGE_FORMAT_I420:
        //upload Y plane data
        glActiveTexture(GL_TEXTURE0);
        glBindTexture(GL_TEXTURE_2D, m_TextureIds[0]);
        glTexImage2D(GL_TEXTURE_2D, 0, GL_LUMINANCE, m_RenderImage.width,
                     m_RenderImage.height, 0, GL_LUMINANCE, GL_UNSIGNED_BYTE,
                     m_RenderImage.ppPlane[0]);
        glBindTexture(GL_TEXTURE_2D, GL_NONE);

        //update U plane data
        glActiveTexture(GL_TEXTURE1);
        glBindTexture(GL_TEXTURE_2D, m_TextureIds[1]);
        glTexImage2D(GL_TEXTURE_2D, 0, GL_LUMINANCE, m_RenderImage.width >> 1,
                     m_RenderImage.height >> 1, 0, GL_LUMINANCE, GL_UNSIGNED_BYTE,
                     m_RenderImage.ppPlane[1]);
        glBindTexture(GL_TEXTURE_2D, GL_NONE);

        //update V plane data
        glActiveTexture(GL_TEXTURE2);
        glBindTexture(GL_TEXTURE_2D, m_TextureIds[2]);
        glTexImage2D(GL_TEXTURE_2D, 0, GL_LUMINANCE, m_RenderImage.width >> 1,
                     m_RenderImage.height >> 1, 0, GL_LUMINANCE, GL_UNSIGNED_BYTE,
                     m_RenderImage.ppPlane[2]);
        glBindTexture(GL_TEXTURE_2D, GL_NONE);
        break;
    default:
        break;
}
对应的顶点着色器和片段着色器,其中重要的是,片段着色器需要针对不同的图像格式采用不用的采样策略。
//顶点着色器
#version 300 es
layout(location = 0) in vec4 a_Position;
layout(location = 1) in vec2 a_texCoord;
out vec2 v_texCoord;
void main()
{
    gl_Position = a_Position;
    v_texCoord = a_texCoord;
}

//片段着色器
#version 300 es
precision highp float;
in vec2 v_texCoord;
layout(location = 0) out vec4 outColor;
uniform sampler2D s_texture0;
uniform sampler2D s_texture1;
uniform sampler2D s_texture2;
uniform int u_ImgType;// 1:RGBA, 2:NV21, 3:NV12, 4:I420

void main()
{

    if(u_ImgType == 1) //RGBA
    {
        outColor = texture(s_texture0, v_texCoord);
    }
    else if(u_ImgType == 2) //NV21
    {
        vec3 yuv;
        yuv.x = texture(s_texture0, v_texCoord).r;
        yuv.y = texture(s_texture1, v_texCoord).a - 0.5;
        yuv.z = texture(s_texture1, v_texCoord).r - 0.5;
        highp vec3 rgb = mat3(1.0,       1.0,     1.0,
        0.0,    -0.344,     1.770,
        1.403,  -0.714,     0.0) * yuv;
        outColor = vec4(rgb, 1.0);

    }
    else if(u_ImgType == 3) //NV12
    {
        vec3 yuv;
        yuv.x = texture(s_texture0, v_texCoord).r;
        yuv.y = texture(s_texture1, v_texCoord).r - 0.5;
        yuv.z = texture(s_texture1, v_texCoord).a - 0.5;
        highp vec3 rgb = mat3(1.0,       1.0,     1.0,
        0.0,    -0.344,     1.770,
        1.403,  -0.714,     0.0) * yuv;
        outColor = vec4(rgb, 1.0);
    }
    else if(u_ImgType == 4) //I420
    {
        vec3 yuv;
        yuv.x = texture(s_texture0, v_texCoord).r;
        yuv.y = texture(s_texture1, v_texCoord).r - 0.5;
        yuv.z = texture(s_texture2, v_texCoord).r - 0.5;
        highp vec3 rgb = mat3(1.0,       1.0,     1.0,
                              0.0,  -0.344,     1.770,
                              1.403,  -0.714,     0.0) * yuv;
        outColor = vec4(rgb, 1.0);
    }
    else
    {
        outColor = vec4(1.0);
    }
}
其中片段着色器 u_ImgType 变量用于设置待渲染图像的格式类型,从而采用不同的采样转换策略。
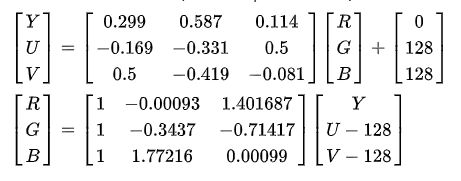
需要注意的是,YUV 格式图像 UV 分量的默认值分别是 127 ,Y 分量默认值是 0 ,8 个 bit 位的取值范围是 0 ~ 255,由于在 shader 中纹理采样值需要进行归一化,所以 UV 分量的采样值需要分别减去 0.5 ,确保 YUV 到 RGB 正确转换。


