前言
来啦老铁!
笔者学习Spring Boot有一段时间了,附上Spring Boot系列学习文章,欢迎取阅、赐教:
- 5分钟入手Spring Boot;
- Spring Boot数据库交互之Spring Data JPA;
- Spring Boot数据库交互之Mybatis;
- Spring Boot视图技术;
- Spring Boot之整合Swagger;
- Spring Boot之junit单元测试踩坑;
- 如何在Spring Boot中使用TestNG;
- Spring Boot之整合logback日志;
- Spring Boot之整合Spring Batch:批处理与任务调度;
- Spring Boot之整合Spring Security: 访问认证;
- Spring Boot之整合Spring Security: 授权管理;
- Spring Boot之多数据库源:极简方案;
- Spring Boot之使用MongoDB数据库源;
- Spring Boot之多线程、异步:@Async;
- Spring Boot之前后端分离(一):Vue前端;
在上一篇文章Spring Boot之前后端分离(一):Vue前端中我们建立了Vue前端,打开了Spring Boot前后端分离的第一步,今天我们将建立后端,并且与前端进行集成,搭建一个完整的前后端分离的web应用!
-
该web应用主要演示登录操作!
整体步骤
- 后端技术栈选型;
- 后端搭建;
- 完成前端登录页面;
- 前后端集成与交互;
- 前后端交互演示;
1. 后端技术栈选型;
有了之前Spring Boot学习的基础,我们可以很快建立后端,整体选型:
- 持久层框架使用Mybatis;
- 集成访问认证与权限控制;
- 集成单元测试;
- 集成Swagger生成API文档;
- 集成logback日志系统;
笔者还预想过一些Spring Boot中常用的功能,如使用Redis、消息系统Kafka等、Elasticsearch、应用监控Acutator等,但由于还未进行这些方面的学习,咱将来再把它们集成到我们的前后端分离的项目中。
2. 后端搭建;
1). 持久层框架使用Mybatis(暂未在本项目中使用,后续加上);
- 参考:Spring Boot数据库交互之Mybatis;
2). 集成访问认证与权限控制(已使用,主要演示访问认证);
- 访问认证参考:Spring Boot之整合Spring Security: 访问认证;
- 权限控制参考:Spring Boot之整合Spring Security: 授权管理;
3). 集成单元测试(暂未在本项目中演示,后续加上);
- 参考:Spring Boot之junit单元测试踩坑;
4). 集成Swagger生成API文档(暂未在本项目中使用,后续加上);
- 参考:Spring Boot之整合Swagger;
5). 集成logback日志系统(已使用);
- 参考:Spring Boot之整合logback日志;
全部是之前学过的知识,是不是有种冥冥中一切都安排好了的感觉?哈哈!!!
整个过程描述起来比较费劲,这里就不再赘述了,需要的同学请参考git仓库代码:
https://github.com/dylanz666/spring-boot-vue-backend
项目整体结构:
- 关键代码,WebSecurityConfig类:
package com.github.dylanz666.config;

import com.alibaba.fastjson.JSONArray;
import com.github.dylanz666.constant.UserRoleEnum;
import com.github.dylanz666.domain.AuthorizationException;
import com.github.dylanz666.domain.SignInResponse;
import com.github.dylanz666.service.UserDetailsServiceImpl;
import org.springframework.beans.factory.annotation.Autowired;
import org.springframework.context.annotation.Bean;
import org.springframework.context.annotation.Configuration;
import org.springframework.http.HttpMethod;
import org.springframework.security.access.hierarchicalroles.RoleHierarchy;
import org.springframework.security.access.hierarchicalroles.RoleHierarchyImpl;
import org.springframework.security.authentication.AuthenticationProvider;
import org.springframework.security.authentication.dao.DaoAuthenticationProvider;
import org.springframework.security.config.annotation.method.configuration.EnableGlobalMethodSecurity;
import org.springframework.security.config.annotation.web.builders.HttpSecurity;
import org.springframework.security.config.annotation.web.builders.WebSecurity;
import org.springframework.security.config.annotation.web.configuration.EnableWebSecurity;
import org.springframework.security.config.annotation.web.configuration.WebSecurityConfigurerAdapter;
import org.springframework.security.core.GrantedAuthority;
import org.springframework.security.core.userdetails.User;
import org.springframework.security.core.userdetails.UserDetails;
import org.springframework.security.core.userdetails.UserDetailsService;
import org.springframework.security.crypto.bcrypt.BCryptPasswordEncoder;
import org.springframework.security.crypto.password.PasswordEncoder;
import org.springframework.security.provisioning.InMemoryUserDetailsManager;
import org.springframework.web.cors.CorsUtils;

import javax.servlet.http.HttpServletResponse;
import java.io.PrintWriter;
import java.util.Collection;

/**
 * @author : dylanz
 * @since : 10/04/2020
 */
@Configuration
@EnableWebSecurity
@EnableGlobalMethodSecurity(prePostEnabled = true)
public class WebSecurityConfig extends WebSecurityConfigurerAdapter {
    @Autowired
    private UserDetailsServiceImpl userDetailsService;
    @Autowired
    private AuthorizationException authorizationException;

    @Override
    protected void configure(HttpSecurity http) throws Exception {
        http
                .authorizeRequests()
                .requestMatchers(CorsUtils::isPreFlightRequest)
                .permitAll()
                .antMatchers("/", "/ping").permitAll()//这3个url不用访问认证
                .antMatchers("/admin/**").hasRole(UserRoleEnum.ADMIN.toString())
                .antMatchers("/user/**").hasRole(UserRoleEnum.USER.toString())
                .anyRequest()
                .authenticated()//其他url都需要访问认证
                .and()
                .formLogin()
                .loginProcessingUrl("/login")
                .permitAll()
                .failureHandler((request, response, ex) -> {//登录失败
                    response.setContentType("application/json");
                    response.setStatus(400);

                    SignInResponse signInResponse = new SignInResponse();
                    signInResponse.setCode(400);
                    signInResponse.setStatus("fail");
                    signInResponse.setMessage("Invalid username or password.");
                    signInResponse.setUsername(request.getParameter("username"));

                    PrintWriter out = response.getWriter();
                    out.write(signInResponse.toString());
                    out.flush();
                    out.close();
                })
                .successHandler((request, response, authentication) -> {//登录成功
                    response.setContentType("application/json");
                    response.setStatus(200);

                    SignInResponse signInResponse = new SignInResponse();
                    signInResponse.setCode(200);
                    signInResponse.setStatus("success");
                    signInResponse.setMessage("success");
                    signInResponse.setUsername(request.getParameter("username"));
                    Collection authorities = authentication.getAuthorities();
                    JSONArray userRoles = new JSONArray();
                    for (GrantedAuthority authority : authorities) {
                        String userRole = authority.getAuthority();
                        if (!userRole.equals("")) {
                            userRoles.add(userRole);
                        }
                    }
                    signInResponse.setUserRoles(userRoles);

                    PrintWriter out = response.getWriter();
                    out.write(signInResponse.toString());
                    out.flush();
                    out.close();
                })
                .and()
                .logout()
                .permitAll()//logout不需要访问认证
                .and()
                .exceptionHandling()
                .accessDeniedHandler(((httpServletRequest, httpServletResponse, e) -> {
                    e.printStackTrace();
                    httpServletResponse.setStatus(HttpServletResponse.SC_FORBIDDEN);
                    httpServletResponse.setContentType("application/json");
                    authorizationException.setCode(HttpServletResponse.SC_FORBIDDEN);
                    authorizationException.setStatus("FAIL");
                    authorizationException.setMessage("FORBIDDEN");
                    authorizationException.setUri(httpServletRequest.getRequestURI());
                    PrintWriter printWriter = httpServletResponse.getWriter();
                    printWriter.write(authorizationException.toString());
                    printWriter.flush();
                    printWriter.close();
                }))
                .authenticationEntryPoint((httpServletRequest, httpServletResponse, e) -> {
                    e.printStackTrace();
                    httpServletResponse.setStatus(HttpServletResponse.SC_UNAUTHORIZED);
                    httpServletResponse.setContentType("application/json");
                    authorizationException.setCode(HttpServletResponse.SC_UNAUTHORIZED);
                    authorizationException.setStatus("FAIL");
                    authorizationException.setMessage("UNAUTHORIZED");
                    authorizationException.setUri(httpServletRequest.getRequestURI());
                    PrintWriter printWriter = httpServletResponse.getWriter();
                    printWriter.write(authorizationException.toString());
                    printWriter.flush();
                    printWriter.close();
                });
        try {
            http.userDetailsService(userDetailsService());
        } catch (Exception e) {
            http.authenticationProvider(authenticationProvider());
        }
        //开启跨域访问
        http.cors().disable();
        //开启模拟请求,比如API POST测试工具的测试,不开启时,API POST为报403错误
        http.csrf().disable();
    }

    @Override
    public void configure(WebSecurity web) {
        //对于在header里面增加token等类似情况,放行所有OPTIONS请求。
        web.ignoring().antMatchers(HttpMethod.OPTIONS, "/**");
    }

    @Bean
    @Override
    public UserDetailsService userDetailsService() {
        BCryptPasswordEncoder bCryptPasswordEncoder = new BCryptPasswordEncoder();
        UserDetails dylanz =
                User.withUsername("dylanz")
                        .password(bCryptPasswordEncoder.encode("666"))
                        .roles(UserRoleEnum.ADMIN.toString())
                        .build();
        UserDetails ritay =
                User.withUsername("ritay")
                        .password(bCryptPasswordEncoder.encode("888"))
                        .roles(UserRoleEnum.USER.toString())
                        .build();
        UserDetails jonathanw =
                User.withUsername("jonathanw")
                        .password(bCryptPasswordEncoder.encode("999"))
                        .roles(UserRoleEnum.USER.toString())
                        .build();
        return new InMemoryUserDetailsManager(dylanz, ritay, jonathanw);
    }

    @Bean
    public PasswordEncoder passwordEncoder() {
        return new BCryptPasswordEncoder();
    }

    @Bean
    public RoleHierarchy roleHierarchy() {
        RoleHierarchyImpl roleHierarchy = new RoleHierarchyImpl();
        roleHierarchy.setHierarchy("ROLE_" + UserRoleEnum.ADMIN.toString() + " > ROLE_" + UserRoleEnum.USER.toString());
        return roleHierarchy;
    }

    @Bean
    public AuthenticationProvider authenticationProvider() {
        DaoAuthenticationProvider daoAuthenticationProvider = new DaoAuthenticationProvider();
        daoAuthenticationProvider.setUserDetailsService(userDetailsService);
        daoAuthenticationProvider.setPasswordEncoder(passwordEncoder());
        return daoAuthenticationProvider;
    }
}
特别是这几行:
try {
    http.userDetailsService(userDetailsService());
} catch (Exception e) {
    http.authenticationProvider(authenticationProvider());
}
//开启跨域访问
http.cors().disable();
//开启模拟请求,比如API POST测试工具的测试,不开启时,API POST为报403错误
http.csrf().disable();
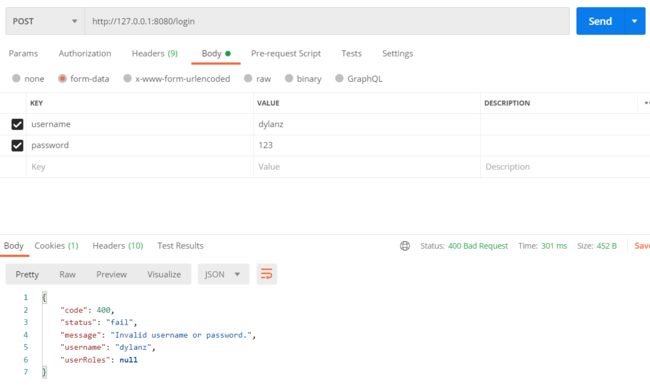
同时我们在WebSecurityConfig类中自定义了登录失败与成功的处理failureHandler和successHandler,用postman掉用登录API,返回例子如:
6). 后端编写的演示API;
package com.github.dylanz666.controller;

import org.springframework.web.bind.annotation.*;

/**
 * @author : dylanz
 * @since : 10/04/2020
 */
@RestController
public class PingController {
    @GetMapping("/ping")
    public String ping() {
        return "success";
    }
}
7). 后端登录API;
这块我使用了Spring Security默认的登录API,无需再自行写登录API,即http://127.0.0.1:8080/login , 这样我们就可以把登录交给Spring Security来做啦,省时省力!!!
8). 跨域设置;
由于我们要完成的是前后端分离,即前端与后端分开部署,二者使用不同的服务器或相同服务器的不同端口(我本地就是这种情况),因此我们需要使后端能够跨域调用,方法如下:
- config包下的WebMvcConfig类代码:
package com.github.dylanz666.config;

import org.springframework.beans.factory.annotation.Autowired;
import org.springframework.context.annotation.Bean;
import org.springframework.context.annotation.Configuration;
import org.springframework.security.config.annotation.method.configuration.EnableGlobalMethodSecurity;
import org.springframework.security.config.annotation.web.configuration.WebSecurityConfigurerAdapter;
import org.springframework.web.cors.CorsConfiguration;
import org.springframework.web.cors.UrlBasedCorsConfigurationSource;
import org.springframework.web.filter.CorsFilter;
import org.springframework.web.servlet.config.annotation.*;

/**
 * @author : dylanz
 * @since : 10/04/2020
 */
@Configuration
public class WebMvcConfig implements WebMvcConfigurer {
    @Autowired
    public CorsInterceptor corsInterceptor;

    @Override
    public void addCorsMappings(CorsRegistry registry) {
        registry.addMapping("/**")
                .allowCredentials(true)
                .allowedHeaders("*")
                .allowedMethods("*")
                .allowedOrigins("*")
                .maxAge(3600);
    }

    @Override
    public void addInterceptors(InterceptorRegistry registry) {
        registry.addInterceptor(corsInterceptor);
    }
}
- 这里头我还引入了拦截器CorsInterceptor类(WebMvcConfig中引入拦截器:addInterceptors),用于打印请求信息:
package com.github.dylanz666.config;

import org.slf4j.Logger;
import org.slf4j.LoggerFactory;
import org.springframework.stereotype.Component;
import org.springframework.web.servlet.handler.HandlerInterceptorAdapter;

import javax.servlet.http.HttpServletRequest;
import javax.servlet.http.HttpServletResponse;

/**
 * @author : dylanz
 * @since : 10/04/2020
 */
@Component
public class CorsInterceptor extends HandlerInterceptorAdapter {
    private static final Logger logger = LoggerFactory.getLogger(CorsInterceptor.class);

    @Override
    public boolean preHandle(HttpServletRequest request, HttpServletResponse response, Object handler) throws Exception {
        String logPattern = "[%s][%s]:%s";
        logger.info(String.format(logPattern, request.getMethod(), request.getRemoteAddr(), request.getRequestURI()));
        return true;
    }
}
至此,后端已准备好,接下来我们来做前端具体页面以及前后端集成!
3. 完成前端登录页面;
1). 安装node-sass和sass-loader模块;
Sass 是世界上最成熟、稳定、强大的专业级 CSS 扩展语言。
Sass 是一个 CSS 预处理器。
Sass 是 CSS 扩展语言,可以帮助我们减少 CSS 重复的代码,节省开发时间。
Sass 完全兼容所有版本的 CSS。
Sass 扩展了 CSS3,增加了规则、变量、混入、选择器、继承、内置函数等等特性。
Sass 生成良好格式化的 CSS 代码,易于组织和维护。
笔者根据过往的一些项目中使用了Sass来写CSS代码,因此也学着使用,学互联网技术,有时候要先使用后理解,用着用着就能理解了!
使用Sass需要安装node-sass和sass-loader模块:
npm install node-sass --save-dev
而sass-loader则不能安装最新版本,否则项目运行会报错,推荐安装低一些的版本,如7.3.1:
npm install [email protected] --save-dev
2). 修改src/App.vue文件;
删除#app样式中的margin-top: 60px; 这样页面顶部就不会有一块空白,如:
3). 修改项目根目录的index.html文件;
修改前:
spring-boot-vue-frontend
修改后:
spring-boot-vue-frontend
其实就加了个body的样式,这是因为如果没有这个样式,项目启动后,页面会有“白边”,例如:
4). 编写前端代码views/login/index.vue;
Sign in to Magic
Username
Password
Sign in
Forgot password?
Create an account.
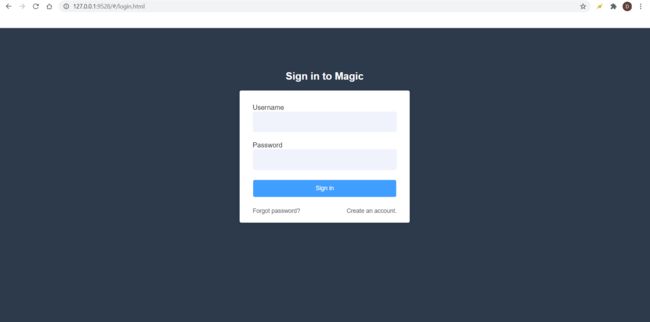
5). 前端登录页面样子;
怎么样,还算美观吧!
5. 前后端集成与交互;
1). 设置代理与跨域;
config/index.js中有个proxyTable,设置target值为后端API基础路径,进行代理转发映射,将changeOrigin值设置为true,这样就不会有跨域问题了。
如:
proxyTable: {
  '/api': {
    target: 'http://127.0.0.1:8080/',
    changeOrigin: true,
    pathRewrite: {
      '^/api': '/api'
    }
  },
  '/login': {
    target: 'http://127.0.0.1:8080/',
    changeOrigin: true,
    pathRewrite: {
      '^/login': '/login'
    }
  }
}
这里有几个注意点:
- 这个proxyTable代表了所有前端以/api开头的请求,均调用后端http://127.0.0.1:8080/api开头的API,如我们前端请求http://127.0.0.1:9528/api/test,则背后实际上调用的是http://127.0.0.1:8080/api/test。
- target中要带上http://
- pathRewrite中'^/api'代表当匹配到前端请求url中以/api为开头的请求,则该请求转发到指定代理去,即http://127.0.0.1:8080/api/XXX,如果'^/api'对应的值为'',则转发至http://127.0.0.1:8080/XXX,这里的'^/api'和"api"可依实际情况自行设定,如'^/test': '/new',代表当匹配到前端请求url中以/test为开头的请求,则该请求转发到指定代理去http://127.0.0.1:8080/new/XXX;
-
设置完成后,需要重启前端应用!注意是重启,不是热部署!!!
最后一点特别重要,因为vue热部署默认没有使用全部代码重启(可配置),而这个代理刚好不在热部署代码范围内,所以,必须要重启前端,除非用户已事先解决这个问题,否则代理是没有生效的。笔者就因为这个问题,困惑了一个下午,说多了都是泪啊!!!
2). 封装login API请求;
在src/api新建login.js文件,在login.js文件中写入代码:
import request from '@/utils/request'

export function login(username, password) {
    let form = new FormData();
    form.append("username", username);
    form.append("password", password);
    return request({
        url: '/login',
        method: 'post',
        data: form
    });
}

export function ping() {
    return request({
        url: '/ping',
        method: 'get',
        params: {}
    })
}
说明一下:
我们基于axios,根据后端Spring Security登录API 127.0.0.1:8080/login 进行封装,方法名为login,入参为username和password,请求方法为post。完成封装后,前端.vue文件中,就能很轻松的进行使用了,同时也一定程度上避免了重复性的代码,减少冗余!
3). .vue文件中使用login API;
在src/views/login/index.vue中的login方法中使用login方法:


