简单介绍下Swagger2吧
算了不说了。就是个文档框架,具体的网上一大堆介绍
如何使用
- 导包
          io.springfox
            springfox-swagger2
            2.8.0


            io.springfox
            springfox-swagger-ui
            2.8.0
- 加载配置类
package com.eliteai.smartiot.config.swagger;

import org.springframework.beans.factory.annotation.Value;
import org.springframework.context.annotation.Bean;
import org.springframework.context.annotation.Configuration;
import springfox.documentation.builders.ApiInfoBuilder;
import springfox.documentation.builders.PathSelectors;
import springfox.documentation.builders.RequestHandlerSelectors;
import springfox.documentation.service.ApiInfo;
import springfox.documentation.spi.DocumentationType;
import springfox.documentation.spring.web.plugins.Docket;
import springfox.documentation.swagger2.annotations.EnableSwagger2;

/**
 * Swagger能成为最受欢迎的REST APIs文档生成工具之一,有以下几个原因:
 * Swagger 可以生成一个具有互动性的API控制台,开发者可以用来快速学习和尝试API。
 * Swagger 可以生成客户端SDK代码用于各种不同的平台上的实现。
 * Swagger 文件可以在许多不同的平台上从代码注释中自动生成。
 * Swagger 有一个强大的社区,里面有许多强悍的贡献者
 *
 * @author MR.ZHANG
 * @create 2018-09-18 10:06
 */
@Configuration
@EnableSwagger2
public class SwaggerConfig {
    private static final String VERSION = "1.0.0";

    @Value("${swagger.enable}")
    private boolean enableSwagger;
    @Bean
    public Docket api() {
        return new Docket(DocumentationType.SWAGGER_2)
                .enable(enableSwagger)
                .apiInfo(apiInfo())
                .select()
                .apis(RequestHandlerSelectors.basePackage("com.eliteai.smartiot.controller"))
                .paths(PathSelectors.any())
                .build();
    }

    private ApiInfo apiInfo() {
        return new ApiInfoBuilder()
                .title("XXXX软件接口")
                .description("Restful 风格接口")
                //服务条款网址
                //.termsOfServiceUrl("http://xxxx")
                .version(VERSION)
                //.contact(new Contact("wesker", "url", "email"))
                .license("Apache 2.0")
                .licenseUrl("http://www.apache.org/licenses/LICENSE-2.0.html")
                .build();
    }
}
basePackage是指定扫描的包,这里要根据实际作修改
package com.eliteai.smartiot.config.swagger;

import org.springframework.beans.factory.annotation.Value;
import org.springframework.context.annotation.Configuration;
import org.springframework.web.servlet.config.annotation.ResourceHandlerRegistry;
import org.springframework.web.servlet.config.annotation.WebMvcConfigurer;

/**
 * 配置Swagger的资源映射路径
 *原有WebMvcConfigurerAdapter已经过时 使用WebMvcConfigurer取代
 * @author MR.ZHANG
 * @create 2018-09-18 10:41
 */
@Configuration
public class WebMvcConfig implements WebMvcConfigurer {

    @Value("${swagger.enable}")
    private boolean enableSwagger;

    @Override
    public void addResourceHandlers(ResourceHandlerRegistry registry) {
        if (enableSwagger) {
            registry.addResourceHandler("/js/**").addResourceLocations("classpath:/js/");
            registry.addResourceHandler("swagger-ui.html")
                    .addResourceLocations("classpath:/META-INF/resources/");
            registry.addResourceHandler("/webjars/**")
                    .addResourceLocations("classpath:/META-INF/resources/webjars/");
        }
    }

}
解释下enableSwagger是多环境配置开关,一般生产环境中不想打开swagger的uil界面,就可以让其为false,当然这个得在yml里增加支持
#----------------swagger配置-----------------------
swagger:
  enable: false
- 在Controller里使用,这里直接贴代码
/**
 * 中央监控中心Controller
 *
 * @author MR.ZHANG
 * @create 2018-09-10 14:22
 */
@Api(value="/central", tags="中央监控中心模块")
@Controller
public class CentralMonitorController extends BaseController {
   @ApiOperation(value="登陆页面", notes = "中央监控中心登陆界面")
    @GetMapping("/")
    public String adminPage() {
        return "login";
    }

    @ApiOperation(value="管理员登陆", notes = "中央监控中心管理员登陆", produces = "application/json", response = BaseResult.class)
    @ApiResponses({@ApiResponse(code = CommonData.SUCCESS, message = "成功"),
                    @ApiResponse(code = CommonData.ERR_USER_NO_LOGIN, message = "限制登陆"),
                    @ApiResponse(code = CommonData.ERR_APP_INVALID_PWD, message = "账号或密码错误")
                    })
    @ApiImplicitParams({@ApiImplicitParam(name = "admin", value = "t_user name", required = true, dataType = "String", paramType = "query"),
                        @ApiImplicitParam(name = "pwd", value = "t_user password", required = true, dataType = "String", paramType = "query")})
    @PostMapping("/login")
    @ResponseBody
    public BaseResult login(String admin, String pwd) {
}
- 运行项目,浏览器输入
http://localhost:8080/swagger-ui.html看看吧
静态部署
有时候我们想要把文档导出来给客户或者其他人用,这时候总不能让他们去登陆这个地址吧。最好就是像以前我们手写文档那样给他们一个doc或者pdf。所以静态部署这个需求就出来了。
如何部署
1. 引入依赖
            io.github.swagger2markup
            swagger2markup
            1.3.1


            org.asciidoctor
            asciidoctorj-pdf
            1.5.0-alpha.10.1
            test
swagger2markup是一个开源的项目,就是用来实现静态部署的。支持导出html,markdown,pdf格式文档。详细可去https://github.com/13001260824/swagger了解下
asciidoctorj-pdf是一个将adoc文件转pdf的插件
2. 配置插件
                io.github.swagger2markup
                swagger2markup-maven-plugin
                1.3.1

                    http://localhost:8080/v2/api-docs
                    src/docs/asciidoc/generated

                        ASCIIDOC


                org.asciidoctor
                asciidoctor-maven-plugin
                1.5.6

                    src/docs/asciidoc/generated
                    src/docs/asciidoc/html
                    html
                    coderay

                        left
看到配置里有一些路径,是的那就是aodc和html文件生成的路径。给个图看一下吧
3. 编写测试程序,用来生成adoc文件
package com.eliteai.smartiot;

import io.github.swagger2markup.Swagger2MarkupConfig;
import io.github.swagger2markup.Swagger2MarkupConverter;
import io.github.swagger2markup.builder.Swagger2MarkupConfigBuilder;
import io.github.swagger2markup.markup.builder.MarkupLanguage;
import org.asciidoctor.cli.AsciidoctorInvoker;
import org.junit.Test;
import org.junit.runner.RunWith;
import org.springframework.boot.test.context.SpringBootTest;
import org.springframework.test.context.junit4.SpringRunner;

import java.net.URL;
import java.nio.file.Paths;

/**
 * @author MR.ZHANG
 * @create 2018-09-18 16:13
 */


@RunWith(SpringRunner.class)
@SpringBootTest(webEnvironment = SpringBootTest.WebEnvironment.DEFINED_PORT)
public class DemoApplicationTests {

    @Test
    public void generateAsciiDocs() throws Exception {
        //    输出Ascii格式
        Swagger2MarkupConfig config = new Swagger2MarkupConfigBuilder()
                .withGeneratedExamples()
                .withMarkupLanguage(MarkupLanguage.ASCIIDOC)
                .build();

        Swagger2MarkupConverter.from(new URL("http://localhost:8080/v2/api-docs"))
                .withConfig(config)
                .build()
                .toFile(Paths.get("src/docs/asciidoc/generated/api"));
    }
    @Test
    public void generatePDF() {
        //样式
        String style = "pdf-style=E:\\themes\\theme.yml";
        //字体
        String fontsdir = "pdf-fontsdir=E:\\fonts";
        //需要指定adoc文件位置
        String adocPath = "E:\\all.adoc";
        AsciidoctorInvoker.main(new String[]{"-a",style,"-a",fontsdir,"-b","pdf",adocPath});
    }
}
generateAsciiDocs这个测试方法执行后会在src/docs/asciidoc/generated目录下生成api.adoc文件
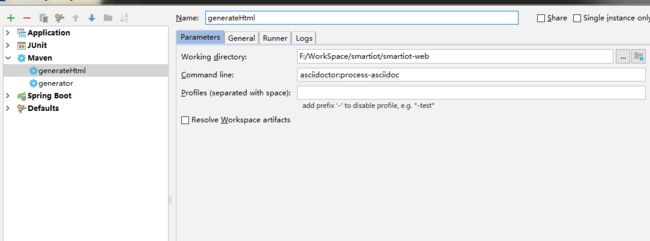
4. 生成HTML文档
asciidoctor:process-asciidoc
创建好后运行
无意外的话会在src/docs/asciidoc/html下生成api.html
5. 生成PDF文档并解决中文乱码问题
5.1 还记得https://github.com/13001260824/swagger这个地址吗,进去把这个项目download下来,把目录下的data目录拷贝到E盘根目录下(当然哪都行啦)
5.2 去下载一个中文字体,后缀是.ttf结尾的,放到data/fonts目录里
5.3 复制data/themes/default-theme.yml为theme.yml,打开theme.yml并搜索mplus1p开头的文件名,换成5.2下载的中文字体
5.4 运行测试程序中的generatePDF生成pdf文件。至此结束!
谢谢观赏!
参考:
使用Swagger2Markup实现API文档的静态部署(一)
asciidoctor-pdf中文乱码问题或显示不全


