【MyBatis Plus 3.5.1】2、CRUD扩展:自动填充、乐观锁、分页查询、逻辑删除【Spring Boot 环境】
1、Insert
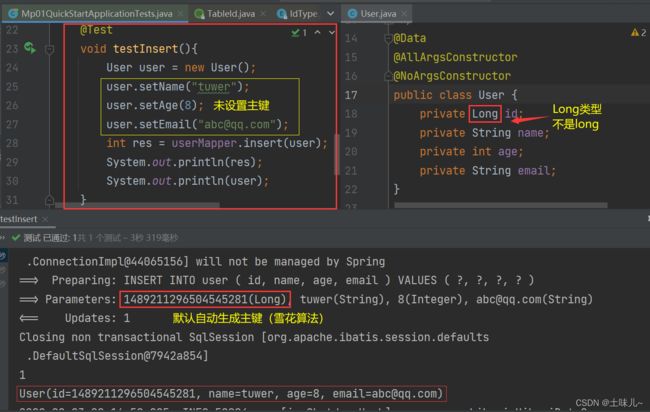
1)插入测试
@Test
void testInsert(){
    User user = new User();
    user.setName("tuwer");
    user.setAge(8);
    user.setEmail("[email protected]");
    // 会自动生成id
    int res = userMapper.insert(user);
    System.out.println(res);
    System.out.println(user);
}
2)主键策略
-
@TableId- 描述:主键注解
- 使用位置:实体类主键字段
@Documented
@Retention(RetentionPolicy.RUNTIME)
@Target({ElementType.FIELD, ElementType.ANNOTATION_TYPE})
public @interface TableId {

    /**
     * 字段名(该值可无)
     */
    String value() default "";

    /**
     * 主键类型
     * {@link IdType}
     */
    IdType type() default IdType.NONE;
}
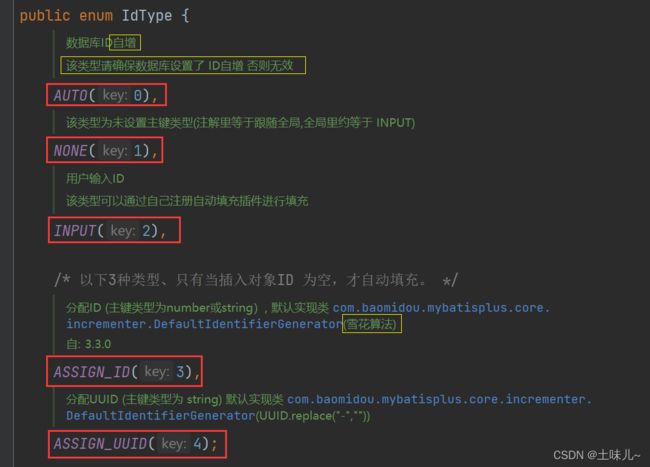
IdType 枚举类
public enum IdType {
    /**
     * 数据库ID自增
     * 该类型请确保数据库设置了 ID自增 否则无效
     */
    AUTO(0),
    /**
     * 该类型为未设置主键类型(注解里等于跟随全局,全局里约等于 INPUT)
     */
    NONE(1),
    /**
     * 用户输入ID
     * 该类型可以通过自己注册自动填充插件进行填充
     */
    INPUT(2),

    /* 以下3种类型、只有当插入对象ID 为空,才自动填充。 */
    /**
     * 分配ID (主键类型为number或string),
     * 默认实现类 {@link com.baomidou.mybatisplus.core.incrementer.DefaultIdentifierGenerator}(雪花算法)
     *
     * @since 3.3.0
     */
    ASSIGN_ID(3),
    /**
     * 分配UUID (主键类型为 string)
     * 默认实现类 {@link com.baomidou.mybatisplus.core.incrementer.DefaultIdentifierGenerator}(UUID.replace("-",""))
     */
    ASSIGN_UUID(4);

    private final int key;

    IdType(int key) {
        this.key = key;
    }
}
- 雪花(snowflake)算法
snowflake是Twitter开源的分布式ID生成算法,结果是一个long型的ID。其核心思想是:使用41bit作为毫秒数,10bit作为机器的ID(5个bit是数据中心(北京、香港···),5个bit的机器ID),12bit作为毫秒内的流水号(意味着每个节点在每毫秒可以产生 4096 个 ID),最后还有一个符号位,永远是0。
2、Update
@Test
void testUpdate(){
    User user = new User();
    user.setId(8L);
    user.setName("tuwer测试");
    user.setAge(28);
    user.setEmail("[email protected]");
    // 虽然方法是ById,但参数是类对象user
    int i = userMapper.updateById(user);
    System.out.println(i);
}
3、自动填充
创建时间、更改时间! 这些操作一般都是自动化完成,不需要手动更新
阿里巴巴开发手册︰几乎所有的表都要配置 gmt_create、gmt_modified !而且需要自动化
1)方式一:数据库级别
实际开发中不允许修改数据库级别
- 修改数据库:添加
gmt_create和gmt_modified字段
alter table user add gmt_create datetime default CURRENT_TIMESTAMP null comment '创建时间';
alter table user add gmt_modified datetime default CURRENT_TIMESTAMP null on update CURRENT_TIMESTAMP comment '更新时间';
-
修改实体类
驼峰命名:
gmtCreate对应于数据库中的gmt_create日期类型可以用
Date和LocalDateTime,建议用LocalDateTime
private Date gmtCreate;
private LocalDateTime gmtModified;
2)方式二:代码级别
-
删除数据库级别中的操作:默认值、更新
-
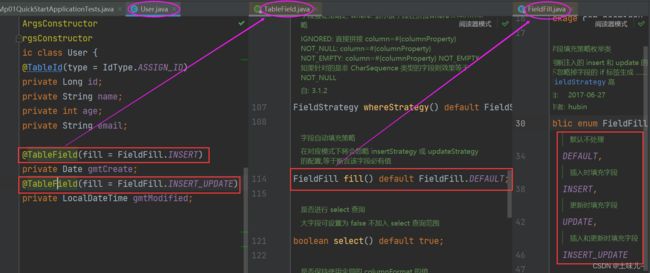
实体类字段属性上增加注解
// 插入时填充
@TableField(fill = FieldFill.INSERT)
private Date gmtCreate;

// 插入、更新时填充
@TableField(fill = FieldFill.INSERT_UPDATE)
private LocalDateTime gmtModified;
-
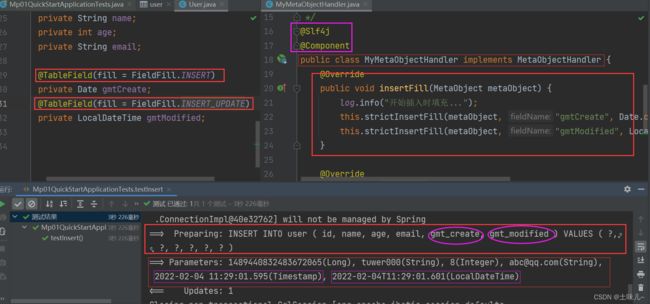
填充处理器
- 填充处理器
MyMetaObjectHandler在 Spring Boot 中需要声明@Component或@Bean注入
- 填充处理器
@Slf4j
@Component
public class MyMetaObjectHandler implements MetaObjectHandler {
    @Override
    public void insertFill(MetaObject metaObject) {
        log.info("开始插入时填充...");
        this.strictInsertFill(metaObject, "gmtCreate", Date.class, new Date());
        this.strictInsertFill(metaObject, "gmtModified", LocalDateTime.class, LocalDateTime.now());
    }

    @Override
    public void updateFill(MetaObject metaObject) {
        log.info("开始插入更新时填充...");
        this.strictUpdateFill(metaObject, "gmtModified", LocalDateTime.class, LocalDateTime.now());
    }
}
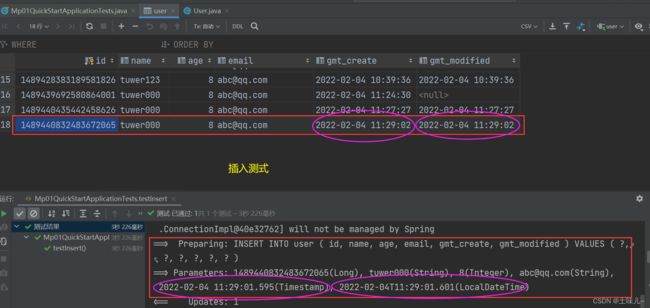
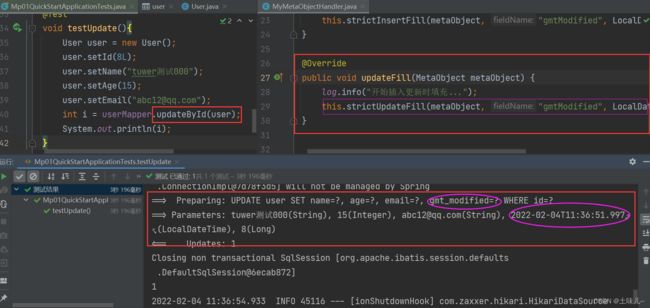
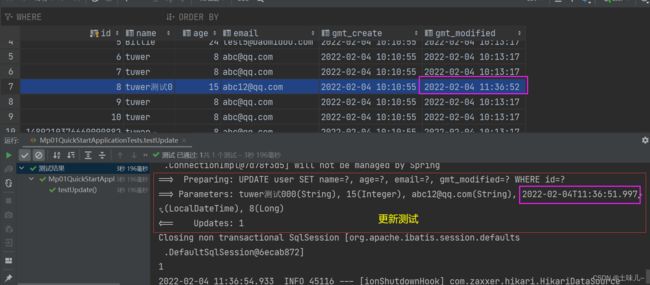
- 测试
插入测试
更新测试
4、乐观锁
乐观锁:十分乐观,总是认为不会出现问题;无论干什么都不上锁!如果出现问题,再次更新值测试
悲观锁:十分悲观,总是认为会出现问题;无论干什么都会上锁!再去操作!
乐观锁实现方式:
当要更新一条记录的时候,希望这条记录没有被别人更新
- 取出记录时,获取当前 version
- 更新时,带上这个 version
- 执行更新时,
set version = newVersion where version = oldVersion- 如果 version 不对,就更新失败
1)修改数据库
添加
version字段
2)修改实体类
添加
version属性,并添加@Version注解
@Version
private Integer version;
3)注册乐观锁组件
@Configuration
@MapperScan("com.tuwer.mapper")
public class MybatisPlusConfig {
    /**
     * 注册乐观锁组件
     */
    @Bean
    public MybatisPlusInterceptor mybatisPlusInterceptor() {
        MybatisPlusInterceptor mybatisPlusInterceptor = new MybatisPlusInterceptor();
        mybatisPlusInterceptor.addInnerInterceptor(new OptimisticLockerInnerInterceptor());
        return mybatisPlusInterceptor;
    }
}
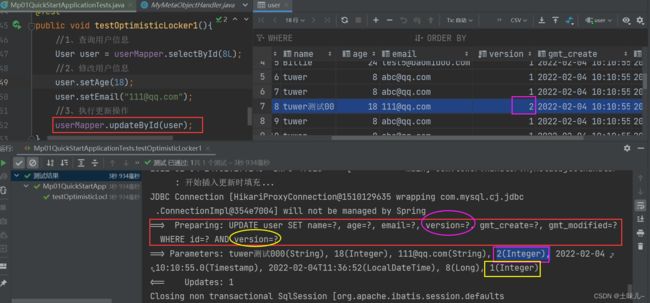
4)测试
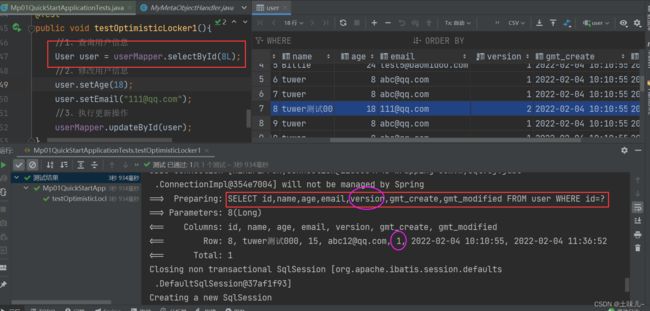
- 单线程
@Test
public void testOptimisticLocker1(){
    //1、查询用户信息
    User user = userMapper.selectById(8L);
    //2、修改用户信息
    user.setAge(18);
    user.setEmail("[email protected]");
    //3、执行更新操作
    userMapper.updateById(user);
}
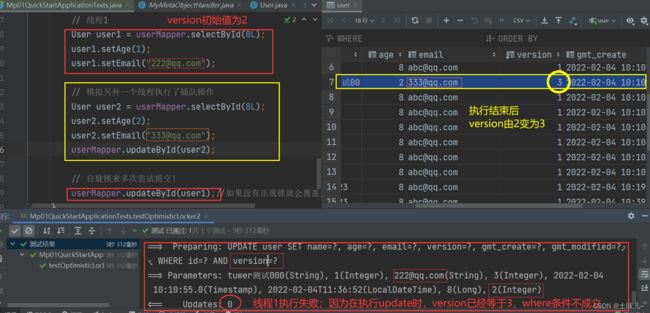
- 模拟多线程
@Test
public void testOptimisticLocker2(){
    // 线程1
    User user1 = userMapper.selectById(8L);
    user1.setAge(1);
    user1.setEmail("[email protected]");

    // 模拟另外一个线程执行了插队操作
    User user2 = userMapper.selectById(8L);
    user2.setAge(2);
    user2.setEmail("[email protected]");
    userMapper.updateById(user2);

    // 自旋锁来多次尝试提交!
    userMapper.updateById(user1);//如果没有乐观锁就会覆盖插队线程的值
}
5、Select
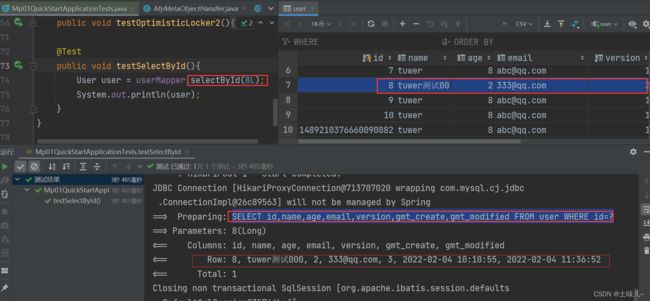
1)通过id查询单个用户
@Test
public void testSelectById(){
    User user = userMapper.selectById(8L);
    System.out.println(user);
}
2)通过id查询多个用户
@Test
public void testSelectBatchIds(){
    List<User> users = userMapper.selectBatchIds(Arrays.asList(1L, 2L, 5L));
    users.forEach(System.out::println);
}
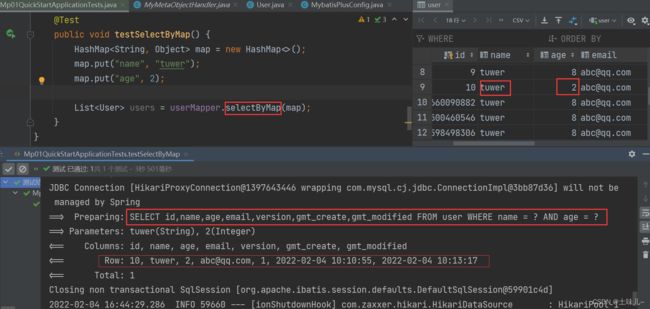
3)条件查询 通过map封装
@Test
public void testSelectByMap() {
    HashMap<String, Object> map = new HashMap<>();
    map.put("name", "tuwer");
    map.put("age", 2);

    List<User> users = userMapper.selectByMap(map);
}
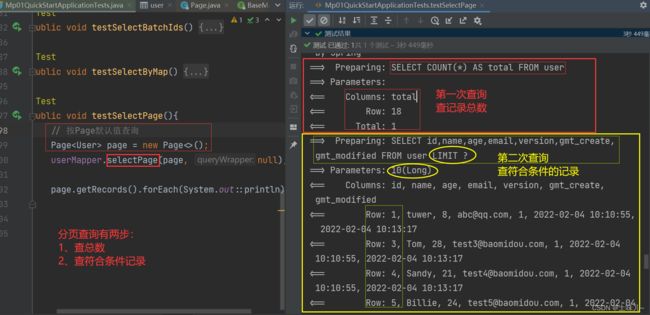
4)分页查询
selectPage()
// 参数1:IPage对象
// 参数2:Wrapper 条件构造器
// 返回:IPage对象;把结果封装进参数1的IPage对象
<P extends IPage<T>> P selectPage(P page, @Param(Constants.WRAPPER) Wrapper<T> queryWrapper);
-
Page 类- Page 类实现了 IPage 接口
- 默认值:每页显示条数
10,当前页1
public class Page<T> implements IPage<T> {

    // ...

    /**
     * 每页显示条数,默认 10
     */
    protected long size = 10;

    /**
     * 当前页
     */
    protected long current = 1;

    // ...
}
构造器
- 注册分页拦截器
/**
* 注册组件
*/
@Bean
public MybatisPlusInterceptor mybatisPlusInterceptor() {
    MybatisPlusInterceptor mybatisPlusInterceptor = new MybatisPlusInterceptor();
    // 乐观锁 ...
    // 分页
    mybatisPlusInterceptor.addInnerInterceptor(new PaginationInnerInterceptor(DbType.MYSQL));
    return mybatisPlusInterceptor;
}
查询
@Test
public void testSelectPage(){
    // 按Page默认值查询
    Page<User> page = new Page<>();
    userMapper.selectPage(page, null);

    page.getRecords().forEach(System.out::println);
}
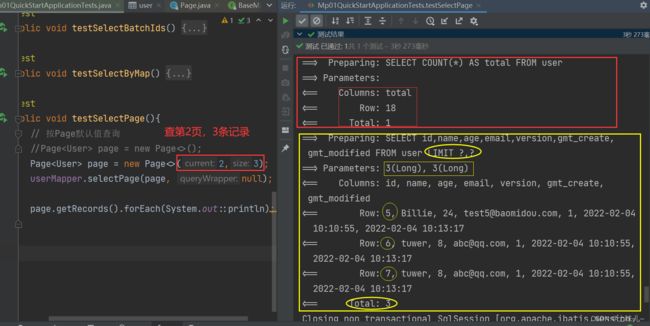
@Test
public void testSelectPage(){
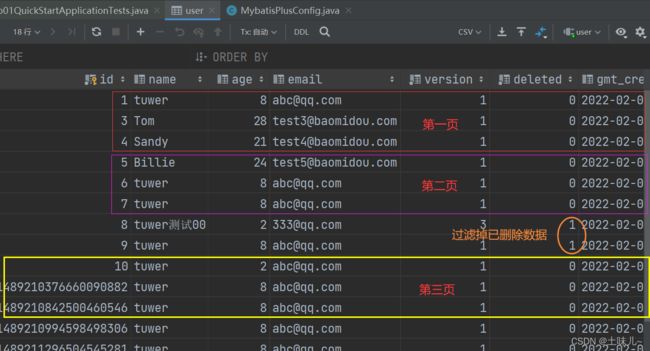
    // 查第2页,3条记录
    Page<User> page = new Page<>(2,3);
    userMapper.selectPage(page, null);

    page.getRecords().forEach(System.out::println);
}
6、Delete
1)物理删除
从数据库中直接删除
2)逻辑删除
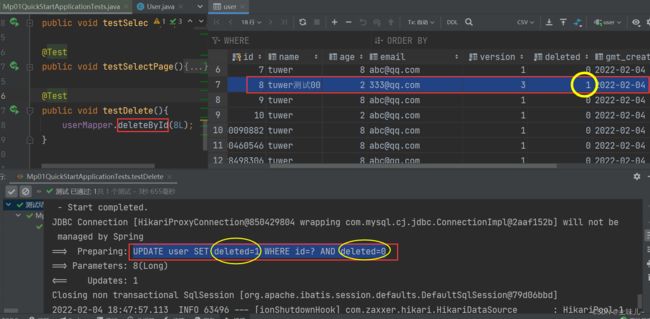
- 在数据库中没有被删除,而是通过一个变量来使它失效! deleted=0 ==> deleted=1
- 逻辑删除是为了 方便数据恢复 和 保护数据本身价值 等等的一种方案,但实际就是删除
- 删除: 转变为 更新
- 修改数据库:增加
deleted字段
alter table user add deleted tinyint default 0 not null comment '逻辑删除';
- 配置
mybatis-plus:
  global-config:
    db-config:
      #logic-delete-field: deleted # 逻辑删除的实体字段名(配置后可以忽略不配置实体类)
      logic-delete-value: 1 # 逻辑已删除值(默认为 1)
      logic-not-delete-value: 0 # 逻辑未删除值(默认为 0)
- 修改实体类:增加
deleted属性,并添加@TableLogic注解
@TableLogic // 如果配置了logic-delete-field: deleted,此处可以省略 @TableLogic
private Integer deleted;
- 删除
@Test
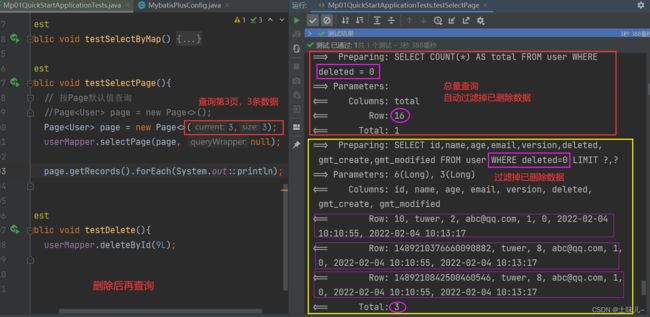
public void testDelete(){
    userMapper.deleteById(8L);
}
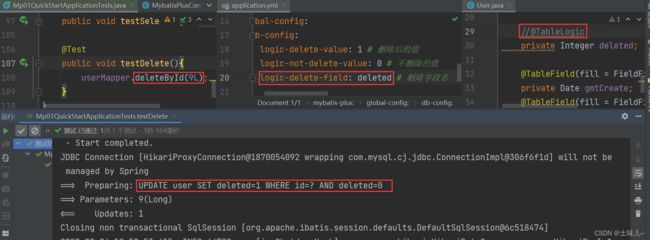
配置
logic-delete-field: deleted,省略@TableLogic
- 删除后再查询
