SpringBoot学习之旅
一、SpringBoot入门
1.1、springboot 简介
springboot是什么?
简化Spring应用开发的框架,spring技术栈的整合,J2EE开发的一站式解决方案
优点:
- 为所有spring开发者快速入门
- 开箱即用,提供各种默认配置来简化项目配置
- 内嵌式容器简化Web项目
- 没有冗余代码生成和XML配置的要求
1.2、微服务
- 是一种架构风格(服务微化)
- 要求在开发一个应用的时候,这个应用必须构建成一系列小服务的组合; 可以通过http的方式进行互通
- 单体应用
- 每一个功能元素最终都是一个可独立替换和独立升级的软件单元;
1.3、快速开始
-
使用Spring Initializr创建一个springboot应用
-
创建一个主程序类,启动SpringBoot应用
-
编写Helloworld的Controller (在主程序类的同级目录下创建一个controller包,在其中写Controller类)
-
运行主程序
-
简化部署
<!‐‐ 这个插件,可以将应用打包成一个可执行的jar包;‐‐>
    <build>
        <plugins>
            <plugin>
                <groupId>org.springframework.bootgroupId>
                <artifactId>spring‐boot‐maven‐pluginartifactId>
            plugin>
        plugins>
    build>
将这个应用打成jar包,直接使用java -jar的命令进行执行;
彩蛋
到项目下的 resources 目录下新建一个banner.txt文件就可以,将启动时显示的字符更改为自己想要的
 /\/\/\                            /  \
| \  / |                         /      \
|  \/  |                       /          \
|  /\  |----------------------|     /\     |
| /  \ |                      |    /  \    |
|/    \|                      |   /    \   |
|\    /|                      |  | (  ) |  |
| \  / |                      |  | (  ) |  |
|  \/  |                 /\   |  |      |  |   /\
|  /\  |                /  \  |  |      |  |  /  \
| /  \ |               |----| |  |      |  | |----|
|/    \|---------------|    | | /|   .  |\ | |    |
|\    /|               |    | /  |   .  |  \ |    |
| \  / |               |    /    |   .  |    \    |
|  \/  |               |  /      |   .  |      \  |
|  /\  |---------------|/        |   .  |        \|
| /  \ |              /   NASA   |   .  |  NASA    \
|/    \|              (          |      |           )
|/\/\/\|               |    | |--|      |--| |    |
------------------------/  \-----/  \/  \-----/  \--------
                        \\//     \\//\\//     \\//
                         \/       \/  \/       \/
//                          _ooOoo_                               //
//                         o8888888o                              //
//                         88" . "88                              //
//                         (| ^_^ |)                              //
//                         O\  =  /O                              //
//                      ____/`---'\____                           //
//                    .'  \\|     |//  `.                         //
//                   /  \\|||  :  |||//  \                        //
//                  /  _||||| -:- |||||-  \                       //
//                  |   | \\\  -  /// |   |                       //
//                  | \_|  ''\---/''  |   |                       //
//                  \  .-\__  `-`  ___/-. /                       //
//                ___`. .'  /--.--\  `. . ___                     //
//              ."" '<  `.___\_<|>_/___.'  >'"".                  //
//            | | :  `- \`.;`\ _ /`;.`/ - ` : | |                 //
//            \  \ `-.   \_ __\ /__ _/   .-` /  /                 //
//      ========`-.____`-.___\_____/___.-`____.-'========         //
//                           `=---='                              //
//      ^^^^^^^^^^^^^^^^^^^^^^^^^^^^^^^^^^^^^^^^^^^^^^^^^^        //
//             佛祖保佑       永不宕机      永无BUG                  //
二、自动装配原理
2.1、POM文件分析
<project xmlns="http://maven.apache.org/POM/4.0.0" xmlns:xsi="http://www.w3.org/2001/XMLSchema-instance"
         xsi:schemaLocation="http://maven.apache.org/POM/4.0.0 https://maven.apache.org/xsd/maven-4.0.0.xsd">

    <modelVersion>4.0.0modelVersion>

    <parent>
        <groupId>org.springframework.bootgroupId>
        <artifactId>spring-boot-starter-parentartifactId>
        <version>2.2.4.RELEASEversion>
        <relativePath/>

    parent>


    <groupId>com.xycgroupId>
    <artifactId>springboot-webartifactId>
    <version>0.0.1-SNAPSHOTversion>
    <name>springboot-webname>
    <description>Demo project for Spring Bootdescription>


    <properties>
        <java.version>1.8java.version>
    properties>

    <dependencies>
        <dependency>
            <groupId>org.springframework.bootgroupId>
            <artifactId>spring-boot-starter-thymeleafartifactId>
        dependency>
        <dependency>
            <groupId>org.springframework.bootgroupId>
            <artifactId>spring-boot-starter-webartifactId>
        dependency>

        <dependency>
            <groupId>org.projectlombokgroupId>
            <artifactId>lombokartifactId>
            <optional>trueoptional>
        dependency>
        <dependency>
            <groupId>org.springframework.bootgroupId>
            <artifactId>spring-boot-starter-testartifactId>
            <scope>testscope>
            <exclusions>
                <exclusion>
                    <groupId>org.junit.vintagegroupId>
                    <artifactId>junit-vintage-engineartifactId>
                exclusion>
            exclusions>
        dependency>
    dependencies>


    <build>
        <plugins>
            <plugin>
                <groupId>org.springframework.bootgroupId>
                <artifactId>spring-boot-maven-pluginartifactId>
            plugin>
        plugins>
    build>

project>
如上所示:POM文件分为四部分
- 项目元数据信息 :创建时候输入的Project Metadata部分,也就是Maven项目的基本元素,包括:groupId、artifactId、version、name、description等
- parent:继承
spring-boot-starter-parent的依赖管理,控制版本与打包等内容 - dependencies:项目具体依赖,这里包含了
spring-boot-starter-web用于实现HTTP接口(该依赖中包含了Spring MVC),官网对它的描述是:使用Spring MVC构建Web(包括RESTful)应用程序的入门者,使用Tomcat作为默认嵌入式容器。;spring-boot-starter-test用于编写单元测试的依赖包。更多功能模块的使用我们将在后面逐步展开。 - build:构建配置部分。默认使用了
spring-boot-maven-plugin,配合spring-boot-starter-parent就可以把Spring Boot应用打包成JAR来直接运行。
我们的程序要想运行主要依赖一个父项目
 <parent>
        <groupId>org.springframework.bootgroupId>
        <artifactId>spring-boot-starter-parentartifactId>
        <version>2.2.4.RELEASEversion>
        <relativePath/>

    parent>
Ctrl+鼠标左键 进入父项目
 <parent>
    <groupId>org.springframework.bootgroupId>
    <artifactId>spring-boot-dependenciesartifactId>
    <version>2.2.4.RELEASEversion>
    <relativePath>../../spring-boot-dependenciesrelativePath>
  parent>
在这里定义着Spring Boot的版本仲裁中心;
以后我们导入依赖默认是不需要写版本;(没有在dependencies里面管理的依赖自然需要声明版本号)
2.2、启动器
<dependency>
    <groupId>org.springframework.bootgroupId>
    <artifactId>spring-boot-starterartifactId>
dependency>
<dependency>
    <groupId>org.springframework.bootgroupId>
    <artifactId>spring‐boot‐starter‐webartifactId>
dependency>
springboot-boot-starter:就是spring-boot的场景启动器
**spring-boot-starter-web **帮我们导入了web模块正常运行所依赖的组件;
Spring Boot将所有的功能场景都抽取出来,做成一个个的starters(启动器),只需要在项目里面引入这些starter相关场景的所有依赖都会导入进来。要用什么功能就导入什么场景的启动器
2.3、主程序类
//@SpringBootApplication 来标注一个主程序类 , 说明这是一个Spring Boot应用
@SpringBootApplication
public class Springboot01HelloworldApplication {

   public static void main(String[] args) {
     //将SpringBoot应用启动起来
      SpringApplication.run(Springboot01HelloworldApplication.class, args);
   }

}
1. @SpringBootApplication 注解:来标注一个主程序类 , 说明这是一个Spring Boot应用,在该类的main方法启动springboot应用
进入这个注解 :
@Target({ElementType.TYPE})
@Retention(RetentionPolicy.RUNTIME)
@Documented
@Inherited

@SpringBootConfiguration
@EnableAutoConfiguration
@ComponentScan(
    excludeFilters = {@Filter(
    type = FilterType.CUSTOM,
    classes = {TypeExcludeFilter.class}
), @Filter(
    type = FilterType.CUSTOM,
    classes = {AutoConfigurationExcludeFilter.class}
)}
)
public @interface SpringBootApplication {
2. @ComponentScan 注解
这个注解在Spring中很重要 , 它对应XML配置中的元素。 @ComponentScan的功能就是自动扫描并加载符合条件的组件或者bean , 将这个bean定义加载到IOC容器中 ;
3. @SpringBootConfiguration 注解:
Spring Boot的配置类;标注在某个类上,表示这是一个Spring Boot的配置类;
进入这个注解 :
@Target({ElementType.TYPE})
@Retention(RetentionPolicy.RUNTIME)
@Documented

@Configuration

public @interface SpringBootConfiguration {
@Configuration:配置类上来标注这个注解,说明这是一个配置类。
配置类 <–> 配置文件;
进入这个注解:
@Target({ElementType.TYPE})
@Retention(RetentionPolicy.RUNTIME)
@Documented

@Component

public @interface Configuration {
@Component :配置类也是容器中的一个组件;说明启动类也是容器的一个组件
4. @EnableAutoConfiguration:
开启自动配置功能;
以前我们需要配置的东西,Spring Boot帮我们自动配置;
进入这个注解:
@Target({ElementType.TYPE})
@Retention(RetentionPolicy.RUNTIME)
@Documented
@Inherited

@AutoConfigurationPackage
@Import({AutoConfigurationImportSelector.class})
public @interface EnableAutoConfiguration {
@import :Spring底层注解 , 给容器中导入一个组件
AutoConfigurationImportSelector.class: 自动配置导入选择器, 那么它会导入哪些组件的选择器呢? 点击进入该类查看源码即可。
@AutoConfigurationPackage : 自动配置包
进入这个注解:
@Target({ElementType.TYPE})
@Retention(RetentionPolicy.RUNTIME)
@Documented
@Inherited

@Import({Registrar.class})
public @interface AutoConfigurationPackage {
@import :Spring底层注解 , 给容器中导入一个组件
Registrar.class 将主配置类 【即@SpringBootApplication标注的类】的所在包及包下面所有子包里面的所有组件扫描到Spring容器 ;
自动配置真正实现是从classpath中搜寻所有的METINF/spring.factories配置文件 ,并将其中对应的 org.springframework.boot.autoconfigure. 包下的配置项,通过反射实例化为对应标注了 @Configuration的JavaConfig形式的IOC容器配置类 , 然后将这些都汇总成为一个实例并加载到IOC容器中。
结论:
- SpringBoot在启动的时候从类路径下的META-INF/spring.factories中获取EnableAutoConfiguration指定的值
- 将这些值作为自动配置类导入容器 , 自动配置类就生效 , 帮我们进行自动配置工作;
- 以前我们需要自己配置的东西 , 自动配置类都帮我们解决了
- 整个J2EE的整体解决方案和自动配置都在springboot-autoconfigure的jar包中;
- 它将所有需要导入的组件以全类名的方式返回 , 这些组件就会被添加到容器中 ;
- 它会给容器中导入非常多的自动配置类 (xxxAutoConfiguration), 就是给容器中导入这个场景需要的所有组件 , 并配置好这些组件 ;
- 有了自动配置类 , 免去了我们手动编写配置注入功能组件等的工作;
2.4、Run
开启一个服务
@SpringBootApplication
public class SpringbootDemo02Application {

    public static void main(String[] args) {

        //该方法返回一个ConfigurableApplicationContext对象
        //参数一:应用入口的类     参数类:命令行参数
        			      SpringApplication.run(SpringbootDemo02Application.class, args);
    }

}
SpringApplication.run分析
分析该方法主要分两部分,一部分是SpringApplication的实例化,二是run方法的执行;
2.5、SpringApplication
这个类主要做了以下四件事情
- 推断应用的类型是普通的项目还是Web项目
- 查找并加载所有可用初始化器 , 设置到initializers属性中
- 找出所有的应用程序监听器,设置到listeners属性中
- 推断并设置main方法的定义类,找到运行的主类
三、配置文件
3.1、配置文件
SpringBoot使用一个全局的配置文件,配置文件名是固定的;
- application.properties
- application.yml
作用:修改SpringBoot自动配置的默认值;
(我们在配置文件中做的修改,SpringBoot在底层都给我们自动配置好)
3.2、yaml
是一种标记语言,不是一种标记语言。
语法:key:(空格)value
以空格的缩进来控制层级关系;只要是左对齐的一列数据,都是同一个层级
server:
    port: 8081
对象:
friends:
	lastName: zhangsan
	age: 20

行内写法:
friends: {lastName: zhangsan,age: 18}
数组(List、Set):
animals:
	- dog
	- cat
	- pid

行内写法:
animals: [cat,dog,pid]
3.3、配置文件占位符
1、随机数
${random.value}、${random.int}、${random.long}
${random.int(10)}、${random.int[1024,65536]}
2、占位符获取之前配置的值,如果没有可以是用:指定默认值
person.last-name=张三${random.uuid}
person.age=${random.int}
person.birth=2017/12/15
person.boss=false
person.maps.k1=v1
person.maps.k2=14
person.lists=a,b,c
person.dog.name=${person.hello:hello}_dog
person.dog.age=15
3.4、配置文件值的注入
@Value和@ConfigurationProperties
yaml:
person:
    lastName: hello
    age: 18
    boss: false
    birth: 2017/12/12
    maps: {k1: v1,k2: 12}
    lists:
      ‐ lisi
      ‐ zhaoliu
    dog:
      name: 小狗
      age: 12
javaBean:
/**
 * 将配置文件中配置的每一个属性的值,映射到这个组件中
 * @ConfigurationProperties:告诉SpringBoot将本类中的所有属性和配置文件中相关的配置进行绑定;
 *      prefix = "person":配置文件中哪个下面的所有属性进行一一映射
 *
 * 只有这个组件是容器中的组件,才能使用容器提供
 *  @ConfigurationProperties功能;
 *
 */
@Component
@ConfigurationProperties(prefix = "person")
public class Person {
    private String lastName;
    private Integer age;
    private Boolean boss;
    private Date birth;
    private Map<String,Object> maps;
    private List<Object> lists;
    private Dog dog;
配置文件处理器
<!‐‐导入配置文件处理器,配置文件进行绑定就会有提示‐‐>
<dependency>
	<groupId>org.springframework.bootgroupId>
	<artifactId>spring‐boot‐configuration‐	processorartifactId>
	<optional>trueoptional>
dependency>
@Value获取值和@ConfigurationProperties获取值比较
| @ConfigurationProperties | @Value | |
|---|---|---|
| 功能 | 批量注入配置文件中的属性 | 一个个指定 |
| 松散绑定(松散语法) | 支持 | 不支持 |
| SpEL | 不支持 | 支持 |
| JSR303数据校验 | 支持 | 不支持 |
| 复杂类型封装 | 支持 | 不支持 |
Profile
多Profile文件
我们在主配置文件编写的时候,文件名可以是
application-{profile}.properties/yml
默认使用application.properties的配置;
yml支持多文档块方式
 server:
  port: 8081
spring:
  profiles:
    active: prod
‐‐‐
server:
  port: 8083
spring:
  profiles: dev
‐‐‐
server:
  port: 8084
spring:
  profiles: prod  #指定属于哪个环境
激活指定profile
1、在配置文件中指定 spring.profiles.active=dev
2、命令行:
java -jar spring-boot-02-config-0.0.1-SNAPSHOT.jar --spring.profiles.active=dev;
可以直接在测试的时候,配置传入命令行参数
3、虚拟机参数;
-Dspring.profiles.active=dev
3.5、配置文件的加载位置
–file:./config/
–file:./
–classpath:/config/
–classpath:/
优先级由高到底,高优先级的配置会覆盖低优先级的配置
3.6、加载指定配置文件
@PropertySource: 加载指定的配置文件
@PropertySource(value = {"classpath:person.properties"})
@ImportResource:导入Spring的配置文件,让配置文件里面的内容生效;
标注在一个配置类上
@ImportResource(locations = {"classpath:beans.xml"})
SpringBoot推荐给容器中添加组件的方式;推荐使用全注解的方式
1、配置类@Configuration------>Spring配置文件
2、使用@Bean给容器中添加组件
/**
* @Configuration:指明当前类是一个配置类;就是来替代之前的Spring配置文件
*
* 在配置文件中用四、日志
4.1、日志框架
市面上的日志框架;
JUL、JCL、Jboss-logging、logback、log4j、log4j2、slf4j…
| 日志门面 (日志的抽象层) | 日志实现 |
|---|---|
| Log4j JUL(java.util.logging) Log4j2 Logback |
左边选一个门面(抽象层)、右边来选一个实现;
日志门面: SLF4J;
日志实现:Logback;
SpringBoot:底层是Spring框架,Spring框架默认是用JCL;‘
SpringBoot选用 SLF4j和logback;
4.2、SLF4j使用
如何在系统中使用SLF4j https://www.slf4j.org
日志记录方法的调用,不应该来直接调用日志的实现类,而是调用日志抽象层里面的方法
import org.slf4j.Logger;
import org.slf4j.LoggerFactory;

public class HelloWorld {
  public static void main(String[] args) {
    Logger logger = LoggerFactory.getLogger(HelloWorld.class);
    logger.info("Hello World");
  }
}
每一个日志的实现框架都有自己的配置文件。使用slf4j以后,配置文件还是做成日志实现框架自己本身的配置文件;
遗留问题
a(slf4j+logback): Spring(commons-logging)、Hibernate(jboss-logging)、MyBatis、xxxx
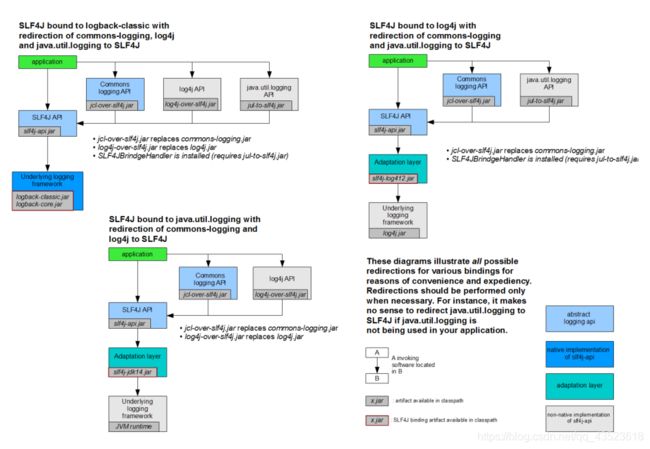
统一日志记录,即使是别的框架和我一起统一使用slf4j进行输出?
如何让系统中所有的日志都统一到slf4j;
1、将系统中其他日志框架先排除出去;
2、用中间包来替换原有的日志框架;
3、我们导入slf4j其他的实现
4.3、日志关系
		<dependency>
			<groupId>org.springframework.bootgroupId>
			<artifactId>spring-boot-starterartifactId>
		dependency>
SpringBoot使用它来做日志功能;
	<dependency>
			<groupId>org.springframework.bootgroupId>
			<artifactId>spring-boot-starter-loggingartifactId>
		dependency>
总结:
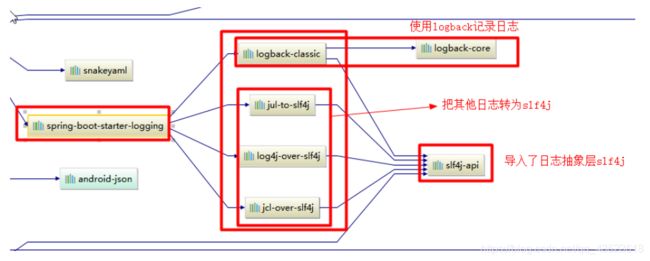
1)、SpringBoot底层也是使用slf4j+logback的方式进行日志记录
2)、SpringBoot也把其他的日志都替换成了slf4j;
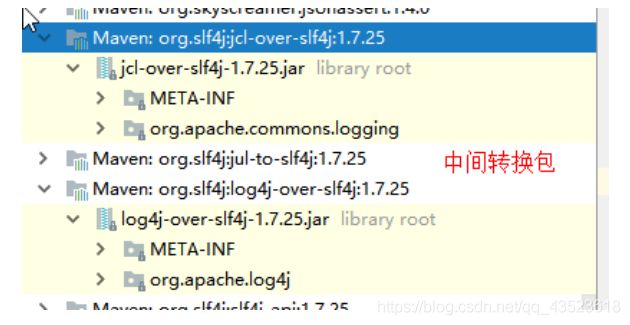
3)、中间替换包?
@SuppressWarnings("rawtypes")
public abstract class LogFactory {

    static String UNSUPPORTED_OPERATION_IN_JCL_OVER_SLF4J = "http://www.slf4j.org/codes.html#unsupported_operation_in_jcl_over_slf4j";

    static LogFactory logFactory = new SLF4JLogFactory();
4)、如果我们要引入其他框架?一定要把这个框架的默认日志依赖移除掉?
Spring框架用的是commons-logging;
		<dependency>
			<groupId>org.springframeworkgroupId>
			<artifactId>spring-coreartifactId>
			<exclusions>
				<exclusion>
					<groupId>commons-logginggroupId>
					<artifactId>commons-loggingartifactId>
				exclusion>
			exclusions>
		dependency>
SpringBoot能自动适配所有的日志,而且底层使用slf4j+logback的方式记录日志,引入其他框架的时候,只需要把这个框架依赖的日志框架排除掉即可;
4.4、日志使用
默认设置
可直接使用
//记录器
	Logger logger = LoggerFactory.getLogger(getClass());
	@Test
	public void contextLoads() {
		//System.out.println();

		//日志的级别;
		//由低到高   trace
		//可以调整输出的日志级别;日志就只会在这个级别以以后的高级别生效
		logger.trace("这是trace日志...");
		logger.debug("这是debug日志...");
		//SpringBoot默认给我们使用的是info级别的,没有指定级别的就用SpringBoot默认规定的级别;root级别
		logger.info("这是info日志...");
		logger.warn("这是warn日志...");
		logger.error("这是error日志...");


	}
springboot修改日志的默认设置
logging.level.com.atguigu=trace

#logging.path=
# 不指定路径在当前项目下生成springboot.log日志
# 可以指定完整的路径;
#logging.file=G:/springboot.log

# 在当前磁盘的根路径下创建spring文件夹和里面的log文件夹;使用 spring.log 作为默认文件
logging.path=/spring/log

#  在控制台输出的日志的格式
logging.pattern.console =%d{yyyy-MM-dd} [%thread] %-5level %logger{50} - %msg%n
# 指定文件中日志输出的格式
logging.pattern.file =%d{yyyy-MM-dd} === [%thread] === %-5level === %logger{50} ==== %msg%n
日志输出格式:
		%d表示日期时间,
		%thread表示线程名,
		%-5level:级别从左显示5个字符宽度
		%logger{50} 表示logger名字最长50个字符,否则按照句点分割。
		%msg:日志消息,
		%n是换行符
    -->
    %d{yyyy-MM-dd HH:mm:ss.SSS} [%thread] %-5level %logger{50} - %msg%n
| logging.file | logging.path | Example | Description |
|---|---|---|---|
| (none) | (none) | 只在控制台输出 | |
| 指定文件名 | (none) | my.log | 输出日志到my.log文件 |
| (none) | 指定目录 | /var/log | 输出到指定目录的 spring.log 文件中 |
指定配置
给类路径下放上每个日志框架自己的配置文件即可;SpringBoot就不使用他默认配置的了
| Logging System | Customization |
|---|---|
| Logback | logback-spring.xml, logback-spring.groovy, logback.xml or logback.groovy |
| Log4j2 | log4j2-spring.xml or log4j2.xml |
| JDK (Java Util Logging) | logging.properties |
logback.xml:直接就被日志框架识别了;
logback-spring.xml:日志框架就不直接加载日志的配置项,由SpringBoot解析日志配置,可以使用SpringBoot的高级Profile功能
<springProfile name="staging">

  	可以指定某段配置只在某个环境下生效
springProfile>
如:
<appender name="stdout" class="ch.qos.logback.core.ConsoleAppender">

        <layout class="ch.qos.logback.classic.PatternLayout">
            <springProfile name="dev">
                <pattern>%d{yyyy-MM-dd HH:mm:ss.SSS} ----> [%thread] ---> %-5level %logger{50} - %msg%npattern>
            springProfile>
            <springProfile name="!dev">
                <pattern>%d{yyyy-MM-dd HH:mm:ss.SSS} ==== [%thread] ==== %-5level %logger{50} - %msg%npattern>
            springProfile>
        layout>
    appender>
如果使用logback.xml作为日志配置文件,还要使用profile功能,会有以下错误
no applicable action for [springProfile]
4.5、切换日志框架
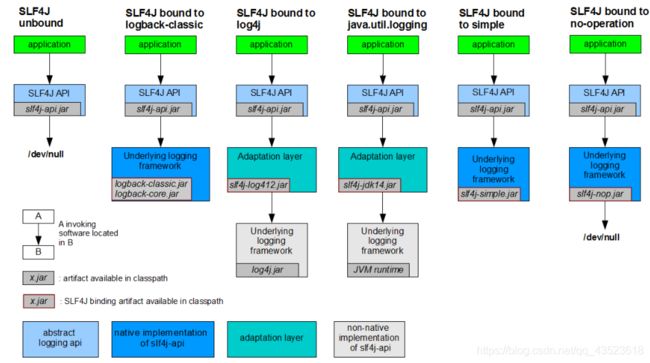
可以按照slf4j的日志适配图,进行相关的切换;
slf4j+log4j的方式;
<dependency>
  <groupId>org.springframework.bootgroupId>
  <artifactId>spring-boot-starter-webartifactId>
  <exclusions>
    <exclusion>
      <artifactId>logback-classicartifactId>
      <groupId>ch.qos.logbackgroupId>
    exclusion>
    <exclusion>
      <artifactId>log4j-over-slf4jartifactId>
      <groupId>org.slf4jgroupId>
    exclusion>
  exclusions>
dependency>

<dependency>
  <groupId>org.slf4jgroupId>
  <artifactId>slf4j-log4j12artifactId>
dependency>
切换为log4j2
   <dependency>
            <groupId>org.springframework.bootgroupId>
            <artifactId>spring-boot-starter-webartifactId>
            <exclusions>
                <exclusion>
                    <artifactId>spring-boot-starter-loggingartifactId>
                    <groupId>org.springframework.bootgroupId>
                exclusion>
            exclusions>
        dependency>

<dependency>
  <groupId>org.springframework.bootgroupId>
  <artifactId>spring-boot-starter-log4j2artifactId>
dependency>
五、Web开发
5.1、静态资源映射
-
所有**/webjars/**** ,都去
classpath:/META-INF/resources/webjars/找资源; webjars:以jar包的方式引入静态资源;
-
“/**” 访问当前项目的任何资源,都去(静态资源的文件夹)找映射
"classpath:/META-INF/resources/",
"classpath:/resources/",
"classpath:/static/",
"classpath:/public/"
"/":当前项目的根路径
localhost:8080/abc=== 去静态资源文件夹里面找abc
- 欢迎页; 静态资源文件夹下的所有index.html页面;被"/**"映射;
localhost:8080/ 找index页面
- 所有的 /favicon.ico 都是在静态资源文件下找;
5.2、模板引擎
JSP、Velocity、Freemarker、Thymeleaf
Springboot推荐Thymelea
引入thymeleaf
<dependency>
	<groupId>org.springframework.bootgroupId>
	<artifactId>spring‐boot‐starter‐thymeleafartifactId>
dependency>
<!‐‐切换thymeleaf版本‐‐>
<properties>
	<thymeleaf.version>3.0.9.RELEASEthymeleaf.version>
<!‐‐ 布局功能的支持程序  thymeleaf3主程序  layout2以上版本 ‐‐>
<!‐‐ thymeleaf2   layout1‐‐>
	<thymeleaf‐layout‐dialect.version>2.2.2thymeleaf‐layout‐dialect.version>
 properties>
thymeleaf使用
只要我们把HTML页面放在classpath:/templates/下,thymeleaf就能自动渲染
1.导入thymeleaf的命名空间
<html lang="en" xmlns:th="http://www.thymeleaf.org">
2.使用语法
<html lang="en" xmlns:th="http://www.thymeleaf.org">
<head>
    <meta charset="UTF‐8">
    <title>Titletitle>
head>
<body>
    <h1>成功!h1>
    <!‐‐th:text 将div里面的文本内容设置为 ‐‐>
    <div th:text="${hello}">这是显示欢迎信息div>
body>
html>
禁用模板引擎的缓存
# 禁用缓存
spring.thymeleaf.cache=false
语法规则
th:text;改变当前元素里面的文本内容;
th:任意html属性;来替换原生属性的值
表达式:
${…}:获取变量值
#{…}:获取国际化内容
*{…}:选择表达式 和${}在功能上是一样
@{…}:定义URL
~{…}:片段引用表达式
Simple expressions:(表达式语法)
    Variable Expressions: ${...}:获取变量值;OGNL;

     1)、获取对象的属性、调用方法
     2)、使用内置的基本对象:
     #ctx : the context object.
     #vars: the context variables.
     #locale : the context locale.
     #request : (only in Web Contexts) the HttpServletRequest object.
     #response : (only in Web Contexts) the HttpServletResponse object.
     #session : (only in Web Contexts) the HttpSession object.
     #servletContext : (only in Web Contexts) the ServletContext object.

                ${session.foo}

	3)、内置的一些工具对象:
     #execInfo : information about the template being processed.
#messages : methods for obtaining externalized messages inside variables expressions, in the
same way as they would be obtained using #{…} syntax.
#uris : methods for escaping parts of URLs/URIs
#conversions : methods for executing the configured conversion service (if any).
#dates : methods for java.util.Date objects: formatting, component extraction, etc.
#calendars : analogous to #dates , but for java.util.Calendar objects.
#numbers : methods for formatting numeric objects.
#strings : methods for String objects: contains, startsWith, prepending/appending, etc.
#objects : methods for objects in general.
#bools : methods for boolean evaluation.
#arrays : methods for arrays.
#lists : methods for lists.
#sets : methods for sets.
#maps : methods for maps.
#aggregates : methods for creating aggregates on arrays or collections.
#ids : methods for dealing with id attributes that might be repeated (for example, as a
result of an iteration).
    Selection Variable Expressions: *{...}:选择表达式:和${}在功能上是一样;
     补充:配合 th:object="${session.user}:
   <div th:object="${session.user}">
    <p>Name: <span th:text="*{firstName}">Sebastian</span>.</p>
    <p>Surname: <span th:text="*{lastName}">Pepper</span>.</p>
    <p>Nationality: <span th:text="*{nationality}">Saturn</span>.</p>
    </div>

    Message Expressions: #{...}:获取国际化内容
    Link URL Expressions: @{...}:定义URL;
     @{/order/process(execId=${execId},execType='FAST')}
    Fragment Expressions: ~{...}:片段引用表达式
     <div th:insert="~{commons :: main}">...</div>

Literals(字面量)
      Text literals: 'one text' , 'Another one!' ,…
      Number literals: 0 , 34 , 3.0 , 12.3 ,…
      Boolean literals: true , false
      Null literal: null
      Literal tokens: one , sometext , main ,…
Text operations:(文本操作)
    String concatenation: +
    Literal substitutions: |The name is ${name}|
Arithmetic operations:(数学运算)
    Binary operators: + , ‐ , * , / , %
        Minus sign (unary operator): ‐
Boolean operations:(布尔运算)
    Binary operators: and , or
    Boolean negation (unary operator): ! , not
Comparisons and equality:(比较运算)
    Comparators: > , < , >= , <= ( gt , lt , ge , le )
    Equality operators: == , != ( eq , ne )
Conditional operators:条件运算(三元运算符)
    If‐then: (if) ? (then)
    If‐then‐else: (if) ? (then) : (else)
    Default: (value) ?: (defaultvalue)
Special tokens:
    No‐Operation: _
5.3、SpringMVC 自动配置
auto-configuration
Spring Boot 自动配置好了SpringMVC
以下是SpringBoot对SpringMVC的默认配置:(WebMvcAutoConfiguration)
- Inclusion of ContentNegotiatingViewResolver and BeanNameViewResolver beans.
- 自动配置了ViewResolver(视图解析器:根据方法的返回值得到视图对象(View),视图对象决定如何渲染(转发?重定向?)
- ContentNegotiatingViewResolver:组合所有的视图解析器的;
- 如何定制:我们可以自己给容器中添加一个视图解析器;自动的将其组合进来;
- Support for serving static resources, including support for WebJars (see below).静态资源文件夹路径,webjars
- Static index.html support. 静态首页访问
- Custom Favicon support (see below). favicon.ico
- 自动注册了 of Converter , GenericConverter , Formatter beans.
- Converter:转换器; public String hello(User user):类型转换使用Converter
- Formatter 格式化器; 2017.12.17===Date;
@Bean
@ConditionalOnProperty(prefix = "spring.mvc", name = "date‐format")
//在文件中配置日期格式化的规则

public Formatter<Date> dateFormatter() {

    return new DateFormatter(this.mvcProperties.getDateFormat());
    //日期格式化组件
}
自己添加的格式化器转换器,我们只需要放在容器中即可
- Support for HttpMessageConverters (see below).
- HttpMessageConverter:SpringMVC用来转换Http请求和响应的;User—Json;
- HttpMessageConverters 是从容器中确定;获取所有的HttpMessageConverter
自己给容器中添加HttpMessageConverter,只需要将自己的组件注册容器中
(@Bean,@Component)
- Automatic registration of MessageCodesResolver (see below).定义错误代码生成规则
- Automatic use of a ConfigurableWebBindingInitializer bean (see below).
我们可以配置一个ConfigurableWebBindingInitializer来替换默认的;(添加到容器)
初始化WebDataBinder;
请求数据=====JavaBean;
org.springframework.boot.autoconfigure.web:web的所有自动场景;
扩展SpringMVC
在config包下 编写一个配置类(@Configuration),实现WebMvcConfigurer接口
注意 :不能标注@EnableWebMvc;标注后springmvc的自动配置就会失效,我们全面接管springmvc
/**
 * 2020/2/13 14:32
 * 文件说明:Mvc的自定义配置类
 *
 * @author 薛云冲
 * 梦可以到的地方,只要努力,总有一天,自己也可以达到!
 */
@Configuration
public class MyMvcConfig implements WebMvcConfigurer {
//    视图解析器
    @Override
    public void addViewControllers(ViewControllerRegistry registry) {
        registry.addViewController("/index").setViewName("index");
        registry.addViewController("/").setViewName("index");
      registry.addViewController("/index.html").setViewName("index");     registry.addViewController("main.html").setViewName("dashboard");
    }

    //自定义的国际化组件
    @Bean
    public LocaleResolver localeResolver(){
        return new MyLocaleResolver();
    }

    @Override
    public void addInterceptors(InterceptorRegistry registry) {
        registry.addInterceptor(new LoginHandlerInterceptor())
                .addPathPatterns("/**").excludePathPatterns
            ("/index.html","/","/index","/user/login","/asserts/**");
    }
}
5.4、修改springboot默认配置
1) SpringBoot在自动配置很多组件的时候,先看容器中有没有用户自己配置的(@Bean、@Component)如果有就用用户配置的,如果没有,才自动配置;如果有些组件可以有多个(ViewResolver)将用户配置的和自己默认的组合起来;
2) 在SpringBoot中会有非常多的xxxConfigurer帮助我们进行扩展配置
3) 在SpringBoot中会有很多的xxxCustomizer帮助我们进行定制配置
5.5、CRUD操作
后台Controller
package com.xyc.springbootweb.Controller;


/**
 * 2020/2/14 21:37
 * 文件说明:
 *
 * @author 薛云冲
 * 梦可以到的地方,只要努力,总有一天,自己也可以达到!
 */
@Controller
@RequestMapping("EMP")
public class EmployeeController {

    @Autowired
    private EmployeeService employeeService;
    @Autowired
    private DepartmentDao departmentDao;
    @RequestMapping("/findAll")
    public String findAll(Model model){
        Collection<Employee> employees = employeeService.findAll();

        model.addAttribute("emps",employees);
        return "list";
    }

//    跳转到添加员工的页面
    @GetMapping("/add")
    public String toAddEmployee( Model model){

        model.addAttribute("depts",departmentDao.getDepartments());
        return "addEmp";
    }

    @PostMapping("/add")
    public  String addEmployee(Employee employee){
        if (employee!=null){
            employeeService.addEmp(employee);
        }
        return "redirect:findAll";
    }
    @GetMapping("/toUpdate")
//    跳转到修改员工信息的页面
    public String toUpdateEmployee(String id,Model model){
        Employee employee = employeeService.findById(id);

        model.addAttribute("depts",departmentDao.getDepartments());
        model.addAttribute("emp",employee);
        return "updateEmp";
    }

    @PostMapping("/update")
    public String updateEmployee(Employee employee){

        employeeService.updateEmployee(employee);
        return "redirect:findAll";
    }
    @RequestMapping("/delete")
    public String deleteEmployee(String id){
        employeeService.deleteEmployee(id);
        return "redirect:findAll";
    }
}
前端利用thymeleaf模板引擎进行数据回显,等等
5.6、国际化
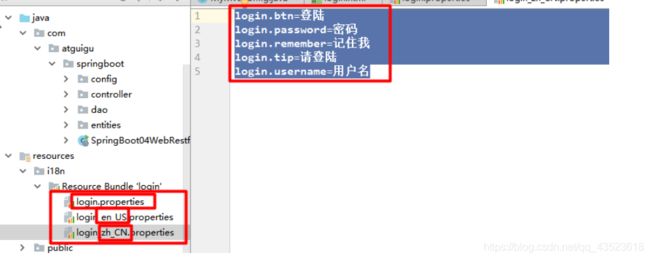
1.在resources文件夹下创建包 i18n,在i18n下编写国际化消息
2.在配置文件中添加消息文件的真实位置
#  我们自定义的消息的配置文件的真实位置
  messages:
    basename: i18n.login
3.根据请求切换国际化语言(只需在相关请求中加入相关参数)
<a class="btn btn-sm" th:href="@{/index.html(l='zh_CN')}">中文a>
<a class="btn btn-sm" th:href="@{/index.html(l='en_US')}">Englisha>
4.创建国际化配置类放入容器(一定要放入容器)
package com.xyc.springbootweb.config;


/**
 * 2020/2/14 1:52
 * 文件说明:
 *
 * @author 薛云冲
 * 梦可以到的地方,只要努力,总有一天,自己也可以达到!
 */
@Component
public class MyLocaleResolver implements LocaleResolver {
    //解析请求
    @Override
    public Locale resolveLocale(HttpServletRequest httpServletRequest) {

        //获取请求中的语言参数
        String language = httpServletRequest.getParameter("l");
        Locale locale = Locale.getDefault();
        // 如果没有就是用默认值

        //如果请求中的链接携带了国际化参数
        if (!StringUtils.isEmpty(language)){
            //zh_CN
            String[] split = language.split("_");
            //国家地区
            locale = new Locale(split[0], split[1]);

        }
        return locale;
    }

    @Override
    public void setLocale(HttpServletRequest httpServletRequest, HttpServletResponse httpServletResponse, Locale locale) {

    }
}
4.去页面获取国际化的值;
#{login.tip}
#{login.username}
5.7、拦截器
自定义拦截器
/**
 * 2020/2/14 18:43
 * 文件说明:
 *
 * @author 薛云冲
 * 梦可以到的地方,只要努力,总有一天,自己也可以达到!
 */
public class LoginHandlerInterceptor implements HandlerInterceptor {

    @Override
    public boolean preHandle(HttpServletRequest request, HttpServletResponse response, Object handler) throws Exception {

        // 登录成功之后,应该有用户的session
        Object username = request.getSession().getAttribute("username");

        if(username==null){

            request.setAttribute("msg","未登录,请先登录!");
            request.getRequestDispatcher("/index.html").forward(request,response);
            return false;
        }else{
            return true;
        }
    }
}
在自定义MvcConfig类中的注册拦截器(必须)
   @Override
    public void addInterceptors(InterceptorRegistry registry) {
        registry.addInterceptor(new LoginHandlerInterceptor())
                .addPathPatterns("/**").excludePathPatterns
           ("/index.html","/","/index","/user/login","/asserts/**");
    }
5.8、错误处理机制
5.8.1、默认的错误处理机制
默认效果:
1)、浏览器,返回一个默认的错误页面
浏览器发送请求的请求头:
2)、如果是其他客户端,默认响应一个json数据
原理
可以参照ErrorMvcAutoConfiguration;错误处理的自动配置;
给容器中添加了以下组件
1、DefaultErrorAttributes:
帮我们在页面共享信息;
@Override
	public Map<String, Object> getErrorAttributes(RequestAttributes requestAttributes,
			boolean includeStackTrace) {
		Map<String, Object> errorAttributes = new LinkedHashMap<String, Object>();
		errorAttributes.put("timestamp", new Date());
		addStatus(errorAttributes, requestAttributes);
		addErrorDetails(errorAttributes, requestAttributes, includeStackTrace);
		addPath(errorAttributes, requestAttributes);
		return errorAttributes;
	}
2、BasicErrorController:处理默认/error请求
@Controller
@RequestMapping("${server.error.path:${error.path:/error}}")
public class BasicErrorController extends AbstractErrorController {

    @RequestMapping(produces = "text/html")//产生html类型的数据;浏览器发送的请求来到这个方法处理
	public ModelAndView errorHtml(HttpServletRequest request,
			HttpServletResponse response) {
		HttpStatus status = getStatus(request);
		Map<String, Object> model = Collections.unmodifiableMap(getErrorAttributes(
				request, isIncludeStackTrace(request, MediaType.TEXT_HTML)));
		response.setStatus(status.value());

        //去哪个页面作为错误页面;包含页面地址和页面内容
		ModelAndView modelAndView = resolveErrorView(request, response, status, model);
		return (modelAndView == null ? new ModelAndView("error", model) : modelAndView);
	}

	@RequestMapping
	@ResponseBody    //产生json数据,其他客户端来到这个方法处理;
	public ResponseEntity<Map<String, Object>> error(HttpServletRequest request) {
		Map<String, Object> body = getErrorAttributes(request,
				isIncludeStackTrace(request, MediaType.ALL));
		HttpStatus status = getStatus(request);
		return new ResponseEntity<Map<String, Object>>(body, status);
	}
3、ErrorPageCustomizer:
	@Value("${error.path:/error}")
	private String path = "/error";  系统出现错误以后来到error请求进行处理;(web.xml注册的错误页面规则)
4、DefaultErrorViewResolver:
@Override
	public ModelAndView resolveErrorView(HttpServletRequest request, HttpStatus status,
			Map<String, Object> model) {
		ModelAndView modelAndView = resolve(String.valueOf(status), model);
		if (modelAndView == null && SERIES_VIEWS.containsKey(status.series())) {
			modelAndView = resolve(SERIES_VIEWS.get(status.series()), model);
		}
		return modelAndView;
	}

	private ModelAndView resolve(String viewName, Map<String, Object> model) {
        //默认SpringBoot可以去找到一个页面?  error/404
		String errorViewName = "error/" + viewName;

        //模板引擎可以解析这个页面地址就用模板引擎解析
		TemplateAvailabilityProvider provider = this.templateAvailabilityProviders
				.getProvider(errorViewName, this.applicationContext);
		if (provider != null) {
            //模板引擎可用的情况下返回到errorViewName指定的视图地址
			return new ModelAndView(errorViewName, model);
		}
        //模板引擎不可用,就在静态资源文件夹下找errorViewName对应的页面   error/404.html
		return resolveResource(errorViewName, model);
	}
步骤
一但系统出现4xx或者5xx之类的错误;ErrorPageCustomizer就会生效(定制错误的响应规则);就会来到/error请求;就会被BasicErrorController处理;
1)响应页面;去哪个页面是由DefaultErrorViewResolver解析得到的;
protected ModelAndView resolveErrorView(HttpServletRequest request,
      HttpServletResponse response, HttpStatus status, Map<String, Object> model) {
    //所有的ErrorViewResolver得到ModelAndView
   for (ErrorViewResolver resolver : this.errorViewResolvers) {
      ModelAndView modelAndView = resolver.resolveErrorView(request, status, model);
      if (modelAndView != null) {
         return modelAndView;
      }
   }
   return null;
}
5.8.2、定制错误响应:
定制错误的页面;
1)、有模板引擎的情况下;error/状态码; 【将错误页面命名为 错误状态码.html 放在模板引擎文件夹里面的 error文件夹下】,发生此状态码的错误就会来到 对应的页面;
我们可以使用4xx和5xx作为错误页面的文件名来匹配这种类型的所有错误,精确优先(优先寻找精确的状态码.html);
页面能获取的信息;
timestamp:时间戳
status:状态码
error:错误提示
exception:异常对象
message:异常消息
errors:JSR303数据校验的错误都在这里
2)、没有模板引擎(模板引擎找不到这个错误页面),静态资源文件夹下找;
3)、以上都没有错误页面,就是默认来到SpringBoot默认的错误提示页面;
定制错误的json数据;
1)、自定义异常处理&返回定制json数据;
@ControllerAdvice
public class MyExceptionHandler {

    @ResponseBody
    @ExceptionHandler(UserNotExistException.class)
    public Map<String,Object> handleException(Exception e){
        Map<String,Object> map = new HashMap<>();
        map.put("code","user.notexist");
        map.put("message",e.getMessage());
        return map;
    }
}
//没有自适应效果...
2)、转发到/error进行自适应响应效果处理
 @ExceptionHandler(UserNotExistException.class)
    public String handleException(Exception e, HttpServletRequest request){
        Map<String,Object> map = new HashMap<>();
        //传入我们自己的错误状态码  4xx 5xx,否则就不会进入定制错误页面的解析流程
        /**
         * Integer statusCode = (Integer) request
         .getAttribute("javax.servlet.error.status_code");
         */
        request.setAttribute("javax.servlet.error.status_code",500);
        map.put("code","user.notexist");
        map.put("message",e.getMessage());
        //转发到/error
        return "forward:/error";
    }
3)、将我们的定制数据携带出去;
出现错误以后,会来到/error请求,会被BasicErrorController处理,响应出去可以获取的数据是由getErrorAttributes得到的(是AbstractErrorController(ErrorController)规定的方法);
1、完全来编写一个ErrorController的实现类【或者是编写AbstractErrorController的子类】,放在容器中;
2、页面上能用的数据,或者是json返回能用的数据都是通过errorAttributes.getErrorAttributes得到;
容器中DefaultErrorAttributes.getErrorAttributes();默认进行数据处理的;
自定义ErrorAttributes
//给容器中加入我们自己定义的ErrorAttributes
@Component
public class MyErrorAttributes extends DefaultErrorAttributes {

    @Override
    public Map<String, Object> getErrorAttributes(RequestAttributes requestAttributes, boolean includeStackTrace) {
        Map<String, Object> map = super.getErrorAttributes(requestAttributes, includeStackTrace);
        map.put("company","atguigu");
        return map;
    }
}
最终的效果:响应是自适应的,可以通过定制ErrorAttributes改变需要返回的内容,
六、整合JDBC
配置
-
导入JDBC的启动器,以及mysql的相关依赖
<dependency> <groupId>org.springframework.bootgroupId> <artifactId>spring-boot-starter-jdbcartifactId> dependency> <dependency> <groupId>mysqlgroupId> <artifactId>mysql-connector-javaartifactId> <scope>runtimescope> dependency> -
在springboot的配置中对数据源datasource进行配置
spring:
  datasource:
    username: root
    password: 123456
    #?serverTimezone=UTC解决时区的报错
    url: jdbc:mysql://localhost:3306/ems?serverTimezone=UTC&useUnicode=true&characterEncoding=utf-8
    driver-class-name: com.mysql.cj.jdbc.Driver

    #type 指定自定义数据源类型,以下是阿里的druid数据源
    type: com.alibaba.druid.pool.DruidDataSource
配置好,就可以直接使用了,其余的springboot自动配置
com.zaxxer.hikari.HikariDataSource (Spring Boot 2.0 以上,默认使用此数据源)
可以使用 spring.datasource.type 指定自定义的数据源类型,值为 要使用的连接池实现的完全限定名。默认情况下,它是从类路径自动检测的。
可以测试一下是否配置完成 在测试类中
@RunWith(SpringRunner.class)
@SpringBootTest
public class SpringbootDemoDataApplicationTests {

    //DI注入数据源
    @Autowired
    DataSource dataSource;

    @Test
    public void contextLoads() throws SQLException {
        //看一下默认数据源 dataSource.getClass()
        System.out.println(dataSource.getClass());
        //输出默认数据源:com.zaxxer.hikari.HikariDataSource
        //获得连接
        Connection connection =   dataSource.getConnection();
        System.out.println(connection);
        //关闭连接
        connection.close();
    }

}
使用
CRUD操作
方法:
- 配置好数据源(dataSource)后,就可以拿到数据库连接(Connection),使用连接和原生的JDBC就可以进行操作数据库
- 使用第三方框架,mybatis,hibernate等
- 使用Spring对原生JDBC的轻量级封装 ,即org.springframework.jdbc.core.JdbcTemplate。
在jdbcTemplate中,封装有数据库操作的所有CRUD方法
在springboot中已默认配置了jdbcTemplate,并放入容器中,直接自行注入即可使用。
jdbcTempalte提供的几类方法:
- execute方法:可以用于执行任何SQL语句,一般用于执行DDL语句;
- update方法及batchUpdate方法:update方法用于执行新增、修改、删除等语句;batchUpdate方法用于执行批处理相关语句;
- query方法及queryForXXX方法:用于执行查询相关语句;
- call方法:用于执行存储过程、函数相关语句。
@RestController
public class JdbcController {
//JdbcTemplate 是 core 包的核心类,用于简化 JDBC操作,还能避免一些常见的错误,如忘记关闭数据库连接
//Spring Boot 默认提供了数据源,默认提供了 org.springframework.jdbc.core.JdbcTemplate
//JdbcTemplate 中会自己注入数据源,使用起来也不用再自己来关闭数据库连接
@Autowired
JdbcTemplate jdbcTemplate;
//查询数据库的所有连接
//没有实体类,怎么取数据库的数据?用Map七、整合Druid数据源
简介:
Druid 是阿里巴巴开源平台上一个数据库连接池实现,结合了 C3P0、DBCP、PROXOOL 等 DB 池的优点,同时加入了日志监控。
Druid 基本配置参数:
| 配置 | 缺省值 | 说明 |
|---|---|---|
| name | 配置这个属性的意义在于,如果存在多个数据源,监控的时候可以通过名字来区分开来。 如果没有配置,将会生成一个名字,格式是:“DataSource-” + System.identityHashCode(this). 另外配置此属性至少在1.0.5版本中是不起作用的,强行设置name会出错 详情-点此处。 | |
| url | 连接数据库的url,不同数据库不一样。例如: mysql : jdbc:mysql://10.20.153.104:3306/druid2 oracle : jdbc:oracle:thin:@10.20.149.85:1521:ocnauto | |
| username | 连接数据库的用户名 | |
| password | 连接数据库的密码。如果你不希望密码直接写在配置文件中,可以使用ConfigFilter。详细看这里:https://github.com/alibaba/druid/wiki/%E4%BD%BF%E7%94%A8ConfigFilter | |
| driverClassName | 根据url自动识别 | 这一项可配可不配,如果不配置druid会根据url自动识别dbType,然后选择相应的driverClassName |
| initialSize | 0 | 初始化时建立物理连接的个数。初始化发生在显示调用init方法,或者第一次getConnection时 |
| maxActive | 8 | 最大连接池数量 |
| maxIdle | 8 | 已经不再使用,配置了也没效果 |
| minIdle | 最小连接池数量 | |
| maxWait | 获取连接时最大等待时间,单位毫秒。配置了maxWait之后,缺省启用公平锁,并发效率会有所下降,如果需要可以通过配置useUnfairLock属性为true使用非公平锁。 | |
| poolPreparedStatements | false | 是否缓存preparedStatement,也就是PSCache。PSCache对支持游标的数据库性能提升巨大,比如说oracle。在mysql下建议关闭。 |
| maxOpenPreparedStatements | -1 | 要启用PSCache,必须配置大于0,当大于0时,poolPreparedStatements自动触发修改为true。在Druid中,不会存在Oracle下PSCache占用内存过多的问题,可以把这个数值配置大一些,比如说100 |
| validationQuery | 用来检测连接是否有效的sql,要求是一个查询语句。如果validationQuery为null,testOnBorrow、testOnReturn、testWhileIdle都不会其作用。 | |
| validationQueryTimeout | 单位:秒,检测连接是否有效的超时时间。底层调用jdbc Statement对象的void setQueryTimeout(int seconds)方法 | |
| testOnBorrow | true | 申请连接时执行validationQuery检测连接是否有效,做了这个配置会降低性能。 |
| testOnReturn | false | 归还连接时执行validationQuery检测连接是否有效,做了这个配置会降低性能 |
| testWhileIdle | false | 建议配置为true,不影响性能,并且保证安全性。申请连接的时候检测,如果空闲时间大于timeBetweenEvictionRunsMillis,执行validationQuery检测连接是否有效。 |
| timeBetweenEvictionRunsMillis | 1分钟(1.0.14) | 有两个含义: 1) Destroy线程会检测连接的间隔时间,如果连接空闲时间大于等于minEvictableIdleTimeMillis则关闭物理连接 2) testWhileIdle的判断依据,详细看testWhileIdle属性的说明 |
| numTestsPerEvictionRun | 不再使用,一个DruidDataSource只支持一个EvictionRun | |
| minEvictableIdleTimeMillis | 30分钟(1.0.14) | 连接保持空闲而不被驱逐的最长时间 |
| connectionInitSqls | 物理连接初始化的时候执行的sql | |
| exceptionSorter | 根据dbType自动识别 | 当数据库抛出一些不可恢复的异常时,抛弃连接 |
| filters | 属性类型是字符串,通过别名的方式配置扩展插件,常用的插件有: 监控统计用的filter:stat 日志用的filter:log4j 防御sql注入的filter:wall | |
| proxyFilters | 类型是List |
导入依赖
<dependency>
    <groupId>com.alibabagroupId>
    <artifactId>druidartifactId>
    <version>1.1.12version>
dependency>

<dependency>
            <groupId>log4jgroupId>
            <artifactId>log4jartifactId>
            <version>1.2.17version>
dependency>
配置数据源
spring:
  datasource:
    username: root
    password: 991016
#    如果mysql关于时区报错,就在url中加一个参数 :serverTimezeno=UTC
    url: JDBC:mysql://localhost:3306/ems?serverTimezone=UTC&useUnicode=true&characterEncoding=utf-8
    driver-class-name: com.mysql.cj.jdbc.Driver
#    切换数据源   默认的数据源:com.zaxxer.hikari.HikariDataSource
    type: com.alibaba.druid.pool.DruidDataSource

    #Spring Boot 默认是不注入这些属性值的,需要自己绑定
    #druid 数据源专有配置
    druid:
        initialSize: 5
        minIdle: 5
        maxActive: 20
        maxWait: 60000
        timeBetweenEvictionRunsMillis: 60000
        minEvictableIdleTimeMillis: 300000
        validationQuery: SELECT 1 FROM DUAL
        testWhileIdle: true
        testOnBorrow: false
        testOnReturn: false
        poolPreparedStatements: true

        #配置监控统计拦截的filters,stat:监控统计、log4j:日志记录、wall:防御sql注入
        #如果允许时报错  java.lang.ClassNotFoundException: org.apache.log4j.Priority
        #则导入 log4j 依赖即可,Maven 地址: https://mvnrepository.com/artifact/log4j/log4j
        filters: stat,log4j
        maxPoolPreparedStatementPerConnectionSize: 20
        useGlobalDataSourceStat: true
        connectionProperties: druid.stat.mergeSql=true;druid.stat.slowSqlMillis=500
配置完成后可在测试类中,检测数据源是否配置完成
配置Druid数据监控
Druid 数据源具有监控的功能,并提供了一个 web 界面方便用户查看,类似安装 路由器 时,人家也提供了一个默认的 web 页面。
所以第一步需要设置 Druid 的后台管理页面,比如 登录账号、密码 等;配置后台管理;
@Configuration
public class DruidConfig {

    @ConfigurationProperties(prefix = "spring.datasource")
    @Bean
    public DataSource druidDataSource(){
        return new DruidDataSource();
    }


    //后台监控   web.xml ServletRegistrationBean
    //因为springboot 内置了servlet容器,所以没有web.xml ,替代方法:servletRegistrationBean
    @Bean
    public ServletRegistrationBean statViewServlet(){
        ServletRegistrationBean<StatViewServlet> bean = new ServletRegistrationBean<>(new StatViewServlet(),"/druid/*");
        //后台需要有人登录,账号密码配置
        HashMap<String,String> initParameters = new HashMap<>();

        //增加配置
        initParameters.put("loginUsername","admin");//登录key,是固定的 LoginUsername、LoginPassword
        initParameters.put("loginPassword","991016");
        //允许谁可以访问
        initParameters.put("allow","");
        //禁止谁可以访问
        initParameters.put("kuangsheng","192.168");

        bean.setInitParameters(initParameters);
        return bean;
    }


    // filter
    public FilterRegistrationBean webStatFilter(){
        FilterRegistrationBean<Filter> bean = new FilterRegistrationBean<>();

        bean.setFilter(new WebStatFilter());

        //可以过滤哪些请求?
        HashMap<String,String> initParameters = new HashMap<>();
        //这些东西不进行统计
        initParameters.put("exclusions","*.js,*.css,/druid/*");

        bean.setInitParameters(initParameters);
        return bean;
    }
}
八、整合Mybatis
1.导入整合mybatis所需依赖
        <dependency>
            <groupId>org.mybatis.spring.bootgroupId>
            <artifactId>mybatis-spring-boot-starterartifactId>
            <version>2.1.0version>
        dependency>
2.配置数据源
spring:
  datasource:
    username: root
    password: 991016
    url: jdbc:mysql://localhost:3306/ems?serverTimezone=UTC&useUnicode=true&characterEncoding=utf-8
    driver-class-name: com.mysql.cj.jdbc.Driver
测试类测试一下是否可以连接成功。。。
3.整合Mybatis
在配置文件中加入
  #整合mybatis
mybatis:
	#对应实体类的路径
  type-aliases-package: com.xyc.pojo
  	#指定mybatis的核心配置文件与Mapper映射文件
  mapper-locations: classpath:mybatis/mapper/*.xml
4.创建实体类:
//lombok的注解标注这是一个实体类
@Data
//标注自动创建无参构造
@NoArgsConstructor
//标注自动创建有参构造
@AllArgsConstructor

public class Admin {
private String id;
private String username;
private String password;
private String name;
}
5.配置Mapper接口类
//@Mapper : 表示本类是一个 MyBatis 的 Mapper,(dao层)
//	等价于以前 Spring 整合 MyBatis 时的 Mapper 接口
@Mapper
//@Repository:将此类放入spring容器中
@Repository
public interface AdminMapper {
    //查询所有
    public List<Admin> findAll();
    //通过id查询
    public Admin findById(String id);
    // 增加
    public int add(Admin admin);
    // 修改
    public int update(Admin admin);
    // 删除
    public int delete(String id);

}
6.Mapper映射文件
<mapper namespace="com.xyc.mapper.AdminMapper" >
    <select id="findAll" resultType="Admin" >
        select * from admin;
    select>
    <select id="findById" resultType="Admin">
        select * from admin where id = #{id};
    select>
    <insert id="add" parameterType="Admin">
        insert into
            admin(id, username, password, name)
        values
            (#{id},#{username},#{password},#{name})
    insert>
    <update id="update" parameterType="Admin">
        update
            admin
        set
            id= #{id},
            username= #{username},
            password= #{password},
            name =#{name}
        where
            id = #{id};
    update>
    <delete id="delete" parameterType="String">
        delete from admin where id = #{id};
    delete>
mapper>
九、springSecurity安全框架
导入坐标依赖
<dependency>
     <groupId>org.thymeleaf.extrasgroupId>
     <artifactId>thymeleaf-extras-springsecurity5artifactId>
     <version>3.0.4.RELEASEversion>
dependency>
<dependency>
     <groupId>org.springframework.securitygroupId>
     <artifactId>spring-security-webartifactId>
dependency>
定义securityConfig配置类,继承WebSecurityConfigurerAdpater实现类,
使用@EnableWebSecurity注解,开启webSecurity功能
A:登录配置(在WebSecurityConfigurerAdpater实现类的configure()方法中配置)
 @Override
    protected void configure(HttpSecurity http) throws Exception {
        //实现首页所有人可以访问,功能页只有对应有权限的人才可以访问
        //设置请求校准规则
        http.authorizeRequests()
                .antMatchers("/").permitAll()
                .antMatchers("/level1/**").hasRole("vip1") //设置请求权限
                .antMatchers("/level2/**").hasRole("vip2")
                .antMatchers("/level3/**").hasRole("vip3");
        		.antMatcher.authenticated()//设置所有请求需要认证

        //没有权限会跳转到登陆页面
        //http.formLogin();//此时会跳转到默认的登陆页面 /login

        http.formLogin() //定义登陆方式为form表单登录
            .loginPage("/toLogin");//定义登录页
       //将自定义登录页的action请求注入到UsernamePasswordAuthentication Filter中
            .loginProcessingUrl(loginProperties.getLoginAction);

        //开启注销功能
        //http.logout();
        //指定注销成功之后跳转的页面
        http.logout()//出发注销操作的URL
            .logoutSuccessUrl("/") //注销成功后跳转的url
            .invalidateHttpSession(true);//指定是否在注销时让HttpSession无效

        //开启记住我功能
        http.rememberMe();

        //关闭csrf防护
        http.csrf().disable();
    }
B:登录成功配置
默认情况下,用户登录成功后由于RequestCache中保存着登录之前的url,将自动跳转到该页面;如果用户需要在登录成功后执
行一些操作,就需要自定义登录成功操作;
A、默认的成功处理类:SavedRequestAwareAuthenticationSuccessHandler
B、自定义处理:
实现AuthenticationSuccessHandler接口,并复写onAnthenticationSuccesss()方法;
要使得自定义登录成功认证生效,需要在WebSecurityConfigurerAdapter接口实现类的configure()方法中添加
successHandler(自定义接口实现类对象)
C:登录失败配置
默认情况下,用户登录失败后会自动跳转到登录页;如果用户需要在登录失败后执行一些操作,就需要自定义登录失败操作
A、默认的失败处理类:SimpleUrlAuthenticationFailureHandler
B、自定义处理:
实现AnthenticationFailureHandler接口,并复写onAuthenticationFailure()方法;
要使得自定义登录成功认证生效,需要在WebSecurityConfigurerAdapter接口实现类的configure()方法中添加
failureHandler(自定义接口实现类对象)
D:注销配置示例(在WebSecurityConfigurerAdapter实现类的configure()方法中配置)
认证
// 认证
    @Override
    protected void configure(AuthenticationManagerBuilder auth) throws Exception {
        auth.inMemoryAuthentication().passwordEncoder(new BCryptPasswordEncoder())
                .withUser("Admin").password(new BCryptPasswordEncoder().encode("991016")).roles("vip1","vip2")
                .and()
                .withUser("root").password(new BCryptPasswordEncoder().encode("991016")).roles("vip1","vip2","vip3")
                .and()
                .withUser("guest").password(new BCryptPasswordEncoder().encode("991016")).roles("vip1");

    }
十、整合Shiro安全框架
整合 Shiro 环境搭建
Shiro 三大对象
Subject 当前用户
SecurityManager 管理所有用户
Realm 连接数据
一、在pom文件中导入shiro的坐标依赖
        <dependency>
            <groupId>org.apache.shirogroupId>
            <artifactId>shiro-spring-boot-starterartifactId>
            <version>1.5.0version>
        dependency>
二、创建Shiro的配置类一个ShiroConfig类:
该类有三大核心组件:
-
getShiroFilterFactoryBean
-
getDefaultWebSecrityManager
-
userRealm
三大组件相互关联:
DefaultWebSecrityManager与userRealm相关联
ShiroFilterFactoryBean与DefaultWebSecrityManager相关联
//ShiroFilterFactoryBean : 3

	@Bean
    public ShiroFilterFactoryBean
        getShiroFilterFactoryBean ( @Qualifier("SecurityManager")
                 DefaultWebSecurityManager defaultWebSecurityManager){

        ShiroFilterFactoryBean bean = new ShiroFilterFactoryBean();

        return bean;
    }


//DefaultWebSecrityManager :2

	@Bean(name="SecurityManager")
    public DefaultWebSecurityManager
        getDefaultWebSecrityManager ( @Qualifier("userRealm")                             			 UserRealm userRealm)		 {

        DefaultWebSecurityManager securityManager
            		= new DefaultWebSecurityManager();

        //关联UserRealm
        securityManager.setRealm(userRealm);
        return securityManager;
    }

//创建realm对象 ,需要自定义类 : 1

	@Bean
    public  UserRealm userRealm(){

        return new UserRealm();

    }
三、创建UserRealm类 并继承AuthorizingRealm类,重写其方法
重写的方法有两个:
1.授权->doGetAuthorizationInfo
2.认证->doGetAuthenticationInfo
//自定义的UserRealm  extends  AuthorizingRealm
public class UserRealm extends AuthorizingRealm {

    //授权
    @Override
    protected AuthorizationInfo doGetAuthorizationInfo
        (PrincipalCollection principalCollection) {

        System.out.println("执行了—> 授权doGetAuthorizationInfo" );

        return null;
    }

    //认证
    @Override
    protected AuthenticationInfo doGetAuthenticationInfo
       		(AuthenticationToken authenticationToken)
        		throws AuthenticationException {

        System.out.println("执行了—> 认证doGetAuthorizationInfo" );

        return null;
    }
}
实现登录拦截
在getShiroFilterFactoryBean组件中
添加shiro的内置过滤器
该过滤器有五大权限:
- anon:无需认证就可以访问
- authc:必需认证才能访问
- user:必须拥有 记住我 功能才能用
- perms:拥有对某个资源的权限才能访问
- role:拥有某个角色权限才能访问
//ShiroFilterFactoryBean : 3
    @Bean
    public ShiroFilterFactoryBean  getShiroFilterFactoryBean
        ( @Qualifier("SecurityManager") DefaultWebSecurityManager
         							defaultWebSecurityManager){

        ShiroFilterFactoryBean bean = new ShiroFilterFactoryBean();

        //设置安全管理器
        //defaultWebSecurityManager为
        //DefaultWebSecurityManager组件的对象
        bean.setSecurityManager(defaultWebSecurityManager);

        //添加shiro的内置过滤器
        /*
        *  anon:无需认证就可以访问
        *  authc:必需认证才能访问
        *  user:必须拥有 记住我 功能才能用
        *  perms:拥有对某个资源的权限才能访问
        *  role:拥有某个角色权限才能访问
        * */

        //登录拦截
        Map<String,String> filterChainDefinitionMap = new LinkedHashMap<>();
		//添加需要拦截(未登录)的请求
        filterChainDefinitionMap.put("/user/add","authc");
        filterChainDefinitionMap.put("/user/update","authc");
		//filterChainDefinitionMap.put("/user/*","authc");

        bean.setFilterChainDefinitionMap(filterChainDefinitionMap);

        //设置登录页面的路径(当拦截到未登录的请求时,跳转到该页面)
        bean.setLoginUrl("/toLogin");
        return bean;
    }
实现用户认证
在登陆的controller中接收用户信息,并封装成一个token(令牌)
 UsernamePasswordToken token = new UsernamePasswordToken
                						(username, password);
//设置记住我
//token.setRememberMe(true);
用当前用户进行登录
@RequestMapping("/login")
    public String login(String username,String password,Model model){

        //获取当前的用户
        Subject subject = SecurityUtils.getSubject();

        //封装用户的登陆数据
        UsernamePasswordToken token = new UsernamePasswordToken
                						(username, password);

        try{
            subject.login(token);//执行登录方法,如果没有异常就说明ok

        }catch (UnknownAccountException e){
            model.addAttribute("msg","用户名错误");
            return "login";
        }catch (IncorrectCredentialsException e){
            model.addAttribute("msg","密码错误");
            return "login";
        }
        return "index";

    }
然后
在userRealm类中的 认证—>方法中对用户名进行认证。。
shiro不用验证密码,shiro自动认证
 //认证
    @Override
    protected AuthenticationInfo doGetAuthenticationInfo
        (AuthenticationToken authenticationToken)
        				throws 		AuthenticationException {

        System.out.println("执行了—> 认证doGetAuthorizationInfo" );

        //用户名,密码   数据库中取
        String username="root";//伪造数据
        String password="123456";

        UsernamePasswordToken usertoken =
            	(UsernamePasswordToken) authenticationToken;

        if(!usertoken.getUsername().equals(username)){
            return null;//抛出用户名错误异常 UnknownAccountException
        }
      //密码认证:shiro做 ,加密了
        //该构造方法中三个参数:
        //    第一个参数为向授权方法中传递的用户信息,
        //    第二个参数为从数据库中查找的用户的密码,用于shiro验证登录的密码是否正确
        return new 	SimpleAuthenticationInfo
            				(admin,admin.getPassword(),"");
    }
整合mybatis的认证
首先导入mybatis, mysql,jdbc的相关依赖坐标
在对数据源和mybatis进行配置
写好与登录所需查找用户表相关的mapper 以及其映射文件,及service类
然后
在userRealm类中的 认证—>方法中,通过前端传来的username从数据库中获取
用户信息;并进行认证
   @Autowired
    private AdminService service;


//认证
    @Override
    protected AuthenticationInfo doGetAuthenticationInfo(AuthenticationToken authenticationToken) throws AuthenticationException {
        System.out.println("执行了—> 认证doGetAuthorizationInfo" );

        UsernamePasswordToken usertoken = (UsernamePasswordToken) authenticationToken;

        //用户名,密码   数据库中取
        Admin admin = service.findByUsername(usertoken.getUsername());

        if (admin==null){
            return null; //UnknowAccountExeception 抛出用户名错误异常
        }

        //密码认证:shiro做 ,加密了
        //该构造方法中三个参数:
        //    第一个参数为向授权方法中传递的用户信息,
        //    第二个参数为从数据库中查找的用户的密码,用于shiro验证登录的密码是否正确
        return new SimpleAuthenticationInfo
            			(admin,admin.getPassword(),"");
    }
}
实现权限设置
在shiroConfig类中可以 对访问某个资源页面所需权限 进行设置
//拦截未拥有对/user/add资源的权限的请求,跳转到未授权页面
filterChainDefinitionMap.put("/user/add",“perms[user:add]”);
显示未授权信息的页面也可自己设置
//设置未授权页面的路径
bean.setUnauthorizedUrl("/noauth");
 @Bean
    public ShiroFilterFactoryBean  getShiroFilterFactoryBean
        ( @Qualifier("SecurityManager")
         DefaultWebSecurityManager 	defaultWebSecurityManager){

        ShiroFilterFactoryBean bean = new ShiroFilterFactoryBean();
        //设置安全管理器
        bean.setSecurityManager(defaultWebSecurityManager);

        //添加shiro的内置过滤器
        /*
        *  anon:无需认证就可以访问
        *  authc:必需认证才能访问
        *  user:必须拥有 记住我 功能才能用
        *  perms:拥有对某个资源的权限才能访问
        *  role:拥有某个角色权限才能访问
        * */
        //设置权限
        //登录拦截
        Map<String,String> filterChainDefinitionMap = new LinkedHashMap<>();

        //拦截未拥有对/user/add资源的权限的请求,跳转到未授权页面
        filterChainDefinitionMap.put("/user/add","perms[user:add]");

        //拦截user下所有未认证请求
        filterChainDefinitionMap.put("/user/*","authc");
//        filterChainDefinitionMap.put("/user/add","authc");
//        filterChainDefinitionMap.put("/user/update","authc");


        bean.setFilterChainDefinitionMap(filterChainDefinitionMap);
        //设置登录页面的路径
        bean.setLoginUrl("/toLogin");
        //设置未授权页面的路径
        bean.setUnauthorizedUrl("/noauth");
        return bean;
    }
实现用户授权
在UserRealm类的 授权->doGetAuthorizationInfo方法中对当前用户所拥有 用户权限进行授权
 //授权
    @Override
    protected AuthorizationInfo doGetAuthorizationInfo(PrincipalCollection principalCollection) {
        System.out.println("执行了—> 授权doGetAuthorizationInfo" );

        SimpleAuthorizationInfo info = new SimpleAuthorizationInfo();
        //拿到当前登录的对象,该对象为 认证方法返回值的第一个参数
        Subject subject = SecurityUtils.getSubject();
        Admin admin = (Admin) subject.getPrincipal();
        //给用户添加在ShiroConfig类中设置的相关权限。
        //(参数为admin用户所拥有的权限)
        info.addStringPermission ( admin.getPerms() );

        return info;
    }
shiro整合thymeleaf
导入相关依赖
        <dependency>
            <groupId>com.github.theborakompanionigroupId>
            <artifactId>thymeleaf-extras-shiroartifactId>
            <version>2.0.0version>
        dependency>
在shiroConfig中将ShiroDialect配置到容器中
用来整合shiro 和 thymeleaf
//整合ShiroDialect :用来整合shiro 和 thymeleaf
    @Bean
    public ShiroDialect getShiroDialect(){
        return new ShiroDialect();
    }
最后 使用
在拥有该权限时,显示该模块
十一、整合Swagger
简介
- 号称世界上最流行的Api框架
- RestFul Api文档在线生成工具->Api文档与API定义同步更新
- 直接运行,可以在线测试API接口;
- 支持多种语言
springboot集成Swagger
-
新建一个springboot项目
-
导入相关依赖
        <dependency>
            <groupId>io.springfoxgroupId>
            <artifactId>springfox-swagger2artifactId>
            <version>2.9.2version>
        dependency>
        <dependency>
            <groupId>io.springfoxgroupId>
            <artifactId>springfox-swagger-uiartifactId>
            <version>2.9.2version>
        dependency>
- 创建SwaggerConfig类,@EnableSwagger2注解开启Swagger2
此时Swagger2已经可以使用,(设置为默认配置)
@Configuration
@EnableSwagger2         //开启Swagger2
public class SwaggerConfig {
}
-
测试运行:
localhost:8080//swagger-ui.html
配置Swagger
再SwaggerConfig类中配置了Swagger的Docket的bean实例
@Configuration
@EnableSwagger2         //开启Swagger2
public class SwaggerConfig {

    //配置了Swagger的Docket的bean实例
    @Bean
    public Docket docket(){

        return new Docket(DocumentationType.SWAGGER_2)
                .apiInfo(apiInfo()) //配置Swagger信息
                .select()
                //RequestHandlerSelectors :配置要扫描接口的方式
                //basePackage 指定要扫描的包
                .apis(RequestHandlerSelectors.basePackage("com.xyc"))

            	//.paths(Predicates.not(PathSelectors.regex("/admin/.*")))
                //.paths(Predicates.not(PathSelectors.regex("/error.*")))
                .build();
    }


    //配置Swagger信息
    private ApiInfo apiInfo(){


        return new ApiInfoBuilder()
                .title("谷粒学院-SwaggerAPI文档")
                .description("本文档描述了课程中心微服务接口定义")
                .version( "v1.0")
                .contact(new Contact("java","http://www.baidu.com","[email protected]"))
                .build();
    }
}
十二、任务
1、异步任务
常规使用异步任务,我们需要自定义多线程,通过开启线程来处理异步任务
springboot使用异步任务,只需用@EnableAsync 注解开启异步任务功能,并在指定方法上使用@Async注解标注该方法为异步任务。
案例:
用一个AsyncService类模拟数据处理,
如果不使用异步任务,在提交请求后,系统会把数据处理完成后,才进行响应。
service
package com.xyc.service;

import org.springframework.stereotype.Service;

/**
 * 2020/5/1 22:39
 * 文件说明:模拟一个service 需要进行处理一个耗时时间长的任务
 *
 * @author xyc
 * 梦可以到的地方,只要努力,总有一天,自己也可以达到!
 */
@Service
public class AsyncService {

    public void hello(){
        System.out.println("数据正在处理。。。");
        try {
            System.out.println("数据3秒后处理完成。。。");
            Thread.sleep(1000);
            System.out.println("数据2秒后处理完成。。。");
            Thread.sleep(1000);
            System.out.println("数据1秒后处理完成。。。");
            Thread.sleep(1000);
        } catch (InterruptedException e) {
            e.printStackTrace();
        }
        System.out.println("数据处理完成。。。");
    }
}
controller
package com.xyc.controller;

import com.xyc.service.AsyncService;
import org.springframework.beans.factory.annotation.Autowired;
import org.springframework.scheduling.annotation.Async;
import org.springframework.scheduling.annotation.EnableAsync;
import org.springframework.stereotype.Controller;
import org.springframework.web.bind.annotation.RequestMapping;
import org.springframework.web.bind.annotation.RestController;

/**
 * 2020/5/1 22:43
 * 文件说明:
 *
 * @author xyc
 * 梦可以到的地方,只要努力,总有一天,自己也可以达到!
 */
@EnableAsync
@RestController
public class AsyncController {
    @Autowired
    AsyncService asyncService;

    @Async
    @RequestMapping("/hello")
    public String hello(){
        asyncService.hello();
        return "hello";
    }
}
2、定时任务
主要的类与注解
TaskScheduler  任务调度者
TaskExecutor   任务执行者

@EnableScheduling  //开启定时功能的注解
//在特定时间执行这个方法
//                 秒 分 时 日 月 周几
@Scheduled(cron = "10 31 20 *  *  ?")

cron表达式
使用案例
@EnableScheduling//开启定时功能的注解
@Service
public class ScheduledService {

   //在特定时间执行这个方法
   //                 秒 分 时 日 月 周几
   @Scheduled(cron = "10 31 20 * * ?")
   public void hello(){
       System.out.println("hello ya~");
   }
}
3、邮件任务
javaWeb原生的发送邮件需要手动配置好多的东西,使用springboot发送邮件,只需要在配置文件中配置邮件相关信息,并new一个JavaMailSenderImpl类,并调用send方法即可。
在springboot中存在一个MailSenderAutoConfiguration类,在里面面定义了对mail的自动配置。
[外链图片转存失败,源站可能有防盗链机制,建议将图片保存下来直接上传(img-74hCo1Ky-1615031178484)(…/…/AppData/Roaming/Typora/typora-user-images/image-20200504173857083.png)]
在MailProperties.class类中定义了电子邮件支持的配置属性,即在application.yml配置文件中需要配置的相关属性
@ConfigurationProperties(prefix = "spring.mail")
public class MailProperties {
	private static final Charset DEFAULT_CHARSET = StandardCharsets.UTF_8;
	/** SMTP server host. For instance, `smtp.example.com`.*/
	private String host;//主机 smtp.XXX.com
	/** SMTP server port.*/
	private Integer port;//端口
	/** Login user of the SMTP server.*/
	private String username;//用户名
	/** Login password of the SMTP server.*/
	private String password;//密码
	/** Protocol used by the SMTP server.*/
	private String protocol = "smtp";//协议
	/** Default MimeMessage encoding.*/
	private Charset defaultEncoding = DEFAULT_CHARSET;
	/** Additional JavaMail Session properties.*/
	private Map<String, String> properties = new HashMap<>();
	/** Session JNDI name. When set, takes precedence over other Session settings.*/
	private String jndiName;
并导入了MailSenderJndiConfiguration.class和MailSenderPropertiesConfiguration.class对邮件发送人进行自动配置,使我们在需要发送邮件时只需要直接调用JavaMailSenderImpl即可
@Import({ MailSenderJndiConfiguration.class, MailSenderPropertiesConfiguration.class })
javaMailSenderImpl实现了JavaMailSender接口,并同时支持JavaMail
{@link MimeMessage MimeMessages}和Spring
{@link SimpleMailMessage SimpleMailMessages}可以仅仅当做mailSender的实现类使用,
允许将所有设置本地定义为Bean属性。或者,可以指定一个预先配置的JavaMail {@link javax.mail.Session},可以从应用程序服务器的JNDI环境中提取。
javaMailSenderImpl中发送邮件需要的的一些方法实现,
	//---------------------------------------------------------------------
	// Implementation of MailSender
	//---------------------------------------------------------------------

//发送简单邮件消息
	public void send(SimpleMailMessage simpleMessage) throws MailException {}
	public void send(SimpleMailMessage... simpleMessages) throws MailException {
	}

	//---------------------------------------------------------------------
	// Implementation of JavaMailSender
	//---------------------------------------------------------------------
//返回一个MimeMessage类,此类用于定义发送邮件消息的相关信息
	public MimeMessage createMimeMessage() {}
	public MimeMessage createMimeMessage(InputStream contentStream) throws MailException {}

//发送复杂的邮件//包括支持html和可以发送附件,在使用时需要借助MimeMessageHelper类
	public void send(MimeMessage mimeMessage) throws MailException {}
	public void send(MimeMessage... mimeMessages) throws MailException {}
	public void send(MimeMessagePreparator mimeMessagePreparator) throws MailException {}
	public void send(MimeMessagePreparator... mimeMessagePreparators) throws MailException {}
使用
-
导入坐标依赖
-
在yml文件中配置相关信息
-
编写邮件并发送
坐标依赖
  <dependency>
            <groupId>org.springframework.bootgroupId>
            <artifactId>spring-boot-starter-mailartifactId>
dependency>
配置信息
spring:
 mail:
   username: [email protected]
   password: XYC123456
   host: smtp.163.com

   #qq邮箱需要开启加密验证
使用
- 实例化 JavaMailSenderImpl类
- 发送简单邮件时,实例化SimpleMailMessage对象,并在里面配置所发送邮件的相关信息
- 发送复杂邮件时,通过JavaMailSenderImp的实例化对象,调用createMimeMessage()方法创建MimeMessage对象,并通过MimeMessageHelper对象配置所发送邮件的相关信息
- 可以通过Ctrl+左键点击类中,来查看发送邮件信息所需要的配置
package com.xyc.service;
import org.springframework.beans.factory.annotation.Autowired;
import org.springframework.mail.SimpleMailMessage;
import org.springframework.mail.javamail.JavaMailSenderImpl;
import org.springframework.mail.javamail.MimeMailMessage;
import org.springframework.mail.javamail.MimeMessageHelper;
import org.springframework.stereotype.Service;
import javax.mail.Message;
import javax.mail.MessagingException;
import javax.mail.internet.MimeMessage;
import javax.xml.soap.MimeHeader;
import java.io.File;
/**
* 2020/5/4 10:20
* 文件说明:
*
* @author xyc
* 梦可以到的地方,只要努力,总有一天,自己也可以达到!
*/
@Service
public class MailService {
@Autowired
private JavaMailSenderImpl mailSender;
//简单的邮件
public void simpleSend(){
//创建简单邮件信息
SimpleMailMessage simpleMailMessage =new SimpleMailMessage();
//设置标题
simpleMailMessage.setSubject("你好啊!");
//设置内容
simpleMailMessage.setText("哈哈哈哈哈");
simpleMailMessage.setTo("[email protected]");
simpleMailMessage.setFrom("[email protected]");
mailSender.send(simpleMailMessage);
}
public void mimeSend() throws MessagingException {
MimeMessage mimeMessage = mailSender.createMimeMessage();
// @param mimeMessage the mime message to work on
// @param multipart whether to create a multipart message that
// supports alternative texts, inline elements and attachments
MimeMessageHelper messageHelper = new MimeMessageHelper(mimeMessage,true);
messageHelper.setSubject("你好啊");
messageHelper.setText("薛云冲,
你订购的软件的验证码123123
",true);
messageHelper.setTo("[email protected]");
messageHelper.setFrom("[email protected]");
//添加附件
messageHelper.addAttachment("",new File(""));
mailSender.send(mimeMessage);
}
}
十三、整合Redis
springboot在 RedisAutoConfiguration 中为我们自动配置了Redis
RedisAutoConfiguration类
@Configuration(proxyBeanMethods = false)
@ConditionalOnClass(RedisOperations.class)
@EnableConfigurationProperties(RedisProperties.class)
@Import({ LettuceConnectionConfiguration.class, JedisConnectionConfiguration.class })
public class RedisAutoConfiguration {
@Bean
//当redisTemplate不存在时使用下面的配置,即当我们需要自己定制redisTemplate时,
//可以自行定义redisTemplate来替换这个默认值
@ConditionalOnMissingBean(name = "redisTemplate")
public RedisTemplate<Object, Object> redisTemplate(RedisConnectionFactory redisConnectionFactory)
throws UnknownHostException {
//默认的RedisTemplate没有过多的设置,redis对象都需要序列化
//两个泛型都是Object,Object的类型,使用时需要强制类型转换在application.yml配置文件中需要配置的相关属性在RedisProperties.class类中定义
RedisProperties.class类
@ConfigurationProperties(prefix = "spring.redis")
public class RedisProperties {
	/** Database index used by the connection factory.*/
	private int database = 0;
	/** Connection URL. Overrides host, port, and password. User is ignored. */
	private String url;
	/** Redis server host.*/
	private String host = "localhost";
	/** Login password of the redis server.*/
	private String password;
	/** Redis server port.*/
	private int port = 6379;
	/**Whether to enable SSL support.*/
	private boolean ssl;
	/** Connection timeout.*/
	private Duration timeout;
	/** Client name to be set on connections with CLIENT SETNAME.*/
	private String clientName;
	private Sentinel sentinel;
	private Cluster cluster;
	private final Jedis jedis = new Jedis();
	private final Lettuce lettuce = new Lettuce();
使用
1、导入依赖
<dependency>
            <groupId>org.springframework.bootgroupId>
            <artifactId>spring-boot-starter-data-redisartifactId>
dependency>
2、配置连接
spring:
  redis:
    host: 127.0.0.1
    post: 6379
3.测试
  @Autowired
    RedisTemplate redisTemplate;

    @Test
    void contextLoads() {
        // opsForValue()
        // opsForList()
        // opsForSet()
        // opsForHash()
        // opsForZSet()
        // opsForGeo()
        // opsForHyperLogLog()
        redisTemplate.opsForValue().set("mykey","myValue");
        System.out.println(redisTemplate.opsForValue().get("mykey"));
    }
十四、消息队列
rabbitmq简介
RabbitMQ是一个erlang开发的AMQP(Advanved Message Queue Protoco)的开源实现
核心概念
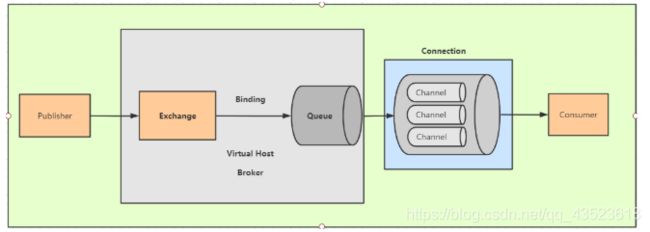
Message:消息,消息不是具体名,它是由消息头和消息体组成,消息体是不透明的,而消息头则是由一系列的可选的属性组成,这些属性包括routing-key(路由键)、priority(相对于其他消息的优先权)、delivery-mode(指出该消息可能需要持久性存储)等。
Publisher:消息生产着,也是一个向交换器发布消息的客户端应用程序。
Exchange:交换器,用来接收生产者发送的消息并将这些消息路由给服务器中的队列。
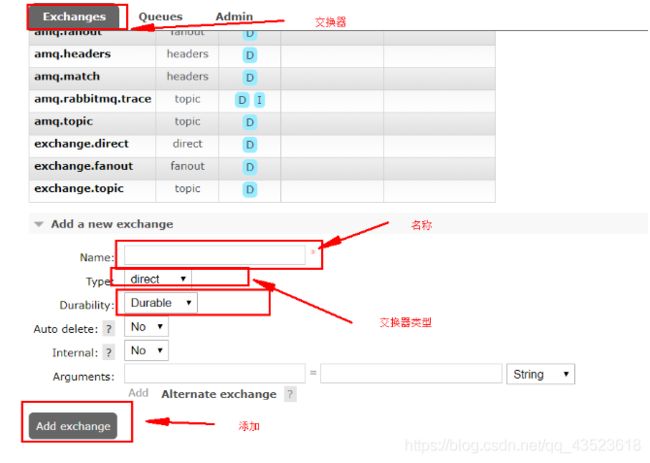
Exchange(四种类型):1、direct(默认),fanout,topic,headers,不同类型的Exchange的转发消息的策略有区别
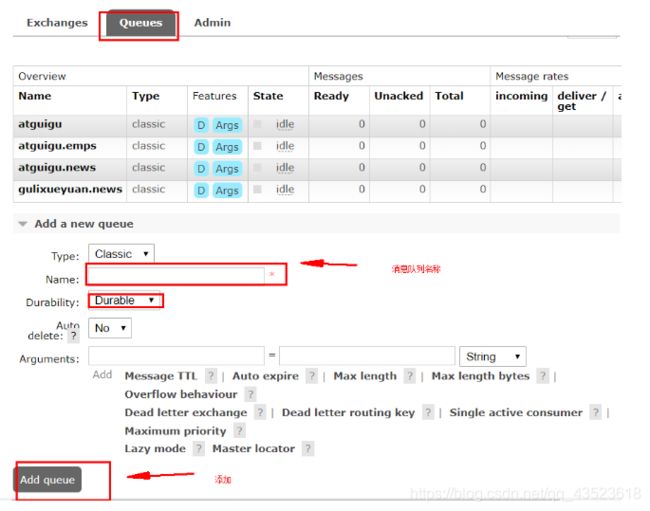
Queue:消息队列,用来保存消息直到发送给消费者。它是消息的容器,也是消息的终点。一个消息可投入一个或多个队列。消息一直在队列里面,等待消费者连接到这个队列将其取走
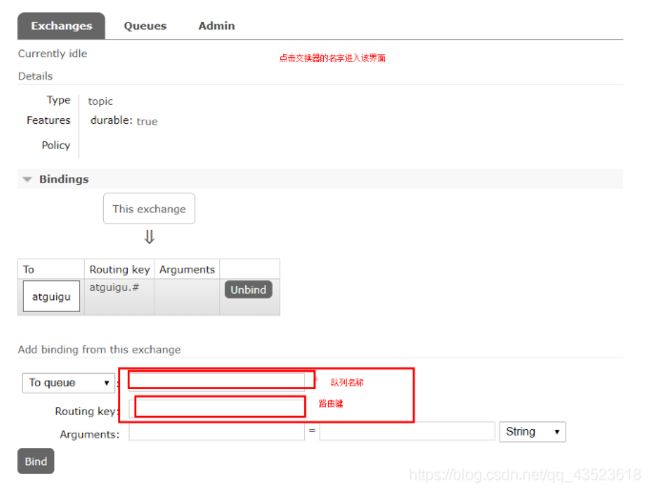
Binding:绑定,用于消息队列和交换器之间的关联。一个绑定就是基于路由键将交换器和消息队列连接起来的路由规则,所以可以将交换器理解成一个由绑定构成的路由表。
Exchange和Queue之间绑定是多对多的关系。
Conection:网络连接
Channel:信道,多路复用链接中的一条独立的双向数据流通道。信道是建立在真实的TCP连接内的虚拟连接,AMQP命令都是通过信道发出去的,不管是发布消息,订阅队列还是接受信息都是通过信道完成。
Consumer:消息的消费者,表示一个从消息队列中取得消息的客户端应用程序
Virtual Host:虚拟主机,表示一批交换器、消息队列和相关对象。虚拟主机是共享相同的身份认证和加密环境的独立服务器域。
Broker:表示消息队列服务器实体
RabbitMQ运行图解
Exchange(四种类型)
1、direct(默认):(单播模式)完全匹配,点对点
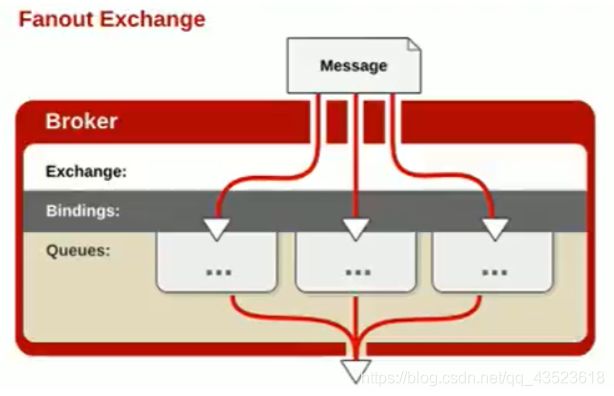
2、fanout:(广播模式,发布订阅)fanout交换器不会处理路由键,只是简单的将队列绑定到交换器上,每个发送到交换器的消息都会被转发到与该交换器绑定的所有队列上。
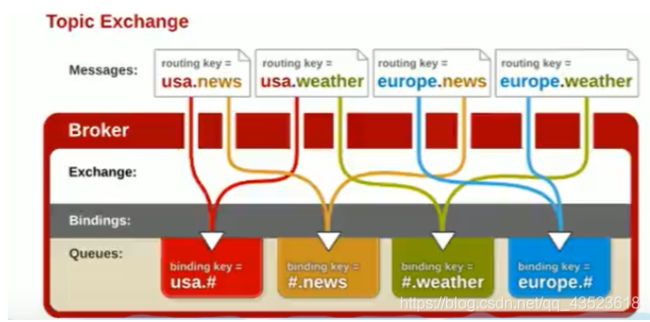
3、topic:通过模式匹配分配消息的路由键属性,将路由键和某个模式进行匹配,此时队列需要绑定在一个模式上。他将路由键和绑定键的字符串分为多个单词,这些单词之间用点隔开。他同样也会识别两个通配符:符号**“#”:匹配0个或多个单词,“*”**匹配一个单词。
4、headers,headers匹配的是消息头而不是路由键,和direct一样完全匹配,点对点,性能不行,不怎么用
rabbitMQ使用
使用Docker安装RabbitMQ
# 拉取镜像
docker pull rabbitmq:3-management
# 启动镜像
docker run -d -p 5672:5672 -p 15672:15672 --name myrabbitmq 镜像id
可以通过 15672端口访问Web界面
Web界面的登录密码 默认用户:guest 密码:guest
添加Exchange
添加queue
Exchange bind queue
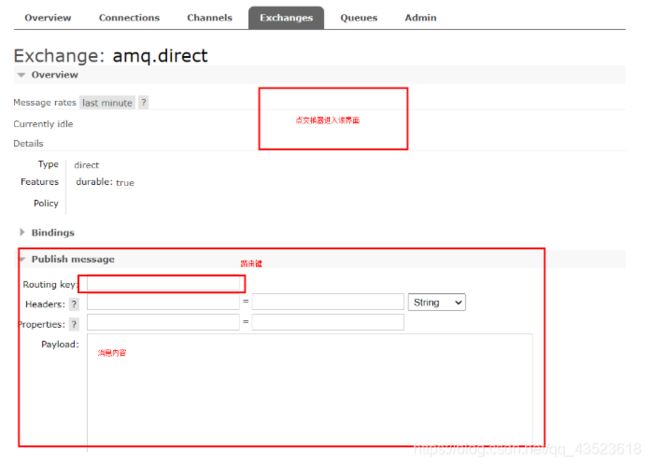
发送消息
接收消息
整合RabbitMQ
自动装配
探究Springboot自动装配RabbitMQ
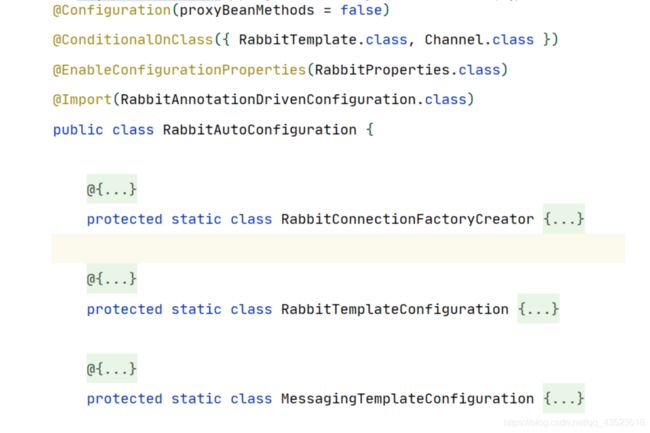
我们先搜索 RabbitAutoConfiguration 该类为RabbitMQ自动配置类
里面有三个静态内部类
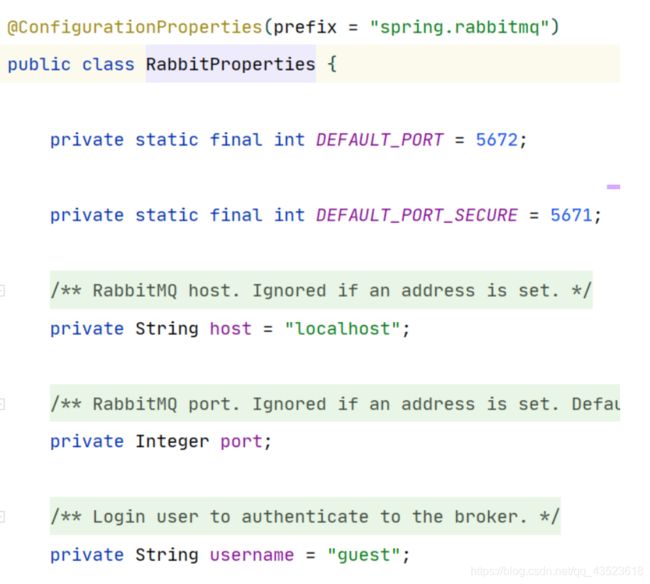
1、RabbitConnectionFactoryCreator类中的rabbitConnectionFactory方法将rabbit的连接对象注入容器,rabbitConnectionFactory方法的参数RabbitProperties中封装了配置RabbitMQ的所有配置,即我们在配置文件中写的配置信息.
RabbitProperties类,为获取配置文件内容的类
2、RabbitTemplateConfiguration类中配置了RabbitTemplate,amqpAdmin
-
RabbitTemplate: RabbitMQ发送消息和接受消息
-
AmqpAdmin:RabbitMQ系统管理功能组件
使用
1、导入pom依赖
<dependency>
            <groupId>org.springframework.bootgroupId>
            <artifactId>spring-boot-starter-amqpartifactId>
dependency>
2、配置文件中配置rabbitmq
spring.rabbitmq.host=47.94.45.85
spring.rabbitmq.port=5672
#端口号不写默认是   5672
#用户密码不写,默认是   guest
#虚拟主机不写默认是   "/"
3、测试使用
发送信息
//Message需要自己构造一个:定义消息体和消息头
//rabbitTemplate.send(exchange,routeKey,message);

//object默认当做message,只需要传入要发送的对象,自动序列化发送给RabbitMQ
//rabbitTemplate.convertAndSend(exchange,routeKey,object);
单播模式(direct)
@Autowired
    RabbitTemplate rabbitTemplate;

 /*
    * 1、单播(点对点)
    * */
    @Test
    void contextLoads() {

        Map<String,Object> map = new HashMap<>();
        map.put("msg","这是第一个");
        map.put("data", Arrays.asList("helloworld",123,true));
        //对象被默认序列化以后发送出去
        rabbitTemplate.convertAndSend
            ("exchange.direct","atguigu.news",map);
    }
广播模式(fanout)
 /**
  * 广播
  */
    @Test
    public void sendMsg() {
        HashMap<String, Object> map = new HashMap<>();
        map.put("msg","这是第二个");
        map.put("name","西游记");
        rabbitTemplate.convertAndSend("exchange.fanout","",map);
    }
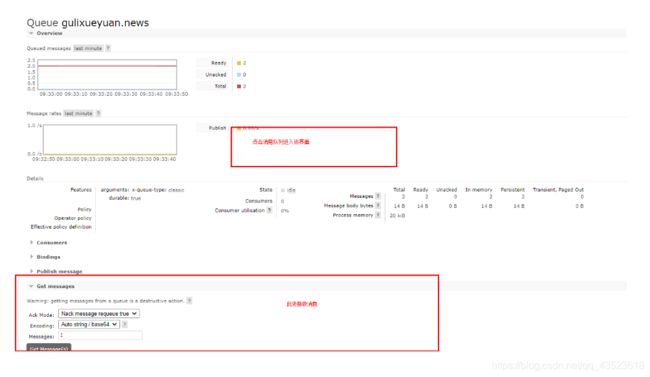
此时,无论单播、广播,所使用的MessageConverter都是默认的,在序列化时使用的Java的序列化,在消息队列中的是通过Java的序列化编码的格式
而我们一般都会发送Json格式的数据,此时就需要我们自己配置MessageConverter
@Configuration
public class MyAmqpConfig {
    /**
     * 配置Json格式的MessageConverter
     * 当我们自己配置过MessageConverter之后,
     * 会使用我们配置的MessageConverter
    * */
    @Bean
    public MessageConverter messageConverter(){
        return new Jackson2JsonMessageConverter();
    }
}
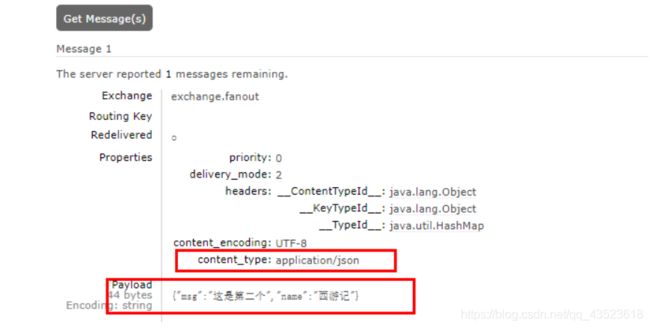
当我们配置好Json格式的MessageConverter之后,再发送消息
接受消息
   /**
     * 接受数据,
     */
    @Test
    public void receive(){
        //接受指定的消息队列中的消息,并返回一个Message
        //Message receive = rabbitTemplate.receive("atguigu.news");
        Object o = rabbitTemplate.receiveAndConvert("atguigu.news");
        System.out.println(o.getClass());
        System.out.println(o);
    }
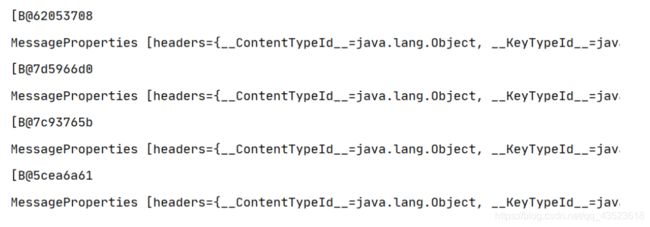
结果:
消息监听
用来监听消息队列中收到的消息
只需要两个注解@EnableRabbit+ @RabbitListener监听消息队列的内容
@EnableRabbit;开启基于注解的RabbitMQ模式
@RabbitListener:监听指定的消息队列
案例:
开启注解
//开启基于注解的RabbitMQ模式
@EnableRabbit
@SpringBootApplication
public class SpringbootAmqpApplication {

    public static void main(String[] args) {
        SpringApplication.run(SpringbootAmqpApplication.class, args);
    }

}
启动监听
@Service
public class BookService {

    @RabbitListener(queues = "atguigu.news")
    public void receive01(Book book){
        System.out.println("收到消息:"+book);
    }

    @RabbitListener(queues = "atguigu")
    public void receive02(Message message){
        System.out.println(message.getBody());
        System.out.println(message.getMessageProperties());
    }

}
当使用这两个注解之后,每次向指定该消息队列中发送消息时,这两个方法就会自动从该消息队列中获取消息。
结果展示:
管理RabbitMQ的组件
AmqpAdmin:RabbitMQ系统管理功能组件,可以创建、删除 queue Exchange Binding
使用案例
 @Autowired
    AmqpAdmin amqpAdmin;

    @Test
    public void createExchange(){

        //以declare***开头的 一般都是
        amqpAdmin.declareExchange(new DirectExchange("amqpadmin.exchange"));
        System.out.println("创建成功");

        amqpAdmin.declareQueue(new Queue("amqpadmin.queue",true));
        System.out.println("创建成功");

        amqpAdmin.declareBinding(new Binding("amqpadmin.queue",
                         		Binding.DestinationType.QUEUE,
                         		"amqpadmin.exchange","amqp.haha",null));

    	//以delete或remove开头的一般都是删除
        amqpAdmin.removeBinding(new Binding("amqpadmin.queue",
                                Binding.DestinationType.QUEUE,                                 				"amqpadmin.exchange","amqp.haha",null));

        amqpAdmin.deleteQueue("amqpadmin.queue");
        amqpAdmin.deleteExchange("amqpadmin.exchange");

    }
十五、ElasticSearch
Elasticsearch概述
Elasticsearch是一个分布式、高度可扩展的开源全文本搜索和分析引擎。它使您可以快速,近乎实时地存储,搜索和分析大量数据。它通常用作支持具有复杂搜索功能和要求的应用程序的基础引擎/技术。
Elasticsearch 是一个开源的搜索引擎,建立在一个全文搜索引擎库 Apache Lucene基础之上,Lucene 仅仅只是一个库。
Elasticsearch 不仅仅是 Lucene,并且也不仅仅只是一个全文搜索引擎,
Elasticsearch 是
- 一个分布式的实时文档存储,每个字段 可以被索引与搜索
- 一个分布式实时分析搜索引擎
- 能胜任上百个服务节点的扩展,并支持 PB 级别的结构化或者非结构化数据
安装
# 拉取镜像
docker pull docker.elastic.co/elasticsearch/elasticsearch:7.9.3


# 运行
docker run -d -p 9200:9200 -p 9300:9300 -e ES_JAVA_OPTS="-Xms512m -Xmx512m" -e -Des.scripting.exception_for_missing_value=true   --name elasticsearch 镜像ID
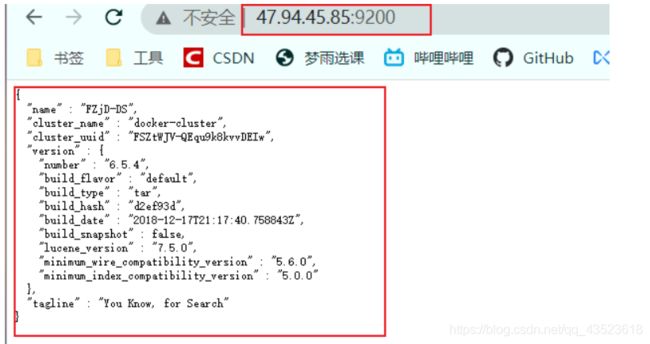
安装成功标志
简介
Elasticsearch 是 面向文档 的,意味着它存储整个对象或 文档。Elasticsearch 不仅存储文档,而且 索引 每个文档的内容,使之可以被检索。在 Elasticsearch 中,我们对文档进行索引、检索、排序和过滤—而不是对行列数据。
Elasticsearch 使用 JSON 作为文档的序列化格式。
例:这就代表一个User对象
{
    "email":      "[email protected]",
    "first_name": "John",
    "last_name":  "Smith",
    "info": {
        "bio":         "Eco-warrior and defender of the weak",
        "age":         25,
        "interests": [ "dolphins", "whales" ]
    },
    "join_date": "2014/05/01"
}
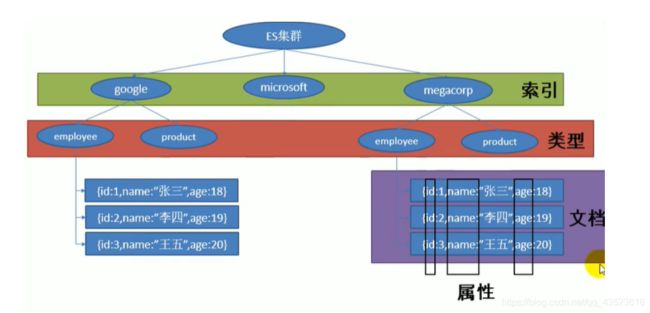
一个 Elasticsearch 集群可以 包含多个 索引 ,相应的每个索引可以包含多个 类型 。 这些不同的类型存储着多个 文档 ,每个文档又有 多个 属性 。
索引(名词):如前所述,一个 索引 类似于传统关系数据库中的一个 数据库 ,是一个存储关系型文档的地方。 索引 (index) 的复数词为 indices 或 indexes 。
索引(动词):索引一个文档 就是存储一个文档到一个 索引 (名词)中以便被检索和查询。这非常类似于 SQL 语句中的
INSERT关键词,除了文档已存在时,新文档会替换旧文档情况之外。
入门使用
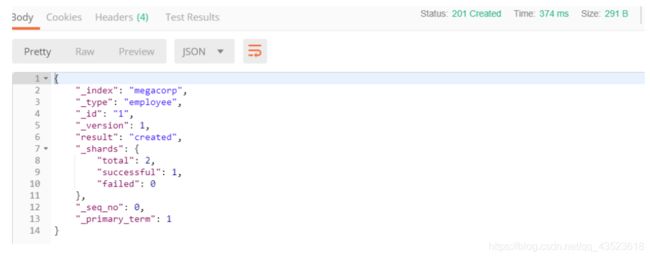
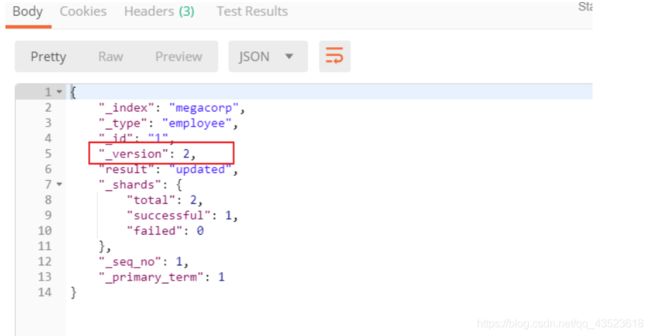
新增(索引)员工
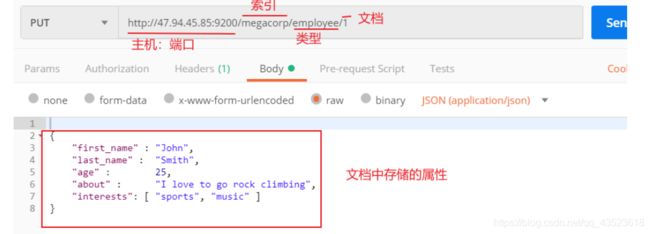
PUT请求
注意:
新增是发PUT请求
路径 /megacorp/employee/1 包含了三部分的信息:
-
megacorp索引名称
-
employee类型名称
-
1特定雇员的ID
请求体 —— JSON 文档 —— 包含了这位员工的所有详细信息,
他的名字叫 John Smith ,今年 25 岁,喜欢攀岩。
响应
修改员工
和新增时的操作是一样的,都是PUT请求
此次对ID为1的员工进行修改
响应结果:
注意:和上面 第一次添加时进行对比,可以发现_version变为了 2
检索(查找)员工
get请求
响应
查找成功
查找失败
轻量搜索数据
依然是get请求,但是此时并没有指定文档ID,而是使用_search.返回结果放在一个hits数组中,默认一个搜索返回十条数据
_search 无参数
返回结果放在一个hits数组中,默认一个搜索返回十条数据
_search 带参数
将查询本身赋值给参数q=,返回所有last_name为Smith的员工
查询表达式搜索
领域特定语言 (DSL), 使用 JSON 构造了一个请求。
案例1
响应和上面查询的结果一样
案例2
查询姓氏为Smith ,年龄大于30 的员工
全文搜索
查询所有喜欢攀岩(rock climbing)的员工
响应结果:
查询结果不但返回了John Smith 还返回了Jane Smith ,Jane Smith的about中只有rock albums 而没有 rock climbing 。
原因
Elasticsearch 默认按照相关性得分排序,即每个文档跟查询的匹配程度。
短语搜索
找出一个属性中的独立单词是没有问题的,但有时候想要精确匹配一系列单词或者_短语_ 。 为此对 match 查询稍作调整,使用一个叫做 match_phrase 的查询
高亮查询
在查询时,增加一个新的 highlight 参数
响应
当执行该查询时,返回结果与之前一样,与此同时结果中还多了一个叫做 highlight 的部分。这个部分包含了 about 属性匹配的文本片段,并以 HTML 标签 封装:
深入学习
《Elasticsearch: 权威指南》
https://www.elastic.co/guide/cn/elasticsearch/guide/current/index.html
