引言
上期我们对AOP核心概念及接口做了粗浅的分析,这期我们主要来探讨一下代理对象的创建过程。在开始之前,先问自己几个问题
Spring是如何帮我们去选择合适的
Advice的?找到了又是通过何种方式创建代理对象的?
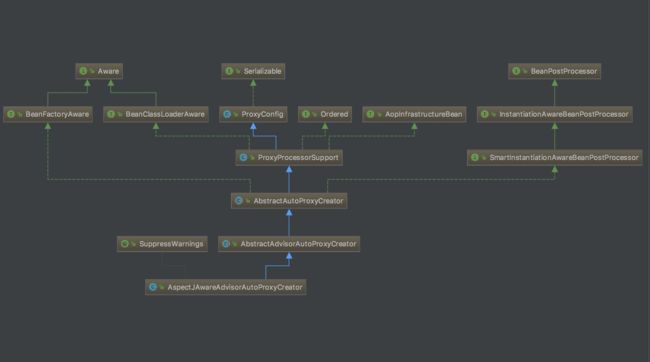
好了,现在我们开始分析代理对象的创建过程,首先,先来看一下AspectJAwareAdvisorAutoProxyCreator.class类的继承体系
可以看到AspectJAwareAdvisorAutoProxyCreator.class主要实现了这几个接口
-
AwareBean创建时注入一些容器属性等 -
BeanPostProcessorIOC 扩展点 -
AopInfrastructureBean标识此类是AOP系统类,不能被代理
这里我们仅需要关注BeanPostProcessor接口的实现,因为代理的创建是在BeanPostProcessor接口的postProcessAfterInitialization方法执行时创建的,postProcessAfterInitialization方法的具体实现逻辑是在抽象父类AbstractAutoProxyCreator中实现的
入口
上文中提到AspectJAwareAdvisorAutoProxyCreator.class是BeanPostProcessor接口的实现,现在就让我们打开它的入口源码慢慢分析
public Object postProcessAfterInitialization(Object bean, String beanName) throws BeansException {
    if (bean != null) {
        // 返回用做缓存的key键
        Object cacheKey = getCacheKey(bean.getClass(), beanName);
        if (!this.earlyProxyReferences.contains(cacheKey)) {
            return wrapIfNecessary(bean, beanName, cacheKey);
        }
    }
    return bean;
}
protected Object wrapIfNecessary(Object bean, String beanName, Object cacheKey) {
    if (beanName != null && this.targetSourcedBeans.contains(beanName)) {
        return bean;
    }
    if (Boolean.FALSE.equals(this.advisedBeans.get(cacheKey))) {
        return bean;
    }
    // 判断当前的Bean是否是AOP本身的系统类,是的话则跳过,不做代理操作
    if (isInfrastructureClass(bean.getClass()) || shouldSkip(bean.getClass(), beanName)) {
        this.advisedBeans.put(cacheKey, Boolean.FALSE);
        return bean;
    }

    // 为该Bean找到一个合适的 advisor
    Object[] specificInterceptors = getAdvicesAndAdvisorsForBean(bean.getClass(), beanName, null);
    // 返回不为空
    if (specificInterceptors != DO_NOT_PROXY) {
        this.advisedBeans.put(cacheKey, Boolean.TRUE);
        // 创建代理对象
        Object proxy = createProxy(
                bean.getClass(), beanName, specificInterceptors, new SingletonTargetSource(bean));
        this.proxyTypes.put(cacheKey, proxy.getClass());
        return proxy;
    }

    // 没有找到合适的 advisor 则直接返回原始Bean
    this.advisedBeans.put(cacheKey, Boolean.FALSE);
    return bean;
}
看完wrapIfNecessary方法,这里就是创建代理对象的全过程。其实在这个方法中一共就做了两件事情:
-
getAdvicesAndAdvisorsForBean方法 筛选合适的Advisor对象,其实就是为当前目标对象找到合适的通知(Advice) -
createProxy方法 根据筛选到的切面(Advisor)集合为目标对象创建代理
下面我们分别对这两件事情作分析
寻找合适的 Advisor
findEligibleAdvisors方法是在父类AbstractAdvisorAutoProxyCreator中,
且直接调用了findEligibleAdvisors 方法
    List advisors = findEligibleAdvisors(beanClass, beanName);
    if (advisors.isEmpty()) {
        return DO_NOT_PROXY;
    }
    return advisors.toArray();
}
protected List findEligibleAdvisors(Class beanClass, String beanName) {
    // 找到容器中的全部通知
    List candidateAdvisors = findCandidateAdvisors();
    // 筛选合适通知对象集合
    List eligibleAdvisors = findAdvisorsThatCanApply(candidateAdvisors, beanClass, beanName);
    extendAdvisors(eligibleAdvisors);
    if (!eligibleAdvisors.isEmpty()) {
        eligibleAdvisors = sortAdvisors(eligibleAdvisors);
    }
    return eligibleAdvisors;
}
这里也是分开做了两件事情
- 首先从Spring 容器中获取到全部Advisors集合
- 执行筛选逻辑,获取符合条件的Advisors集合
找到Spring容器中全部 Advisor
这里是调用了BeanFactoryAdvisorRetrievalHelper.class的方法去获取到Spring 容器中全部Advisor集合的,这里需要注意BeanFactoryAdvisorRetrievalHelper.class类的初始化是在setBeanFactory方法中进行的
protected List findCandidateAdvisors() {
    return this.advisorRetrievalHelper.findAdvisorBeans();
}
-
BeanFactoryAdvisorRetrievalHelper的findAdvisorBeans方法
public List findAdvisorBeans() {
    // Determine list of advisor bean names, if not cached already.
    String[] advisorNames = null;
    synchronized (this) {
        // 尝试从缓存中获取 Advisor 类型的Bean名称
        advisorNames = this.cachedAdvisorBeanNames;
        //
        if (advisorNames == null) {
            // 从BeanFactory中获取 Advisor 类型的全部Bean名称集合,并设置缓存
            advisorNames = BeanFactoryUtils.beanNamesForTypeIncludingAncestors(
                    this.beanFactory, Advisor.class, true, false);
            this.cachedAdvisorBeanNames = advisorNames;
        }
    }
    if (advisorNames.length == 0) {
        return new LinkedList();
    }

    List advisors = new LinkedList();
    // 遍历 Advisor类型 BeanName 集合
    for (String name : advisorNames) {
        // 判断是否合法,这里返回都是true
        if (isEligibleBean(name)) {
            // 判断该Bean是否正在创建中,创建中则直接跳过
            if (this.beanFactory.isCurrentlyInCreation(name)) {
                if (logger.isDebugEnabled()) {
                    logger.debug("Skipping currently created advisor '" + name + "'");
                }
            }
            else {
                try {
                    // 根据BeanName和Advisor类型从BeanFactory中获取Bean
                    advisors.add(this.beanFactory.getBean(name, Advisor.class));
                }
                catch (BeanCreationException ex) {
                    Throwable rootCause = ex.getMostSpecificCause();
                    if (rootCause instanceof BeanCurrentlyInCreationException) {
                        BeanCreationException bce = (BeanCreationException) rootCause;
                        if (this.beanFactory.isCurrentlyInCreation(bce.getBeanName())) {
                            if (logger.isDebugEnabled()) {
                                logger.debug("Skipping advisor '" + name +
                                        "' with dependency on currently created bean: " + ex.getMessage());
                            }
                            // Ignore: indicates a reference back to the bean we're trying to advise.
                            // We want to find advisors other than the currently created bean itself.
                            continue;
                        }
                    }
                    throw ex;
                }
            }
        }
    }
    return advisors;
}
findAdvisorBeans方法的的目的非常明确,就是找到容器中全部的Advisor
- 先尝试从缓存中获取
Advisor集合 - 缓存中不存在,则执行获取逻辑
- 获取到了所有类型为
Advisor的Bean的名称 - 根据获取到的BeanName获取Bean
- 获取到了所有类型为
为当前Bean匹配合适的 Advisor
在以上的步骤中,我们已经拿到了容器中所有的Advisor对象集合,也就是说我们已经拿到了容器中所有已配置的AOP切面。接下里的事情就是为当前的目标对象筛选出适合的Advisor集合,现在我们开始分析AbstractAdvisorAutoProxyCreator.class的findAdvisorsThatCanApply方法
protected List findAdvisorsThatCanApply(
        List candidateAdvisors, Class beanClass, String beanName) {

    ProxyCreationContext.setCurrentProxiedBeanName(beanName);
    try {
        // 调用 AopUtils.findAdvisorsThatCanApply 为当前Bean筛选合适的 Advisor
        return AopUtils.findAdvisorsThatCanApply(candidateAdvisors, beanClass);
    }
    finally {
        ProxyCreationContext.setCurrentProxiedBeanName(null);
    }
}
findAdvisorsThatCanApply方法里调用了工具类AOPUtils的findAdvisorsThatCanApply方法
public static List findAdvisorsThatCanApply(List candidateAdvisors, Class clazz) {
    if (candidateAdvisors.isEmpty()) {
        return candidateAdvisors;
    }
    List eligibleAdvisors = new LinkedList();
    // 先找出 IntroductionAdvisor 类型的Advisor
    for (Advisor candidate : candidateAdvisors) {
        if (candidate instanceof IntroductionAdvisor && canApply(candidate, clazz)) {
            eligibleAdvisors.add(candidate);
        }
    }
    boolean hasIntroductions = !eligibleAdvisors.isEmpty();
    // 再从余下的Advisor中继续匹配
    for (Advisor candidate : candidateAdvisors) {
        if (candidate instanceof IntroductionAdvisor) {
            // already processed
            continue;
        }
        if (canApply(candidate, clazz, hasIntroductions)) {
            eligibleAdvisors.add(candidate);
        }
    }
    return eligibleAdvisors;
}
以上代码逻辑会先筛选出IntroductionAdvisor类型的Advisor,再筛选余下的其他Advisor
public static boolean canApply(Advisor advisor, Class targetClass) {
    return canApply(advisor, targetClass, false);
}
public static boolean canApply(Advisor advisor, Class targetClass, boolean hasIntroductions) {
    if (advisor instanceof IntroductionAdvisor) {
        return ((IntroductionAdvisor) advisor).getClassFilter().matches(targetClass);
    }
    else if (advisor instanceof PointcutAdvisor) {
        PointcutAdvisor pca = (PointcutAdvisor) advisor;
        return canApply(pca.getPointcut(), targetClass, hasIntroductions);
    }
    else {
        // It doesn't have a pointcut so we assume it applies.
        return true;
    }
}
public static boolean canApply(Pointcut pc, Class targetClass, boolean hasIntroductions) {
    Assert.notNull(pc, "Pointcut must not be null");
    // 先判断类型是否匹配
    if (!pc.getClassFilter().matches(targetClass)) {
        return false;
    }

    // 获取切点方法匹配器
    MethodMatcher methodMatcher = pc.getMethodMatcher();
    if (methodMatcher == MethodMatcher.TRUE) {
        // No need to iterate the methods if we're matching any method anyway...
        return true;
    }

    IntroductionAwareMethodMatcher introductionAwareMethodMatcher = null;
    if (methodMatcher instanceof IntroductionAwareMethodMatcher) {
        introductionAwareMethodMatcher = (IntroductionAwareMethodMatcher) methodMatcher;
    }

    Set> classes = new LinkedHashSet>(ClassUtils.getAllInterfacesForClassAsSet(targetClass));
    classes.add(targetClass);
    for (Class clazz : classes) {
        // 获取当前目标class的所有方法
        Method[] methods = ReflectionUtils.getAllDeclaredMethods(clazz);
        for (Method method : methods) {
            // 调用 methodMatcher.matches 判断当前方法是否匹配该切点
            if ((introductionAwareMethodMatcher != null &&
                    introductionAwareMethodMatcher.matches(method, targetClass, hasIntroductions)) ||
                    methodMatcher.matches(method, targetClass)) {
                return true;
            }
        }
    }

    return false;
}
canApply是用于筛选核心方法,在上期分析连接点Pointcut接口时,我们知道Pointcut持有ClassFilter和MethodMatcher对象,具体的筛选逻辑就是由它们完成的,至于在它们具体的macthes方法是是如何实现筛选的,这里我也没有进行过深入分析,感兴趣的可以在其实现类AspectJExpressionPointcut.class中继续查看
生成代理对象
在上文的分析结束后,我们已经筛选出来了合适的 Advisor,Advisor持有Advice(通知),接下来的操作就是根据我们配置的Advice为目标对象创建代理对象了
protected Object createProxy(
        Class beanClass, String beanName, Object[] specificInterceptors, TargetSource targetSource) {

    if (this.beanFactory instanceof ConfigurableListableBeanFactory) {
        AutoProxyUtils.exposeTargetClass((ConfigurableListableBeanFactory) this.beanFactory, beanName, beanClass);
    }

    // 首先创建一个代理创建工厂类,之后的操作都是为此工厂配置属性
    ProxyFactory proxyFactory = new ProxyFactory();
    proxyFactory.copyFrom(this);
    // 判断配置属性proxy-target-class  是否等于False
    if (!proxyFactory.isProxyTargetClass()) {
        // 判断目标 BeanDefinition是否配置preserveTargetClass 为 ture,是的话配置CGLIB动态代理
        if (shouldProxyTargetClass(beanClass, beanName)) {
            proxyFactory.setProxyTargetClass(true);
        }
        else {
            // 设置目标类接口到proxyFactory,如果没有实现接口则使用CGLIB代理
            evaluateProxyInterfaces(beanClass, proxyFactory);
        }
    }

    Advisor[] advisors = buildAdvisors(beanName, specificInterceptors);
    // proxyFactory 设置 advisors
    proxyFactory.addAdvisors(advisors);
    // 设置目标对象资源
    proxyFactory.setTargetSource(targetSource);
    customizeProxyFactory(proxyFactory);

    proxyFactory.setFrozen(this.freezeProxy);
    if (advisorsPreFiltered()) {
        proxyFactory.setPreFiltered(true);
    }

    // 创建代理
    return proxyFactory.getProxy(getProxyClassLoader());
创建代理对象前,会新建一个代理工厂创建类,并为此工厂类配置相关属性,例如proxy-target-class的配置,虽然默认配置是false会使用JDK动态代理,但如果没有实现接口,也会自动设置proxy-target-class为true使用CGLIB创建代理对象
完成ProxyFactory的配置之后,就可以通过它创建代理对象了
/**
 * 创建代理对象
 */
public Object getProxy(ClassLoader classLoader) {
    return createAopProxy().getProxy(classLoader);
}
调用父类ProxyCreatorSupport的createAopProxy方法,获取到代理创建工厂,工厂类(DefaultAopProxyFactory)是在父类的构造方法中创建的
protected final synchronized AopProxy createAopProxy() {
    if (!this.active) {
        activate();
    }
    // 获取代理创建工厂类 (DefaultAopProxyFactory.class)创建代理对象
    return getAopProxyFactory().createAopProxy(this);
}
最终在DefaultAopProxyFactory工厂类createAopProxy中创建代理对象
public AopProxy createAopProxy(AdvisedSupport config) throws AopConfigException {
    // 这里主要是判断 proxy-target-class 属性是否为true。默认是false
    if (config.isOptimize() || config.isProxyTargetClass() || hasNoUserSuppliedProxyInterfaces(config)) {
        Class targetClass = config.getTargetClass();
        if (targetClass == null) {
            throw new AopConfigException("TargetSource cannot determine target class: " +
                    "Either an interface or a target is required for proxy creation.");
        }
        if (targetClass.isInterface() || Proxy.isProxyClass(targetClass)) {
            return new JdkDynamicAopProxy(config);
        }
        // 使用CGLIB动态代理
        return new ObjenesisCglibAopProxy(config);
    }
    else {
        // 默认使用JDK动态打理
        return new JdkDynamicAopProxy(config);
    }
}
最终的代理的创建是在ObjenesisCglibAopProxy或JdkDynamicAopProxy中完成的,至于更具体的创建逻辑,因为这一系列的源码分析只是为了能够对AOP的整体逻辑有清晰的认识,所以这里就不做更详细的分析了。
尾言
本篇文章分析了AOP代理创建的整个过程,纵观整篇文章,篇幅有限,其中还有很多的点没有详细展开分析,只是粗略的分析了AOP代理的创建过程,惭愧 ... 。分析有误的地方,希望大家可以指出。
博客原文地址戳这里
Spring 系列
Spring-源码解析一(IOC容器的创建)
Spring 源码解析二(BeanFactory的创建)
Spring 源码解析三(BeanDefinitions的载入注册)
Spring IOC 源码解析四(加载非延迟单例前的操作)
Spring IOC 源码解析五(非延迟加载bean的初始化)
Spring AOP 源码解析一 (AOP入口浅谈)
Spring AOP 源码解析二 (AOP核心概念及接口分析)
Spring AOP 源码解析三(代理对象的创建)
Spring IOC 源码解析 (循环依赖的解决)
