- SpringBoot备份神通数据库
松岛的枫叶
springboot数据库后端
SpringBoot备份神通数据库····直接上代码···publicStringbackupOsrdb(){//构建命令Listcommand=newArrayList<>();command.add("osrexp");command.add("-u");command.add("SYSDBA"+"/"+"szoscar55");//用户名/密码command.add("-d");comman
- 【面试实战】Spring基础、IoC、AOP、MVC、Mybatis、Spring Boot
Sivan_Xin
技术实战专栏(已上云)面试mvcspring
version:1.0文章目录SpringSpring基础/IoC♂️面试官:举例Spring的模块?♂️面试官:Spring、SpringMVC、SpringBoot关系?♂️面试官:说说对SpringIoC的了解?♂️面试官:什么是SpringBean?♂️面试官:Bean的作用域?♂️面试官:Bean的生命周期?♂️面试官:单例Bean的线程安全问题了解吗?♂️面试官:@Co
- c语言字母概率,C/C++知识点之智邮普创c语言面试题 ---- 字母概率
OK up
c语言字母概率
本文主要向大家介绍了C/C++知识点之智邮普创c语言面试题----字母概率,通过具体的内容向大家展示,希望对大家学习C/C++知识点有所帮助。题目描述小明最近对概率问题很感兴趣。一天,小明和小红一起玩一个概率游戏,首先小明给出一个字母和一个单词,然后由小红计算这个字母在这个单词中出现的概率。字母不区分大小写。例如,给定的字母是a,单词是apple,那么概率是0.20000。输入输入包含多组测试数据
- 说说 Spring MVC 的执行流程?
浮生带你学Java
Java面试题Springspringmvcjava
高频面试题:说说SpringMVC的执行流程?大家好,我是浮生,一个工作了十四年的java程序员!昨天,一个工作2年的粉丝在面试的时候,面试官要求他说SpringMVC的执行流程。他没回答上来,错过了这个offer。一、问题解析SpringMVC的执行流程,一个面试频率超级高的问题,但是缺难倒了无数的程序员。这个问题的考察范围主要是3~5年,甚至5年以上都会问到。和它同类型的问题还有Bean的加载
- SpringCloud/Boot集成LogBack
azoon.top
springcloudlogbackspringlog4jslf4j
一.简要介绍什么是SLF4J?官网介绍:SimpleLoggingFacadeforJava(SLF4J)充当简单的各种日志记录框架的Facade或抽象(e.g.java.util.logging、logback、log4j)允许最终用户在部署时插入所需的日志记录框架。类似java中的接口,如果只集成SLF4J,日志只能输出在控制台,并没有输出到文件的能力,要实现真正的日志能力,需要引入其实现层:
- spring boot、spring cloud、spring cloud alibaba 之间的版本对应关系
薄荷街的兔比先生
springbootspringcloudjava
大家在引用pom的时候还是要以官方推荐版本为主,不然容易出现未知的问题。1.springboot和springcloud的版本关系官方提供的版本对照表https://start.spring.io/actuator/info{"git":{"branch":"93e528fc7e79e41a513e493d057499401a15eb67","commit":{"id":"93e528f","ti
- SpringBoot + vue 管理系统
m0_74825565
面试学习路线阿里巴巴springbootvue.js后端
SpringBoot+vue管理系统文章目录SpringBoot+vue管理系统1、成品效果展示2、项目准备3、项目开发3.1、部门管理3.1.1、前端核心代码3.1.2、后端代码实现3.2、员工管理3.2.1、前端核心代码3.2.2、后端代码实现3.3、班级管理3.3.1、前端核心代码3.3.2、后端代码实现3.4、学生管理3.4.1、前端核心代码3.4.2、后端代码实现3.5、数据统计3.5.
- Spring 核心技术解析【纯干货版】- XII:Spring 数据访问模块 Spring-R2dbc 模块精讲
m0_74825003
面试学习路线阿里巴巴springjava后端
在现代应用架构中,高并发、低延迟的需求推动了响应式编程的发展,而传统的JDBC由于其同步阻塞机制,在高吞吐场景下可能成为瓶颈。R2DBC(ReactiveRelationalDatabaseConnectivity)作为响应式关系型数据库访问标准,正是为了解决这一问题而诞生的。SpringR2DBC作为Spring生态对R2DBC的封装,提供了非阻塞、异步的数据库访问能力,并与SpringWebF
- Spring Boot的项目结构
m0_74823983
面试学习路线阿里巴巴springboot后端java
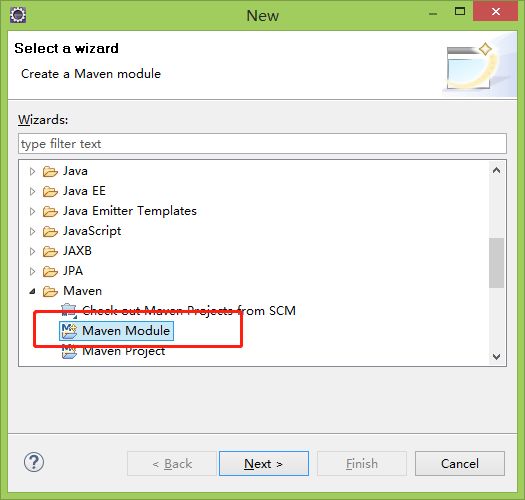
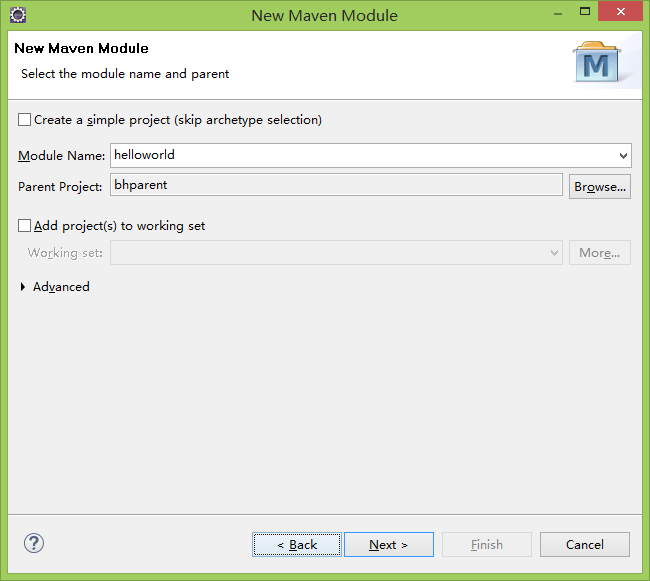
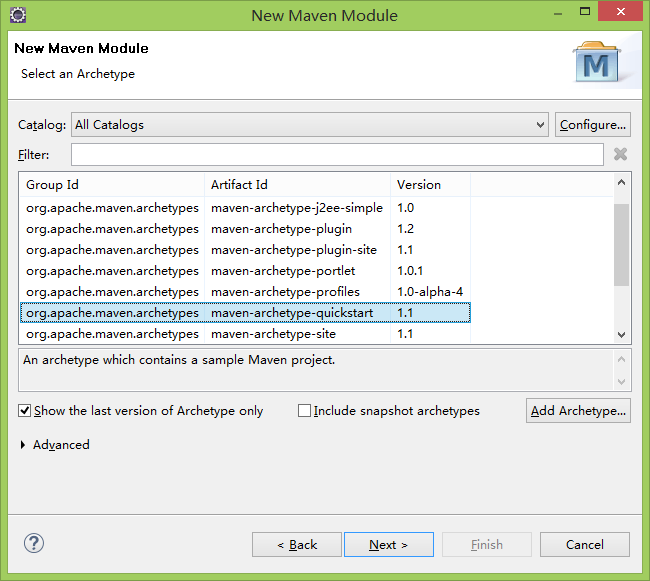
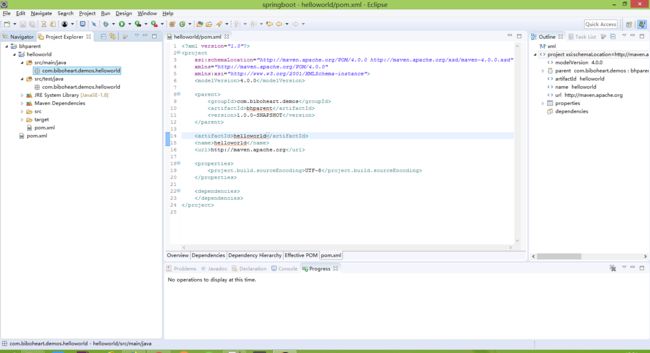
SpringBoot的项目结构技术背景SpringBoot项目结构遵循Maven或Gradle的标准目录结构,同时融入了SpringBoot的特定约定。良好的项目结构不仅有助于代码组织,还能提高开发效率和项目可维护性。了解SpringBoot的项目结构对于开发高质量的应用至关重要。1.基础项目结构1.1标准目录结构基本的SpringBoot项目结构如下:myproject/├──src/│├──m
- Spring Cloud Alibaba Spring Cloud Spring Boot 版本对应关系
马丁半只瞄
javaspringspringbootspringcloud
版本不对应可能有以下报错:Failedtobindpropertiesundermybatis-plus.configuration.result-maps[0]NoClassDefFoundError:reactor/netty/http/server/WebsocketServerSpec$Builderreactor.netty.resources.ConnectionProvider.el
- Spring Boot@Component注解下的类无法@Autowired的问题
Micrle_007
springbootSpring
这个问题心累(确实)在把我的一个非Web程序迁移从Spring迁移到SpringBoot时,出现了在@Component注解下@Autowired的类为null的情况,也就是没注入成功,或者说是此类在bean加载之前就被调用了。试了各种办法,修改扫描包,修改@Component注解等等,皆未成功,后来看到了一个方法,探究了一下。@ComponentpublicclassComponentClass
- spring cloud alibaba版本对应表(2024/6/26)
翻身仗
springcloudspringboot中间件
毕业版本依赖关系(推荐使用)由于SpringBoot3.0,SpringBoot2.7~2.4和2.4以下版本之间变化较大,目前企业级客户老项目相关SpringBoot版本仍停留在SpringBoot2.4以下,为了同时满足存量用户和新用户不同需求,社区以SpringBoot3.0和2.4分别为分界线,同时维护2022.x、2021.x、2.2.x三个分支迭代。如果不想跨分支升级,如需使用新特性,
- Spring Bean 的生命周期全过程
2401_85327573
springjava后端
SpringBean的生命周期是指从Bean的创建到销毁的整个过程。在这个过程中,Spring容器会按照一系列固定的步骤对Bean进行初始化、配置、使用和销毁。了解SpringBean的生命周期可以帮助我们更好地理解和使用Spring框架,尤其是通过自定义生命周期行为来实现特定功能。以下是SpringBean生命周期的全过程,按阶段详细说明:---###**1.实例化(Instantiation)
- ArrayList 源码分析
2401_85327573
java开发语言
ArrayList简介ArrayList的底层是数组队列,相当于动态数组。与Java中的数组相比,它的容量能动态增长。在添加大量元素前,应用程序可以使用ensureCapacity操作来增加ArrayList实例的容量。这可以减少递增式再分配的数量。ArrayList继承于AbstractList,实现了List,RandomAccess,Cloneable,java.io.Serializabl
- Spring Boot @Component注解介绍
CnLg.NJ
Javaspringboot后端java
@Component是Spring中的一个核心注解,用于声明一个类为Spring管理的组件(Bean)。它是一个通用的注解,可以用于任何层次的类(如服务层、控制器层、持久层等)。通过@Component注解,Spring会自动检测并注册该类为一个Bean,从而实现依赖注入和生命周期管理。1.@Component的作用@Component是一个元注解,它本身被@Configuration、@Serv
- redis集群迅速搭建(个人学习和测试用)
yinhezhanshen
redis学习java
笔者使用ubuntu操作系统下载redis地址:Indexof/releases/,选择最新的版本下载。解压后进入目录,直接make就可以编译。编译成功后在src目录下会生成redis-server和redis-cli可执行文件。进入redis目录下的utils/create-cluster目录,执行./create-clusterstart,快速启动6个实例zy@zy-VirtualBox:~/
- 多线程之三:MFC多线程及实例(转)
Stef若木
MFC线程
MFC中有两类线程,分别称之为工作者线程和用户界面线程。二者的主要区别在于工作者线程没有消息循环,而用户界面线程有自己的消息队列和消息循环。工作者线程没有消息机制,通常用来执行后台计算和维护任务,如冗长的计算过程,打印机的后台打印等。用户界面线程一般用于处理独立于其他线程执行之外的用户输入,响应用户及系统所产生的事件和消息等。但对于Win32的API编程而言,这两种线程是没有区别的,它们都只需线程
- 【四】3D Object Model之测量Features——area_object_model_3d()/distance_object_model_3d()算子
cqy阳
#【四】3DObjectModel3d
欢迎来到本博客Halcon算子太多,学习查找都没有系统的学习查找路径,本专栏主要分享Halcon各类算子含义及用法,有时间会更新具体案例。具体食用方式:可以点击本专栏【Halcon算子快速查找】–>搜索你要查询的算子名称;或者点击Halcon算子汇总博客,即可食用。支持:如果觉得博主的文章还不错或者您用得到的话,可以悄悄关注一下博主哈,如果三连收藏支持就更好啦!这就是给予我最大的支持!文章目录学习
- 【四】3D Object Model之测量Features——get_object_model_3d_params()算子
cqy阳
#【四】3DObjectModel3d图像处理计算机视觉halcon
欢迎来到本博客Halcon算子太多,学习查找都没有系统的学习查找路径,本专栏主要分享Halcon各类算子含义及用法,有时间会更新具体案例。具体食用方式:可以点击本专栏【Halcon算子快速查找】–>搜索你要查询的算子名称;或者点击Halcon算子汇总博客,即可食用。支持:如果觉得博主的文章还不错或者您用得到的话,可以悄悄关注一下博主哈,如果三连收藏支持就更好啦!这就是给予我最大的支持!文章目录学习
- 一个基于 React + SpringBoot 的在线多功能问卷系统(附源码)
程序员-李旭亮
Java项目源码react.jsspringboot前端
简介:一个基于React+SpringBoot的在线多功能问卷系统前端技术栈:React、React-Router、Webpack、Antd、Zustand、Echarts、DnDKit后端技术栈:SpringBoot、MySQL、MyBatisPlus、Redis项目源码下载链接:https://pan.quark.cn/s/2e32786e0c61部分页面静态预览:主要前端业务需求与技术突破:
- python 商城 性能,python商城项目总结
Yvetzy
python商城性能
importhashlib#实例化md5对象md5=hashlib.md5()#md5.update()方法的参数必须是字节型数据md5.update(bytes(request.POST['password'],encoding="UTF-8"))#以16进制格式存储md5.hexdigest()'''这里有个坑必须注意:md5.update()方法会将每次加密的字符进行拼接,所以每次加密前都要
- python pandas 读取数据库_Python+Pandas 获取数据库并加入DataFrame的实例
weixin_39955149
pythonpandas读取数据库
Python+Pandas获取数据库并加入DataFrame的实例实例如下所示:importpandasaspdimportsysimportimpimp.reload(sys)fromsqlalchemyimportcreate_engineimportcx_Oracledb=cx_Oracle.connect('userid','password','10.10.1.10:1521/dbins
- Java与Spring的“甜蜜毒药”:从辉煌到疲态的技术反思
步子哥
javaspringpython
“Java生态就像一场漫长的婚姻,Spring是那个看似完美的伴侣,但当你意识到对方的控制欲时,已经为TA背上了巨额房贷。”Java,这位曾经的企业级开发之王,如今却像一位中年危机的技术巨人,站在2023年的技术浪潮中,显露出疲态。而Spring,这个曾经被誉为“轻量级救世主”的框架,早已从灵活的工具箱变成了沉重的枷锁。今天,我们就来聊聊这对技术界的“黄金搭档”,如何从蜜月期走向了“分居边缘”。Ⅰ
- Linux上用C++和GCC开发程序实现不同PostgreSQL实例下单个数据库的多个Schema之间的稳定高效的数据迁移
weixin_30777913
c++数据库postgresql
设计一个在Linux上运行的GCCC++程序,同时连接两个不同的PostgreSQL实例,两个实例中分别有一个数据库的多个Schema的表结构完全相同,复制一个实例中一个数据库的多个Schema里的所有表的数据到另一个实例中一个数据库的多个Schema里,使用以下快速高效的方法,加入异常处理,支持每隔固定时间重试一定次数,每张表的复制运行状态和记录条数,开始结束时间戳,运行时间,以及每个批次的运行
- python画出roc曲线 auc计算逻辑_Python画ROC曲线和AUC值计算
路过炊烟
python画出roc曲线auc计算逻辑
前言ROC(ReceiverOperatingCharacteristic)曲线和AUC常被用来评价一个二值分类器(binaryclassifier)的优劣。这篇文章将先简单的介绍ROC和AUC,而后用实例演示如何python作出ROC曲线图以及计算AUC。AUC介绍AUC(AreaUnderCurve)是机器学习二分类模型中非常常用的评估指标,相比于F1-Score对项目的不平衡有更大的容忍性,
- UML各种图的定义及组成元素(期末复习用)
难啊楠
umljava开发语言
UML各种图的定义及组成元素用例图定义用例图是表示一个系统中的用例与参与者关系之间的图。组成元素参与者用例关系关联关系泛化关系依赖关系类图定义类图是显示一组类、接口、协作以及它们之间关系的图。组成元素类接口协作依赖关系泛化关系实现关系关联关系对象图定义对象图显示了某一时刻的一组对象及它们之间的关系。组成元素对象链对象图与类图之间的关系!!!!!!相同点:两者都是面向对象建模工具,对象是类的实例。两
- Spring Boot 集成 Kafka
m0_74823471
面试学习路线阿里巴巴springbootkafkalinq
在现代软件开发中,分布式系统和微服务架构越来越受到关注。为了实现系统之间的异步通信和解耦,消息队列成为了一种重要的技术手段。Kafka作为一种高性能、分布式的消息队列系统,被广泛应用于各种场景。而SpringBoot作为一种流行的Java开发框架,提供了便捷的方式来构建应用程序。本文将介绍如何在SpringBoot项目中集成Kafka,包括Kafka的基本概念、SpringBoot集成Kafka的
- server.servlet.session.timeout: 12h(HTTP 会话的超时时间为 12 小时)
小丁学Java
产品资质管理系统servlethttpfirefox
从你提供的配置文件(应该是SpringBoot的application.yml或application.properties文件)来看,以下部分与会话超时时间相关:server:servlet:session:timeout:12h#timeout:30cookie:name:VENDER_SID会话超时时间的设置server.servlet.session.timeout:12h:这行配置明确指
- The Rust Programming Language 学习 (四)
rust结构体c编程语言
结构体struct,或者structure,是一个自定义数据类型,允许你命名和包装多个相关的值,从而形成一个有意义的组合。如果你熟悉一门面向对象语言,struct就像对象中的数据属性。定义并实例化结构体和元组一样,结构体的每一部分可以是不同类型。但不同于元组,结构体需要命名各部分数据以便能清楚的表明其值的意义。由于有了这些名字,结构体比元组更灵活:不需要依赖顺序来指定或访问实例中的值。定义结构体,
- UML各种图形及作用
Wuli波板糖
UMLUML
分类图的名字介绍结构型图静态图类图(ClassDiagram)类图用于定义系统中的类,包括描述类之间的联系(如:关联、依赖、聚合)以及类的内部结构,即类的属性和操作。因此类图是描述系统中类的静态结构,即它所描述的是一种静态关系,在系统的整个生命周期都是有效的。对象图(ObjectDiagram)对象图所使用的表示符号与类图几乎完全相同,它们的不同点在于对象图只是显示类的对象实例,而不是实际的类。一
- log4j对象改变日志级别
3213213333332132
javalog4jlevellog4j对象名称日志级别
log4j对象改变日志级别可批量的改变所有级别,或是根据条件改变日志级别。
log4j配置文件:
log4j.rootLogger=ERROR,FILE,CONSOLE,EXECPTION
#log4j.appender.FILE=org.apache.log4j.RollingFileAppender
log4j.appender.FILE=org.apache.l
- elk+redis 搭建nginx日志分析平台
ronin47
elasticsearchkibanalogstash
elk+redis 搭建nginx日志分析平台
logstash,elasticsearch,kibana 怎么进行nginx的日志分析呢?首先,架构方面,nginx是有日志文件的,它的每个请求的状态等都有日志文件进行记录。其次,需要有个队 列,redis的l
- Yii2设置时区
dcj3sjt126com
PHPtimezoneyii2
时区这东西,在开发的时候,你说重要吧,也还好,毕竟没它也能正常运行,你说不重要吧,那就纠结了。特别是linux系统,都TMD差上几小时,你能不痛苦吗?win还好一点。有一些常规方法,是大家目前都在采用的1、php.ini中的设置,这个就不谈了,2、程序中公用文件里设置,date_default_timezone_set一下时区3、或者。。。自己写时间处理函数,在遇到时间的时候,用这个函数处理(比较
- js实现前台动态添加文本框,后台获取文本框内容
171815164
文本框
<%@ page language="java" import="java.util.*" pageEncoding="UTF-8"%>
<!DOCTYPE html PUBLIC "-//W3C//DTD XHTML 1.0 Transitional//EN" "http://w
- 持续集成工具
g21121
持续集成
持续集成是什么?我们为什么需要持续集成?持续集成带来的好处是什么?什么样的项目需要持续集成?... 持续集成(Continuous integration ,简称CI),所谓集成可以理解为将互相依赖的工程或模块合并成一个能单独运行
- 数据结构哈希表(hash)总结
永夜-极光
数据结构
1.什么是hash
来源于百度百科:
Hash,一般翻译做“散列”,也有直接音译为“哈希”的,就是把任意长度的输入,通过散列算法,变换成固定长度的输出,该输出就是散列值。这种转换是一种压缩映射,也就是,散列值的空间通常远小于输入的空间,不同的输入可能会散列成相同的输出,所以不可能从散列值来唯一的确定输入值。简单的说就是一种将任意长度的消息压缩到某一固定长度的消息摘要的函数。
- 乱七八糟
程序员是怎么炼成的
eclipse中的jvm字节码查看插件地址:
http://andrei.gmxhome.de/eclipse/
安装该地址的outline 插件 后重启,打开window下的view下的bytecode视图
http://andrei.gmxhome.de/eclipse/
jvm博客:
http://yunshen0909.iteye.com/blog/2
- 职场人伤害了“上司” 怎样弥补
aijuans
职场
由于工作中的失误,或者平时不注意自己的言行“伤害”、“得罪”了自己的上司,怎么办呢?
在职业生涯中这种问题尽量不要发生。下面提供了一些解决问题的建议:
一、利用一些轻松的场合表示对他的尊重
即使是开明的上司也很注重自己的权威,都希望得到下属的尊重,所以当你与上司冲突后,最好让不愉快成为过去,你不妨在一些轻松的场合,比如会餐、联谊活动等,向上司问个好,敬下酒,表示你对对方的尊重,
- 深入浅出url编码
antonyup_2006
应用服务器浏览器servletweblogicIE
出处:http://blog.csdn.net/yzhz 杨争
http://blog.csdn.net/yzhz/archive/2007/07/03/1676796.aspx
一、问题:
编码问题是JAVA初学者在web开发过程中经常会遇到问题,网上也有大量相关的
- 建表后创建表的约束关系和增加表的字段
百合不是茶
标的约束关系增加表的字段
下面所有的操作都是在表建立后操作的,主要目的就是熟悉sql的约束,约束语句的万能公式
1,增加字段(student表中增加 姓名字段)
alter table 增加字段的表名 add 增加的字段名 增加字段的数据类型
alter table student add name varchar2(10);
&nb
- Uploadify 3.2 参数属性、事件、方法函数详解
bijian1013
JavaScriptuploadify
一.属性
属性名称
默认值
说明
auto
true
设置为true当选择文件后就直接上传了,为false需要点击上传按钮才上传。
buttonClass
”
按钮样式
buttonCursor
‘hand’
鼠标指针悬停在按钮上的样子
buttonImage
null
浏览按钮的图片的路
- 精通Oracle10编程SQL(16)使用LOB对象
bijian1013
oracle数据库plsql
/*
*使用LOB对象
*/
--LOB(Large Object)是专门用于处理大对象的一种数据类型,其所存放的数据长度可以达到4G字节
--CLOB/NCLOB用于存储大批量字符数据,BLOB用于存储大批量二进制数据,而BFILE则存储着指向OS文件的指针
/*
*综合实例
*/
--建立表空间
--#指定区尺寸为128k,如不指定,区尺寸默认为64k
CR
- 【Resin一】Resin服务器部署web应用
bit1129
resin
工作中,在Resin服务器上部署web应用,通常有如下三种方式:
配置多个web-app
配置多个http id
为每个应用配置一个propeties、xml以及sh脚本文件
配置多个web-app
在resin.xml中,可以为一个host配置多个web-app
<cluster id="app&q
- red5简介及基础知识
白糖_
基础
简介
Red5的主要功能和Macromedia公司的FMS类似,提供基于Flash的流媒体服务的一款基于Java的开源流媒体服务器。它由Java语言编写,使用RTMP作为流媒体传输协议,这与FMS完全兼容。它具有流化FLV、MP3文件,实时录制客户端流为FLV文件,共享对象,实时视频播放、Remoting等功能。用Red5替换FMS后,客户端不用更改可正
- angular.fromJson
boyitech
AngularJSAngularJS 官方APIAngularJS API
angular.fromJson 描述: 把Json字符串转为对象 使用方法: angular.fromJson(json); 参数详解: Param Type Details json
string
JSON 字符串 返回值: 对象, 数组, 字符串 或者是一个数字 示例:
<!DOCTYPE HTML>
<h
- java-颠倒一个句子中的词的顺序。比如: I am a student颠倒后变成:student a am I
bylijinnan
java
public class ReverseWords {
/**
* 题目:颠倒一个句子中的词的顺序。比如: I am a student颠倒后变成:student a am I.词以空格分隔。
* 要求:
* 1.实现速度最快,移动最少
* 2.不能使用String的方法如split,indexOf等等。
* 解答:两次翻转。
*/
publ
- web实时通讯
Chen.H
Web浏览器socket脚本
关于web实时通讯,做一些监控软件。
由web服务器组件从消息服务器订阅实时数据,并建立消息服务器到所述web服务器之间的连接,web浏览器利用从所述web服务器下载到web页面的客户端代理与web服务器组件之间的socket连接,建立web浏览器与web服务器之间的持久连接;利用所述客户端代理与web浏览器页面之间的信息交互实现页面本地更新,建立一条从消息服务器到web浏览器页面之间的消息通路
- [基因与生物]远古生物的基因可以嫁接到现代生物基因组中吗?
comsci
生物
大家仅仅把我说的事情当作一个IT行业的笑话来听吧..没有其它更多的意思
如果我们把大自然看成是一位伟大的程序员,专门为地球上的生态系统编制基因代码,并创造出各种不同的生物来,那么6500万年前的程序员开发的代码,是否兼容现代派的程序员的代码和架构呢?
- oracle 外部表
daizj
oracle外部表external tables
oracle外部表是只允许只读访问,不能进行DML操作,不能创建索引,可以对外部表进行的查询,连接,排序,创建视图和创建同义词操作。
you can select, join, or sort external table data. You can also create views and synonyms for external tables. Ho
- aop相关的概念及配置
daysinsun
AOP
切面(Aspect):
通常在目标方法执行前后需要执行的方法(如事务、日志、权限),这些方法我们封装到一个类里面,这个类就叫切面。
连接点(joinpoint)
spring里面的连接点指需要切入的方法,通常这个joinpoint可以作为一个参数传入到切面的方法里面(非常有用的一个东西)。
通知(Advice)
通知就是切面里面方法的具体实现,分为前置、后置、最终、异常环
- 初一上学期难记忆单词背诵第二课
dcj3sjt126com
englishword
middle 中间的,中级的
well 喔,那么;好吧
phone 电话,电话机
policeman 警察
ask 问
take 拿到;带到
address 地址
glad 高兴的,乐意的
why 为什么
China 中国
family 家庭
grandmother (外)祖母
grandfather (外)祖父
wife 妻子
husband 丈夫
da
- Linux日志分析常用命令
dcj3sjt126com
linuxlog
1.查看文件内容
cat
-n 显示行号 2.分页显示
more
Enter 显示下一行
空格 显示下一页
F 显示下一屏
B 显示上一屏
less
/get 查询"get"字符串并高亮显示 3.显示文件尾
tail
-f 不退出持续显示
-n 显示文件最后n行 4.显示头文件
head
-n 显示文件开始n行 5.内容排序
sort
-n 按照
- JSONP 原理分析
fantasy2005
JavaScriptjsonpjsonp 跨域
转自 http://www.nowamagic.net/librarys/veda/detail/224
JavaScript是一种在Web开发中经常使用的前端动态脚本技术。在JavaScript中,有一个很重要的安全性限制,被称为“Same-Origin Policy”(同源策略)。这一策略对于JavaScript代码能够访问的页面内容做了很重要的限制,即JavaScript只能访问与包含它的
- 使用connect by进行级联查询
234390216
oracle查询父子Connect by级联
使用connect by进行级联查询
connect by可以用于级联查询,常用于对具有树状结构的记录查询某一节点的所有子孙节点或所有祖辈节点。
来看一个示例,现假设我们拥有一个菜单表t_menu,其中只有三个字段:
- 一个不错的能将HTML表格导出为excel,pdf等的jquery插件
jackyrong
jquery插件
发现一个老外写的不错的jquery插件,可以实现将HTML
表格导出为excel,pdf等格式,
地址在:
https://github.com/kayalshri/
下面看个例子,实现导出表格到excel,pdf
<html>
<head>
<title>Export html table to excel an
- UI设计中我们为什么需要设计动效
lampcy
UIUI设计
关于Unity3D中的Shader的知识
首先先解释下Unity3D的Shader,Unity里面的Shaders是使用一种叫ShaderLab的语言编写的,它同微软的FX文件或者NVIDIA的CgFX有些类似。传统意义上的vertex shader和pixel shader还是使用标准的Cg/HLSL 编程语言编写的。因此Unity文档里面的Shader,都是指用ShaderLab编写的代码,
- 如何禁止页面缓存
nannan408
htmljspcache
禁止页面使用缓存~
------------------------------------------------
jsp:页面no cache:
response.setHeader("Pragma","No-cache");
response.setHeader("Cache-Control","no-cach
- 以代码的方式管理quartz定时任务的暂停、重启、删除、添加等
Everyday都不同
定时任务管理spring-quartz
【前言】在项目的管理功能中,对定时任务的管理有时会很常见。因为我们不能指望只在配置文件中配置好定时任务就行了,因为如果要控制定时任务的 “暂停” 呢?暂停之后又要在某个时间点 “重启” 该定时任务呢?或者说直接 “删除” 该定时任务呢?要改变某定时任务的触发时间呢? “添加” 一个定时任务对于系统的使用者而言,是不太现实的,因为一个定时任务的处理逻辑他是不
- EXT实例
tntxia
ext
(1) 增加一个按钮
JSP:
<%@ page language="java" import="java.util.*" pageEncoding="UTF-8"%>
<%
String path = request.getContextPath();
Stri
- 数学学习在计算机研究领域的作用和重要性
xjnine
Math
最近一直有师弟师妹和朋友问我数学和研究的关系,研一要去学什么数学课。毕竟在清华,衡量一个研究生最重要的指标之一就是paper,而没有数学,是肯定上不了世界顶级的期刊和会议的,这在计算机学界尤其重要!你会发现,不论哪个领域有价值的东西,都一定离不开数学!在这样一个信息时代,当google已经让世界没有秘密的时候,一种卓越的数学思维,绝对可以成为你的核心竞争力. 无奈本人实在见地