在现在愈益复杂的应用系统中,消息中间件必不可少,而不同的业务也可能会选择不同的消息中间件,比如RabbitMQ或者Kafka。而不同的中间件又有一套不同的逻辑结构,假如一个系统从RabbitMQ换成Kafka,那么将是灾难性的迁移,因此为了解决这个问题,Spring Cloud Stream帮我们屏蔽了消息中间件的差异来实现消息传递。
系列文章
SpringCloud(一)-手把手教你创建springcloud微服务父子项目
SpringCloud(二)-手把手教你搭建Eureka Server和Eureka Client
SpringCloud(三)-手把手教你通过Rinbbon实现客户端负载均衡
SpringCloud(四)-手把手教你使用OpenFeign
SpringCloud(五)-手把手教你使用Hystrix配置服务熔断和降级以及Hystrix Dashboard
SpringCloud(六)-手把手教你搭建SpringCloud Config配置中心
SpringCloud(七)-手把手教你使用消息总线Bus实现动态刷新
SpringCloud(八)-手把手教你使用Stream消息驱动
1. 简介
Spring Cloud Stream 提供了input,output,binder实现应用程序间的交互,其中output相当于消息发送者,input相当于消息接收者,它们通过binder绑定起来,然后通过通道进行连接。开发者不需要再关注使用到的具体的消息中间件,只需要实现对应的接口即可。
2. 安装RabbitMQ
在笔者的另一篇文章中[RabbitMQ和Kafka:Win10安装教程] (https://www.jianshu.com/p/63d32ab9389f),已经详细介绍了如何安装和启动RabbitMQ了,如果本机还没安装RabbitMQ的同学请参考上篇文章。
启动成功后的RabbitMQ,在浏览器中输入http://localhost:15672/#/ 可以看到如下界面,就说明RabbitMQ安装和启动成功。

3. 搭建stream-producer-8700
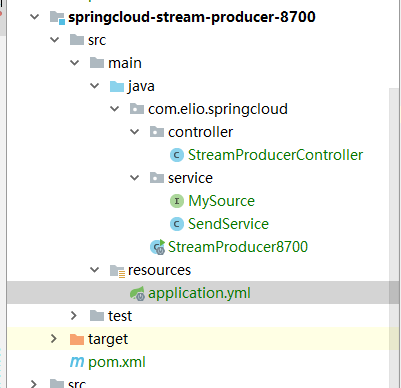
新增子项目springcloud-stream-producer-8700(简称stream-producer-8700),项目的结构如下:
3.1 pom.xml引入依赖
        springcloudtest
        com.elio.springcloud
        1.0-SNAPSHOT

    4.0.0

    springcloud-stream-producer-8700


            org.springframework.boot
            spring-boot-starter-web


            org.springframework.cloud
            spring-cloud-starter-netflix-eureka-client


            org.springframework.cloud
            spring-cloud-stream


            org.springframework.cloud
            spring-cloud-starter-stream-rabbit


            org.springframework.boot
            spring-boot-starter-actuator


                org.springframework.boot
                spring-boot-maven-plugin

                    true
                    true
3.2 新增application.yml配置文件
其中cloud.stream.bindings 就是我们要绑定的输出通道,其中myOutput是自定义的
server:
  port: 8700 #端口号

spring:
  application:
    name: springcloud-stream-producer

  rabbitmq:
    host: localhost
    port: 5672
    username: guest
    password: guest

  cloud:
    stream:
      bindings:
        myOutput:
          destination: stream-test

eureka:
  instance:
    instance-id: ${spring.application.name}:${server.port}
  client:
    fetch-registry: true
    register-with-eureka: true
    service-url:
      defaultZone: http://localhost:8300/eureka/,http://localhost:8301/eureka/
3.3 新增StreamProducer8700主启动类
主启动类没有加上什么特殊注解
package com.elio.springcloud;

import com.elio.springcloud.service.MySource;
import org.springframework.boot.SpringApplication;
import org.springframework.boot.autoconfigure.SpringBootApplication;
import org.springframework.cloud.client.discovery.EnableDiscoveryClient;
import org.springframework.cloud.stream.annotation.EnableBinding;

@SpringBootApplication
@EnableDiscoveryClient
public class StreamProducer8700 {

    public static void main(String[] args){
        SpringApplication.run(StreamProducer8700.class, args);
    }
}
3.4 新增MySource个性化接口
其实标准的有个Source接口,但是可以自定义,因为实际生产中也是自定义较多。
package com.elio.springcloud.service;

import org.springframework.cloud.stream.annotation.Output;
import org.springframework.messaging.MessageChannel;
import org.springframework.stereotype.Component;

@Component
public interface MySource {

    @Output("myOutput")
    MessageChannel myOutput();
}
3.5 新增SendService服务类
这个服务类将会被controller调用,进行发送消息
package com.elio.springcloud.service;

import org.springframework.beans.factory.annotation.Autowired;
import org.springframework.cloud.stream.annotation.EnableBinding;
import org.springframework.cloud.stream.messaging.Source;
import org.springframework.messaging.support.MessageBuilder;

import javax.annotation.Resource;

@EnableBinding({MySource.class})
public class SendService {

    @Autowired
    private  MySource mysource;

    public void sendMsg(String msg){
        mysource.myOutput().send(MessageBuilder.withPayload(msg).build());
    }
}
3.6 新增StreamProducerController类
package com.elio.springcloud.controller;

import com.elio.springcloud.service.SendService;
import org.springframework.beans.factory.annotation.Autowired;
import org.springframework.web.bind.annotation.GetMapping;
import org.springframework.web.bind.annotation.PathVariable;
import org.springframework.web.bind.annotation.RestController;

@RestController
public class StreamProducerController {

    @Autowired
    private SendService sendService;

    @GetMapping(value="/send/{msg}")
    public void send(@PathVariable("msg") String msg){
        sendService.sendMsg(msg);
    }
}
4. 搭建stream-consumer-8800
新增springcloud-stream-consumer-8800(简称stream-consumer-8800)作为消息的接收者。
4.1 修改pom.xml引入相关依赖
        springcloudtest
        com.elio.springcloud
        1.0-SNAPSHOT

    4.0.0

    springcloud-stream-consumer-8800


            org.springframework.boot
            spring-boot-starter-web


            org.springframework.cloud
            spring-cloud-starter-netflix-eureka-client


            org.springframework.cloud
            spring-cloud-stream


            org.springframework.cloud
            spring-cloud-starter-stream-rabbit


            org.springframework.boot
            spring-boot-starter-actuator


                org.springframework.boot
                spring-boot-maven-plugin

                    true
                    true
4.2 新增application.yml配置文件
其中myInput 是自定义的input
server:
  port: 8800 #端口号

spring:
  application:
    name: springcloud-stream-consumer

  rabbitmq:
    host: localhost
    port: 5672
    username: guest
    password: guest

  cloud:
    stream:
      bindings:
        myInput:
          destination: stream-test

eureka:
  instance:
    instance-id: ${spring.application.name}:${server.port}
  client:
    fetch-registry: true
    register-with-eureka: true
    service-url:
      defaultZone: http://localhost:8300/eureka/,http://localhost:8301/eureka/
4.3 新增StreamConsumer8800主启动类
package com.elio.springcloud;

import com.elio.springcloud.message.MySink;
import org.springframework.boot.SpringApplication;
import org.springframework.boot.autoconfigure.SpringBootApplication;
import org.springframework.cloud.client.discovery.EnableDiscoveryClient;
import org.springframework.cloud.netflix.eureka.EnableEurekaClient;
import org.springframework.cloud.stream.annotation.EnableBinding;

@SpringBootApplication
@EnableDiscoveryClient
public class StreamConsumer8800 {

    public static void main(String[] args){
        SpringApplication.run(StreamConsumer8800.class, args);
    }

}
4.4 新增MySink类
package com.elio.springcloud.message;

import org.springframework.cloud.stream.annotation.Input;
import org.springframework.messaging.SubscribableChannel;

public interface MySink {

    @Input("myInput")
    SubscribableChannel myInput();
}
4.5 新增MySink类
package com.elio.springcloud.message;

import org.springframework.cloud.stream.annotation.Input;
import org.springframework.messaging.SubscribableChannel;

public interface MySink {

    @Input("myInput")
    SubscribableChannel myInput();
}
4.6 新增ReceiveService类
package com.elio.springcloud.message;

import org.springframework.cloud.stream.annotation.EnableBinding;
import org.springframework.cloud.stream.annotation.StreamListener;
import org.springframework.stereotype.Service;

@Service
@EnableBinding(MySink.class)
public class ReceiveService {

    @StreamListener("myInput")
    public void recieve(Object payload){
        System.out.println(payload);
    }
}
5. 测试
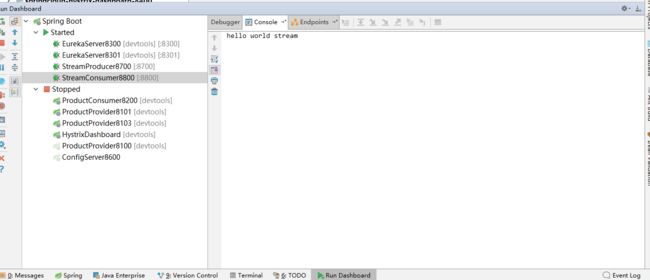
依次启动eureka-server-8300,eureka-server-8301,stream-producer-8700,stream-consumer-8800,启动成功后,访问stream-producer-8700发送消息接口
http://localhost:8700/send/hello%20world%20stream
然后查看stream-consumer-8800的控制台信息,发现消费者成功的接收到了信息。
6. 总结
通过这篇文章,我们简单的实现了通过Spring Cloud Stream来实现消息的发送者和接送者,在配置过程中,没有和具体的RabbitMQ进行交互,而是和input, output, binder继续交互,从而屏蔽底层消息中间件细节,达到解耦的效果。