前言
来啦老铁!
笔者学习Spring Boot有一段时间了,附上Spring Boot系列学习文章,欢迎取阅、赐教:
- 5分钟入手Spring Boot;
- Spring Boot数据库交互之Spring Data JPA;
- Spring Boot数据库交互之Mybatis;
- Spring Boot视图技术;
- Spring Boot之整合Swagger;
- Spring Boot之junit单元测试踩坑;
- 如何在Spring Boot中使用TestNG;
- Spring Boot之整合logback日志;
- Spring Boot之整合Spring Batch:批处理与任务调度;
- Spring Boot之整合Spring Security: 访问认证;
- Spring Boot之整合Spring Security: 授权管理;
- Spring Boot之多数据库源:极简方案;
- Spring Boot之使用MongoDB数据库源;
近期项目忙碌,家里事情也接踵而至,今天咱简单学点Spring Boot知识:
-
Spring Boot之多线程、异步:@Async
通常情况下,我们基于Spring Boot写的API或方法,都是同步类型的,同步过程是阻塞式的,前一行代码在未得到结果之前,会产生阻塞,后续的代码就只能等待。比如,调用一个API,该API与数据库交互,然后返回API结果,数据库交互如果用了2秒钟,那么返回API结果这个过程就要等2秒钟,才能发生;
而实际场景中,有些功能其实不需要等待结果就可以执行后续代码,比如:
-
发邮件功能,这个功能往往不用关心整个过程花了多久时间,只要最终对方能够收到邮件即可,因此完全不用等待发邮件服务返回,可采用异步方式;
-
一些任务,如批处理任务等,触发时往往只需要得到服务器的应答,而不用等到任务执行结束才告诉客户端,也可采用异步的方式;
-
等;
通常,我们采用多线程技术来实现异步过程,而Spring Boot中,对这个过程又做了简化,使用起来非常简单,接下来我们就一起来探索一下!
项目代码已上传Git Hub仓库,欢迎取阅:
- https://github.com/dylanz666/spring-boot-async-demo
整体步骤
- 快速建立Spring Boot项目;
- 修饰项目启动类;
- 编写Service;
- 编写Controller;
- 验证效果;
- 线程池管理配置类;
1. 快速建立Spring Boot项目;
请参考5分钟入手Spring Boot;
2. 修饰项目启动类;
在项目启动类上添加注解@EnableAsync即可:
package com.github.dylanz666;

import org.springframework.boot.SpringApplication;
import org.springframework.boot.autoconfigure.SpringBootApplication;
import org.springframework.scheduling.annotation.EnableAsync;

/**
 * @author : dylanz
 * @since : 09/27/2020
 */
@SpringBootApplication
@EnableAsync
public class App {
    public static void main(String[] args) {
        SpringApplication.run(App.class, args);
    }
}
3. 编写Service;
为了演示同步与异步的差异,以及异步的不同用法,我会编写3个service类和3个controller类;
1). 同步service类;
package com.github.dylanz666.service;

import org.springframework.stereotype.Service;

import java.util.Date;

/**
 * @author : dylanz
 * @since : 09/27/2020
 */
@Service
public class SyncTaskService {
    public void syncTask1() throws InterruptedException {
        Thread.sleep(2000);//模拟阻塞操作
        System.out.println(new Date() + ": syncTask1 complete.");
    }

    public void syncTask2() throws InterruptedException {
        Thread.sleep(2000);//模拟阻塞操作
        System.out.println(new Date() + ": syncTask2 complete.");
    }

    public void syncTask3() throws InterruptedException {
        Thread.sleep(2000);//模拟阻塞操作
        System.out.println(new Date() + ": syncTask3 complete.");
    }
}
2). 简单的异步service类;
package com.github.dylanz666.service;

import org.springframework.scheduling.annotation.Async;
import org.springframework.stereotype.Service;

import java.util.Date;

/**
 * @author : dylanz
 * @since : 09/27/2020
 */
@Service
public class AsyncTaskService {
    @Async
    public void asyncTask1() throws InterruptedException {
        Thread.sleep(2000);//模拟阻塞操作
        System.out.println(new Date() + ": asyncTask1 complete.");
    }

    @Async
    public void asyncTask2() throws InterruptedException {
        Thread.sleep(2000);//模拟阻塞操作
        System.out.println(new Date() + ": asyncTask2 complete.");
    }

    @Async
    public void asyncTask3() throws InterruptedException {
        Thread.sleep(2000);//模拟阻塞操作
        System.out.println(new Date() + ": asyncTask3 complete.");
    }
}
3). 异步拓展应用的service类;
package com.github.dylanz666.service;

import org.springframework.scheduling.annotation.Async;
import org.springframework.scheduling.annotation.AsyncResult;
import org.springframework.stereotype.Service;

import java.util.Date;
import java.util.concurrent.Future;

/**
 * @author : dylanz
 * @since : 09/27/2020
 */
@Service
@Async
public class AsyncTaskService2 {
    public Future asyncTask1() throws InterruptedException {
        Thread.sleep(10000);//模拟阻塞操作
        System.out.println(new Date() + ": asyncTask1 complete");
        return new AsyncResult("asyncTask1 complete");
    }

    public Future asyncTask2() throws InterruptedException {
        Thread.sleep(10000);//模拟阻塞操作
        System.out.println(new Date() + ": asyncTask1 complete");
        return new AsyncResult("asyncTask1 complete");
    }

    public Future asyncTask3() throws InterruptedException {
        Thread.sleep(10000);//模拟阻塞操作
        System.out.println(new Date() + ": asyncTask1 complete");
        return new AsyncResult("asyncTask1 complete");
    }
}
简单解读一下:
- 要使一个方法或类称为异步方法或类,只需要在方法或类上添加@Async即可,非常简单!
- 可以通过方法返回Future类型(也可以用ListenableFuture)的对象,用于操作异步方法、提供异步方法的执行状态等;
4. 编写Controller;
1). 用于演示同步过程的API;
package com.github.dylanz666.controller;

import com.github.dylanz666.service.AsyncTaskService;
import com.github.dylanz666.service.SyncTaskService;
import org.springframework.beans.factory.annotation.Autowired;
import org.springframework.web.bind.annotation.GetMapping;
import org.springframework.web.bind.annotation.ResponseBody;
import org.springframework.web.bind.annotation.RestController;

import java.util.Date;

/**
 * @author : dylanz
 * @since : 09/27/2020
 */
@RestController
public class SyncTaskController {
    @Autowired
    private SyncTaskService syncTaskService;

    @GetMapping("/sync/task")
    @ResponseBody
    public String execute() throws InterruptedException {
        long startTimeStamp = System.currentTimeMillis();
        syncTaskService.syncTask1();
        syncTaskService.syncTask2();
        syncTaskService.syncTask3();
        long endTimeStamp = System.currentTimeMillis();
        String message = "sync tasks are complete, duration: " + (endTimeStamp - startTimeStamp) + " ms";
        System.out.println(message);
        return message;
    }
}
2). 用于演示简单异步过程的API;
package com.github.dylanz666.controller;

import com.github.dylanz666.service.AsyncTaskService;
import org.springframework.beans.factory.annotation.Autowired;
import org.springframework.web.bind.annotation.GetMapping;
import org.springframework.web.bind.annotation.ResponseBody;
import org.springframework.web.bind.annotation.RestController;

import java.util.Date;

/**
 * @author : dylanz
 * @since : 09/27/2020
 */
@RestController
public class AsyncTaskController {
    @Autowired
    private AsyncTaskService asyncTaskService;

    @GetMapping("/async/task")
    @ResponseBody
    public String execute() throws InterruptedException {
        long startTimeStamp = System.currentTimeMillis();
        asyncTaskService.asyncTask1();
        asyncTaskService.asyncTask2();
        asyncTaskService.asyncTask3();
        long endTimeStamp = System.currentTimeMillis();
        String message = "async tasks are triggered successfully, duration: " + (endTimeStamp - startTimeStamp) + " ms";
        System.out.println(message);
        return message;
    }
}
3). 用于演示异步拓展应用的API;
package com.github.dylanz666.controller;

import com.github.dylanz666.service.AsyncTaskService2;
import org.springframework.beans.factory.annotation.Autowired;
import org.springframework.web.bind.annotation.*;

import java.util.concurrent.Future;

/**
 * @author : dylanz
 * @since : 09/27/2020
 */
@RestController
@RequestMapping("/async/complex")
public class AsyncTaskController2 {
    @Autowired
    private AsyncTaskService2 asyncTaskService2;

    public static String status = "async tasks are not triggered.";
    public static Future task1;
    public static Future task2;
    public static Future task3;

    @GetMapping("/task")
    @ResponseBody
    public String execute() throws InterruptedException {
        long startTimeStamp = System.currentTimeMillis();
        task1 = asyncTaskService2.asyncTask1();
        task2 = asyncTaskService2.asyncTask2();
        task3 = asyncTaskService2.asyncTask3();
        long endTimeStamp = System.currentTimeMillis();
        status = "async tasks are doing.";
        String message = "async tasks are triggered successfully, duration: " + (endTimeStamp - startTimeStamp) + " ms";
        System.out.println(message);
        return message;
    }

    @GetMapping("/task/status")
    @ResponseBody
    public String getTasksStatus() {
        assert task1 != null;
        if (task1.isDone() && task2.isDone() && task3.isDone()) {
            status = "async tasks are done.";
        }
        return status;
    }

    @GetMapping("/task/status/{taskId}")
    @ResponseBody
    public Boolean getTaskStatus(@PathVariable(name = "taskId") int taskId) {
        boolean taskStatus = false;
        switch (taskId) {
            case 1:
                taskStatus = task1.isDone();
                break;
            case 2:
                taskStatus = task2.isDone();
                break;
            case 3:
                taskStatus = task3.isDone();
                break;
        }
        return taskStatus;
    }
}
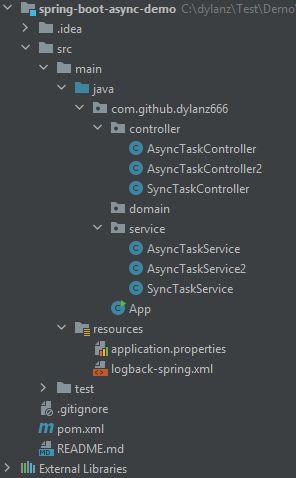
项目整体结构如下:
5. 验证效果;
启动项目:
1). 验证同步API和执行结果;
浏览器直接访问 http://127.0.0.1:8080/sync/task:
解读:
- 由于syncTask1、syncTask2、syncTask3各等待了2秒钟,最终整体用时6.002秒才返回API结果;
- syncTask1、syncTask2、syncTask3按代码中指定的顺序,顺序执行;
2). 验证简单异步API和执行结果;
浏览器直接访问 http://127.0.0.1:8080/async/task:
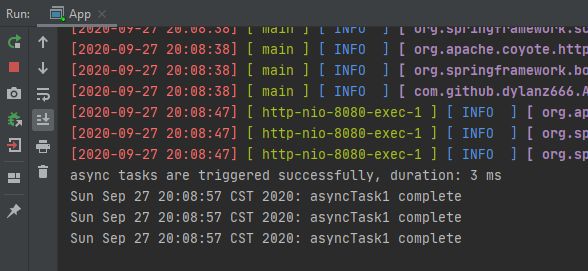
解读:
- 虽然asyncTask1、asyncTask2、asyncTask3的代码中也写了等待2秒的代码,但API调用时却未等待,而是直接返回结果,仅用了4毫秒,速度非常快;
- asyncTask1、asyncTask2、asyncTask3三个方法均采用@Async注解,三者并行执行,即使用了3个线程,基本无先后概念;
3). 验证异步拓展应用API和执行结果;
这里头的API主要演示@Async可以写在类上,可以通过返回Future类型的对象,对异步任务进行处理和获取其信息;
浏览器直接访问 http://127.0.0.1:8080/async/complex/task:
-
浏览器直接访问 http://127.0.0.1:8080/async/complex/task/status 和http://127.0.0.1:8080/async/complex/task/status/1;
-
由于asyncTask1、asyncTask2、asyncTask3均设置了10秒中的阻塞时间,因此前10秒钟,整体task的状态和各个task的状态应该是未完成的:
-
10秒钟过去后,浏览器再次访问 http://127.0.0.1:8080/async/complex/task/status 和http://127.0.0.1:8080/async/complex/task/status/1;
-
过了设置好的10秒阻塞时间,整体task的状态和各个task的状态应该是完成的:
这样的拓展,我们不仅会使用多线程、异步,而且能够获取异步方法的状态,真香!
6. 线程池管理配置类;
上述这种方式,当并发量很小时,上述方式一般不会有问题,但当并发量很大时,可能会遇到一些问题:
- 由于我们没有对线程数量进行限制,如果所有请求都去占用资源,很容易使资源负载过大,甚至宕机;
- 当我们需要的并发执行线程数量很多时,且每个线程执行很短的时间就结束了,这样,我们频繁的创建、销毁线程就大大降低了工作效率(创建和销毁线程需要时间、资源);
- 线程池可以使一个线程执行完任务之后,继续去执行下一个任务,不被销毁,这样线程利用率就提高了。
因此,有必要使用线程池对线程进行管理。
通常我们使用Spring提供的ThreadPoolTaskExecutor,进行线程管理;
项目内创建config包,并建立配置类ThreadPoolConfig(名字随意),代码如下:
package com.github.dylanz666.config;

import org.springframework.context.annotation.Bean;
import org.springframework.context.annotation.Configuration;
import org.springframework.core.task.TaskExecutor;
import org.springframework.scheduling.annotation.EnableAsync;
import org.springframework.scheduling.concurrent.ThreadPoolTaskExecutor;

import java.util.concurrent.ThreadPoolExecutor;

/**
 * @author : dylanz
 * @since : 09/27/2020
 */
@Configuration
@EnableAsync
public class ThreadPoolConfig {
    @Bean
    public TaskExecutor taskExecutor() {
        ThreadPoolTaskExecutor executor = new ThreadPoolTaskExecutor();
        //设置核心线程数
        executor.setCorePoolSize(5);
        //设置最大线程数
        executor.setMaxPoolSize(10);
        //设置队列容量
        executor.setQueueCapacity(20);
        //设置线程活跃时间(秒)
        executor.setKeepAliveSeconds(60);
        //设置默认线程名称
        executor.setThreadNamePrefix("demo-");
        //设置拒绝策略
        executor.setRejectedExecutionHandler(new ThreadPoolExecutor.CallerRunsPolicy());
        //等待所有任务结束后再关闭线程池
        executor.setWaitForTasksToCompleteOnShutdown(true);
        return executor;
    }
}
如果采用配置类方式管理线程,则项目入口类的@EnableAsync可以去除;
此时项目整体结构:
至此,我们学会了Spring Boot多线程、异步的基本使用方法,非常简单,相信未来定能派上用场!!!
如果本文对您有帮助,麻烦点赞+关注!
谢谢!


