参考链接
- API文档:http://www.android-doc.com/tools/help/MonkeyDevice.html
- 环境搭建:http://www.cnblogs.com/lynn-li/p/5885001.html
- 基础入门:http://www.jianshu.com/p/52742630c311

MonkeyRunner.png
monkey和monkeyrunner的区别
- (不可控)Monkey工具直接运行在设备或模拟器的adb shell中,生成用户或系统的伪随机事件流。
- (可控)Monkeyrunner工具是在工作站上通过API定义的特定命令和事件控制设备或模拟器。
一、cmd命令运行:
#导入模块
fromcom.android.monkeyrunnerimportMonkeyRunner,MonkeyDevice,MonkeyImage
#连接设备
device=MonkeyRunner.waitForConnection()
#安装apk
device.installPackage('e:/hjclass.apk')
#启动应用
device.startActivity(‘com.xx.xxx/.activity.xxxActivity’)
#卸载应用
device.removePackage(‘应用名’)

MonkeyRunner.png
我把命令写到Python脚本中,cmd运行即可
Monkeyrunner + Python脚本的位置

MonkeyRunner.png
# -*- coding:utf-8 -*-
#导入模块
from com.android.monkeyrunner import MonkeyRunner as MR,MonkeyDevice as MD,MonkeyImage as MI
#连接设备
print 'start connect device loading ...'
device = MR.waitForConnection()
#安装应用
print 'start installPackage loading ...'
device.installPackage('C:\Users\yuanyuan_cheng\Desktop\monkeyrunner\cn.taxen.mengmeng_5.apk')
MR.sleep(3)
#运行应用
print 'install success startActivity now  loading ...'
device.startActivity('cn.taxen.mengmeng/cn.taxen.mengmeng.MengMeng')
MR.sleep(3)
#点击按钮
device.touch(993.7,1725.3,'DOWN_AND_UP')
MR.sleep(3)
#输入内容
device.type('xinjiang')
MR.sleep(3)
device.touch(557.4,974.0,'DOWN_AND_UP')
二、录制与播放
- Monkeyrunner脚本录制monkey_recorder.py
参考链接:http://www.cnblogs.com/xbzhu/p/6077913.html
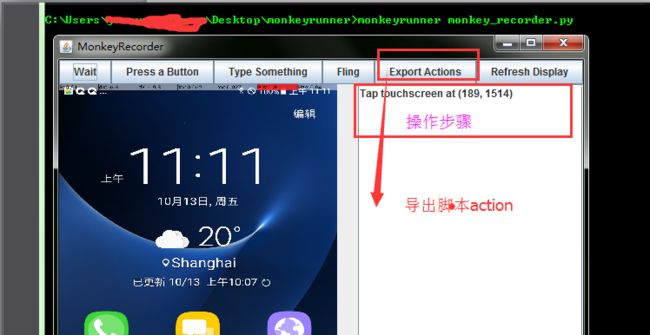 image.png
# -*- coding:utf-8 -*-
from com.android.monkeyrunner import MonkeyRunner as mr
from com.android.monkeyrunner.recorder import MonkeyRecorder as recorder
print 'connect device loading...'
device = mr.waitForConnection()
mr.sleep(3)
print 'start recorder loading...'
recorder.start(device)
- 二、脚本回放:monkey_playback.py(将此python文件和导出的脚本一同放到sdk的tools文件夹下)
附monkey_playback.py
#!/usr/bin/env monkeyrunner
# Copyright 2010, The Android Open Source Project
#
# Licensed under the Apache License, Version 2.0 (the "License");
# you may not use this file except in compliance with the License.
# You may obtain a copy of the License at
#
#     http://www.apache.org/licenses/LICENSE-2.0
#
# Unless required by applicable law or agreed to in writing, software
# distributed under the License is distributed on an "AS IS" BASIS,
# WITHOUT WARRANTIES OR CONDITIONS OF ANY KIND, either express or implied.
# See the License for the specific language governing permissions and
# limitations under the License.

import sys
from com.android.monkeyrunner import MonkeyRunner

# The format of the file we are parsing is very carfeully constructed.
# Each line corresponds to a single command.  The line is split into 2
# parts with a | character.  Text to the left of the pipe denotes
# which command to run.  The text to the right of the pipe is a python
# dictionary (it can be evaled into existence) that specifies the
# arguments for the command.  In most cases, this directly maps to the
# keyword argument dictionary that could be passed to the underlying
# command.

# Lookup table to map command strings to functions that implement that
# command.
CMD_MAP = {
    'TOUCH': lambda dev, arg: dev.touch(**arg),
    'DRAG': lambda dev, arg: dev.drag(**arg),
    'PRESS': lambda dev, arg: dev.press(**arg),
    'TYPE': lambda dev, arg: dev.type(**arg),
    'WAIT': lambda dev, arg: MonkeyRunner.sleep(**arg)
    }

# Process a single file for the specified device.
def process_file(fp, device):
    for line in fp:
        (cmd, rest) = line.split('|')
        try:
            # Parse the pydict
            rest = eval(rest)
        except:
            print 'unable to parse options'
            continue

        if cmd not in CMD_MAP:
            print 'unknown command: ' + cmd
            continue

        CMD_MAP[cmd](device, rest)


def main():
    file = sys.argv[1]
    fp = open(file, 'r')

    device = MonkeyRunner.waitForConnection()

    process_file(fp, device)
    fp.close();


if __name__ == '__main__':
    main()
image.png
其中action是保存出来的脚本名
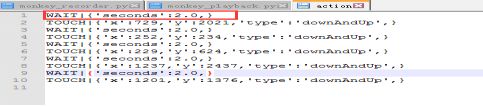
image.png
三、滑动解锁:
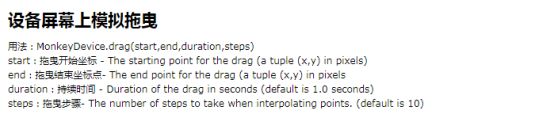
image.png
device.drag((1080/2, 1700),(1080/2, 400),0.5,1)
device.drag((550, 1450),(550, 450),0.5,1)
device.drag((x1, y1),(x1, y2),0.5,1)
四、截图对比
# -*- coding:utf-8 -*-
from com.android.monkeyrunner import MonkeyRunner as MR,MonkeyDevice as MD,MonkeyImage as MI
print 'start connect device loading ...'
device = MR.waitForConnection()
print 'connect success ...'
#截图
MR.sleep(3)
res1 = device.takeSnapshot()
res1.writeToFile('C:\\Users\\Desktop\\monkeyrunnerDemo\\image\\result1.png','png')
print 'shot success 1 ...'

MR.sleep(10)
res2 = device.takeSnapshot()
res2.writeToFile('C:\\Users\\Desktop\\monkeyrunnerDemo\\image\\result2.png','png')
print 'shot success 2 ...'

MR.sleep(3)
print (res1.sameAs(res2,1.0))