目录
- MVC的简介
- MVC三者的职责和关系
- 标准MVC与非标准MVC的区别及利弊
- 项目实战应用(标准MVC写法与非标准MVC写法对比)
- view上面的用户行为事件如何处理?
- 如何更新对应的数据模型?
- 数据模型更新了后如何处理?
- 如何更新 view 上面的视图元素?
简介
摘自百度百科对MVC的解释 MVC
MVC (全名是Model View Controller,是模型(model)-视图(view)-控制器(controller)的缩写,一种软件设计典范,用一种业务逻辑、数据、界面显示分离的方法组织代码,将业务逻辑聚集到一个部件里面,在改进和个性化定制界面及用户交互的同时,不需要重新编写业务逻辑。MVC被独特的发展起来用于映射传统的输入、处理和输出功能在一个逻辑的图形化用户界面的结构中。
三者的职责
Model(模型)是应用程序中用于处理应用程序数据逻辑的部分,通常模型对象负责在数据库中存取数据。View(视图)是应用程序中处理数据显示的部分,通常视图是依据模型数据创建的。Controller(控制器)是应用程序中处理用户交互的部分,通常控制器负责从视图读取数据,控制用户输入,并向模型发送数据。
或许很多小伙伴感觉很疑惑,下面我们就结合例子详细说说MVC
一 初识 MVC
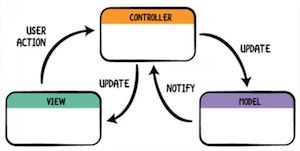
我们先看一副图,很清晰明了的描述了三者之间的关系
三者职责解释说明
Model层数据处理层,包括网络请求,数据加工View层所有App上看得到的界面Controller层Model 与 View层的中介,把Model数据在View上展示出来
对应箭头解释
-
view将用户交互通知给controller,通常使用代理。 -
controller通过更新model来反应状态的改变。 -
model(通常使用KVO)通知controller来更新他们负责的view
二 变异的MVC
网上还有另外一幅图也很形象的表现iOS实际开发中MVC架构图
这张图是iOS的MVC架构中最经常出现的图,因为IOS中的Controlller 是UIViewController,所以导致很多人会把视图写在Controller中,这样无疑会导致VC很臃肿。
因此,M-VC 可能是对 iOS 开发中的 MVC模式更为准确的解读,同时更也准确地描述了我们日常开发可能已经编写的 MVC 代码,但它并没有做太多事情来解决 iOS 应用中日益增长的重量级视图控制器的问题。
三 MVC的利与弊
在 iOS 开发中,MVC(Model View Controller)是构建iOS App的标准模式,是苹果推荐的一个用来组织代码的权威范式。
Apple甚至是这么说的。在MVC下,所有的对象被归类为一个Model,一个View,和一个Controller。Model持有数据,View显示与用户交互的界面,而ViewController调解Model和View之间的交互。现在,MVC 依然是目前主流客户端编程框架,但同时它也被调侃成Massive View Controller(重量级视图控制器),想必开发者在开发中无可避免被下面几个问题所困扰:
- 厚重的ViewController
- 遗失的网络逻辑(无立足之地)
- 较差的可测试性
接下来就让我们一起探讨MVC的弊端,剖析问题产生原因,打造一个轻量级的ViewController,明确MVC设计模式中各个角色的职责。
3.1 厚重的View Controller
Model:模型model的对象通常非常的简单。根据Apple的文档,model应包括数据和操作数据的业务逻辑。而在实践中,model层往往非常薄,不管怎样,model层的业务逻辑不应被拖入到controller。
View:视图view通常是UIKit控件,View不应该直接引用model(PS:现实中,使用了),并且仅仅通过IBAction事件引用controller。业务逻辑很明显不归入view,视图本身没有任何业务。
Controller:Controller是app的胶水代码:协调模型和视图之间的所有交互。控制器负责管理他们所拥有的视图的视图层次结构,还要响应视图的loading、appearing、disappearing等等,同时往往也会充满我们不愿暴露的model的模型逻辑以及不愿暴露给视图的业务逻辑。
网络数据的请求及后续处理,本地数据库操作,以及一些带有工具性质辅助方法都加大了Massive View Controller的产生。
3.2 遗失(无处安放)的网络逻辑
苹果使用的MVC的定义是这么说的:所有的对象都可以被归类为一个model,一个view,或是一个controller。
你可能试着把它放在Model对象里,但是也会很棘手,因为网络调用应该使用异步,这样如果一个网络请求比持有它的model生命周期更长,事情将变的复杂。显然View里面做网络请求那就更格格不入了,因此只剩下Controller了。若这样,这又加剧了Massive View Controller的问题。若不这样,何处才是网络逻辑的家呢?
3.3 较差的可测试性
由于View Controller混合了视图处理逻辑和业务逻辑,分离这些成分的单元测试成了一个艰巨的任务。
四 项目实战
4.1 实际开发中MVC的使用
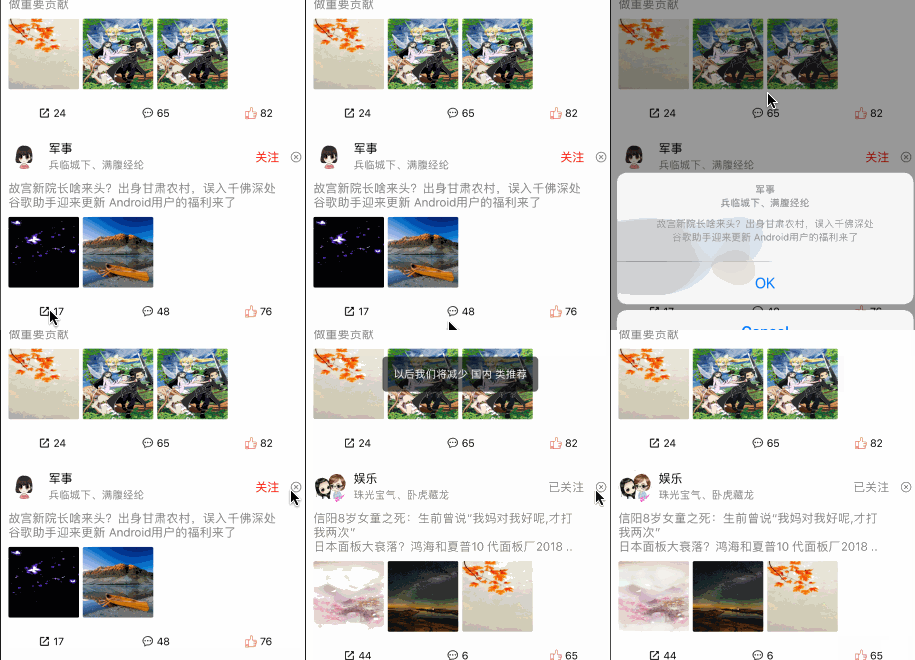
我们仿头条主页样式写了一个测试用例,然后来讲解实际开发的用法。
核心类讲解
- NewsModel 新闻模型数据类
@interface NewsModel : NSObject

/** id */
@property(nonatomic, copy)NSString *newsId;
/** icon */
@property(nonatomic, copy)NSString *icon;
/** title */
@property(nonatomic, copy)NSString *title;
/** subTitle */
@property(nonatomic, copy)NSString *subTitle;
/** content */
@property(nonatomic, copy)NSString *content;
/** if attention */
@property(nonatomic, assign, getter=isAttention)BOOL attention;
/** imgList */
@property(nonatomic, copy)NSArray *imgs;
/** share number */
@property(nonatomic, assign)NSUInteger shareNum;
/** discuss num */
@property(nonatomic, assign)NSUInteger discussNum;
/** like */
@property(nonatomic, assign)NSUInteger likeNum;
/** if like */
@property(nonatomic, assign,getter=isLike)BOOL like;

@end
- NewsCell.h 新闻视图类
@class NewsModel;

@interface NewsCell : UITableViewCell

/** model */
@property(nonatomic, strong)NewsModel *model;

@end
- NewsCell.m 实现类
// 1.我们使用懒加载的形式加载视图
/** icon */
@property(nonatomic, strong)UIImageView *iconImgView;
/** title */
@property(nonatomic, strong)UILabel *titleLbe;
/** subTitle */
@property(nonatomic, strong)UILabel *subTitleLbe;
......  // 粘贴部分代码

// 2.采用masonry约束布局
- (instancetype)initWithStyle:(UITableViewCellStyle)style reuseIdentifier:(NSString *)reuseIdentifier {
    self = [super initWithStyle:style reuseIdentifier:reuseIdentifier];
    if (self) {
        self.contentView.backgroundColor = [UIColor whiteColor];
        [self drawUI];
    }
    return self;
}

#pragma mark - drawUI

- (void)drawUI {
    [self.contentView addSubview:self.iconImgView];
    [self.contentView addSubview:self.titleLbe];
    [self.contentView addSubview:self.subTitleLbe];

    [self.iconImgView mas_makeConstraints:^(MASConstraintMaker *make) {
        make.size.mas_equalTo(CGSizeMake(44, 44));
        make.top.equalTo(self.contentView.mas_top).offset(10);
        make.leading.equalTo(self.contentView.mas_leading).offset(10);
    }];

    [self.titleLbe mas_makeConstraints:^(MASConstraintMaker *make) {
        make.leading.equalTo(self.iconImgView.mas_trailing).offset(10);
        make.bottom.equalTo(self.iconImgView.mas_centerY).offset(-2);
    }];

    [self.subTitleLbe mas_makeConstraints:^(MASConstraintMaker *make) {
        make.leading.equalTo(self.titleLbe.mas_leading);
        make.top.equalTo(self.iconImgView.mas_centerY).offset(2);
    }];
    ......  // 粘贴部分代码
}

// 3.设置数据
#pragma mark - set

- (void)setModel:(NewsModel *)model {
    _model = model;
    [self.iconImgView sd_setImageWithURL:[NSURL URLWithString:model.icon]];

    self.titleLbe.text = model.title;
    [self.titleLbe sizeToFit];

    self.subTitleLbe.text = model.subTitle;
    [self.subTitleLbe sizeToFit];
    ......  // 粘贴部分代码
}

// 4.懒加载形式加载控件
#pragma mark - lazy

- (UIImageView *)iconImgView {
    if (_iconImgView == nil) {
        _iconImgView = [[UIImageView alloc] initWithFrame:CGRectMake(0, 0, 44, 44)];
        _iconImgView.layer.cornerRadius = 22;
        _iconImgView.layer.masksToBounds = YES;
    }
    return _iconImgView;
}

- (UILabel *)titleLbe {
    if (_titleLbe == nil) {
        _titleLbe = [self getLbeWithFont:16 textColor:[UIColor blackColor]];
    }
    return _titleLbe;
}

- (UILabel *)subTitleLbe {
    if (_subTitleLbe == nil) {
        _subTitleLbe = [self getLbeWithFont:14 textColor:[UIColor grayColor]];
    }
    return _subTitleLbe;
}
- ViewController 控制器
// tableView也使用懒加载的形式
- (UITableView *)tableView {
    if (_tableView == nil) {
        _tableView = [[UITableView alloc] initWithFrame:CGRectMake(0, 64, kScreenWidth, kScreenHeight - 64) style:UITableViewStyleGrouped];
        _tableView.delegate = self;
        _tableView.dataSource = self;
        _tableView.scrollsToTop = true;
        _tableView.backgroundColor = [UIColor whiteColor];;
        _tableView.separatorStyle = UITableViewCellSeparatorStyleNone;
        _tableView.showsVerticalScrollIndicator = NO;
        _tableView.scrollsToTop = YES;
        _tableView.estimatedRowHeight = 250;//预估高度
        _tableView.rowHeight = UITableViewAutomaticDimension;
        [_tableView registerClass:[NewsCell class] forCellReuseIdentifier:cellId];
        __weak typeof(self) weakSelf = self;
        [_tableView addPullToRefreshWithActionHandler:^{
            [weakSelf refreshData];
        }];
        [_tableView addInfiniteScrollingWithActionHandler:^{
            [weakSelf loadNextPage];
        }];
    }
    return _tableView;
}

// 核心代码
#pragma mark - UITableViewDataSource

- (NSInteger)numberOfSectionsInTableView:(UITableView *)tableView {
    return 1;
}

- (NSInteger)tableView:(UITableView *)tableView numberOfRowsInSection:(NSInteger)section {
    return self.dataSource.count;
}

- (UITableViewCell *)tableView:(UITableView *)tableView cellForRowAtIndexPath:(NSIndexPath *)indexPath {
    NewsModel *model = [self.dataSource objectAtIndex:indexPath.row];
    NewsCell *cell = [tableView dequeueReusableCellWithIdentifier:cellId];
    cell.selectionStyle = UITableViewCellSelectionStyleNone;
    cell.model = model;
    return cell;
}
注解说明
- 一个基本的数据展示就完成了,相信很多开发小伙伴也是这样做的,如果没有涉及到用户的交互行为,纯粹是做展示,那基本就完工了。但是实际开发中往往不是这样的。
- 比如用户点击了
分享,评论,点赞,关注,删除等按钮,那我们应该如何处理数据及更新页面呢?
接下来我们就从以下几点出发来阐述标准的MVC和非标准的MVC两者之间的区别。
4.1 view上面的用户行为事件如何处理?
当用户在视图上做了点击,那我们应该如何处理用户的点击事件?以本文实例中点赞为例子说明。
说明:当用户点击赞或者取消赞,我们需要告知后台用户的行为,同时更新对应的视图。
4.1.1 标准MVC写法
view将user action传给VC,一共有三种方式可以将view上的行为传递给VC,分别是代理,block和通知。本文介绍如果使用代理将用户的行为告知VC。
- NewsCell.h (声明一个cell的协议,并定义一些方法)
@protocol NewsCellDelegate
// tap like
- (void)didTapNewsCellLike:(NewsModel *)newsModel;

@end

@interface NewsCell : UITableViewCell
/** delegate */
@property(nonatomic,weak)id delegate;

@end
- NewsCell.m (在点击回调方法中调用该协议方法)
// 用户点击了点赞按钮
- (void)tapLike {
    if ([self.delegate respondsToSelector:@selector(didTapNewsCellLike:)]) {
        [self.delegate didTapNewsCellLike:self.model];
    }
}
- ViewController.m (设置代理并实现代理方法即可)
@interface ViewController ()

- (UITableViewCell *)tableView:(UITableView *)tableView cellForRowAtIndexPath:(NSIndexPath *)indexPath {
    NewsModel *model = [self.dataSource objectAtIndex:indexPath.row];
    NewsCell *cell = [tableView dequeueReusableCellWithIdentifier:cellId];
    cell.selectionStyle = UITableViewCellSelectionStyleNone;
    cell.model = model;
    cell.delegate = self;   // VC作为Cell视图的代理对象
    return cell;
}

- (void)didTapNewsCellLike:(NewsModel *)newsModel {
    // 处理view上的点击事件
}
4.1.2 非标准的MVC写法
有些小伙伴或许想直接在view视图中处理网络,数据,然后更新对应视图,和VC没有关系。
实例代码如下
- NewsCell.m (直接在视图中调用网络请求并处理数据)
// 用户点击了点赞按钮
- (void)tapLike {
   // 直接发起网络请求并处理回调事件
    __weak typeof(self) weakSelf = self;
    [self.model addLike:^(NSDictionary *json) {
        weakSelf.model.like = !weakSelf.model.isLike;
        if (weakSelf.model.isLike) {
            [weakSelf.likeActionView updateImgName:@"like_red"];
            weakSelf.model.likeNum++;
        } else {
            [weakSelf.likeActionView updateImgName:@"like"];
            weakSelf.model.likeNum--;
        }
        [weakSelf.likeActionView updateTitle:[NSString stringWithFormat:@"%lu",(unsigned long)weakSelf.model.likeNum]];
    }];
}
运行结果
如果在用户不拖拽的情况下,该方法是可以实现效果的,但是一旦用户进行了拖拽,我们知道UITableView是采用
重用机制,所以对应的视图和模型数据都会发生变化,我们可以将请求前和请求后的对象地址打印一下就知道了。
2019-04-14 10:04:16.496819+0800 MVC-Demo[65856:2082156] old model 0x6000011d9680
2019-04-14 10:04:18.745787+0800 MVC-Demo[65856:2082156] new model 0x6000011d9860
由打印结果可知,模型对象发生了变化,所以此种方法不可取。
第二种方法
或许有的小伙伴想,在view中完成网络请求,然后将结果告知VC,然后由VC来更新对应的数据及视图,此种方法可以,但是不推荐这样做,因为UITableViewCell重用机制的原因。
4.2 如何更新对应的数据模型?
4.2.1 标准的MVC写法
根据苹果官方的推荐,模型包含数据处理层,包括网络请求,数据加工及处理。
实例代码如下
- NewsModel.m (新闻模型对象,里面封装了点赞的网络请求及数据处理)
/// 添加点赞
- (void)addLike:(void(^)(NSDictionary *json))callback {
    NSURLSessionConfiguration *config = [NSURLSessionConfiguration defaultSessionConfiguration];
    NSURLSession *session = [NSURLSession sessionWithConfiguration:config];
    NSURLSessionTask *task = [session dataTaskWithURL:[NSURL URLWithString:API_GetGaoShiList] completionHandler:^(NSData *data, NSURLResponse *response, NSError *error) {
        dispatch_async(dispatch_get_main_queue(), ^{
            if (error == nil) {
                self.like = !self.like;
                if (self.like) {
                    self.likeNum += 1;
                } else {
                    self.likeNum -= 1;
                }
            }
            if (callback) {
                callback(nil);
            }
        });
    }];
    [task resume];
}
- viewController.m (外界直接调用,监听回调block即可)
- (void)didTapNewsCellLike:(NewsModel *)newsModel {
    __weak typeof(NewsModel *) weakNewsModel = newsModel;
    [newsModel addLike:^(NSDictionary *json) {
        // 更新对应的视图
        [self updateNewsView:weakNewsModel];
    }];
}
运行结果
我们将点赞的网络请求处理,数据处理都封装到了模型里面,外界直接调用并监听结果的回调即可。
4.2.2 非标准的MVC写法
有些小伙伴喜欢将网络请求之间写在VC里面,然后在VC里面处理请求和数据的处理。
实例代码
- ViewController.m (之间在VC中发网络请求,然后通过newId更新对应的数据模型)
- (void)didTapNewsCellLike:(NewsModel *)newsModel {
     // 非标准的MVC写法
    [self postLikeNetwork:newsModel];
}

#pragma mark - like network + data dealwith

- (void)postLikeNetwork:(NewsModel *)newsModel {
    NSString *api = @"http://rap2api.taobao.org/app/mock/163155/gaoshilist"; // 告示
    NSURLSessionConfiguration *config = [NSURLSessionConfiguration defaultSessionConfiguration];
    NSURLSession *session = [NSURLSession sessionWithConfiguration:config];
    NSURLSessionTask *task = [session dataTaskWithURL:[NSURL URLWithString:api] completionHandler:^(NSData *data, NSURLResponse *response, NSError *error) {
        dispatch_async(dispatch_get_main_queue(), ^{
            if (error == nil) {
                [self dealwithLikeData:newsModel.newsId];
            }
        });
    }];
    [task resume];
}

- (void)dealwithLikeData:(NSString *)newsId {
    __block NewsModel *newsModel;
    [self.dataSource enumerateObjectsUsingBlock:^(NewsModel *obj, NSUInteger idx, BOOL *stop) {
        if ([obj.newsId isEqualToString:newsId]) {
            newsModel = obj;
            *stop = YES;
        }
    }];
    if (newsModel) {
        newsModel.like = !newsModel.like;
        if (newsModel.like) {
            newsModel.likeNum += 1;
        } else {
            newsModel.likeNum -= 1;
        }
        [self updateNewsView:newsModel];
    }
}
运行结果
这种方法也可以实现功能,而且不会出问题,但是很明显,代码行数增加了,并且会增加VC的臃肿,所以不是很推荐。
4.3 数据模型更新了后如何处理?
一般数据模型更新了后都需要更新对应的视图,那是直接去更新视图操作还是先通知VC,然后让VC去更新对应的视图。
4.3.1 标准的MVC写法
苹果官方推荐当模型数据更新后告知VC,方法主要有三种,分别是delegate,block和通知。根据使用场景,三种方法各有优缺点,本文以block为例讲解。
使用场景:用户更新点赞状态后,需要告知后台,然后更新对应的模型数据,然后在更新视图。
- NewsModel.m (处理网络请求,更新数据然后回调给VC)
/// 添加点赞
- (void)addLike:(void(^)(NSDictionary *json))callback {
    NSURLSessionConfiguration *config = [NSURLSessionConfiguration defaultSessionConfiguration];
    NSURLSession *session = [NSURLSession sessionWithConfiguration:config];
    NSURLSessionTask *task = [session dataTaskWithURL:[NSURL URLWithString:API_GetGaoShiList] completionHandler:^(NSData *data, NSURLResponse *response, NSError *error) {
        dispatch_async(dispatch_get_main_queue(), ^{
            if (error == nil) {
                self.like = !self.like;
                if (self.like) {
                    self.likeNum += 1;
                } else {
                    self.likeNum -= 1;
                }
            }
            if (callback) {
                callback(nil);
            }
        });
    }];
    [task resume];
}
viewController.m (在回调中更新视图)
- (void)didTapNewsCellLike:(NewsModel *)newsModel {
    // 标准的MVC写法
    __weak typeof(NewsModel *) weakNewsModel = newsModel;
    [newsModel addLike:^(NSDictionary *json) {
        // 更新对应的视图
        [self updateNewsView:weakNewsModel];
    }];
}
标准的MVC写法是在模型对象内部完成数据的处理,然后再告知VC。
4.3.1 非标准的MVC写法
有些小伙伴喜欢在view视图中直接对模型进行操作,数据的处理等操作。例子和之前的类似
- NewsCell.m(当用户点赞后,直接在视图中发起网络请求,处理数据,然后发通知更新对应的视图)
- (instancetype)initWithStyle:(UITableViewCellStyle)style reuseIdentifier:(NSString *)reuseIdentifier {
    self = [super initWithStyle:style reuseIdentifier:reuseIdentifier];
    if (self) {
        self.contentView.backgroundColor = [UIColor whiteColor];
        [self drawUI];
        [self addNotify];  // 监听通知
    }
    return self;
}

#pragma mark - notify

- (void)addNotify {
    [[NSNotificationCenter defaultCenter] addObserver:self selector:@selector(onNotifyModelUpdate:) name:kNotifyModelUpdate object:nil];
}

- (void)onNotifyModelUpdate:(NSNotification *)notify {
    NewsModel *model = (NewsModel *)notify.object;
    if (model == nil) {
        return;
    }
    if (![self.model.newsId isEqualToString:model.newsId]) {
        return;
    }
    // 更新视图操作
    if (self.model.isLike) {
        [self.likeActionView updateImgName:@"like_red"];
    } else {
        [self.likeActionView updateImgName:@"like"];
    }
    [self.likeActionView updateTitle:[NSString stringWithFormat:@"%lu",(unsigned long)self.model.likeNum]];
}

// 用户点击了点赞按钮
- (void)tapLike {
    /**
     * 数据模型更新了后如何处理?
     * 直接发通知,然后视图监听通知并刷新视图
     */
    __weak typeof(self) weakSelf = self;
    [self.model addLike:^(NSDictionary *json) {
        // 发通知
        [[NSNotificationCenter defaultCenter] postNotificationName:kNotifyModelUpdate object:weakSelf.model];
    }];
}
运行结果
结果运行正常,没有任何问题,这种写法就只是
view和model之间进行交互,没有涉及到vc,虽然可以实现功能,但是违背了MVC的设计初衷,在视图中做了很多不该视图做的事情,而且代码也比较多,复杂。
4.4 如何更新 view 上面的视图元素
当用户点赞之后或者取消点赞视图,需要将对应的视图图标替换,那当数据更新后,我们如何更新View上面的视图元素呢?
4.4.1 标准的MVC写法
由VC来更新对应的视图
- viewController.m (在VC中更新视图)
- (void)updateNewsView:(NewsModel *)newsModel {
    __block NSUInteger index = NSNotFound;
    [self.dataSource enumerateObjectsUsingBlock:^(NewsModel *obj, NSUInteger idx, BOOL *stop) {
        if ([newsModel.newsId isEqualToString:obj.newsId]) {
            index = idx;
            *stop = YES;
        }
    }];
    if (index == NSNotFound) {
        return;
    }
    NSIndexPath *indexPath = [NSIndexPath indexPathForRow:index inSection:0];
    [self.tableView reloadRowsAtIndexPaths:@[indexPath] withRowAnimation:UITableViewRowAnimationNone];
}
通过
newsId,找到该模型在数据源中的索引,然后tableView更新对应位置的``cell`即可。
4.4.1 非标准的MVC写法
视图中监听对应通知,然后更新对应的视图,前面例子已经提到过了
- NewsCell.m (直接在视图中监听模型数据的变化,然后更新对应视图的元素)
#pragma mark - notify

- (void)addNotify {
    [[NSNotificationCenter defaultCenter] addObserver:self selector:@selector(onNotifyModelUpdate:) name:kNotifyModelUpdate object:nil];
}

- (void)onNotifyModelUpdate:(NSNotification *)notify {
    NewsModel *model = (NewsModel *)notify.object;
    if (model == nil) {
        return;
    }
    if (![self.model.newsId isEqualToString:model.newsId]) {
        return;
    }
    // 更新视图操作
    if (self.model.isLike) {
        [self.likeActionView updateImgName:@"like_red"];
    } else {
        [self.likeActionView updateImgName:@"like"];
    }
    [self.likeActionView updateTitle:[NSString stringWithFormat:@"%lu",(unsigned long)self.model.likeNum]];
}
1.给
cell添加监听通知,当模型数据发生变化后,全局发通知,每一个cell监听到通知后都需要去做判断,即当前cell对应的model是否是需要更新的model,通过newsId来区分。
2.很明显,这种方法显得比较low,而且每一个cell都要添加监听,然后做判断,性能较低。
本文参考
iOS 关于MVC和MVVM设计模式的那些事
杂谈: MVC/MVP/MVVM
本文是我对MVC的一些理解及认知,如果有问题欢迎提问,如有错误,欢迎指正,水平有限,犯错难免,不喜勿喷。本文为原著,如果转载请注明出处,谢谢。
项目连接地址 - MVC-Demo


