一、systemd的新特性及unit常见类型
systemd即为system daemon,是Centos 7上用于替换init启动进程的新的启动进程。systemd出现的主要目的为减少系统引导时间和计算开销。Linux系统使用Systemd引导程序取代传统的SysV init,Systemd兼容init开机启动脚本。
systemd的特性
- 系统引导时,其服务并行启动
- 按需激活进程
- 系统状态快照
- 基于依赖关系定义服务控制逻辑
systemd的核心概念:unit单元
systemd的unit用于对相关配置文件进行标识、识别和配置;unit文件中主要包含了系统服务、监听的socket、保存的快照以及其他的init相关的信息。这些unit文件主要保存在一下三个目录中:
/usr/lib/systemd/system
/run/systemd/system
/etc/systemd/system
unit常见类型
service unit:文件扩展名为.service,用于定义系统服务
target unit:文件扩展名为.target,用于模拟实现“运行级别”
device unit:文件扩展名为.device,用于定义内核识别的设备
mount unit:文件扩展名为.mount,定义文件系统的挂载点
socket unit:扩展名为.socket,用于表示进程间通信用到的socket文件
snapshot unit:文件扩展名为.snapshot,用于管理系统快照
swap unit:文件扩展名为.swap,用于表示swap设备
automount unit:扩展名为.automount,文件系统自动挂载点设备
path unit:文件扩展名为.path,用于定义文件系统中的文件或者目录
unit的关键特性
系统支持的unit类型可通过命令systemctl -t help来进行查看。
- 基于socket的激活机制:socket与程序分离。systemd为支持此机制的服务监听socket,当接收到来自客户端的socket通信时,由systemd激活对应的服务,应答客户端的请求
- 基于bus的激活机制:基于总线的请求来激活设备
- 基于device的激活机制;当有设备接入到系统时,systemd会自动激活device、mount、automount等unit来识别、挂载、接入对应的设备
- 基于path的激活机制:当某个文件路径变得可用时或路径出现相应的文件时,激活相应的服务;
- 系统快照:保存各unit的当前状态信息于持久存储在设备中
- 向后兼容sysv init脚本:能够继续使用/etc/init.d/目录中的服务管理脚本
不兼容的情况:
- systemctl的命令是固定不变的
- 不是由systemd启动的服务,systemctl无法与之通信
unit文件的组成
unit文件通常有Unit、Service、Install这三个段组成。其每个段的意义及常用选项如下:
- [Unit]段:定义了与Unit类型无关的通用选项;用于提供unit的描述信息、unit行为及依赖关系等
- Description:秒速信息;意义性描述。
- After:定义unit的启动次序;表示当前unit应该晚于那些unit启动;功能与Before相反。
- Requies:依赖到的其他units;强依赖,被依赖的units无法激活时,当前unit即无法激活
- Wants:依赖的其他units;弱依赖。
- conflicts:定义units间的冲突关系
- [Service]段:与特定类型相关的专用选项,此处为service类型
- type:用于定义影响ExecStart及相关参数的功能的unit进程启动类型。类型包括:simple、forking、oneshot、dbus、notify、idle
- EnvironmentFile:环境配置文件
- ExecStart:指明启动unit要运行命令或脚本;ExecStartPre、ExecStartPost
- ExecStop:指明停止unit要运行的命令或脚本
- Restart:启动此项,意外终止会自动重启脚本
- [Install]段:定义由“systemctl enable”以及“systemctl disable”命令在实现服务启用或仅用时用到的一些选项。
- Alias:别名
- RequiredBy:被那些units所依赖
- WantedBy:被那些units所依赖
注意:对于新创建的unit文件或,修改了的unit文件,要通知systemd重载此配置文件:systemctl daemon-reload
使用systemctl管理系统服务
语法
systemctl [OPTIONS···] COMMAND [NAME···]
常用命令
下面为常用的systemctl子命令的使用格式以及在旧版本中对应的实现方式:
| 功能 | 新指令 | 旧指令 |
|---|---|---|
| 启动服务 | systemctl start NAME.service | service NAME start |
| 停止服务 | systemctl stop NAME.service | service NAME stop |
| 重启服务 | systemctl restart NAME.service | service NAME restart |
| 查看服务状态 | systemctl status NAME.service | service NAME status |
| 条件式重启 | systemctl try-restart NAME.service | service NAME condrestart |
| 重载或重启服务 | systemctl reload-or-try-restart NAME.service | -- |
| 重载或条件式重启服务 | systemctl reload-or-try-restart NAME.service | -- |
| 查看某服务当前激活与否的状态务 | systemctl is-active NAME.service | -- |
| 查看所有以激活的服务 | systemctl list-units --type service | -- |
| 查看所有服务 | systemctl list-units -t service --all(-a) | -- |
| 设置服务开机自启 | systemctl enable NAME.service | chkconfig NAME on |
| 禁止服务开机自启 | systemctl disable NAME.service | chkconfig NAME off |
| 查看某服务是否能开机自启 | systemctl is-enabled NAME.service | chkconfig --list NAME |
| 禁止某服务设定为开机自启动 | systemctl mask NAME.service | -- |
| 取消此禁止 | systemctl unmask NAME.service | -- |
| 查看服务的依赖关系 | systemctl list-dependencies NAME.service | -- |
| 查看所有运行级别 | systemctl list-units -t target --all(-a) | -- |
| 获取默认运行级别 | systemctl get-default | -- |
| 修改默认运行级别 | systemctl set-default NAME.target | -- |
| 切换至紧急救援模式 | systemctl rescue | -- |
| 切换至emergency模式 | systemctl emergency | -- |
| 关机 | systemctl halt、systemctl poweroff | -- |
| 重启 | systemctl reboot | -- |
| 挂起 | systemctl suspend | -- |
| 快照 | systemctl hibernate | -- |
| 快照并挂起 | systemctl hybrid-sleep | -- |
| 运行级别切换 | systemctl isolate NAME.target | init N |
centos7中target units文件中对应的级别:
- 级别0:runlevel0.target或poweroff.target
- 级别1:runlevel1.target或rescue.target
- 级别2:runlevel2.target或multi-user.target
- 级别3:runlevel3.target或multi-user.target
- 级别4:runlevel4.target或multi-user.target
- 级别5:runlevel5.target或graphical.taget
- 级别6:runlevel6.target或reboot.target
示例
1、查看服务的依赖关系
[root@localhost nginx]# systemctl list-dependencies nginx.service
nginx.service
● ├─-.mount
● ├─system.slice
● ├─var.mount
● └─basic.target
●   ├─alsa-restore.service
●   ├─alsa-state.service
●   ├─microcode.service
●   ├─rhel-dmesg.service
●   ├─[email protected]
●   ├─paths.target
●   ├─slices.target
●   │ ├─-.slice
●   │ └─system.slice
●   ├─sockets.target
●   │ ├─avahi-daemon.socket
●   │ ├─cups.socket
●   │ ├─dbus.socket
●   │ ├─dm-event.socket
●   │ ├─iscsid.socket
●   │ ├─iscsiuio.socket
●   │ ├─rpcbind.socket
●   │ ├─spice-vdagentd.socket
●   │ ├─systemd-initctl.socket
●   │ ├─systemd-journald.socket
●   │ ├─systemd-shutdownd.socket
●   │ ├─systemd-udevd-control.socket
●   │ ├─systemd-udevd-kernel.socket
●   │ ├─virtlockd.socket
●   │ └─virtlogd.socket
●   ├─sysinit.target
●   │ ├─dev-hugepages.mount
●   │ ├─dev-mqueue.mount
●   │ ├─dmraid-activation.service
●   │ ├─iscsi.service
●   │ ├─kmod-static-nodes.service
lines 1-36
2、查看服务是否处于激活状态
[root@localhost nginx]# systemctl is-active nginx.service
active
3、查看所有已激活的服务
[root@localhost nginx]# systemctl list-units --type service
  UNIT                               LOAD   ACTIVE SUB     DESCRIPTION
  abrt-ccpp.service                  loaded active exited  Install ABRT coredump hook
  abrt-oops.service                  loaded active running ABRT kernel log watcher
  abrt-xorg.service                  loaded active running ABRT Xorg log watcher
  abrtd.service                      loaded active running ABRT Automated Bug Reporting Tool
  alsa-state.service                 loaded active running Manage Sound Card State (restore and store)
  atd.service                        loaded active running Job spooling tools
  auditd.service                     loaded active running Security Auditing Service
  avahi-daemon.service               loaded active running Avahi mDNS/DNS-SD Stack
  blk-availability.service           loaded active exited  Availability of block devices
  chronyd.service                    loaded active running NTP client/server
  crond.service                      loaded active running Command Scheduler
  cups.service                       loaded active running CUPS Printing Service
  dbus.service                       loaded active running D-Bus System Message Bus
  [email protected]                 loaded active running Getty on tty1
  gssproxy.service                   loaded active running GSSAPI Proxy Daemon
  irqbalance.service                 loaded active running irqbalance daemon
  iscsi-shutdown.service             loaded active exited  Logout off all iSCSI sessions on shutdown
  kdump.service                      loaded active exited  Crash recovery kernel arming
  kmod-static-nodes.service          loaded active exited  Create list of required static device nodes for the current kernel
  ksm.service                        loaded active exited  Kernel Samepage Merging
  ksmtuned.service                   loaded active running Kernel Samepage Merging (KSM) Tuning Daemon
  libstoragemgmt.service             loaded active running libstoragemgmt plug-in server daemon
  libvirtd.service                   loaded active running Virtualization daemon
  lvm2-lvmetad.service               loaded active running LVM2 metadata daemon
4、psacct的unit文件
[Unit]
Description=The Apache HTTP Server
After=network.target remote-fs.target nss-lookup.target
Documentation=man:httpd(8)
Documentation=man:apachectl(8)

[Service]
Type=notify
EnvironmentFile=/etc/sysconfig/httpd
ExecStart=/usr/sbin/httpd $OPTIONS -DFOREGROUND
ExecReload=/usr/sbin/httpd $OPTIONS -k graceful
ExecStop=/bin/kill -WINCH ${MAINPID}
# We want systemd to give httpd some time to finish gracefully, but still want
# it to kill httpd after TimeoutStopSec if something went wrong during the
# graceful stop. Normally, Systemd sends SIGTERM signal right after the
# ExecStop, which would kill httpd. We are sending useless SIGCONT here to give
# httpd time to finish.
KillSignal=SIGCONT
PrivateTmp=true

[Install]
WantedBy=multi-user.target
二、文本处理三剑客之awk
awk命令是一种编程语言,用于在linux/unix下对文本和数据进行扫描和处理的工具,其数据来源可以为标准输入、文件、管道等等。awk命令会从第一行输入开始逐行扫描至最后一行,寻找其中匹配特定模式的行,并在相应的行上执行用户指定的操作。Awk命令的基本架构由模式匹配和处理动作组成,默认处理动作为print打印行。
语法
awk [options] 'program...' FILE...
选项参数
options:
- -F fs:指明输入时字段分隔符
- -v var=value:自定义变量
- -f programfile:从文件中读取program命令
program
program语句的常用格式为:PATTERN{ACTION STATEMENTS},其中多个program语句之间用分号‘;’分割。
PATTERN:
- PATTERN的格式为:
- empty:空模式,表示匹配每一行
- /regular expression/:仅处理能被此模式匹配到的行
- relational expression:关系表达式;结果为真才会被处理
- line ranges:行范围。startline,endline:/pat1/,/pat2/或者(NR>=2&&NR<=10)。不支持直接用数字表示的行号
- BEGIN{}和END{}:
BEGIN{}:表示在开始处理行前执行一次指定的操作;
END{}:表示在结束对行的处理后执行一次指定的操作
- program语句的变量
- 内建变量
- FS:input field seperator,输入时分隔符,默认为空白字符 awk -v FS=':' '{print 4}' /etc/passwd
- OFS:output field seperator,输出时分隔符,默认为空白字符
- RS:input record Seperator,输入时换行符
- ORS:output record Seperator,输出时换行符
- NF:number of field,统计字段数。awk '{print NF}' /etc/fstab。显示最后一个字段awk '{print $NF}'
- NR:number of record:行数
- FNR:各文件分别统计行数
- FILENAME:当前文件名
- ARGC:命令行参数的个数
- ARGV:数组,保存的是命令行所给定的各参数
- 自定义变量
- -v var=value:定义变量
- 也可以在program语句中直接定义
ACTION
常用的action:
- print:使用格式为print item1,item2,....
- 逗号作为字段间的分隔符
- 输出的各item可以是字符串、也可以是数值;当前记录的字段、变量或awk表达式
- 如果省略item,相当于print $0,输出整行
- printf:格式为printf FORMAT,item1,item2...
- FORMAT必须给出
- 不会自动换行,需要显示给出换行控制符\n
- FORMAT中需要分别为后面的每个item制定一个格式化符号:
- 格式符
- %c:显示字符的ASCII码
- %d,%i:显示十进制整数
- %e,%E:科学计数法数值显示
- %f:显示为浮点数
- %g,%G:以科学计数法或浮点形式显示数据
- %s:显示字符串
- %u:无符号整数
- %%:显示%自身
- 修饰符:通过修饰符对格式符进行输出格式的整理
- #[.#]:第一个#数字控制显示的宽度;第二个#表示小数点后的精度,如%3.1f
- -:左对齐
- +:显示数值的符号
- 操作符:
- 算术操作符:x[+|-|/|*|%|^|%]y,-x,+x转换为数值
- 字符串操作符:没有符号的操作符,字符串连接
- 赋值操作符:=、+=、-=、*=、/=、%=、^=、++、--
- 比较操作符:>,>=,<,<=,!=,==
- 模式匹配符::是否匹配,!:是否不匹配
- 逻辑操作符:&&,||,!
- 函数调用:function_name(arg1,arg2,...)
- 条件表达式:
awk [options] '{selector?if-true-expression:if-false-expression}' /PATH/TO/SOMFILE- expression表达式:
- control statements:if,while控制语句
- compound statements:组合语句
- input statements:输入语句
示例
1、在program语句中自定义变量
[root@localhost ~]# ls -l | awk '/root/{hello="this is a test.";print $3,hello}'
root this is a test.
root this is a test.
root this is a test.
2、显示/etc/passwd中的用户名、uid和默认shell
[root@localhost ~]# awk -v FS=':' -v OFS=':' '{print $1,$3,$7}' /etc/passwd
root:0:/bin/bash
bin:1:/sbin/nologin
daemon:2:/sbin/nologin
adm:3:/sbin/nologin
lp:4:/sbin/nologin
sync:5:/bin/sync
shutdown:6:/sbin/shutdown
halt:7:/sbin/halt
mail:8:/sbin/nologin
operator:11:/sbin/nologin
games:12:/sbin/nologin
3、显示/etc/passwd中的用户名、uid,并右对齐
[root@localhost ~]# awk -F: '{printf "username:%15s,UID:%d\n",$1,$3}' /etc/passwd
username:           root,UID:0
username:            bin,UID:1
username:         daemon,UID:2
username:            adm,UID:3
username:             lp,UID:4
username:           sync,UID:5
username:       shutdown,UID:6
username:           halt,UID:7
username:           mail,UID:8
username:       operator,UID:11
username:          games,UID:12
username:            ftp,UID:14
username:         nobody,UID:99
username:            ods,UID:999
username:systemd-network,UID:192
username:           dbus,UID:81
username:        polkitd,UID:998
username:         apache,UID:48
username:        unbound,UID:997
4、根据用户ID判断对应用户是系统用户还是普通用户,显示结果左对齐
[root@localhost ~]#  awk -F:  '{$3>=1000?usertype="this is a common user.":usertype="This is a system user.";printf "%-20s:%-s\n",$1,usertype}' /etc/passwd
root                :This is a system user.
bin                 :This is a system user.
daemon              :This is a system user.
adm                 :This is a system user.
lp                  :This is a system user.
sync                :This is a system user.
shutdown            :This is a system user.
halt                :This is a system user.
mail                :This is a system user.
operator            :This is a system user.
games               :This is a system user.
ftp                 :This is a system user.
nobody              :This is a system user.
ods                 :This is a system user.
systemd-network     :This is a system user.
dbus                :This is a system user.
polkitd             :This is a system user.
apache              :This is a system user.
unbound             :This is a system user.
libstoragemgmt      :This is a system user.
rpc                 :This is a system user.
5、显示默认为shell类型为bash的用户
[root@localhost ~]# awk -F: '$NF=="/bin/bash"{print $1,$NF}' /etc/passwd
root /bin/bash
wxq /bin/bash
hadoop /bin/bash
bash /bin/bash
testbash /bin/bash
basher /bin/bash
awk的高级应用
awk语句中的控制语句
awk命令是一种编程语言,有相应的控制语句。其控制语句的类型与bash shell编程的类似,包括:if-else、while、for、switch、break、continue和next。其中break、continue用于跳出循环及跳出本次循环,next用于提前结束当前行的处理,直接进入下一行。
- if-else语句
awk命令的if-else语句通常用于对匹配的行或字段做条件判断选择,支持双分支if语句。其格式通常为:
awk [options] '{if (condition) {statements} [else {statements}] }' /PATH/TO/SOMEFILE
当使用了else语句时,if-else语句中的statements语句需要用{}括起来
示例:
以冒号为分隔符,判断ID>=1000的用户ID为普通用户;
[root@localhost ~]# awk -F: '{if($3>=1000) {printf "Common user: %s\n",$1} else {printf "root or Sysuser: %s\n",$1}}' /etc/passwd
root or Sysuser: root
root or Sysuser: bin
root or Sysuser: daemon
root or Sysuser: adm
root or Sysuser: lp
root or Sysuser: sync
root or Sysuser: shutdown
root or Sysuser: halt
root or Sysuser: mail
root or Sysuser: operator
root or Sysuser: games
root or Sysuser: ftp
root or Sysuser: nobody
root or Sysuser: ods
root or Sysuser: systemd-network
root or Sysuser: dbus
root or Sysuser: polkitd
root or Sysuser: apache
root or Sysuser: unbound
root or Sysuser: libstoragemgmt
root or Sysuser: rpc
root or Sysuser: colord
root or Sysuser: rpcuser
Common user: nfsnobody
- while循环语句
while语句主要应用于对一行内多个字段逐一进行类似处理时使用,亦或者是对数组中的各元素逐一处理时使用。其语法格式通常为:
awk '[/PATTERN/]{while(condition) {statements}}' /PATH/TO/SOMEFILE
示例:
以空格开头0次或多次,后跟linux16的行,以空格为分隔符,只显示每行中字段的长度>=7的字段;
[root@localhost ~]# awk '/^[[:space:]]*linux16/{i=1;while(i<=NF) {if(length($i)>=7) {print $i,length($i)}; i++}}' /etc/grub2.cfg
linux16 7
/vmlinuz-3.10.0-862.el7.x86_64 30
root=UUID=934c9a34-c3a2-40e3-9696-4e4edda5ede4 46
crashkernel=auto 16
LANG=zh_CN.UTF-8 16
linux16 7
/vmlinuz-0-rescue-ee1d782742df449b86df71311eb27f85 50
root=UUID=934c9a34-c3a2-40e3-9696-4e4edda5ede4 46
crashkernel=auto 16
- do-while循环
do-while循环的意义在于无论条件真假,循环体都会执行一次。也就是至少执行一次循环体。其语法格式为:
awk '[/PATTERN/]{do statements while(condition)}' /PATH/TO/SOMEFILE
- for循环
awk命令的for 循环常用于进行累加或遍历操作,如累计某个关键字出现次数、遍历数组等等。其常见的格式为:
awk '/PATTERN/{for(expr1;expr2;expr3) {循环体}}' /PATH/TO/SOMEFILE
expr1:控制变量初始化;
expr2:条件判断;
expr3:控制变量的数值修正表达式;
即:
awk '/PATTERN/{for(变量赋值;判断条件;条件变化) {循环体}}' /PATH/TO/SOMEFILE
示例:
以空格开头0次或多次,后跟linux16的行,以空格为分隔符,显示每行中各字段的长度。
[root@localhost ~]# awk '/^[[:space:]]*linux16/{i=1;while(i<=NF) {if(length($i)>=7) {print $i,length($i)}; i++}}' /etc/grub2.cfg
linux16 7
/vmlinuz-3.10.0-862.el7.x86_64 30
root=UUID=934c9a34-c3a2-40e3-9696-4e4edda5ede4 46
crashkernel=auto 16
LANG=zh_CN.UTF-8 16
linux16 7
/vmlinuz-0-rescue-ee1d782742df449b86df71311eb27f85 50
root=UUID=934c9a34-c3a2-40e3-9696-4e4edda5ede4 46
crashkernel=auto 16
[root@localhost ~]# awk '/^[[:space:]]*linux16/{for(i=1;i<=NF;i++) {print $i,length($i)}}' /etc/grub2.cfg
linux16 7
/vmlinuz-3.10.0-862.el7.x86_64 30
root=UUID=934c9a34-c3a2-40e3-9696-4e4edda5ede4 46
ro 2
crashkernel=auto 16
rhgb 4
quiet 5
LANG=zh_CN.UTF-8 16
linux16 7
/vmlinuz-0-rescue-ee1d782742df449b86df71311eb27f85 50
root=UUID=934c9a34-c3a2-40e3-9696-4e4edda5ede4 46
ro 2
crashkernel=auto 16
rhgb 4
quiet 5
- switch语句
awk的switch语句类似于bashshell编程的case语句,判断表达式的值符合case里面的哪个条件,可以等于case里的值,也可以是被case里的正则表达式匹配;如果符合条件就执行该case里的语句,不会往下判断了;类似case语句,只不过是关键字写法不同。其格式为:
awk [options] '{switch(CONDITION){case [VALUE|/PATTERN/]:statement;case [VALUE|/PATTERN/]:statement;...;default:statement}}'
示例:
打印行号为6以及5的倍数的行的行号
[root@localhost ~]# awk -F: '{switch(NR+5){case 6:{print NR;next}; case /[[:digit:]]+0/: {print NR; next} ;default: print "-------------"}}' /etc/passwd
1
-------------
-------------
-------------
5
-------------
-------------
-------------
-------------
-------------
-------------
-------------
-------------
-------------
swk语句中的数组
awk命令也可以结合数组来完成一系列的工作,其数组格式为:
array[index-expression]
- 其中index-expression可使用任意字符串,字符串要使用双引号括起来;
- 如果数组中的元素事先不存在,在引用时,awk命令会自动创建此元素,并将其值初始化为“空串”。
- 若要判断数组中是否存在某元素,要使用"index in array"格式进行
示例
[root@localhost ~]# awk 'BEGIN{weekdays["mon"]="Monday";weekdays["tue"]="Tuesday";print weekdays["mon"]}'
Monday
若要遍历数组中的每个元素,要使用for循环;
即for(变量名 in 数组名) {循环体}
变量名中保存的是数组的索引,而不是数组中的元素;对应的变量var会遍历array数组的每个索引;
例如:
统计/etc/fstab文件中每个单词出现的次数。
[root@localhost ~]# awk '{for(i=1;i<=NF;i++){count[$i]++}}END{for(i in count) {print i,count[i]}}' /etc/fstab
UUID=4ef876f1-19ad-4cf6-b7f5-e54f96e818b5 1
man 1
UUID=4eabc87c-d983-4090-8a3c-6d1a3963c827 1
and/or 1
maintained 1
UUID=e7275fe6-32b3-4a7b-a90d-c8a39cb23af1 1
xfs 4
Wed 1
/var 1
Accessible 1
# 7
awk中的函数
awk命令也支持函数的编写,通常来说用得较多的为awk命令的几个内置函数。
- 内置函数
- length([s]):返回指定字符串的长度
- sub(r,s,[t]):以r表示的模式来查找t所代表的字符串中的匹配的内容,并将其第一次出现替换为s所标识的内容
- gsub(r,s,[t]):以r表示的模式来查找t所代表的字符串中的匹配的内容,并将其所有出现替换为s所标识的内容
- split(s,a[,r]):以r为分隔符切割字符s,并将切割后的结果保存至a所表示的属组中。
例如:
显示来访的主机地址连接的次数。
[root@localhost ~]# netstat -tan | awk '/^tcp\>/{split($5,ip,":");count[ip[1]]++}END{for (i in count) {print i,count[i]}}'
0.0.0.0 6
192.168.2.112 1
- 自定义函数
其格式为:
function function_name(argument1,argument2,...)
{
function_body
}
function_name为用户定义的函数的名称,函数通常可以接受以逗号分割的多个arguments,参数是可选的;通常来说一个function_body是由一个或多个语句组成的。
例如:
打印UID大于100的用户名及用户UID。
[root@localhost ~]# awk -F: 'function test(a,b){if(b>100) printf "User:%-20s UID:%-10s\n",a,b};test($1,$3)' /etc/passwd
User:ods                  UID:999
User:systemd-network      UID:192
User:polkitd              UID:998
User:unbound              UID:997
User:libstoragemgmt       UID:996
User:colord               UID:995
User:nfsnobody            UID:65534
User:saslauth             UID:994
User:abrt                 UID:173
User:setroubleshoot       UID:993
User:rtkit                UID:172
示例:
打印九九乘法表。
[root@localhost ~]# awk 'BEGIN{for(n=1;n<=9;n++){for (i=1;i<=n;i++) printf i"x"n"="i*n" ";printf "\n"}}'
1x1=1
1x2=2 2x2=4
1x3=3 2x3=6 3x3=9
1x4=4 2x4=8 3x4=12 4x4=16
1x5=5 2x5=10 3x5=15 4x5=20 5x5=25
1x6=6 2x6=12 3x6=18 4x6=24 5x6=30 6x6=36
1x7=7 2x7=14 3x7=21 4x7=28 5x7=35 6x7=42 7x7=49
1x8=8 2x8=16 3x8=24 4x8=32 5x8=40 6x8=48 7x8=56 8x8=64
1x9=9 2x9=18 3x9=27 4x9=36 5x9=45 6x9=54 7x9=63 8x9=72 9x9=81
三、编译安装NGINX,实现通过systemd管理。
1.在进行编译安装nginx前需要先进安装相关的依赖包,如下:
[root@localhost test1]# yum install gc gcc gcc-c++ pcre-devel zlib-devel openssl-devel
2.下载nginx,此处使用的是稳定版nginx-1.14.0,然后解压缩
[root@localhost test1]# wget  http://nginx.org/download/nginx-1.14.0.tar.gz
--2018-10-14 17:24:16--  http://101.110.118.70/nginx.org/download/nginx-1.14.0.tar.gz
正在连接 101.110.118.70:80... 已连接。
已发出 HTTP 请求,正在等待回应... 200 OK
长度:1016272 (992K) [application/octet-stream]
正在保存至: “nginx-1.14.0.tar.gz”

100%[===========================================================================================>] 1,016,272   2.06MB/s 用时 0.5s

2018-10-14 17:24:17 (2.06 MB/s) - 已保存 “nginx-1.14.0.tar.gz” [1016272/1016272])

[root@localhost test1]# ll
总用量 996
-rw-r--r--. 1 root root 1016272 4月  17 23:35 nginx-1.14.0.tar.gz
[root@localhost test1]# tar -zxvf nginx-1.14.0.tar.gz
nginx-1.14.0/
nginx-1.14.0/auto/
nginx-1.14.0/conf
4.创建nginx安装目录:/usr/local/nginx,并进入已解压出的源码包目录nginx-1.14.0.
[root@localhost test1]# mkdir /usr/local/nginx
[root@localhost test1]# cd nginx-1.14.0
[root@localhost nginx-1.14.0]#
5.定义编译设置,./configure,这里只设置一个基本能使用的nginx即可,具体需要什么功能模块可自主选择,使用./configure --help 命令可以查看所有模块。若运行后没有报错,则可以进行编译安装。
[root@localhost nginx-1.14.0]# ./configure --user=nginx --group=nginx --prefix=/usr/local/nginx --with-http_stub_status_module --with-http_ssl_module --with-http_gzip_static_module
checking for OS
 + Linux 3.10.0-862.el7.x86_64 x86_64
checking for C compiler ... found
6.进行编译安装:make && make install
[root@localhost nginx-1.14.0]# make && make install
make -f objs/Makefile
make[1]: 进入目录“/tmp/test1/nginx-1.14.0”
......
[root@localhost nginx-1.14.0]# cd /usr/local/nginx
[root@localhost nginx]# ll
总用量 4
drwxr-xr-x. 2 root root 4096 10月 14 17:54 conf
drwxr-xr-x. 2 root root   40 10月 14 17:54 html
drwxr-xr-x. 2 root root    6 10月 14 17:54 logs
drwxr-xr-x. 2 root root   19 10月 14 17:54 sbin
7.编译安装成功后,注意检查防火墙和selinux是否关闭,若未关闭需要关闭掉,以免影响输出结果。
[root@localhost nginx]# systemctl status firewalld.service
● firewalld.service - firewalld - dynamic firewall daemon
   Loaded: loaded (/usr/lib/systemd/system/firewalld.service; disabled; vendor preset: enabled)
   Active: active (running) since 日 2018-10-14 15:34:10 CST; 2h 28min ago
     Docs: man:firewalld(1)
 Main PID: 713 (firewalld)
   CGroup: /system.slice/firewalld.service
           └─713 /usr/bin/python -Es /usr/sbin/firewalld --nofork --nopid

10月 14 15:34:10 localhost.localdomain systemd[1]: Starting firewalld - dynamic firewall daemon...
10月 14 15:34:10 localhost.localdomain systemd[1]: Started firewalld - dynamic firewall daemon.
[root@localhost nginx]# systemctl disable firewalld.service
Removed symlink /etc/systemd/system/multi-user.target.wants/firewalld.service.
Removed symlink /etc/systemd/system/dbus-org.fedoraproject.FirewallD1.service.
[root@localhost nginx]# systemctl stop firewalld.service
[root@localhost nginx]# systemctl status firewalld.service
● firewalld.service - firewalld - dynamic firewall daemon
   Loaded: loaded (/usr/lib/systemd/system/firewalld.service; disabled; vendor preset: enabled)
   Active: inactive (dead)
     Docs: man:firewalld(1)
[root@localhost nginx]# getenforce  #检测selinux状态
Enforcing #此为开启状态
[root@localhost nginx]# setenforce 0  #关闭selinux
[root@localhost nginx]# getenforce
Permissive
8.编辑nginx的unit文件。
在/usr/lib/systemd/system/目录下新建一个名为nginx.service,编辑此文件并写入以下脚本并保存:
[Unit]
Description=nginx - high performance web server
Documentation=http://nginx.org/en/docs/
After=network.target remote-fs.target nss-lookup.target
[Service]
Type=forking
PIDFile=/usr/local/nginx/logs/nginx.pid
ExecStartPre=/usr/local/nginx/sbin/nginx -t -c /usr/local/nginx/conf/nginx.conf
ExecStart=/usr/local/nginx/sbin/nginx -c /usr/local/nginx/conf/nginx.conf
ExecReload=/bin/kill -s HUP $MAINPID
ExecStop=/bin/kill -s QUIT $MAINPID
PrivateTmp=true
[Install]
WantedBy=multi-user.target
9.创建并编辑完成nginx的unit文件之后,就可以运用systemd管理nginx服务了。
首先启动nginx服务:systemctl start nginx.service
然后用systemctl status nginx.service查看nginx服务的运行状态
[root@localhost nginx]# systemctl start nginx.service
[root@localhost nginx]# systemctl status nginx.service
● nginx.service - nginx - high performance web server
   Loaded: loaded (/usr/lib/systemd/system/nginx.service; disabled; vendor preset: disabled)
   Active: active (running) since 日 2018-10-14 18:21:43 CST; 2s ago
     Docs: http://nginx.org/en/docs/
  Process: 6326 ExecStart=/usr/local/nginx/sbin/nginx -c /usr/local/nginx/conf/nginx.conf (code=exited, status=0/SUCCESS)
  Process: 6324 ExecStartPre=/usr/local/nginx/sbin/nginx -t -c /usr/local/nginx/conf/nginx.conf (code=exited, status=0/SUCCESS)
 Main PID: 6328 (nginx)
    Tasks: 2
   CGroup: /system.slice/nginx.service
           ├─6328 nginx: master process /usr/local/nginx/sbin/nginx -c /usr/local/nginx/conf/nginx.conf
           └─6329 nginx: worker process

10月 14 18:21:43 localhost.localdomain systemd[1]: Starting nginx - high performance web server...
10月 14 18:21:43 localhost.localdomain nginx[6324]: nginx: the configuration file /usr/local/nginx/conf/nginx.conf syntax is ok
10月 14 18:21:43 localhost.localdomain nginx[6324]: nginx: configuration file /usr/local/nginx/conf/nginx.conf test is successful
10月 14 18:21:43 localhost.localdomain systemd[1]: Failed to read PID from file /usr/local/nginx/logs/nginx.pid: Invalid argument
10月 14 18:21:43 localhost.localdomain systemd[1]: Started nginx - high performance web server.
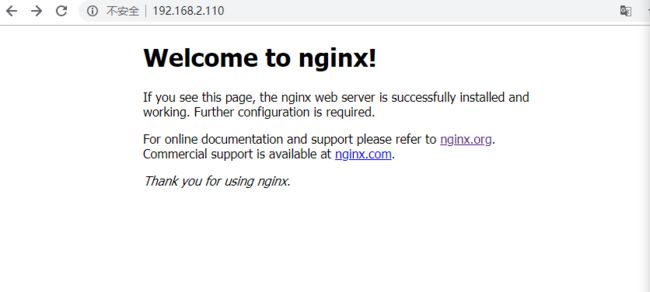
10.在浏览器中输入配置了nginx的服务器地址,出现以下页面,说明编译安装后运行成功。
11.可以使用以下命令对nginx服务进行管理
- systemctl enable nginx.service:开机运行nginx
- systemctl is-enabled nginx.service:开机运行nginx
[root@localhost nginx]# systemctl enable nginx.service
Created symlink from /etc/systemd/system/multi-user.target.wants/nginx.service to /usr/lib/systemd/system/nginx.service.
[root@localhost nginx]# systemctl is-enabled nginx.service
enabled
- systemctl disable nginx.service:取消开机运行nginx
- systemctl stop nginx.service:停止nginx
- systemctl restart nginx.service:重启nginx
- systemctl reload nginx.service:重新加载nginx配置文件
- systemctl --failed:显示启动失败的服务