环境
- VM: VMware Fusion 8.5
- hostname: localhost.localdomain
- ip: 192.168.12.xxx
- OS: CentOS Linux 7 (Core)
- Memory: 4G
- HDD: 80G
- /swap: 4G
- /: 35G
- DB: Oracle Database 12c Release 1(12.1.0.2.0) - Enterprise Edition for Linux x86-64 (server class)
- EM: Oracle Enterprise Manager Cloud Control 12c Release 4 (12.1.0.4) for Linux x86-64
安装必须的软件包
需要连接外网,从Oracle Public Yum仓库来安装oracle-rdbms-server-12cR1-preinstall
先下载 repo 文件
[root@localhost zodas]# cd /etc/yum.repos.d/
[root@localhost yum.repos.d]# wget http://public-yum.oracle.com/public-yum-ol7.repo
--2018-11-12 20:20:20--  http://public-yum.oracle.com/public-yum-ol7.repo
Resolving public-yum.oracle.com (public-yum.oracle.com)... 23.35.178.109
Connecting to public-yum.oracle.com (public-yum.oracle.com)|23.35.178.109|:80... connected.
HTTP request sent, awaiting response... 200 OK
Length: 14602 (14K) [text/plain]
Saving to: ‘public-yum-ol7.repo’

100%[========================================================================================================================================>] 14,602      --.-K/s   in 0s

2018-11-12 20:20:21 (197 MB/s) - ‘public-yum-ol7.repo’ saved [14602/14602]
测试 yum 是否正常工作
[root@localhost yum.repos.d]# yum repolist
Loaded plugins: fastestmirror
Loading mirror speeds from cached hostfile
 * base: mirrors.njupt.edu.cn
 * extras: mirrors.aliyun.com
 * updates: mirrors.njupt.edu.cn
ol7_UEKR4                                                                                                                                                  | 1.2 kB  00:00:00
ol7_latest                                                                                                                                                 | 1.4 kB  00:00:00
(1/5): ol7_UEKR4/x86_64/updateinfo                                                                                                                         |  82 kB  00:00:00
(2/5): ol7_latest/x86_64/group                                                                                                                             | 659 kB  00:00:00
(3/5): ol7_UEKR4/x86_64/primary                                                                                                                            | 3.5 MB  00:00:01
(4/5): ol7_latest/x86_64/primary                                                                                                                           | 9.5 MB  00:00:04
(5/5): ol7_latest/x86_64/updateinfo                                                                                                                        | 740 kB  00:00:19
ol7_UEKR4                                                                                                                                                                 124/124
ol7_latest                                                                                                                                                            11482/11482
repo id                                                  repo name                                                                                                          status
base/7/x86_64                                            CentOS-7 - Base                                                                                                     9,911
extras/7/x86_64                                          CentOS-7 - Extras                                                                                                     434
ol7_UEKR4/x86_64                                         Latest Unbreakable Enterprise Kernel Release 4 for Oracle Linux 7 (x86_64)                                            124
ol7_latest/x86_64                                        Oracle Linux 7 Latest (x86_64)                                                                                     11,482
updates/7/x86_64                                         CentOS-7 - Updates                                                                                                  1,614
repolist: 23,565
下载 RPM-GPG-KEY-oracle
[root@localhost yum.repos.d]# wget https://public-yum.oracle.com/RPM-GPG-KEY-oracle-ol7 -O /etc/pki/rpm-gpg/RPM-GPG-KEY-oracle
--2018-11-12 20:22:51--  https://public-yum.oracle.com/RPM-GPG-KEY-oracle-ol7
Resolving public-yum.oracle.com (public-yum.oracle.com)... 23.51.208.99
Connecting to public-yum.oracle.com (public-yum.oracle.com)|23.51.208.99|:443... connected.
HTTP request sent, awaiting response... 200 OK
Length: 1011 [text/plain]
Saving to: ‘/etc/pki/rpm-gpg/RPM-GPG-KEY-oracle’

100%[========================================================================================================================================>] 1,011       --.-K/s   in 0s

2018-11-12 20:22:53 (127 MB/s) - ‘/etc/pki/rpm-gpg/RPM-GPG-KEY-oracle’ saved [1011/1011]
安装 oracle-rdbms-server-12cR1-preinstall
[root@localhost yum.repos.d]# yum install oracle-rdbms-server-12cR1-preinstall

Installed:
  oracle-rdbms-server-12cR1-preinstall.x86_64 0:1.0-7.el7

Dependency Installed:
  bc.x86_64 0:1.06.95-13.el7                           bind-libs.x86_64 32:9.9.4-72.el7                                   bind-utils.x86_64 32:9.9.4-72.el7
  compat-libcap1.x86_64 0:1.10-7.el7                   compat-libstdc++-33.x86_64 0:3.2.3-72.el7                          cpp.x86_64 0:4.8.5-36.0.1.el7
  gcc.x86_64 0:4.8.5-36.0.1.el7                        gcc-c++.x86_64 0:4.8.5-36.0.1.el7                                  glibc-devel.x86_64 0:2.17-260.0.9.el7
  glibc-headers.x86_64 0:2.17-260.0.9.el7              gssproxy.x86_64 0:0.7.0-21.el7                                     kernel-container.x86_64 0:3.10.0-0.0.0.2.el7
  kernel-headers.x86_64 0:3.10.0-957.el7               keyutils.x86_64 0:1.5.8-3.el7                                      ksh.x86_64 0:20120801-139.0.1.el7
  libICE.x86_64 0:1.0.9-9.el7                          libSM.x86_64 0:1.2.2-2.el7                                         libX11.x86_64 0:1.6.5-2.el7
  libX11-common.noarch 0:1.6.5-2.el7                   libXau.x86_64 0:1.0.8-2.1.el7                                      libXext.x86_64 0:1.3.3-3.el7
  libXi.x86_64 0:1.7.9-1.el7                           libXinerama.x86_64 0:1.1.3-2.1.el7                                 libXmu.x86_64 0:1.1.2-2.el7
  libXrandr.x86_64 0:1.5.1-2.el7                       libXrender.x86_64 0:0.9.10-1.el7                                   libXt.x86_64 0:1.1.5-3.el7
  libXtst.x86_64 0:1.2.3-1.el7                         libXv.x86_64 0:1.0.11-1.el7                                        libXxf86dga.x86_64 0:1.1.4-2.1.el7
  libXxf86misc.x86_64 0:1.0.3-7.1.el7                  libXxf86vm.x86_64 0:1.1.4-1.el7                                    libaio-devel.x86_64 0:0.3.109-13.el7
  libbasicobjects.x86_64 0:0.1.1-32.el7                libcollection.x86_64 0:0.7.0-32.el7                                libdmx.x86_64 0:1.1.3-3.el7
  libevent.x86_64 0:2.0.21-4.el7                       libini_config.x86_64 0:1.3.1-32.el7                                libmpc.x86_64 0:1.0.1-3.el7
  libnfsidmap.x86_64 0:0.25-19.el7                     libpath_utils.x86_64 0:0.2.1-32.el7                                libref_array.x86_64 0:0.1.5-32.el7
  libstdc++-devel.x86_64 0:4.8.5-36.0.1.el7            libtirpc.x86_64 0:0.2.4-0.15.el7                                   libverto-libevent.x86_64 0:0.2.5-4.el7
  libxcb.x86_64 0:1.13-1.el7                           lm_sensors-libs.x86_64 0:3.4.0-6.20160601gitf9185e5.el7            mailx.x86_64 0:12.5-19.el7
  mpfr.x86_64 0:3.1.1-4.el7                            nfs-utils.x86_64 1:1.3.0-0.61.0.1.el7                              psmisc.x86_64 0:22.20-15.el7
  quota.x86_64 1:4.01-17.el7                           quota-nls.noarch 1:4.01-17.el7                                     rpcbind.x86_64 0:0.2.0-47.el7
  smartmontools.x86_64 1:6.5-1.el7                     sysstat.x86_64 0:10.1.5-17.el7                                     tcp_wrappers.x86_64 0:7.6-77.el7
  unzip.x86_64 0:6.0-19.el7                            xorg-x11-utils.x86_64 0:7.5-23.el7                                 xorg-x11-xauth.x86_64 1:1.0.9-1.el7

Dependency Updated:
  bind-libs-lite.x86_64 32:9.9.4-72.el7        bind-license.noarch 32:9.9.4-72.el7        glibc.x86_64 0:2.17-260.0.9.el7            glibc-common.x86_64 0:2.17-260.0.9.el7
  libgcc.x86_64 0:4.8.5-36.0.1.el7             libgomp.x86_64 0:4.8.5-36.0.1.el7          libstdc++.x86_64 0:4.8.5-36.0.1.el7

Complete!
安装完之后,会自动创建 oracle 用户和 oinstall 用户组。现在最好给 oracle 用户设置一下密码:
[root@localhost yum.repos.d]# passwd oracle
Changing password for user oracle.
New password:
BAD PASSWORD: The password is shorter than 8 characters
Retype new password:
passwd: all authentication tokens updated successfully.
前期准备
修改 hostname
修改默认主机名 localhost.localdomain 为 oem.com。若不修改,在后续安装 oracle 12c 的过程中,可能会出现 oracle net configuration failed,为了避免后续安装的复杂性,建议修改主机名。
先修改/etc/hosts为以下内容:
[root@localhost yum.repos.d]# vi /etc/hosts
127.0.0.1   localhost localhost.localdomain localhost4 localhost4.localdomain4
::1         localhost localhost.localdomain localhost6 localhost6.localdomain6
192.168.12.174 oem oem.com
然后修改 /etc/sysconfig/network 为以下内容:
[root@localhost yum.repos.d]# vi /etc/sysconfig/network
# Created by anaconda
# oracle-rdbms-server-12cR1-preinstall : Add NOZEROCONF=yes
NOZEROCONF=yes
HOSTNAME=oem.com
最后重启电脑,并检查 hostname 是否修改成功:
[root@localhost yum.repos.d]# reboot
[root@oem ~] hostnamectl
   Static hostname: localhost.localdomain
Transient hostname: oem #看这里!!!表示修改成功!!!
         Icon name: computer-vm
           Chassis: vm
        Machine ID: f8d5c3cadxxxxxxxx3faaee11e76d665
           Boot ID: 9f4838b65fbe4dxxxxxxxxcb4ef8afad
    Virtualization: vmware
  Operating System: CentOS Linux 7 (Core)
       CPE OS Name: cpe:/o:centos:centos:7
            Kernel: Linux 3.10.0-862.14.4.el7.x86_64
      Architecture: x86-64
配置 SSH 和 X11 转发
如果是在远程连接的情况下来安装 EM(比如使用VNC服务等),Oracle Universal Installer (OUI) GUI 需要使用X11会话来运行。所以首先需要配置SSH来支持X11转发(默认就是开启的,只需要确认一下即可):
[root@oem ~]# vi /etc/ssh/sshd_config
#X11Forwarding no
X11Forwarding yes
#X11DisplayOffset 10
#X11UseLocalhost yes
[root@localhost ~]#
还需要安装 xauth 和 xorg-x11-apps 包:
[root@oem ~]# rpm -qa | grep -i xauth
xorg-x11-xauth-1.0.2-7.1.el6.x86_64
[root@oem ~]# rpm -qa | grep -i xorg-x11-apps
[root@oem ~]# yum -y install xorg-x11-apps xauth
Loaded plugins: fastestmirror
Loading mirror speeds from cached hostfile
* base: mirrors.njupt.edu.cn
* extras: mirrors.aliyun.com
* updates: mirrors.njupt.edu.cn
Package 1:xorg-x11-xauth-1.0.9-1.el7.x86_64 already installed and latest version
Resolving Dependencies
--> Running transaction check
---> Package xorg-x11-apps.x86_64 0:7.7-7.el7 will be installed
--> Processing Dependency: libpng15.so.15(PNG15_0)(64bit) for package: xorg-x11-apps-7.7-7.el7.x86_64
--> Processing Dependency: libxkbfile.so.1()(64bit) for package: xorg-x11-apps-7.7-7.el7.x86_64
--> Processing Dependency: libpng15.so.15()(64bit) for package: xorg-x11-apps-7.7-7.el7.x86_64
--> Processing Dependency: libfontenc.so.1()(64bit) for package: xorg-x11-apps-7.7-7.el7.x86_64
--> Processing Dependency: libfontconfig.so.1()(64bit) for package: xorg-x11-apps-7.7-7.el7.x86_64
--> Processing Dependency: libXft.so.2()(64bit) for package: xorg-x11-apps-7.7-7.el7.x86_64
--> Processing Dependency: libXcursor.so.1()(64bit) for package: xorg-x11-apps-7.7-7.el7.x86_64
--> Processing Dependency: libXaw.so.7()(64bit) for package: xorg-x11-apps-7.7-7.el7.x86_64
--> Running transaction check
---> Package fontconfig.x86_64 0:2.13.0-4.3.el7 will be installed
--> Processing Dependency: freetype >= 2.8-7 for package: fontconfig-2.13.0-4.3.el7.x86_64
--> Processing Dependency: fontpackages-filesystem for package: fontconfig-2.13.0-4.3.el7.x86_64
--> Processing Dependency: dejavu-sans-fonts for package: fontconfig-2.13.0-4.3.el7.x86_64
---> Package libXaw.x86_64 0:1.0.13-4.el7 will be installed
--> Processing Dependency: libXpm.so.4()(64bit) for package: libXaw-1.0.13-4.el7.x86_64
---> Package libXcursor.x86_64 0:1.1.15-1.el7 will be installed
--> Processing Dependency: libXfixes.so.3()(64bit) for package: libXcursor-1.1.15-1.el7.x86_64
---> Package libXft.x86_64 0:2.3.2-2.el7 will be installed
---> Package libfontenc.x86_64 0:1.1.3-3.el7 will be installed
---> Package libpng.x86_64 2:1.5.13-7.el7_2 will be installed
---> Package libxkbfile.x86_64 0:1.0.9-3.el7 will be installed
--> Running transaction check
---> Package dejavu-sans-fonts.noarch 0:2.33-6.el7 will be installed
--> Processing Dependency: dejavu-fonts-common = 2.33-6.el7 for package: dejavu-sans-fonts-2.33-6.el7.noarch
---> Package fontpackages-filesystem.noarch 0:1.44-8.el7 will be installed
---> Package freetype.x86_64 0:2.4.11-15.el7 will be updated
---> Package freetype.x86_64 0:2.8-12.el7 will be an update
---> Package libXfixes.x86_64 0:5.0.3-1.el7 will be installed
---> Package libXpm.x86_64 0:3.5.12-1.el7 will be installed
--> Running transaction check
---> Package dejavu-fonts-common.noarch 0:2.33-6.el7 will be installed
--> Finished Dependency Resolution
Dependencies Resolved
==================================================================================================================================================================================
Package Arch Version Repository Size
==================================================================================================================================================================================
Installing:
xorg-x11-apps x86_64 7.7-7.el7 base 307 k
Installing for dependencies:
dejavu-fonts-common noarch 2.33-6.el7 base 64 k
dejavu-sans-fonts noarch 2.33-6.el7 base 1.4 M
fontconfig x86_64 2.13.0-4.3.el7 ol7_latest 254 k
fontpackages-filesystem noarch 1.44-8.el7 base 9.9 k
libXaw x86_64 1.0.13-4.el7 base 192 k
libXcursor x86_64 1.1.15-1.el7 ol7_latest 30 k
libXfixes x86_64 5.0.3-1.el7 base 18 k
libXft x86_64 2.3.2-2.el7 base 58 k
libXpm x86_64 3.5.12-1.el7 base 55 k
libfontenc x86_64 1.1.3-3.el7 base 31 k
libpng x86_64 2:1.5.13-7.el7_2 base 213 k
libxkbfile x86_64 1.0.9-3.el7 base 83 k
Updating for dependencies:
freetype x86_64 2.8-12.el7 ol7_latest 379 k
Transaction Summary
==================================================================================================================================================================================
Install 1 Package (+12 Dependent packages)
Upgrade ( 1 Dependent package)
Total download size: 3.1 M
Downloading packages:
Delta RPMs disabled because /usr/bin/applydeltarpm not installed.
(1/14): dejavu-fonts-common-2.33-6.el7.noarch.rpm | 64 kB 00:00:00
(2/14): libXaw-1.0.13-4.el7.x86_64.rpm | 192 kB 00:00:00
(3/14): fontpackages-filesystem-1.44-8.el7.noarch.rpm | 9.9 kB 00:00:01
(4/14): freetype-2.8-12.el7.x86_64.rpm | 379 kB 00:00:01
(5/14): fontconfig-2.13.0-4.3.el7.x86_64.rpm | 254 kB 00:00:02
(6/14): libXfixes-5.0.3-1.el7.x86_64.rpm | 18 kB 00:00:00
(7/14): libXpm-3.5.12-1.el7.x86_64.rpm | 55 kB 00:00:00
(8/14): libXft-2.3.2-2.el7.x86_64.rpm | 58 kB 00:00:00
(9/14): libfontenc-1.1.3-3.el7.x86_64.rpm | 31 kB 00:00:00
(10/14): libpng-1.5.13-7.el7_2.x86_64.rpm | 213 kB 00:00:00
(11/14): libxkbfile-1.0.9-3.el7.x86_64.rpm | 83 kB 00:00:00
(12/14): libXcursor-1.1.15-1.el7.x86_64.rpm | 30 kB 00:00:00
(13/14): dejavu-sans-fonts-2.33-6.el7.noarch.rpm | 1.4 MB 00:00:03
(14/14): xorg-x11-apps-7.7-7.el7.x86_64.rpm | 307 kB 00:00:00
----------------------------------------------------------------------------------------------------------------------------------------------------------------------------------
Total 965 kB/s | 3.1 MB 00:00:03
Running transaction check
Running transaction test
Transaction test succeeded
Running transaction
Installing : fontpackages-filesystem-1.44-8.el7.noarch 1/15
Installing : 2:libpng-1.5.13-7.el7_2.x86_64 2/15
Updating : freetype-2.8-12.el7.x86_64 3/15
Installing : dejavu-fonts-common-2.33-6.el7.noarch 4/15
Installing : dejavu-sans-fonts-2.33-6.el7.noarch 5/15
Installing : fontconfig-2.13.0-4.3.el7.x86_64 6/15
Installing : libXft-2.3.2-2.el7.x86_64 7/15
Installing : libfontenc-1.1.3-3.el7.x86_64 8/15
Installing : libXfixes-5.0.3-1.el7.x86_64 9/15
Installing : libXcursor-1.1.15-1.el7.x86_64 10/15
Installing : libxkbfile-1.0.9-3.el7.x86_64 11/15
Installing : libXpm-3.5.12-1.el7.x86_64 12/15
Installing : libXaw-1.0.13-4.el7.x86_64 13/15
Installing : xorg-x11-apps-7.7-7.el7.x86_64 14/15
Cleanup : freetype-2.4.11-15.el7.x86_64 15/15
Verifying : libXpm-3.5.12-1.el7.x86_64 1/15
Verifying : fontconfig-2.13.0-4.3.el7.x86_64 2/15
Verifying : libxkbfile-1.0.9-3.el7.x86_64 3/15
Verifying : libXaw-1.0.13-4.el7.x86_64 4/15
Verifying : libXfixes-5.0.3-1.el7.x86_64 5/15
Verifying : dejavu-fonts-common-2.33-6.el7.noarch 6/15
Verifying : dejavu-sans-fonts-2.33-6.el7.noarch 7/15
Verifying : libXcursor-1.1.15-1.el7.x86_64 8/15
Verifying : 2:libpng-1.5.13-7.el7_2.x86_64 9/15
Verifying : libXft-2.3.2-2.el7.x86_64 10/15
Verifying : libfontenc-1.1.3-3.el7.x86_64 11/15
Verifying : freetype-2.8-12.el7.x86_64 12/15
Verifying : fontpackages-filesystem-1.44-8.el7.noarch 13/15
Verifying : xorg-x11-apps-7.7-7.el7.x86_64 14/15
Verifying : freetype-2.4.11-15.el7.x86_64 15/15
Installed:
xorg-x11-apps.x86_64 0:7.7-7.el7
Dependency Installed:
dejavu-fonts-common.noarch 0:2.33-6.el7 dejavu-sans-fonts.noarch 0:2.33-6.el7 fontconfig.x86_64 0:2.13.0-4.3.el7 fontpackages-filesystem.noarch 0:1.44-8.el7
libXaw.x86_64 0:1.0.13-4.el7 libXcursor.x86_64 0:1.1.15-1.el7 libXfixes.x86_64 0:5.0.3-1.el7 libXft.x86_64 0:2.3.2-2.el7
libXpm.x86_64 0:3.5.12-1.el7 libfontenc.x86_64 0:1.1.3-3.el7 libpng.x86_64 2:1.5.13-7.el7_2 libxkbfile.x86_64 0:1.0.9-3.el7
Dependency Updated:
freetype.x86_64 0:2.8-12.el7
Complete!
为保险起见,此时最好重启系统。
安装 Oracle 12c
本章开始在 Centos7 上安装 Oracle Database 12c Release 1(12.1.0.2.0)
创建目录和部署安装文件
Oracle 12c 可以从这里下载到。
以 root 用户创建保存安装文件的目录:
[root@oem ~]# mkdir -p /u01/stage
[root@oem ~]# chown -R oracle:oinstall /u01/*
切换回 oracle 用户,创建目录:
[oracle@oem ~]$ mkdir /u01/stage/db12c
将下载好的数据库安装文件拷贝到 /u01/stage/db12c 目录,并解压:
[oracle@oem ~]$ cd /u01/stage/db12c/
[oracle@oem db12c]$ ll
total 2625080
-rw-r--r--. 1 oracle oinstall 1673544724 Nov 12 15:38 linuxamd64_12102_database_1of2.zip
-rw-r--r--. 1 oracle oinstall 1014530602 Nov 12 15:38 linuxamd64_12102_database_2of2.zip
[oracle@localhost db12c]$ unzip linuxamd64_12102_database_1of2.zip
[oracle@localhost db12c]$ unzip linuxamd64_12102_database_2of2.zip
[oracle@localhost db12c]$ ll
total 2625080
drwxr-xr-x. 7 oracle oinstall        117 Jul  7  2014 database
-rw-r--r--. 1 oracle oinstall 1673544724 Nov 12 15:38 linuxamd64_12102_database_1of2.zip
-rw-r--r--. 1 oracle oinstall 1014530602 Nov 12 15:38 linuxamd64_12102_database_2of2.zip
创建安装用目录(按照OFA标准)
Optimal Flexible Architecture (OFA) 标准是为管理Oracle安装而定义的一套目录推荐命名标准。OFA提供了与Oracle Universal Installer相一致的挂载点,目录,文件名的命名规范。
以root用户执行以下命令来创建所需的各个目录:
[root@oem ~]# mkdir -p /u01/app/oracle/product/12.1.0/dbhome_1
[root@oem ~]# chown -R oracle:oinstall /u01/*
[root@oem ~]# chmod -R 775 /u01/*
注意: /u01这个目录的拥有者应该是 root。
修改 ulimit 值:最大文件描述符数为4096
安装完 oracle-rdbms-server-12cR1-preinstall 之后,会在 /etc/security/limits.d 自动生成配置文件 oracle-rdbms-server-12cR1-preinstall.conf。以root用户修改里面的值如下:
[root@oem zodas]# cd /etc/security/limits.d
[root@oem limits.d]# vi oracle-rdbms-server-12cR1-preinstall.conf
#oracle   soft   nofile    1024
oracle   soft   nofile    4096
修改完之后,切换到oracle用户,查看ulimit值是否生效:
[root@oem limits.d]# su - oracle
[oracle@oem ~]$ ulimit -n
4096
[oracle@oem ~]$
修改 ulimit 值:最大用户进程数为16384
安装完 oracle-rdbms-server-12cR1-preinstall之后,会在/etc/security/limits.d自动生成配置文件20-nproc.conf。以root用户修改里面的值如下:
[root@oem oracle]# cd /etc/security/limits.d
[root@oem limits.d]# vi 20-nproc.conf
# Default limit for number of user's processes to prevent
# accidental fork bombs.
# See rhbz #432903 for reasoning.

#*          soft    nproc     4096
*          -    nproc     16384
root       soft    nproc     unlimited
切换为 oracle 用户,查看修改结果:
[oracle@oem ~]$ ulimit -a
core file size          (blocks, -c) 0
data seg size           (kbytes, -d) unlimited
scheduling priority             (-e) 0
file size               (blocks, -f) unlimited
pending signals                 (-i) 7191
max locked memory       (kbytes, -l) 134217728
max memory size         (kbytes, -m) unlimited
open files                      (-n) 4096  ##看这里!!!
pipe size            (512 bytes, -p) 8
POSIX message queues     (bytes, -q) 819200
real-time priority              (-r) 0
stack size              (kbytes, -s) 10240
cpu time               (seconds, -t) unlimited
max user processes              (-u) 16384 ##看这里!!!
virtual memory          (kbytes, -v) unlimited
file locks                      (-x) unlimited
增大 tmpfs 到4GB
默认的 tmpfs 的值过小,Oracle数据库启动时可能会报错(ORA-00838,ORA-00845)。为了防止这种错误,先增大 tmpfs 的值到4GB。
[root@oem zodas]# df -h
Filesystem               Size  Used Avail Use% Mounted on
/dev/mapper/centos-root   35G  9.2G   26G  27% /
devtmpfs                 1.9G     0  1.9G   0% /dev
tmpfs                    1.9G     0  1.9G   0% /dev/shm
tmpfs                    1.9G   12M  1.9G   1% /run
tmpfs                    1.9G     0  1.9G   0% /sys/fs/cgroup
/dev/sda2               1014M  184M  831M  19% /boot
/dev/mapper/centos-home   30G   33M   30G   1% /home
tmpfs                    378M     0  378M   0% /run/user/1000
[root@oem oracle]# mount -t tmpfs shmfs -o size=4000m /dev/shm
[root@oem oracle]# df -h
Filesystem               Size  Used Avail Use% Mounted on
/dev/mapper/centos-root   35G  9.2G   26G  27% /
devtmpfs                 1.9G     0  1.9G   0% /dev
shmfs                    4.0G     0  4.0G   0% /dev/shm
tmpfs                    1.9G   12M  1.9G   1% /run
tmpfs                    1.9G     0  1.9G   0% /sys/fs/cgroup
/dev/sda2               1014M  184M  831M  19% /boot
/dev/mapper/centos-home   30G   33M   30G   1% /home
tmpfs                    378M     0  378M   0% /run/user/1000
同时修改 /etc/fstab 文件,使配置永久生效:
[root@oem zodas]# vi /etc/fstab
#
# /etc/fstab
# Created by anaconda on Mon Nov 12 00:31:16 2018
#
# Accessible filesystems, by reference, are maintained under '/dev/disk'
# See man pages fstab(5), findfs(8), mount(8) and/or blkid(8) for more info
#
/dev/mapper/centos-root /                       xfs     defaults        0 0
UUID=9ffb8583-88fa-4fbe-8cb5-9c21c8fbfa9c /boot                   xfs     defaults        0 0
/dev/mapper/centos-swap swap                    swap    defaults        0 0
tmpfs           /dev/shm        tmpfs   size=4000m  0 0 ##看这里!!!
重启系统后,应该能看到如下的内容:
[zodas@oem ~]$ df -h
Filesystem               Size  Used Avail Use% Mounted on
/dev/mapper/centos-root   35G  9.3G   26G  27% /
devtmpfs                 1.9G     0  1.9G   0% /dev
tmpfs                    4.0G     0  4.0G   0% /dev/shm
tmpfs                    1.9G   12M  1.9G   1% /run
tmpfs                    1.9G     0  1.9G   0% /sys/fs/cgroup
/dev/mapper/centos-home   30G   33M   30G   1% /home
/dev/sda2               1014M  172M  843M  17% /boot
tmpfs                    378M     0  378M   0% /run/user/1000
若 swap space < 4G,则需要扩充 swap space
使用如下命令查看 swap space:
[root@oem ~]# swapon -s
Filename                Type        Size    Used    Priority
/dev/dm-1                               partition   2097148 0   -1
执行以下命令,增加 swap space
[root@oem ~]# dd if=/dev/zero of=/swapfile bs=1M count=4096
4096+0 records in
4096+0 records out
4294967296 bytes (4.3 GB) copied, 25.9202 s, 166 MB/s
[root@oem ~]# mkswap /swapfile
Setting up swapspace version 1, size = 4194300 KiB
no label, UUID=fcdf3cfe-9352-4d77-b4dc-3517b41cb18a
[root@localhost ~]# swapon /swapfile
swapon: /swapfile: insecure permissions 0644, 0600 suggested.
[root@localhost db12c]# swapon -s
Filename                Type        Size    Used    Priority
/dev/dm-1                               partition   2097148 0   -1
/swapfile                               file    4194300 0   -2
配置环境变量 /home/oracle/.bashrc
以 oracle 用户,在 ~/.bashrc 的末尾加入如下配置内容:
# Oracle variables
ORACLE_HOSTNAME=oem.com; export ORACLE_HOSTNAME
ORACLE_BASE=/u01/app/oracle; export ORACLE_BASE
ORACLE_HOME=$ORACLE_BASE/product/12.1.0/dbhome_1; export ORACLE_HOME
AGENT_HOME=$ORACLE_BASE/product/agentr4/agent_inst; export AGENT_HOME
OMS_HOME=$ORACLE_BASE/product/MiddlewareR4/oms; export OMS_HOME
ORACLE_INSTANCE=/u01/app/oracle/product/gc_inst/WebTierIH1; export ORACLE_INSTANCE
ORACLE_SID=omr; export ORACLE_SID
ORACLE_UNQNAME=omr; export ORACLE_UNQNAME
PATH=$ORACLE_HOME/bin:$PATH; export PATH
LD_LIBRARY_PATH=$ORACLE_HOME/lib:/lib:/usr/lib; export LD_LIBRARY_PATH
并使之生效:
[oracle@oem ~]$ source .bashrc
开始安装 oracle 数据库
打开一个新的终端,远程连接服务器GUI界面安装 oracle:
[mac]ssh -Y [email protected]
[email protected]'s password:
Last login: Mon Nov 12 16:30:05 2018
/usr/bin/xauth:  file /home/oracle/.Xauthority does not exist
[oracle@oem ~]$ cd /u01/stage/db12c/database/runInstaller
Starting Oracle Universal Installer...

Checking Temp space: must be greater than 500 MB.   Actual 5597 MB    Passed
Checking swap space: must be greater than 150 MB.   Actual 2047 MB    Passed
Checking monitor: must be configured to display at least 256 colors.    Actual 16777216    Passed
Preparing to launch Oracle Universal Installer from /tmp/OraInstall2018-11-12_04-35-35PM. Please wait ...[oracle@localhost database]$
在运行
runInstaller时,可能会出现Checking monitor: must be configured to display at least 256 colors. Failed。对于 macOS,安装xquartz方可解决。
打开 mac 的 terminal,用 homebrew 安装 xquartz:
[mac]$ brew cask install xquartz
说明:
- 参考我的另一篇博文,了解 homebrew 的安装与使用
- 参考此文,了解如何能在 macos 上显示 x11 apps
- 参考此文,了解什么是 X Window System及其工作原理
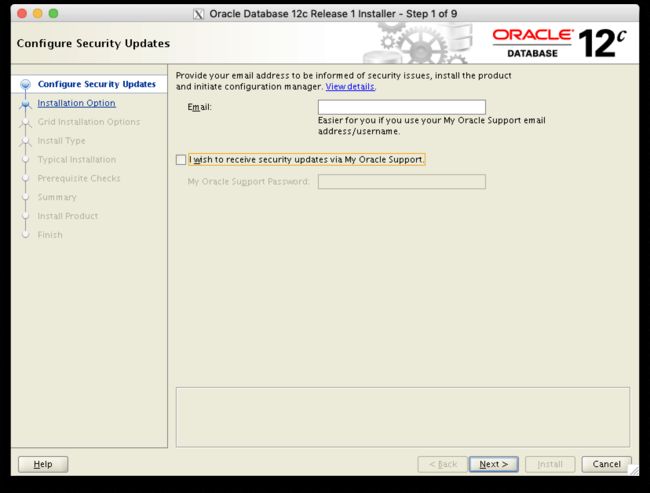
Configure Security Updates
不选择 I wish to receive security updates via My Oracle Support,点击Next。
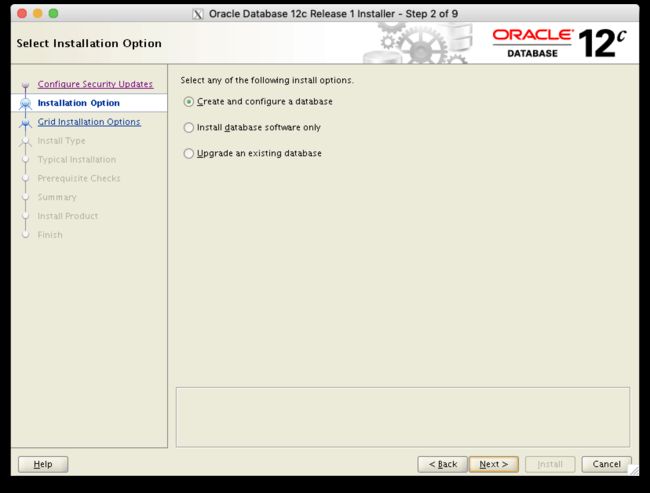
Select Installation Option
勾选 Create and configure a database,点击 Next。
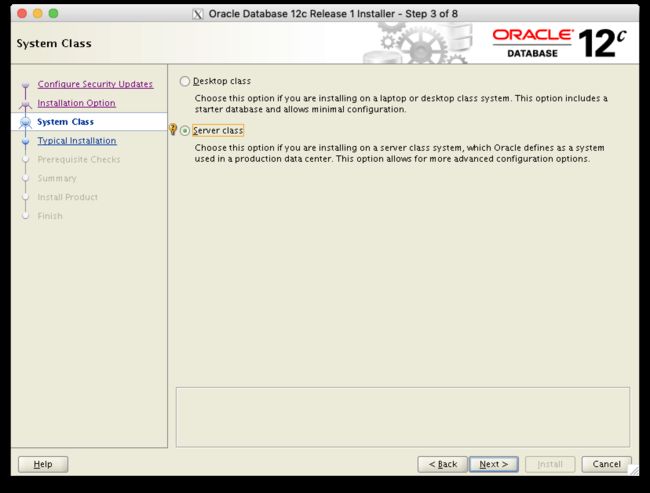
Server Class
勾选 Server Class,点击 Next。
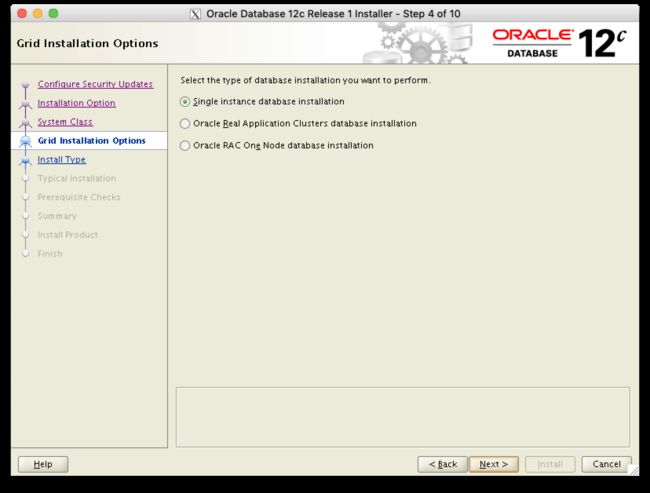
Grid Installation Options
勾选 Single instance database installation,点击Next。
Select Install Type
勾选 Advanced install,点击 Nex。
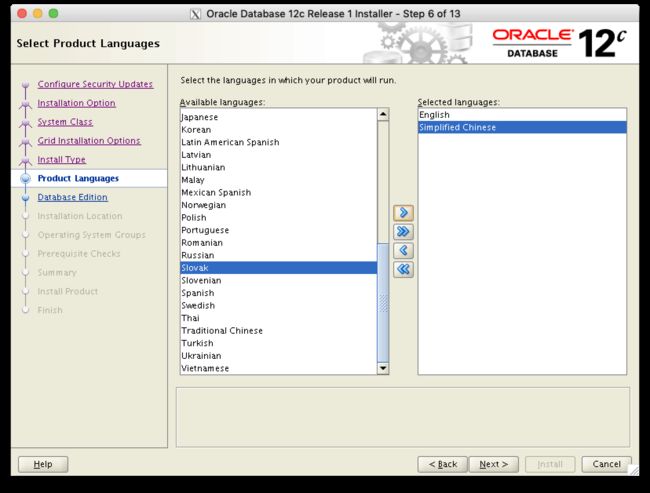
Select Product Languages
如果要支持多语言的话,勾选对应的语言,本文加入了 Simplified Chinese 支持,点击 Next。
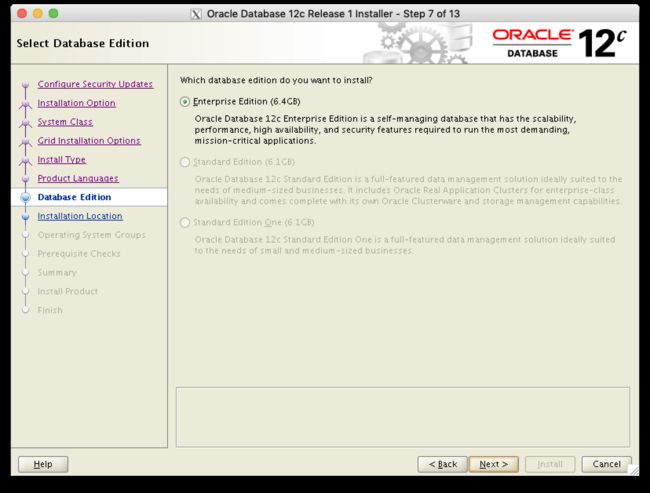
Select Database Edition
保持默认选择(Enterprise Edition (6.4GB)),直接点击 Next。
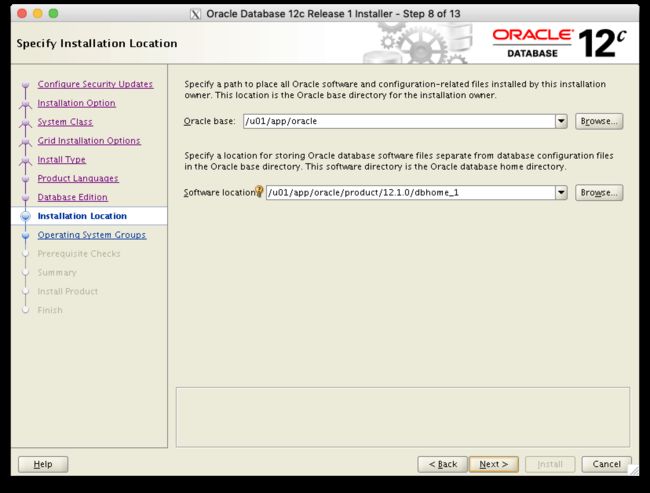
Specify Installation Location
保持默认选择:
- Oracle base:
/u01/app/oracle - Software location:
/u01/app/oracle/product/12.1.0/dbhome_1
直接点击Next。
Create Inventory
保持默认选择:
- Inventory Directory:
/u01/app/oraInventory - oraInventory Group Name:
oinstall
直接点击Next。
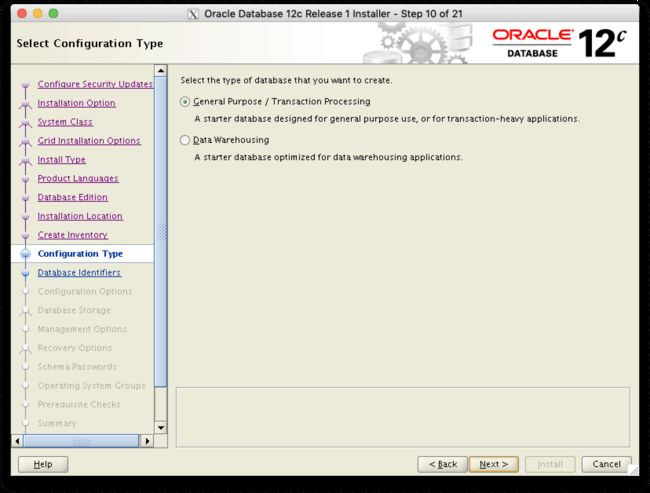
Select Configuration Type
保持默认选择(General Purpose / Transaction Processing),直接点击 Next。
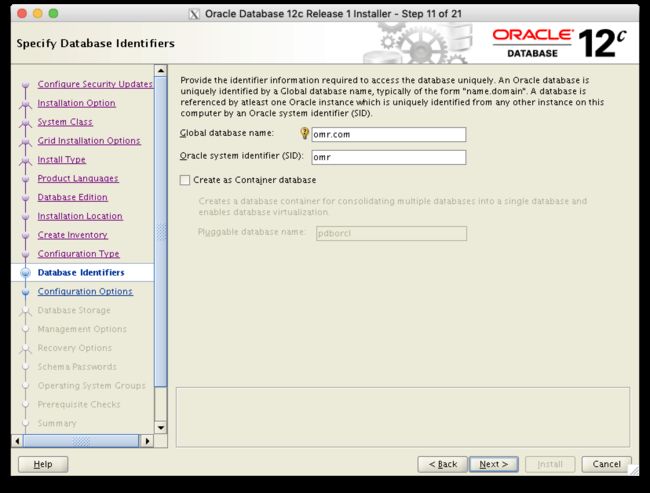
Specify Database Identifiers
设置:
- Global database name:
omr.com - Oracle system identifier (SID):
omr
同时一定不要勾选Create as Container database。点击Next。
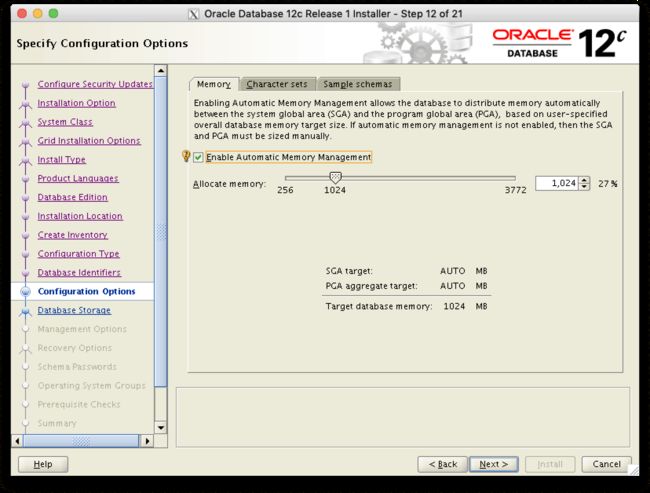
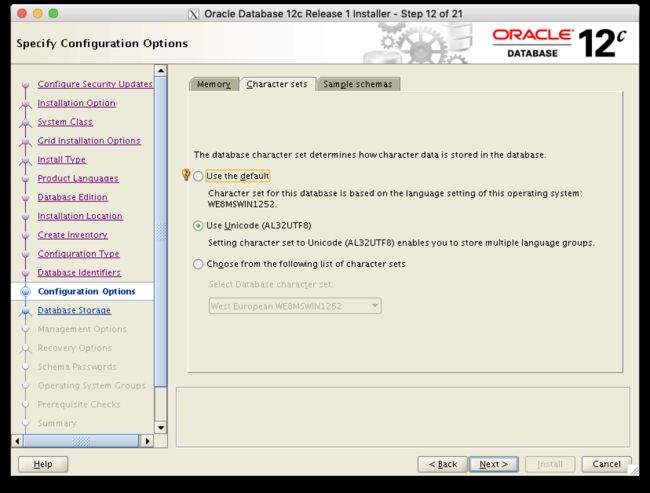
Specify Configuration Options
由于是测试环境的内存容量有限,所以将内存先设置为 1024。
字符集选择可以支持任何语言的Use Unicode (AL32UTF8)。点击 Next
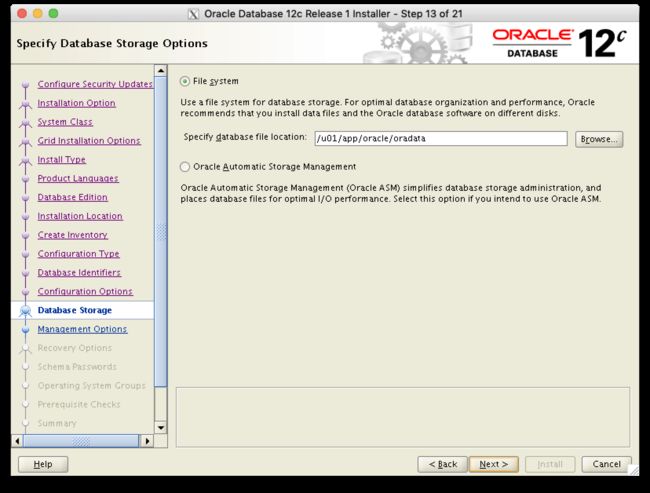
Specify Database Storage Options
保持默认选择(File System)。点击 Next。
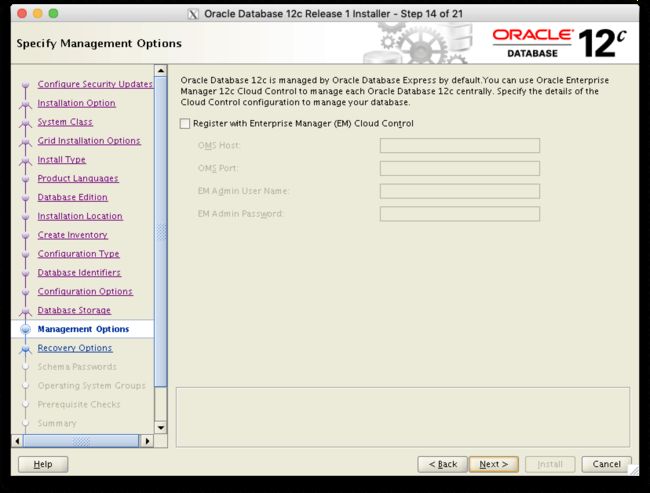
Specify Management Options
保持默认选择(先不注册到EM中)。点击 Next。
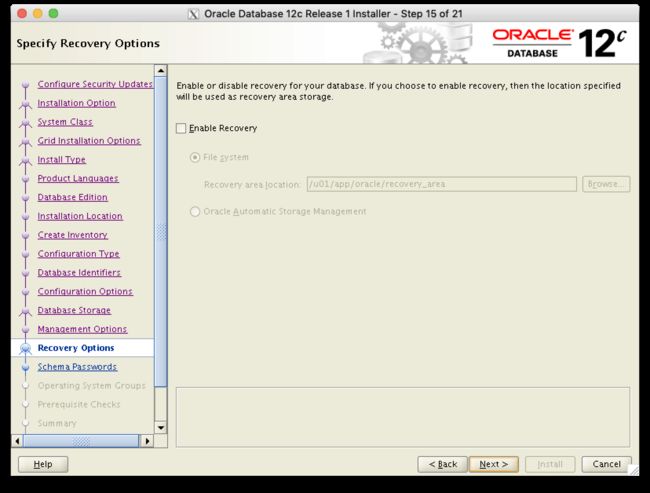
Specify Recovery Options
保持默认选择(先不启用数据库恢复)。点击 Next
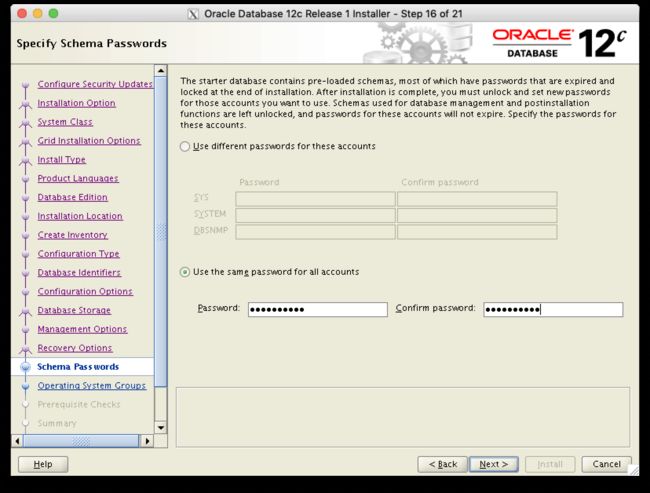
Specify Schema Passwords
选择 Use the same password for all accounts,并设置密码,点击 Next。
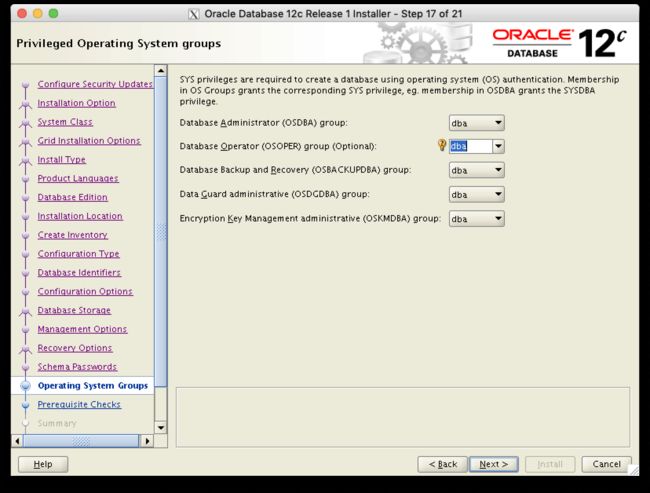
Specify Operating System groups
全部都选择 dba,点击 Next。
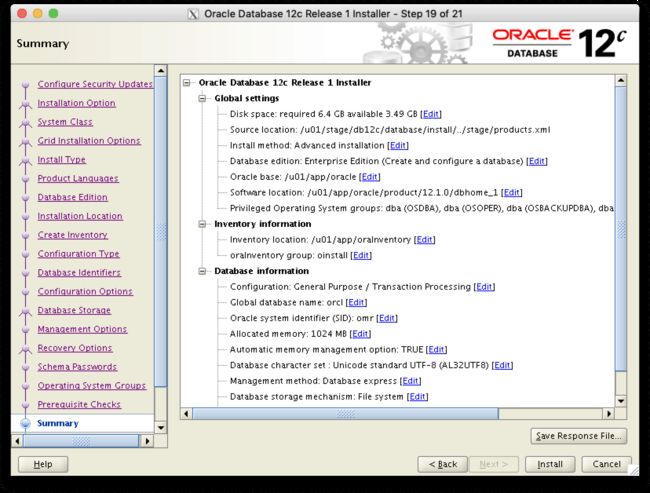
Summary
最后检查一遍配置,没有问题的话,点击 Install。
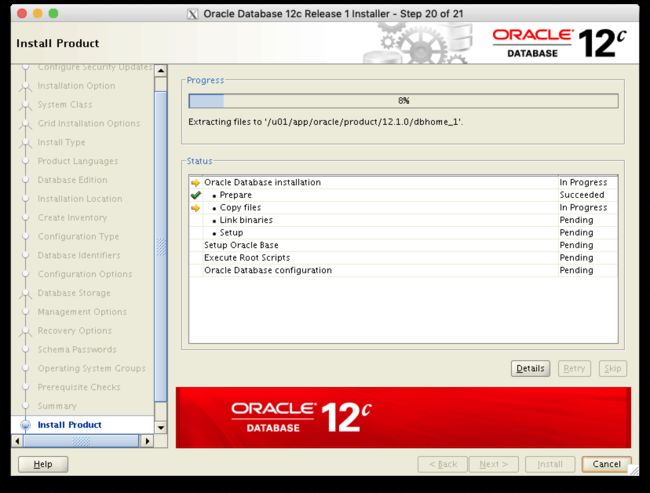
Install Product
开始漫长的安装过程,请耐心等待。。。
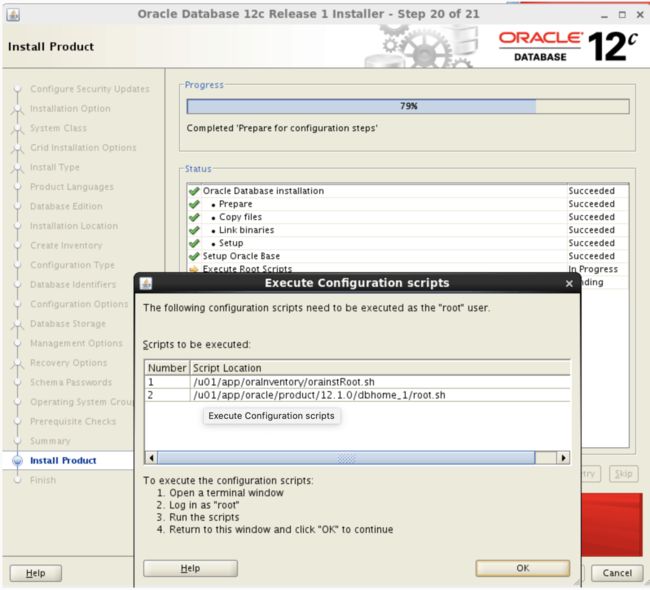
Execute Configuration scripts
这时需要以root用户执行两个脚本:
打开一个终端,切换到root用户,执行以下命令:
[oracle@oem ~]$ su -
Password:
[root@oem zodas]# /u01/app/oraInventory/orainstRoot.sh
Changing permissions of /u01/app/oraInventory.
Adding read,write permissions for group.
Removing read,write,execute permissions for world.

Changing groupname of /u01/app/oraInventory to oinstall.
The execution of the script is complete.
[root@oem zodas]# /u01/app/oracle/product/12.1.0/dbhome_1/root.sh
Performing root user operation.

The following environment variables are set as:
    ORACLE_OWNER= oracle
    ORACLE_HOME=  /u01/app/oracle/product/12.1.0/dbhome_1

Enter the full pathname of the local bin directory: [/usr/local/bin]:
   Copying dbhome to /usr/local/bin ...
   Copying oraenv to /usr/local/bin ...
   Copying coraenv to /usr/local/bin ...


Creating /etc/oratab file...
Entries will be added to the /etc/oratab file as needed by
Database Configuration Assistant when a database is created
Finished running generic part of root script.
Now product-specific root actions will be performed.
可能出现的问题
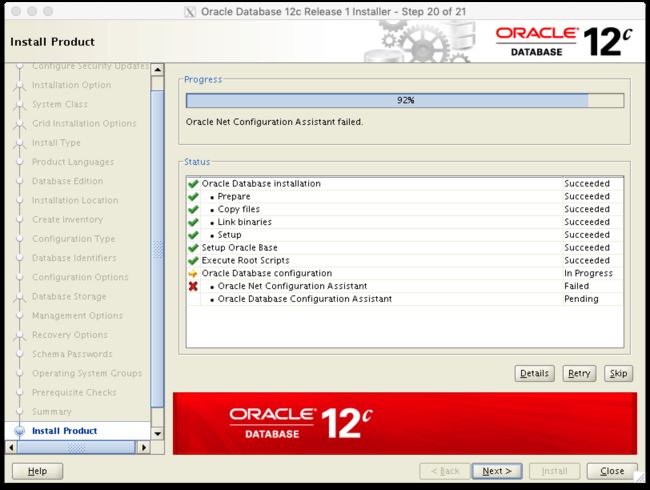
若完全按照本文一步一步操作,一般来说是不会有问题的。如果,在前期准备时,没有修改 hostname,只是简单的修改了 /etc/hosts文件,如按照该文,执行完脚本后,可能会出现 Oracle Net Configuration Assistant failed:
先选择 Skip,以让安装能够继续进行(后续如果修复这个问题,请参考我的另一篇博文“@解决 Oracle Net Configuration Assistant Failed 问题”),安装完成后,得到的结果如下图:
[图片上传失败...(image-604159-1542074745760)]
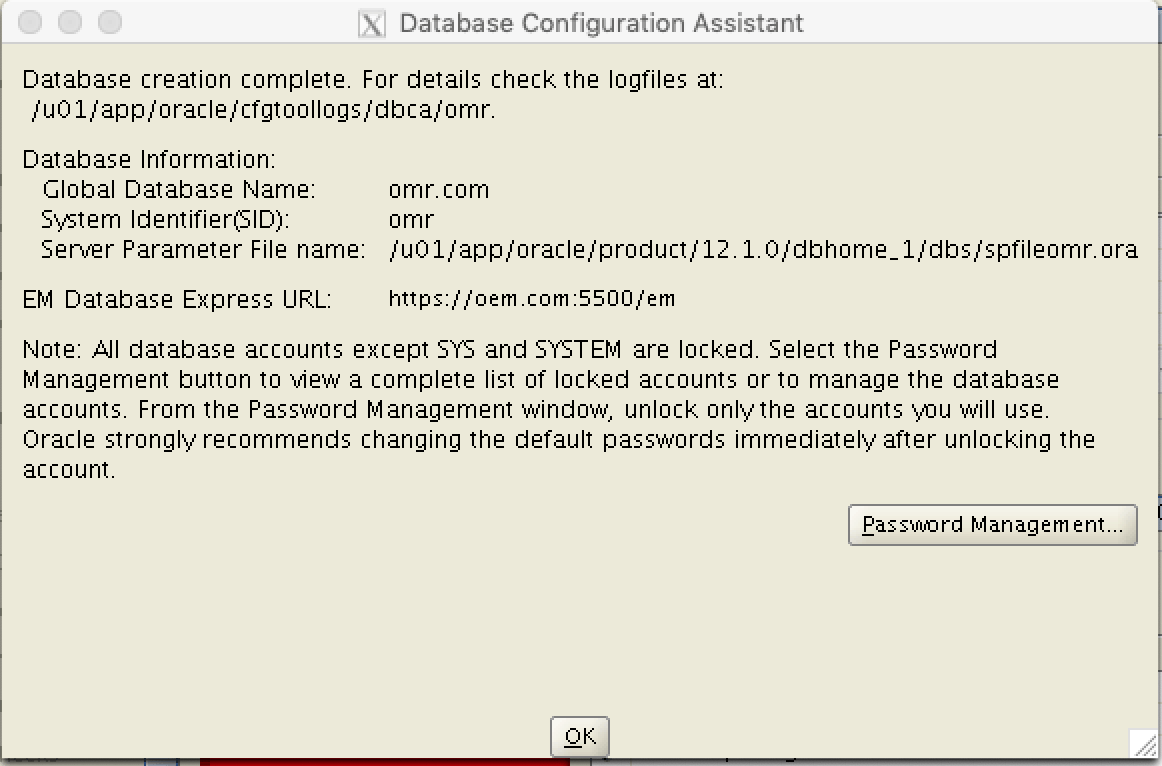
Database Configuration Assistant
看到下面的画面时,说明数据库已经安装完成。
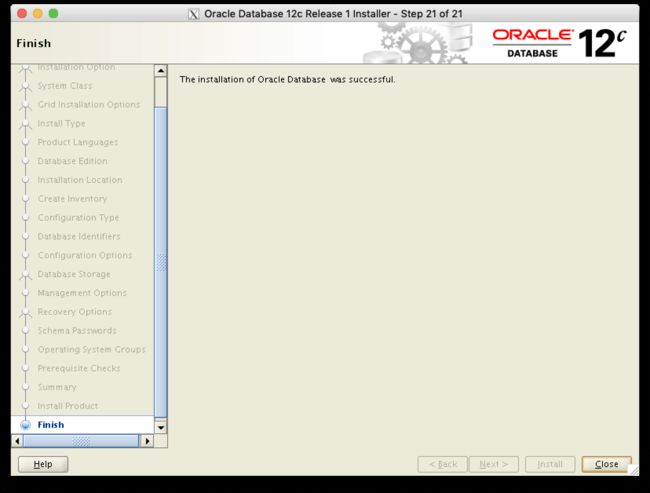
Finish
这时可以关闭安装向导。
顺便说一下,此时如果想删除数据库的话,可以执行$ORACLE_HOME/deinstall/deinstall脚本,简单一个命令就可以搞定了。
数据库安装后设置
数据库参数修改和监听服务查看
以root用户修改/etc/oratab文件,将restart标志位设置为Y:
[root@oem zodas]# vi /etc/oratab
# This file is used by ORACLE utilities.  It is created by root.sh
# and updated by either Database Configuration Assistant while creating
# a database or ASM Configuration Assistant while creating ASM instance.

# A colon, ':', is used as the field terminator.  A new line terminates
# the entry.  Lines beginning with a pound sign, '#', are comments.
#
# Entries are of the form:
#   $ORACLE_SID:$ORACLE_HOME::
#
# The first and second fields are the system identifier and home
# directory of the database respectively.  The third field indicates
# to the dbstart utility that the database should , "Y", or should not,
# "N", be brought up at system boot time.
#
# Multiple entries with the same $ORACLE_SID are not allowed.
#
#
#omr:/u01/app/oracle/product/12.1.0/dbhome_1:N
omr:/u01/app/oracle/product/12.1.0/dbhome_1:Y
以oracle用户,创建Oracle数据库的redo日志文件夹:
[oracle@oem ~]$ mkdir /u01/app/oracle/product/redo_logs/
接着,登录到数据库中,先从spfile创建一个pfile:
[oracle@oem ~]$ sqlplus / as sysdba

SQL*Plus: Release 12.1.0.2.0 Production on Tue Nov 13 01:22:41 2018

Copyright (c) 1982, 2014, Oracle.  All rights reserved.


Connected to:
Oracle Database 12c Enterprise Edition Release 12.1.0.2.0 - 64bit Production
With the Partitioning, OLAP, Advanced Analytics and Real Application Testing options

SQL> create pfile from spfile;

File created.
然后,修改数据库参数并创建redo文件:
SQL> ALTER SYSTEM SET processes=300 SCOPE=SPFILE;

System altered.

SQL> ALTER SYSTEM SET session_cached_cursors=200 SCOPE=SPFILE;

System altered.

SQL> ALTER SYSTEM SET db_securefile=PERMITTED SCOPE=BOTH;

System altered.

SQL> ALTER DATABASE ADD LOGFILE GROUP 4 ('/u01/app/oracle/product/redo_logs/log1a.rdo') SIZE 300M REUSE;

Database altered.

SQL> ALTER DATABASE ADD LOGFILE GROUP 5 ('/u01/app/oracle/product/redo_logs/log2a.rdo') SIZE 300M REUSE;

Database altered.

SQL> ALTER DATABASE ADD LOGFILE GROUP 6 ('/u01/app/oracle/product/redo_logs/log3a.rdo') SIZE 300M REUSE;

Database altered.
重启数据库,使配置生效:
SQL> SHUTDOWN IMMEDIATE;
Database closed.
Database dismounted.
ORACLE instance shut down.
SQL> STARTUP;
ORACLE instance started.

Total System Global Area 1073741824 bytes
Fixed Size          2932632 bytes
Variable Size         713031784 bytes
Database Buffers      352321536 bytes
Redo Buffers            5455872 bytes
Database mounted.
Database opened.
确认一下HTTPS的端口是否是5500,并退出sqlplus:
SQL> SELECT dbms_xdb_config.gethttpsport FROM dual;

GETHTTPSPORT
------------
    5500
SQL> EXIT
Disconnected from Oracle Database 12c Enterprise Edition Release 12.1.0.2.0 - 64bit Production
With the Partitioning, OLAP, Advanced Analytics and Real Application Testing options
最后确认LISTNER的状态,看看监听服务是否正常:
[oracle@oem ~]$ lsnrctl status

LSNRCTL for Linux: Version 12.1.0.2.0 - Production on 13-NOV-2018 04:54:19

Copyright (c) 1991, 2014, Oracle.  All rights reserved.

Connecting to (DESCRIPTION=(ADDRESS=(PROTOCOL=TCP)(HOST=oem.com)(PORT=1521)))
STATUS of the LISTENER
------------------------
Alias                     LISTENER
Version                   TNSLSNR for Linux: Version 12.1.0.2.0 - Production
Start Date                13-NOV-2018 04:26:03
Uptime                    0 days 0 hr. 28 min. 16 sec
Trace Level               off
Security                  ON: Local OS Authentication
SNMP                      OFF
Listener Parameter File   /u01/app/oracle/product/12.1.0/dbhome_1/network/admin/listener.ora
Listener Log File         /u01/app/oracle/diag/tnslsnr/oem/listener/alert/log.xml
Listening Endpoints Summary...
  (DESCRIPTION=(ADDRESS=(PROTOCOL=tcp)(HOST=oem)(PORT=1521)))
  (DESCRIPTION=(ADDRESS=(PROTOCOL=ipc)(KEY=EXTPROC1521)))
  (DESCRIPTION=(ADDRESS=(PROTOCOL=tcps)(HOST=oem)(PORT=5500))(Security=(my_wallet_directory=/u01/app/oracle/admin/omr/xdb_wallet))(Presentation=HTTP)(Session=RAW))
Services Summary...
Service "omr.com" has 1 instance(s).
  Instance "omr", status READY, has 1 handler(s) for this service...
Service "omrXDB.com" has 1 instance(s).
  Instance "omr", status READY, has 1 handler(s) for this service...
The command completed successfully
可以看到数据库服务omr.example.com已经就绪。
开机自动启动数据库(可选)
其实到上一步骤为止,Oracle的数据库安装已经完成。
如果还需要在开机时自动启动数据服务的话,可以按照下面的步骤实现。
首先以root用户创建一个自启动脚本:
[root@oem ~]# vim /etc/init.d/dbora
#!/bin/sh
# chkconfig: 345 99 10
# description: Oracle auto start-stop script.
#
# Set ORA_HOME to be equivalent to the $ORACLE_HOME
# from which you wish to execute dbstart and dbshut;
#
# Set ORA_OWNER to the user id of the owner of the
# Oracle database in ORA_HOME.
ORA_HOME=/u01/app/oracle/product/12.1.0/dbhome_1
ORA_OWNER=oracle
if [ ! -f ${ORA_HOME}/bin/dbstart ]
then
        echo "Oracle startup: cannot start"
        exit
fi
case "$1" in
'start')
    # Start the Oracle databases:
    # The following command assumes that the oracle login
    # will not prompt the user for any values
    su - ${ORA_OWNER} -c "${ORA_HOME}/bin/dbstart $ORA_HOME"
    touch /var/lock/subsys/dbora
    ;;
'stop')
    # Stop the Oracle databases:
    # The following command assumes that the oracle login
    # will not prompt the user for any values
    su - ${ORA_OWNER} -c "${ORA_HOME}/bin/dbshut $ORA_HOME"
    rm -f /var/lock/subsys/dbora
    ;;
esac
以root用户修改脚本权限,并加入到开机启动服务列表中:
[root@oem ~]# chmod 750 /etc/init.d/dbora
[root@oem ~]# chkconfig dbora on
[root@oem ~]# chkconfig --list|grep dbora
dbora           0:off   1:off   2:on    3:on    4:on    5:on    6:off
最后,以root用户创建一些软链接,将自启动脚本加入到Oracle Linux 的启动进程中:
[root@oem ~]# ln -s /etc/init.d/dbora /etc/rc.d/rc0.d/K01dbora
[root@oem ~]# ln -s /etc/init.d/dbora /etc/rc.d/rc3.d/S96dbora
[root@oem ~]# ln -s /etc/init.d/dbora /etc/rc.d/rc5.d/S96dbora
这时可以重启一下系统,验证一下数据库服务有没有随系统自动启动。
参考文献
- Oracle Enterprise Manager 12c 安装过程,by 夕阳下的奔跑
- Oracle Database 12c Installation Procedure
- Oracle Database 12c Installation on CentOS 7, by centos.org
- How to Install Oracle Database 12c on CentOS 7, by howtoforge
- How to Install Oracle Database 12c on RHEL/CentOS 7
- 深入理解Linux修改hostname, by 潇湘隐者
