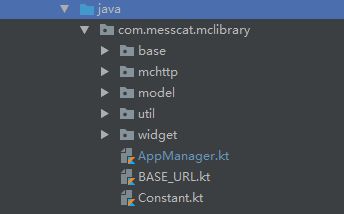
越来越多的大公司都采用了Kotlin做为开发android的第一语言,为了跟上时代和响应谷歌的号召,今天给大家介绍一个我自己编写的Kotlin+Retrofit+Rxjava+MVP的框架。详细代码已经在github上MCLibrary
框架的整体架构
大概说一下框架的文件目录。
先介绍一下build.gradle
//Diaog样式
    compile 'com.github.ybq:Android-SpinKit:1.1.0'
    compile "org.jetbrains.kotlin:kotlin-stdlib-jre7:$kotlin_version"
    //网络请求 retrofit+okhttp+gson
    compile 'com.squareup.retrofit2:retrofit:2.2.0'
    compile 'com.squareup.retrofit2:converter-gson:2.2.0'
    compile 'com.squareup.retrofit2:adapter-rxjava:2.2.0'
    compile 'com.squareup.okhttp3:okhttp:3.8.0'
    compile 'com.squareup.okio:okio:1.11.0'
    compile 'com.github.bumptech.glide:okhttp3-integration:1.4.0@aar'
    compile 'com.squareup.okhttp3:logging-interceptor:3.8.0'
    compile 'io.reactivex:rxjava:1.1.0'
    compile 'io.reactivex:rxandroid:1.1.0'
    //图片加载
    compile 'com.github.bumptech.glide:glide:3.7.0'
    //design
    compile 'com.android.support:design:26.0.0-alpha1'
    //二维码
    compile 'com.google.zxing:core:3.2.1'
    //Json数据解析
    compile 'com.google.code.gson:gson:2.8.0'
    //适配html代码
    compile 'org.jsoup:jsoup:1.10.1'
    //图片选择器
    compile 'com.lzy.widget:imagepicker:0.5.5'
    //事件分发
    compile 'org.greenrobot:eventbus:3.0.0'
    //Banner
    compile 'com.youth.banner:banner:1.4.8'
    //Xrecycler列表
    compile 'com.jcodecraeer:xrecyclerview:1.3.2'
    //圆形头像
    compile 'de.hdodenhof:circleimageview:2.1.0'
    //城市、时间等选择器
    compile 'com.contrarywind:Android-PickerView:3.2.5'
    //滚轮选择器
    compile 'com.f1reking.library:wheelview:1.1'
引用library以后可能会报错,这个时候你只需要在dependencies后面加上下面代码:
repositories {
    mavenCentral()
    maven {
        url "https://www.jitpack.io"
    }
}
重新编译,这个时候就可以正常使用了,还有就是可能会报kotlin的版本问题,更新一下就行了。
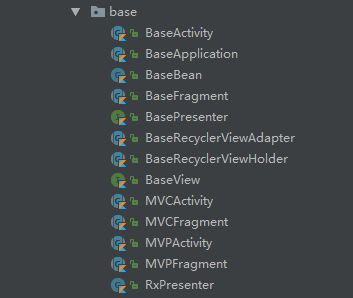
base目录
很清晰的看出这个目录主要是一些共用的类的封装操作。细心的你会发现目录中出现了一个MVPActivity、MVCActivity和MVPFragment、MVCFragment没错,这里为什么做区分,是因为我们在开发过程中比如用到闪屏页往往都是一个静态的页面,无需请求http,这个时候我们可以用最原始的方法处理就好(MVCActivity或MVCFragment)如果需要请求http(MVPActivity或MVPFragment)。这里我就不粘贴代码出来了,如果你想了解可以到我的git上下载MCLibrary
BaseRecyclerViewAdapter和BaseReyclerViewHolder是我封装好的RecyclerView的设配器处理,大大的简化了以前的代码。
public class ClassifyAdapter extends BaseRecyclerViewAdapter {

    private Activity mContext;

    public ClassifyAdapter(Activity context, int width) {
        this.mContext = context;
    }
    //逻辑处理
    @Override
    public void onBaseBindViewHolder(final ClassifyAdapter.ClassifyHolder holder, ClassifyBean objectData,
                                     final int position, View itemView, final Boolean isSelect) {

    }
    //加载界面
    @Override
    public ClassifyHolder onCreateViewHolder(ViewGroup parent, int viewType) {
        return new ClassifyHolder(LayoutInflater.from(mContext).inflate(R.layout.item_classify, parent, false));
    }
    //holder 初始化控件
    class ClassifyHolder extends BaseRecyclerViewHolder {

        public ClassifyHolder(View itemView) {
            super(itemView);
        }
    }
}
是不是简洁了很多,不在需要那么多繁杂的方法处理。你只需要将你的实体类和holder传给BaseRecyclerViewAdapter就行了。
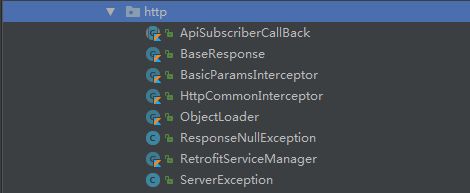
http目录
很明显这是网络请求的框架,框架使用了现在最流行的网络请求框架Rxjava和Retrofit结合的。由于我们公司提倡模块化,所以封装的网络请求框架比较适合模块化操作。
RetrofitServiceManager.instance.create(ClassifyPresenter.ClassifyHttp::class.java)
其中:ClassifyPresenter.ClassifyHttp::class.java参数是你的类。
RetrofitServiceManager重要代码如下:
init {
        // 创建 OKHttpClient
        val builder = OkHttpClient.Builder()
        builder.connectTimeout(DEFAULT_TIME_OUT.toLong(), TimeUnit.SECONDS)//连接超时时间
        builder.writeTimeout(DEFAULT_READ_TIME_OUT.toLong(), TimeUnit.SECONDS)//写操作 超时时间
        builder.readTimeout(DEFAULT_READ_TIME_OUT.toLong(), TimeUnit.SECONDS)//读操作超时时间

        //添加日志拦截器
        builder.addInterceptor(HttpLoggingInterceptor().setLevel(HttpLoggingInterceptor.Level.BODY))
        //修改请求头
        builder.addInterceptor(object : Interceptor {
            override fun intercept(chain: Interceptor.Chain?): Response {
                val original = chain?.request()
                val request = original?.newBuilder()!!
                        .header("", "")
                        .header("", )
                        .header("", )
                        .header("Content-Type", "application/json; charset=UTF-8")
                        .method(original.method(), original.body())
                        .build()
                return chain.proceed(request)
            }
        })

        // 创建Retrofit
        mRetrofit = Retrofit.Builder()
                .client(builder.build())
                .addCallAdapterFactory(RxJavaCallAdapterFactory.create())
                .addConverterFactory(GsonConverterFactory.create(Gson()))
                .baseUrl(BASE_URL)
                .build()
    }
在开发过程中后台可能要求有些接口是要传form有些接口是传json的,我们就需要修改请求头。我们公司接口是做加密的,所以也可以将加密的数据一起写在请求头。是不是很方便。
ObjectLoader主要是对线程进行操作
open class ObjectLoader {

    protected fun  observe(observable: Observable): Observable {
        return observable.subscribeOn(Schedulers.io())
                .unsubscribeOn(Schedulers.io())
                .observeOn(AndroidSchedulers.mainThread())
    }
}
大家都知道网络请求是耗时的操作,修改UI数据我们需要在主线程进行操作。
ApiSubscriberCallBack请求的回调方法处理,当请求报错的时候,对网络、空、操作失败等情况的处理。
util主要是一些工具类的这里我就不做多介绍了,自己看代码吧!
widget主要是一些自定义的东西。
表达能力不是很好,感觉没什么好说的,因为如果你懂android代码,相信你是很容易看得懂这些代码的。自己去github上下载看看吧!有什么不明白之处可以发表评论看到会回复,如果有什么需要改进的也可以发表评论,我会急时更新改正。


