用户图片上传思路:
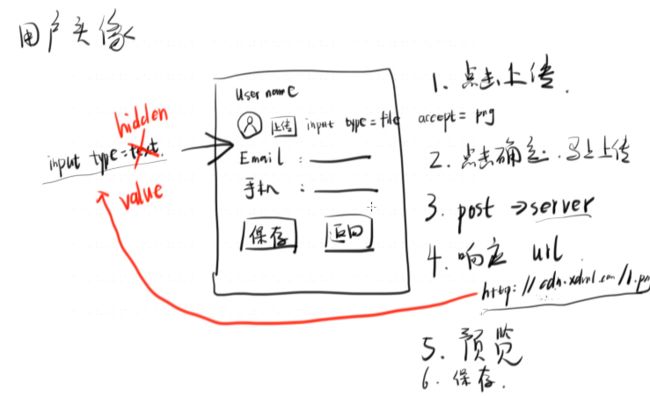
1.点击上传,通过一个input type="file"选择你要上传的图片
2.点击确定,马上上传
3.发送一个post请求给服务器
4.得到一个响应 url(以:http://cdn.lifa.com/1.png)为例,然后把这个url放到页面中一个隐藏的input中,作为这个input的value
5.预览
6.保存(去你上面存的那个隐藏的input中去取url,把这个url存到数据库中)
功能

api设计
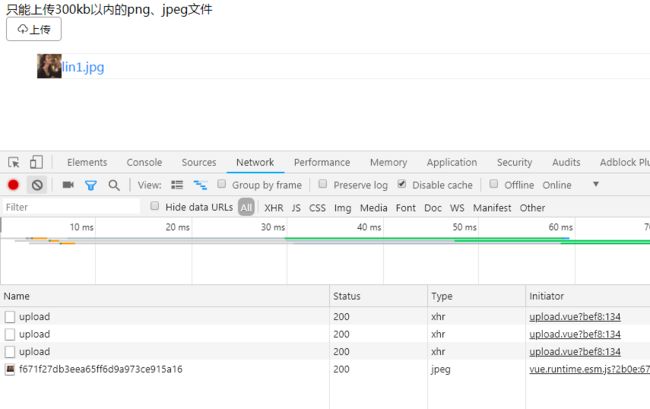
只能上传300kb以内的png、jpeg文件
accept: 支持传入的文件类型
action: 上传到的哪个网址
name: 上传的文件名称
fileList: 文件上传成功后的url数组集合
如何做到浏览器把文件传到你的服务器
- form表单必须设置action对应你服务器的路径,必须设置method="post" enctype="multipart/form-data"
- 必须指定文件的name
- 自己写一个server
1). 首先运行npm init -y
2). 安装express multer和cors
3). 使用express响应一个页面
- index.js
const express = require('express')

const app = express()
app.get('/',(req,res)=>{
    res.send('hello')
})
app.listen(3000)
这样当我们打开localhost:3000的时候页面就会显示hello
4). 如何实现把用户上传的图片保存下来
- index.js
 //把用户传来的文件存到我服务器的yyy目录下,没有这个目录它会自动创建
+ const upload = multer({dest: 'yyy/'})
//下面的single('xxx')里的xxx与你传来的文件名要一致
app.post('/upload',upload.single('xxx'),(req,res)=>{
    console.log(req.file)
    res.send('hello')
})
- 前台页面代码
运行node控制台打印出
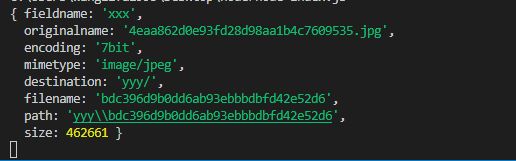
我们可以通过req.file.filename获取到上传成功后的文件名
上面的做法我们无法拿到这个url,因为form表单一旦提交页面就刷新了,所以我们要通过阻止表单提交的默认行为,然后通过ajax提交
let form = document.querySelector('#form')
form.addEventListener('submit',(e)=>{
  e.preventDefault()//阻止默认行为
  let formData = new FormData
  let fileInput = document.querySelector('input[name="xxx"]')
  //xxx你要添加的文件名,fileInput你要上传文件的input
  formData.append('xxx',fileInput.files[0])
  var xhr = new XMLHttpRequest()
  xhr.open('POST',form.getAttribute('action'))
  //成功后打印出响应内容
  xhr.onload = function(){
    console.log(xhr.response)
  }
  xhr.send(formData)
})
运行上面的代码会报一个错误,因为他不允许你跨域

所以我们需要在node里设置一个允许跨域的响应头
app.post('/upload',upload.single('xxx'),(req,res)=>{
+    res.set('Access-Control-Allow-Origin','*')
    res.send(req.file.filename)
})
实现上传成功的文件在前台页面中显示(下载你上传的文件)
我们在ajax请求成功后,给img设置一个src,路径是根目录下的preview里也就是
xhr.onload = function(){
    img.src = `http://127.0.0.1:3000/preview/${xhr.response}`
  }
在我们的node里我们通过设置preview这个路径来下载你上传的图片从而在前台页面展示
//这里面的:key就是用户上传后文件的文件名
app.get('/preview/:key',(req,res)=>{
    //通过req.params.key获取:key
    res.sendFile(`yyy/${req.params.key}`,{
        root: __dirname, //根目录是当前目录
        headers: {
            'Content-Type': 'image/jpeg'
        }
    },(error)=>{
        console.log(error)
    })
})
使用cors替代Access-Control-Allow-Origin
在所有需要跨域的域名路径里添加一个cors就可以
- index.js
const express = require('express')
const multer = require('multer')
const cors = require('cors')
//把用户传来的文件存到我服务器的uploads目录下,没有这个目录它会自动创建
const upload = multer({dest: 'uploads/'})
const app = express()

//options和post都得加cors()
app.options('/upload', cors())
//cors()替代了上面的res.set('Access-Control-Allow-Origin','*')
app.post('/upload', cors(), upload.single('file'),(req,res)=>{
    res.send(req.file.filename)
})
app.get('/preview/:key', cors(), (req,res)=>{
    res.sendFile(`uploads/${req.params.key}`,{
        root: __dirname,
        headers: {
            'Content-Type': 'image/jpeg'
        }
    },(error)=>{
        console.log(error)
    })
})
app.listen(3000)
前台页面代码
![]() let form = document.querySelector('#form')
console.log(form)
form.addEventListener('submit',(e)=>{
e.preventDefault()
let formData = new FormData
let fileInput = document.querySelector('input[name="file"]')
formData.append('file',fileInput.files[0])
var xhr = new XMLHttpRequest()
xhr.open('POST',form.getAttribute('action'))
xhr.onload = function(){
img.src = `http://127.0.0.1:3000/preview/${xhr.response}`
}
xhr.send(formData)
})
let form = document.querySelector('#form')
console.log(form)
form.addEventListener('submit',(e)=>{
  e.preventDefault()
  let formData = new FormData
  let fileInput = document.querySelector('input[name="file"]')
  formData.append('file',fileInput.files[0])
  var xhr = new XMLHttpRequest()
  xhr.open('POST',form.getAttribute('action'))
  xhr.onload = function(){
    img.src = `http://127.0.0.1:3000/preview/${xhr.response}`
  }
  xhr.send(formData)
})
5). 使用heroku当做服务器
因为我们没法保证我们的server一直在自己的服务器上开着,所以需要将我们的node代码上传到heroku
这里要注意:因为heroku里的端口号是随机给的,不一定是3000,所以我们的端口号不能写死,要通过环境获取端口号
- index.js
let port = process.env.PORT || 3000
app.listen(port)
然后给package.json中添加一个start命令
"scripts": {
    "test": "echo \"Error: no test specified\" && exit 1",
+    "start": "node index.js"
  },

使用heroku必须注意两点
1.script里必须配置start
2.必须配置环境端口号
创建upload
思路:当我们引入这个组件的时候,用户自己写入一个按钮,点击弹出选择文件窗口,我们可以通过slot,把用户的按钮放到插槽里,然后点击按钮,在它的下面的兄弟元素下创建一个input标签,然后默认点击它,之后监听input的chage事件,拿到对应的文件名和相应的相应,发送ajax请求
- upload.vue
初步实现upload
后端给前端的接口返回的必须是JSON格式的字符串,原因是http协议只支持字符串形式,后端通过JSON.stringify将对象转换为字符串这叫做序列化,前端拿到这个JSON格式的字符串,通过JSON.parse将字符串转成对象,这叫做反序列化
- index.js
app.post('/upload', cors(), upload.single('file'),(req,res)=>{
    let fileAttr = req.file
    let object = {id:fileAttr.filename}
    res.send(JSON.stringify(object))
})
- upload.vue
xhr.onload = ()=> {
     let {id, name, type, size} = JSON.parse(xhr.response)
     let url = `http://127.0.0.1:3000/preview/${id}`
}
上面的代码的问题我们的upload组件必须得接受一个JSON格式的字符串,然后对它反序列化,但我们没法保证用户用的是JSON格式,他有可能不用JSON格式,所以我们不能在onload里写上面两句代码,要让用户去写,然后通过props接受传进来的这个parseResponse的函数
methods: {
  parseResponse(response){
    let {id} = JSON.parse(response)
    let url = `http://127.0.0.1:3000/preview/${id}`
    return url
}
}
- upload.vue
props: {
  parseResponse: {
                type: Function,
                required: true
            }
}
xhr.onload = ()=> {
   this.url = this.parseResponse(xhr.response)
}
对代码进行重构
data(){
            return {
                url: 'about:blank'
            }
        },
        methods: {
            onClickUpload(){
                let input = this.createInput()
                input.addEventListener('change',()=>{
                    let file = input.files[0]
                    input.remove()
                    this.updateFile(file)

                })
                input.click()
            },
            createInput(){
                let input = document.createElement('input')
                input.type= 'file'
                this.$refs.tmp.appendChild(input)
                return input
            },
            updateFile(file){
                let formData = new FormData()
                formData.append(this.name, file)
                this.doUploadFile(formData,(response)=>{
                    let url = this.parseResponse(response)
                    this.url = url
                })
            },
            doUploadFile(formData,success){
                let xhr = new XMLHttpRequest()
                xhr.open(this.method, this.action)
                xhr.onload = ()=>{
                    success(xhr.response)
                }
                xhr.send(formData)
            }
        }
使用一个fileList对每次上传的文件信息进行存储
-
![]() {{file.name}}
        {{file.name}}


fileList: {
     type: Array,
     default: ()=>[]
 },
methods: {
  updateFile(file){
    let formData = new FormData()
    formData.append(this.name, file)
    let {name,size,type}=file
    this.doUploadFile(formData,(response)=>{
        let url = this.parseResponse(response)
        this.url = url
        this.$emit('update:fileList',[...this.fileList,{name,size,type,url}])
    })
},
}
上面的代码,因为有可能你每次上传的图片的name都是一样的,但是我们绑定的key必须得是唯一值,所以当你上传同一张图片就会报错,解决办法:
- 强制规定每一个上传的文件都必须返回一个唯一的id
- 每次判断fileList数组里的每一项里是否有当前name,有的话就在现在的name后面加一个(1)
this.doUploadFile(formData,(response)=>{
    let url = this.parseResponse(response)
    this.url = url
+    while(this.fileList.filter(n=>n.name === name).length > 0){
        let division = name.lastIndexOf('.')
        let start = name.substring(0,division)
        let end = name.substring(division)
        start+= '(1)'
        name = start+end
    }
    this.$emit('update:fileList',[...this.fileList,{name,size,type,url}])
})
效果如下:

实现删除功能
![]() {{file.name}}
x
        {{file.name}}
        x

onRemoveFile(index){
    let copy = JSON.parse(JSON.stringify(this.fileList))
    let confirm = window.confirm('你确定要删除吗?')
    if(confirm){
        copy.splice(index,1)
        this.$emit('update:fileList',copy)
    }
}
显示上传中
思路:定义两个钩子函数一个是上传成功后(afterUploadFile)触发,一个是上传时(beforeUploadFile)触发,在beforeUPloadFIle里给fileList中添加一个status属性为uploading,然后成功后我们先通过唯一的name在fileList中查找name等于我们现在的name的一项,之后对它进行深拷贝然后给这一项添加一个url和status改为success,之后拿到这一项的索引,在对fileList深拷贝后删除这一项改为修改后的(这里因为要name唯一所以我们需要把修改name的操作放在updateFile最开始的地方)
- upload.vue
菊花
![]() {{file.name}}
x
{{file.name}}
x
methods: {
updateFile(rawFile){
let {name,size,type}=rawFile
let newName = this.generateName(name)
this.beforeUpdateFile(rawFile,newName)
let formData = new FormData()
formData.append(this.name, rawFile)
this.doUploadFile(formData,(response)=>{
let url = this.parseResponse(response)
this.url = url
this.afterUpdateFile(rawFile,newName,url)
})
},
generateName(name){
while(this.fileList.filter(n=>n.name === name).length > 0){
let dotIndex = name.lastIndexOf('.')
let nameWithoutExtension = name.substring(0,dotIndex)
let extension = name.substring(dotIndex)
//每一次在.前面加一个(1)
name = nameWithoutExtension + '(1)'+extension
}
return name
},
beforeUpdateFile(file,newName){
let {name,size,type}=file
this.$emit('update:fileList',[...this.fileList,{name:newName,type,size,status: 'uploading'}])
},
afterUpdateFile(rawFile,newName,url){
//因为name是唯一的,所以根据name来获取这个文件的一些属性
let file = this.fileList.filter(i=>i.name === newName)[0]
//file是通过fileList获取的,fileList是props不能直接修改
let fileCopy = JSON.parse(JSON.stringify(file))
let index = this.fileList.indexOf(file)
fileCopy.url = url
fileCopy.status = 'success'
let fileListCopy = JSON.parse(JSON.stringify(this.fileList))
//将数组中之前的file删除换成fileCopy
fileListCopy.splice(index,1,fileCopy)
this.$emit('update:fileList',fileListCopy)
},
}
实现上传失败
思路:和上面显示上传的思路大致相同,通过一个uploadError函数,先通过name查找到当前这个上传的文件,然后对这个file和fileList深拷贝,拿到file在fileList中的索引,拷贝后的fileCopy.status='fail',然后从拷贝后的fileList中删除这一项,添加fileCopy
uploadError(newName){
    let file = this.fileList.filter(f=>f.name === newName)[0]
    console.log(file);
    console.log('this.fileList.length');
    console.log(this.fileList.length);
    let index = this.fileList.indexOf(file)
    let fileCopy = JSON.parse(JSON.stringify(file))
    fileCopy.status = 'fail'
    let fileListCopy = JSON.parse(JSON.stringify(this.fileList))
    fileListCopy.splice(index,1,fileCopy)
    console.log(fileListCopy);
    this.$emit('update:fileList',fileListCopy)
},
doUploadFile(formData,success,fail){
    fail()
    let xhr = new XMLHttpRequest()
    xhr.open(this.method, this.action)
    xhr.onload = ()=>{
        success(xhr.response)

    }
    xhr.send(formData)
},
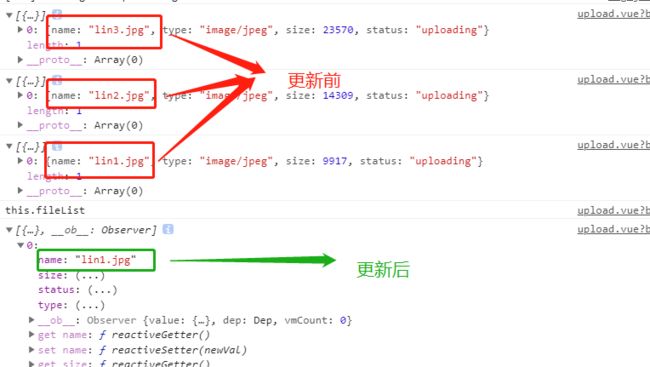
运行上面的代码我们发现当我们上传的时候会报错,我们在控制台打印出file和fileList.length发现分别是undefined和0,可我们在父组件中监听的update:fileList却是拿到的fileList.length为1
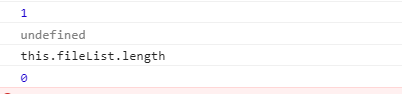
原因:vue的事件是同步的,你触发一个事件,父组件会马上得到这个事件,父组件得到这个事件后会去创造一个异步的ui更新任务(重新渲染页面)
一下图为例:

上图中我们的fileList就是父组件传给子组件的props,实际上它是一个数组,当用户点击上传的时候,我们不会去改变原来的filList,而是直接拷贝一个对这个拷贝的去添加一项,然后把这个拷贝后的重新赋给父组件的fileList(这个过程是同步的);父组件拿到新的fileList它不会去马上传给子组件,也就是这时候我们在子组件中通过this.fileList拿到的任然是旧的fileList,只有当我们子组件重新渲染的时候才会去把新的fileList传给子组件(父组件给子组件传递数据的过程是异步的)
解决方法:直接在异步中调用
doUploadFile(formData,success,fail){
    let xhr = new XMLHttpRequest()
    xhr.open(this.method, this.action)
    xhr.onload = ()=>{
        //success(xhr.response)
        fail()
    }
    xhr.send(formData)
},
解决用户取消选中时每次dom里多一个input的bug
思路:在每次创建input的时候先清空里面的input
this.$refs.tmp.innerHTML = ''
抛出失败后对应的提示
思路:再上传文件失败的函数中触发一个error事件把信息传出去,父组件监听这个error,拿到对应的信息,同时失败的回调还得传入每次的请求数据
- 实现断网状态下提示网络无法连接
主要是通过请求的状态码为0,判断
this.doUploadFile(formData, (response) => {
    let url = this.parseResponse(response)
    this.url = url
    this.afterUpdateFile(rawFile, newName, url)
}, (xhr) => {
    this.uploadError(xhr,newName)
})
uploadError(xhr,newName) {
+    let error = ''
+    if(xhr.status === 0){
+        error = '网络无法连接'
+    }
+    this.$emit('error',error)
},
doUploadFile(formData, success, fail) {
    let xhr = new XMLHttpRequest()
    xhr.open(this.method, this.action)
    xhr.onload = () => {
        success(xhr.response)
    }
+    xhr.onerror = () => {
        fail(xhr)
    }
    xhr.send(formData)
},
alert(error){
    window.alert(error || '上传失败')
}
- 文件尺寸不得超出的提示
思路:在文件上传前的函数里判断尺寸是否大于我们限定的,如果大于就出发error,返回false,然后把图片不能大于的信息传进去,否则就触发update:fileList,返回true;之后如果图片信息不符我们就不能接着上传,所以我们要在更新文件中通过判定这个上传前的返回值是否为true,如果不为true就直接return不继续下面的上传操作
updateFile(rawFile) {
 +   if(!this.beforeUpdateFile(rawFile, newName)){return}
    let formData = new FormData()
    formData.append(this.name, rawFile)
    this.doUploadFile(formData, (response) => {
        let url = this.parseResponse(response)
        this.url = url
        this.afterUpdateFile(rawFile, newName, url)
    }, (xhr) => {
        this.uploadError(xhr,newName)
    })
},
beforeUpdateFile(file, newName) {
    let {name, size, type} = file
    if(size > this.sizeLimit){
        this.$emit('error',`文件大小不能超过${this.sizeLimit}`)
        return false
    }else{
        this.$emit('update:fileList', [...this.fileList, {name: newName, type, size, status: 'uploading'}])
        return true
    }
},
实现支持多文件上传
思路:首先需要给上传时候的input添加一个 input.multiple = true,然后在把获取的files传进去,在uplodFile里对files进行遍历,拿到每一个file,对每一个file分别执行单文件操作
onClickUpload() {
    let input = this.createInput()
    input.addEventListener('change', () => {
        let files = input.files
        input.remove()
        this.uploadFile(files)

    })
    input.click()
},
uploadFile(rawFiles) {
    Array.from(rawFiles).forEach(rawFile=>{
        let {name, size, type} = rawFile
        let newName = this.generateName(name)
        if(!this.beforeuploadFile(rawFile, newName)){return}
        let formData = new FormData()
        formData.append(this.name, rawFile)
        this.doUploadFile(formData, (response) => {
            let url = this.parseResponse(response)
            this.url = url
            this.afteruploadFile(rawFile, newName, url)
        }, (xhr) => {
            this.uploadError(xhr,newName)
        })
    })
},
问题:上面的代码虽然可以同时上传多个,而且请求也会请求多个,但是最后只会显示一个
我们在文件上传前和上传后分别打出this.fileList发现每次更新前是我们需要的每个文件的信息,而成功后就只有最后一个的了
实际上我们上面代码中的问题就可以看成下面的
{{msg}}
上面的代码我们点击的时候不是把当前的数组先变成[1,2,3]而是直接变成[3]
解决办法:不要每次整体替换,而是每次触发事件的时候把当前元素传给父元素,然后父元素再将当前元素push进去
将我们的代码更改为:
- upload.vue
beforeuploadFile(file, newName) {
    let {size,type} = file
    if(size > this.sizeLimit){
        this.$emit('error',`文件大小不能超过${this.sizeLimit}`)
        return false
    }else{
❉        this.$emit('addFile',{name: newName, type, size, status: 'uploading'})
        return true
    }
},
- demo
            上传

addFile(file){
                this.fileList.push(file)
            }
上面虽然解决了我们上传多个只显示一个的问题,但是还需要用户手动添加一个addFile事件监听
改进:把uploadFile里面的循环分成两个,添加一个生成newName的循环,然后再次上传文件前先把所有的文件放到一个数组里,然后在原来的fileList的基础上把这个总的数组合并进去,之后作为数据传给父组件
uploadFiles(rawFiles) {
    let newNames = []
    for(let i = 0;i{
        let newName = newNames[i]
        let formData = new FormData()
        formData.append(this.name, rawFile)
        this.doUploadFile(formData, (response) => {
            let url = this.parseResponse(response)
            this.url = url
            this.afteruploadFile(rawFile, newName, url)
        }, (xhr) => {
            this.uploadError(xhr,newName)
        })
    })
},
beforeuploadFiles(rawFiles, newNames) {
    for(let i = 0;i this.sizeLimit){
            this.$emit('error',`文件大小不能超过${this.sizeLimit}`)
            return false
        }else{
            //把所有的文件都放到x这个数组里
            let selectFiles = Array.from(rawFiles).map((rawFile,i)=>{
                return {name: newNames[i],type,size,status: 'uploading'}
            })
            this.$emit('update:fileList',[...this.fileList,...selectFiles])
            return true
        }
    }
},
单元测试
- uplode.spec.js
import chai, {expect} from 'chai'
import sinon from 'sinon'
import sinonChai from 'sinon-chai'
import {mount} from '@vue/test-utils'
import Upload from '@/upload.vue'
chai.use(sinonChai)
describe('Upload.vue', () => {
it('存在.', () => {
expect(Upload).to.exist
})
it('可以上传一个文件', ()=>{
const wrapper = mount(Upload, {
propsData: {
name: 'file',
action: '/xxx',
parseResponse: ()=>{}
},
slots: {
//构造一个按钮来点击
default: ''
}
})
console.log(wrapper.html())
//点击当前按钮页面会多一个input标签,然后会弹出对话框
wrapper.find('#x').trigger('click')
console.log(wrapper.html())
})
})
问题1:我们没法操作对话框,而我们操作对话框是为了选中文件把文件放到input里面去,所以如果我们能用js把文件放到input中去就可以不操作对话框了,往input里面放文件就是改input.files
let inputWrapper =  wrapper.find('input[type="file"]')
        let input = inputWrapper.element
        //new File接受两个参数第一个文件内容(必须是数组),第二个是文件名
        let file1 = new File(['xxxx'], 'xxx.txt')
        let file2 = new File(['yyyy'], 'yyy.txt')
        const data = new DataTransfer()
        data.items.add(file1)
        data.items.add(file2)
        input.files = data.files
如何测试ajax:做一个假的ajax测试请求
新建一个http.js
function core(method, url, options) {
    let xhr = new XMLHttpRequest()
    xhr.open(method, url)
    xhr.onload = () => {
        options.success && options.success(xhr.response)
    }
    xhr.onerror = () => {
        options.fail && options.fail(xhr)
    }
    xhr.send(options.data)
}
export default {
    post(url, options) {
        return core('post', url, options)
    },
    get(){}
}
- upload.vue
doUploadFile(formData, success, fail) {
                http[this.method.toLowerCase()](this.action,{
                    success,
                    fail,
                    data: formData
                })
            },
- upload.spec.js
import http from '../../src/http.js'
it('可以上传一个文件', (done)=>{
// 当我们上传的时候把我们的ajax请求改成自己mock的
http.post = (url, options) => {
setTimeout(()=>{
options.success({id: "123123"})
done()
},1000)
}
const wrapper = mount(Upload, {
propsData: {
name: 'file',
action: '/xxx',
method: 'post',
parseResponse: ()=>{}
},
slots: {
default: ''
}
})
上面之所以要单独在一个对象里写post方法,是因为如果我们直接写成一个对象或者函数,那我们更改它,只是更改了引用地址,原来的还是不会变,而我们通过对象里的引用来修改外层引用一直不会变,所以改了里面的引用其他的也会跟着变
上面的代码运行后发现会有bug,主要原因是我们在使用组件的时候是通过.sync来更新fileList的,但是我们在做单元测试的时候没有这一步,所以我们必须手动更新fileList
- upload.spec.js
propsData: {
name: 'file',
action: '/xxx',
method: 'post',
parseResponse: ()=>{},
fileList: []
},
slots: {
default: ''
},
listeners: {
'update:fileList': (fileList) => {
wrapper.setProps({fileList})
}
}
检测上传loading时显示的菊花
首先在upload.vue中文件上传成功后添加一行触发uploaded事件的代码
- upload.vue
afteruploadFile(){
    ...
    this.$emit('uploaded')
}
it('可以上传一个文件', (done)=>{
http.post = (url, options) => {
setTimeout(()=>{
options.success({id: "123123"})
done()
},1000)
}
const wrapper = mount(Upload, {
propsData: {
name: 'file',
action: '/xxx',
method: 'post',
parseResponse: (response)=>{
let object = JSON.parse(response)
return `/preview/${object.id}`
},
fileList: []
},
slots: {
default: ''
},
listeners: {
'update:fileList': (fileList) => {
wrapper.setProps({fileList})
},
//上传成功
'uploaded': () => {
expect(wrapper.find('use').exists()).to.eq(false)
//第一个fileList里的url就是你上面设置的
expect(wrapper.props().fileList[0].url).to.eq('/preview/123123')
}
}
})
wrapper.find('#x').trigger('click')
let inputWrapper = wrapper.find('input[type="file"]')
let input = inputWrapper.element
//new File接受两个参数第一个文件内容(必须是数组),第二个是文件名
let file1 = new File(['xxxx'], 'xxx.txt')
const data = new DataTransfer()
data.items.add(file1)
input.files = data.files
// 没上传成功前显示菊花
let use = wrapper.find('use').element
expect(use.getAttribute('xlink:href')).to.eq('#i-loading')
})