人脸特征点检测——基于Face_Recognition库
1.Face_Recognition库介绍
face_recognition基于dlib进行了二次封装,号称世界上最简洁的人脸识别库。
(1)github地址:
https://github.com/ageitgey/face_recognition
(2)官方指南:
Face Recognition — Face Recognition 1.4.0 documentation
2.load_image_file方法
主要用于加载要识别的人脸图像,加载返回的数据是Numpy数组。记录了图片的所有像素的特征向量。

源码:
def load_image_file(file, mode='RGB'):
    """
    Loads an image file (.jpg, .png, etc) into a numpy array

    :param file: image file name or file object to load
    :param mode: format to convert the image to. Only 'RGB' (8-bit RGB, 3 channels) and 'L' (black and white) are supported.
    :return: image contents as numpy array
    """
    im = PIL.Image.open(file)
    if mode:
        im = im.convert(mode)
    return np.array(im)
3.face_locations方法
定位图中所有的人脸的像素位置,返回值为列表形式,列表中每一行是一张人脸的位置信息,包括【top, right, bottom, left】 这是一组元组。
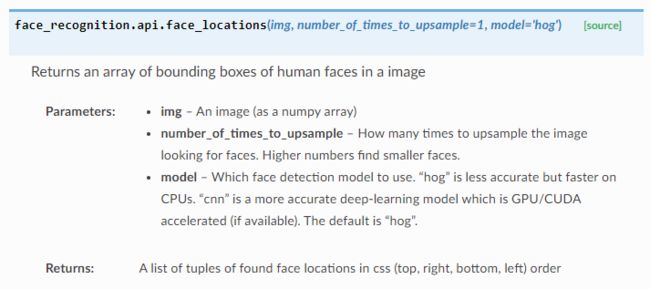
源码:
def face_locations(img, number_of_times_to_upsample=1, model="hog"):
    """
    Returns an array of bounding boxes of human faces in a image

    :param img: An image (as a numpy array)
    :param number_of_times_to_upsample: How many times to upsample the image looking for faces. Higher numbers find smaller faces.
    :param model: Which face detection model to use. "hog" is less accurate but faster on CPUs. "cnn" is a more accurate
                  deep-learning model which is GPU/CUDA accelerated (if available). The default is "hog".
    :return: A list of tuples of found face locations in css (top, right, bottom, left) order
    """
    if model == "cnn":
        return [_trim_css_to_bounds(_rect_to_css(face.rect), img.shape) for face in _raw_face_locations(img, number_of_times_to_upsample, "cnn")]
    else:
        return [_trim_css_to_bounds(_rect_to_css(face), img.shape) for face in _raw_face_locations(img, number_of_times_to_upsample, model)]
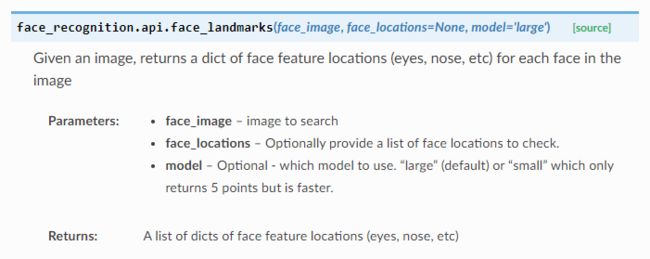
4.face_landmarks方法
识别人脸关键特征点
1)参数仍然是待检测的图像对象,返回值是包含面部特征字典的列表,列表长度就是图像中的人脸数,使用for循环遍历列表。
2)面部特征包括以下几个部分:nose_bridge(鼻梁)、 right_eyebrow(右眼眉)、 left_eyebrow(左眼眉)、 righe_eye()、 left_eye()、chin(下巴)、 nose_tip(下鼻部)、 bottom_lip(下嘴唇)
3) 勾勒脸部大体轮廓
源码:
def face_landmarks(face_image, face_locations=None, model="large"):
    """
    Given an image, returns a dict of face feature locations (eyes, nose, etc) for each face in the image

    :param face_image: image to search
    :param face_locations: Optionally provide a list of face locations to check.
    :param model: Optional - which model to use. "large" (default) or "small" which only returns 5 points but is faster.
    :return: A list of dicts of face feature locations (eyes, nose, etc)
    """
    landmarks = _raw_face_landmarks(face_image, face_locations, model)
    landmarks_as_tuples = [[(p.x, p.y) for p in landmark.parts()] for landmark in landmarks]

    # For a definition of each point index, see https://cdn-images-1.medium.com/max/1600/1*AbEg31EgkbXSQehuNJBlWg.png
    if model == 'large':
        return [{
            "chin": points[0:17],
            "left_eyebrow": points[17:22],
            "right_eyebrow": points[22:27],
            "nose_bridge": points[27:31],
            "nose_tip": points[31:36],
            "left_eye": points[36:42],
            "right_eye": points[42:48],
            "top_lip": points[48:55] + [points[64]] + [points[63]] + [points[62]] + [points[61]] + [points[60]],
            "bottom_lip": points[54:60] + [points[48]] + [points[60]] + [points[67]] + [points[66]] + [points[65]] + [points[64]]
        } for points in landmarks_as_tuples]
    elif model == 'small':
        return [{
            "nose_tip": [points[4]],
            "left_eye": points[2:4],
            "right_eye": points[0:2],
        } for points in landmarks_as_tuples]
    else:
        raise ValueError("Invalid landmarks model type. Supported models are ['small', 'large'].")
5.人脸特征点检测代码
# 1.导入库文件
import face_recognition
import cv2
import matplotlib.pyplot as plt

# 2.显示图片
def show_image(img,title):
    img=img[:,:,::-1]
    plt.title(title)
    plt.imshow(img)
    plt.axis('off')

# 3.绘制关键点
def show_landmarks(img,landmarks):
    for landmarks_dict in landmarks:
        for landmarks_key in landmarks_dict.keys():
            for point in landmarks_dict[landmarks_key]:
                cv2.circle(img,point,2,(0,0,255),-1)
    return img

# 4.主函数
def main():
    # 4.1 读取图片
    img = cv2.imread('img_1.jpg')

    # 4.2 灰度转换
    gray = cv2.cvtColor(img,cv2.COLOR_BGR2GRAY)

    # 4.3 通过face_recognition.face_landmarks()方法读取人脸关键点
    face_marks = face_recognition.face_landmarks(gray,None,'large')

    # 4.4 在人脸上绘制关键点
    img_result=show_landmarks(img,face_marks)

    # 4.5 新建画布
    plt.figure(figsize=(9,6))
    plt.suptitle('Face Landmarks with face recognition',fontsize=14,fontweight='bold')

    # 4.6 显示人脸关键点照片
    show_image(img_result,'Landmarks')
    plt.show()

if __name__ == "__main__":
    main()
参考:
pycharm-人脸识别|face_recognition库 - 樱桃窝窝头 - 博客园