大部分代码来自这里,好不容易找个写的不错的博客。
这个博客真的是救了我
https://www.cnblogs.com/hackyo/p/6646051.html
没想到,配置这个SSM框架会如此难,用了我好几个小时,在此记录一下自己的过程。
需要准备的环境
1.JDK
2.IJ idea
3.Maven
前面两个就不说了,说一下Maven。这个我也是第一次接触这个,弄了好长时间。在此下载(https://maven.apache.org/download.cgi)
解压到文件夹,配置环境变量就略过。
1.配置Maven
打开解压到的文件夹,找到conf文件修改settings.xml,修改目录
E:\apache-maven-3.5.3\repo
创建个repo目录,然后拷一份settings.xml到这个目录
2.配置idea
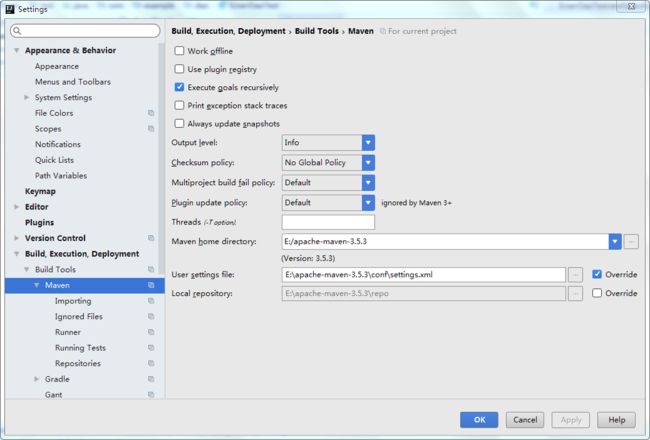
打开setting,照着图修改就好了
创建Maven项目
选择webapp,下一步,然后选择你安装的Maven(千万别忘了,自带的Maven没有setting)
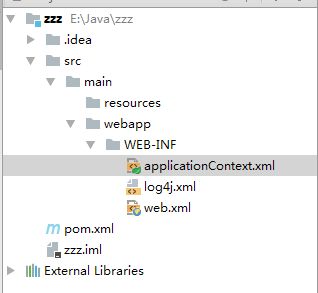
刚创建的项目如下
打开pop.xml
        UTF-8
        UTF-8

        4.3.5.RELEASE

        3.4.1


            javax
            javaee-api
            7.0


            junit
            junit
            4.12


            ch.qos.logback
            logback-classic
            1.2.2


            com.fasterxml.jackson.core
            jackson-databind
            2.8.7


            mysql
            mysql-connector-java
            5.1.41
            runtime


            com.mchange
            c3p0
            0.9.5.2


            org.mybatis
            mybatis
            ${mybatis.version}


            org.mybatis
            mybatis-spring
            1.3.1


            org.springframework
            spring-core
            ${spring.version}


            org.springframework
            spring-beans
            ${spring.version}


            org.springframework
            spring-context
            ${spring.version}


            org.springframework
            spring-jdbc
            ${spring.version}


            org.springframework
            spring-tx
            ${spring.version}


            org.springframework
            spring-web
            ${spring.version}


            org.springframework
            spring-webmvc
            ${spring.version}


            org.springframework
            spring-test
            ${spring.version}
把这一堆考进去,然后Import Changes 就好了。
最重要的部分来了
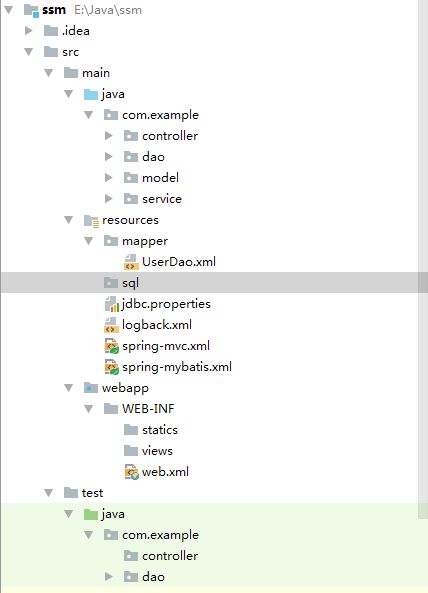
照着这个图片把目录给建好
开始xml和一些其他的配置
1.jdbc.properties
jdbc.driver=com.mysql.jdbc.Driver
jdbc.url=jdbc:mysql://127.0.0.1:3306/ssmtest?useUnicode=true&characterEncoding=utf8
jdbc.username=root
jdbc.password=123456
c3p0.maxPoolSize=30
c3p0.minPoolSize=10
#关闭连接后不自动commit
c3p0.autoCommitOnClose=false
c3p0.checkoutTimeout=10000
#当获取连接失败重试次数
c3p0.acquireRetryAttempts=2
2.spring-mvc.xml
3.spring-mybatis.xml
4.web.xml
    ssm


        encodingFilter
        org.springframework.web.filter.CharacterEncodingFilter

            encoding
            UTF-8


        encodingFilter
        /*


        SpringMVC
        org.springframework.web.servlet.DispatcherServlet


            contextConfigLocation
            classpath:spring-*.xml

        1
        true


        SpringMVC

        /


        index.html
这种地方很容易出错,能复制就复制。
现在开始SQL语句的编写
http://www.mybatis.org/mybatis-3/zh/sqlmap-xml.html
我也不解释了,自己去看。
CREATE TABLE `user` (
  `id` int(11) NOT NULL AUTO_INCREMENT COMMENT '用户ID',
  `email` varchar(255) NOT NULL COMMENT '用户邮箱',
  `password` varchar(255) NOT NULL COMMENT '用户密码',
  `username` varchar(255) NOT NULL COMMENT '用户昵称',
  `role` varchar(255) NOT NULL COMMENT '用户身份',
  `status` int(1) NOT NULL COMMENT '用户状态',
  `regTime` datetime NOT NULL COMMENT '注册时间',
  `regIp` varchar(255) NOT NULL COMMENT '注册IP',
  PRIMARY KEY (`id`),
  UNIQUE KEY `email` (`email`) USING BTREE
) ENGINE=InnoDB AUTO_INCREMENT=2 DEFAULT CHARSET=utf8;
INSERT INTO `user` VALUES ('1', 'xxx', 'xxxxx', 'xxxxx', 'root', '0', '2017-03-28 09:40:31', '127.0.0.1');
SET FOREIGN_KEY_CHECKS=1;
INSERT INTO user
(email,password,username,role,status,regTime,regIp)
VALUE(#{email},#{password},#{username},#{role},#{status},#{regTime},#{regIp})
UPDATE user set
email = #{email},
password = #{password},
username = #{username},
role = #{role},
status = #{status},
regTime = #{regTime},
regIp = #{regIp}
WHERE id = #{id}
delete from user where id = #{id}
开始代码的编写
1.dao
public interface IUserDao {
    User selectUser(long id);

    int insertUser(User user);

    int updateUser(User user);

    int deleteUser(long id);
}
2.model
public class User {
    private long id;
    private String email;
    private String password;
    private String username;
    private String role;
    private int status;
    private Date regTime;
    private String regIp;
}
GET AND SET 自己去生成
3.service
public interface IUserService {
    User selectUser(long userId);

    int insertUser(User user);

    int updateUser(User user);

    int deleteUser(long userId);
}
3.5.service impl
@Service("userService")
public class UserServiceImpl implements IUserService {

    @Resource
    private IUserDao userDao;

    public User selectUser(long userId) {
        return userDao.selectUser(userId);
    }

    public int insertUser(User user) {
        return userDao.insertUser(user);
    }

    public int updateUser(User user) {
        return userDao.updateUser(user);
    }

    public int deleteUser(long userId) {
        return userDao.deleteUser(userId);
    }
}
4.controller
@Controller
@RequestMapping("/user")
public class UserController {
    @Resource
    private IUserService userService;

    @RequestMapping("/showUser.do")
    public void selectUser(HttpServletRequest request, HttpServletResponse response) throws IOException {
        request.setCharacterEncoding("UTF-8");
        response.setCharacterEncoding("UTF-8");

        long useId = Long.parseLong(request.getParameter("id"));
        User user = this.userService.selectUser(useId);

        ObjectMapper mapper = new ObjectMapper();
        response.getWriter().write(mapper.writeValueAsString(user));
        response.getWriter().close();
    }
}
5.Test
// 加载spring配置文件
@RunWith(SpringJUnit4ClassRunner.class)
@ContextConfiguration({"classpath:spring-mybatis.xml"})
public class IUserDaoTest {

    @Autowired
    private IUserDao dao;

    @Test
    public void testSelectUser() throws Exception {
        //查询
//        long id = 1;
//        User user = dao.selectUser(id);
//        System.out.println(user.getUsername());
        // 添加
//        user = new User();
//        user.setEmail("[email protected]");
//        user.setPassword("123456");
//        user.setUsername("Test2");
//        user.setRole("admin");
//        user.setStatus(1);
//        Date date = new Date();
//        user.setRegTime(date);
//        user.setRegIp("127.0.0.1");
//        System.out.println(dao.insertUser(user));
        // 删除
//        System.out.println("Delete:"+dao.deleteUser(2));

        //修改
//        User user = new User();
//        user.setId(1);
//        user.setEmail("update_email");
//        user.setPassword("update_password");
//        user.setUsername("update1_name");
//        user.setRole("update1_role");
//        user.setStatus(100);
//        Date date = new Date();
//        user.setRegTime(date);
//        user.setRegIp("update1_ip");
//        System.out.println("Update:"+dao.updateUser(user));
    }
}
到这一步,应该就可以运行了。
框架搭建就差不多了。
勉强测试跑通了
代码来自一开始那个博客,他那个XML哪里有个小问题。
这样看起来有问题,其实没问题。浪费了我好久时间。
test
Hello World!
运行一下就好了。有BUG自己修,反正我没有


