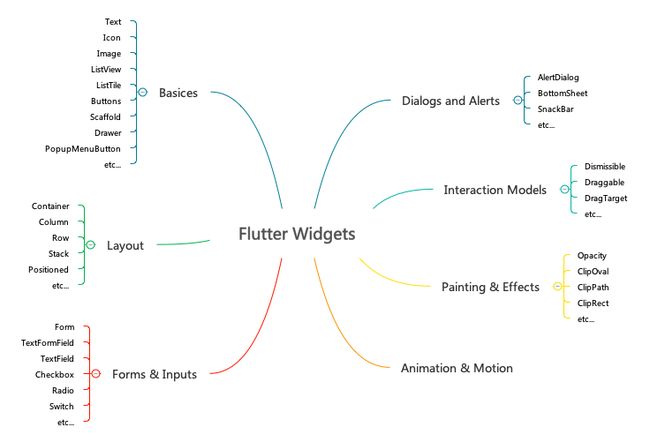
Flutter 提供了大量的 Widget,种类繁多,就是布局组件就多达 30 个,我们就不一一介绍,只介绍比较常用的一些。在介绍组件之前,我们先了解一下 Flutter 部件的不同种类,在 Flutter 的官方文档中,对所有部件的分类比较混乱,不同类型的部件之间有很多交叉现象,例如:Container 既属于基础部件又属于布局类型的部件;Image 部件同时在基础类型和 Material 类型中,并且还专门为资源类型的部件(Icon、RowImage 等)定义了一个类别。个人感觉它的分类比较混乱,因此我试着重新梳理一下 Flutter 的常用部件类型,以便于学习使用。
- Basics
- Forms and Inputs
- Layout
- Dialogs and Alerts
- Interaction Models
- Animation and Motion
- Painting and effects
StatelessWidget vs StatefulWidget
在介绍各种不同的部件之前,我们先了解一下什么是无状态部件和有状态部件。无状态部件,它内部的状态是来自父组件,并且使用 final 类型的变量来存储,当部件被创建的时候,UI 是由这些不可改变的数据构建的,他们都是最终态。那么有状态部件刚好和无状态部件相反,它内部的状态在部件的整个生命周期是可以发生变化的。
Flutter 诡异的两个基类,这是在做动静分离吗?性能的考虑吗?个人觉得大可不必,在实际项目中绝大多数 UI 都需要
常用 Widgets
- Basics:
- Text & Image & Icon
- ListView & ListTile
- Buttons
- Scaffold & Appbar & Drawer & PopupMenuButton
- Forms and Inputs:
- Form
- TextFormField & TextField
- Checkbox & Radio & Switch
- Date & Time Pickers
- Layout:
- Container & Padding & Center & Positioned
- Column & Row & Stack & GridView
- Dialogs and Alerts:
- AlertDialog
- SnackBar
- BottomSheet
- Interaction Models
- Animation and Motion
- Painting and effects
常用基础部件(Basics)
Text & Icon & Image
Text & Image & Icon 是 UI 中最基础的信息显示部件,这些部件就不做详细的介绍,因为作为前端工程师,用的最多最熟悉的也就是这些部件,直接看代码:
Column(
    children: [
        Text('Text Widget'),
        Image.network('https://metaimg.baichanghui.com/appdownload.jpg'),
        Icon(Icons.help),
    ]
)
ListView & ListTile
ListView & ListTile 这类组件,主要是解决大量列表数据的展示和交互。ListView 为列表的主体部分,它可以绑定数据集合,并且滚动时可以和远程数据进行交互,当然也可以对列表项的数据进行不同的布局展示。ListTile 为列表项的布局,它是基于 Material Design 设计出来的一种特殊布局的部件。
List listData = ['a', 'b', 'c', 'd'];

//...

ListView.builder(
    itemCount: 4,
    itemBuilder: (context, index) {
        String item = listData[index];

        return ListTile(
            title: Text(item),
            subtitle: Text(index.toString())
        );
    }
);
Buttons
在 Flutter 部件中有各种不同风格的按钮,例如:IconButton、FlatButton、RaisedButton、RawMaterialButton 等等,其实它们仅仅是风格不同,用处没有太大的差别:
Column(
    children: [
        FlatButton(
            color: Colors.black,
            textColor: Colors.white,
            child: Text('Button'),
            onPressed: () { },
        ),
        IconButton(
            icon: Icon(Icons.help),
            iconSize: 20,
            color: Colors.black,
            onPressed: () { },
        )
    ]
)
他们在初始化是,有一个必须要初始化的属性 onPressed
Scaffold & Appbar & Drawer & PopupMenuButton
这一组部件也是基于 Material Design 设计出来的,它们主要解决 App 的导航、辅助功能等问题,当然它也会帮你适配页面在不同设备下的表现。下面的代码中,会出现上述所有组件,让我们分享一下代码:
Scaffold(
    appBar: Appbar(
        title: Text('Title'),
        actions:  [
            PopupMenuButton(
                itemBuilder: (context) {
                    return [
                        PopupMenuItem(
                            value: '',
                            child: Text('Item1')
                        )
                    ];
                }
            )
        ]
    ),
    drawer: Drawer(
        child: Column(),
    ),
    body: Container(),
)
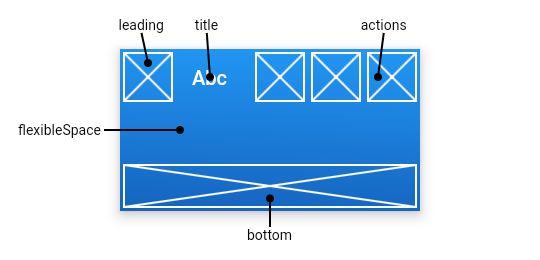
- Scaffold:Material Design 布局结构的基本实现
- appbar: Appbar:引用程序栏
- title:标题
- actions:操作部件
- PopupMenuButton:弹出菜单按钮
- PopupMenuItem:菜单项
- PopupMenuButton:弹出菜单按钮
- drawer: Drawer:侧边抽屉导航
- body:应用程序主体
- appbar: Appbar:引用程序栏
表单部件(Forms and Inputs)
我们通过表单来收集用户填写的相关信息,和 Web 中的表单类似,Flutter 提供了表单中常用的文本输入、单选、多选和开关等部件,并且它也提供了基本的表单校验的功能,以及满足我们通常的业务。
Form(
    key: _formKey,
    child: Column(
        children: [
            TextFormField(
                validator: (value) {
                    if(value.isEmpty) {
                    return 'Please enter some text';
                    }
                },
            ),
            Checkbox(
                value: false,
                onChanged: (value) { },
            ),
            Radio(
                value: false,
                groupValue: 0,
                onChanged: (value) { },
            ),
            Switch(
                value: false,
                onChanged: (value) {},
            ),
            RaisedButton(
                child: Text('Submit'),
                color: Colors.black,
                textColor: Colors.white,
                onPressed: (){
                if(_formKey.currentState.validate()) {
                        Scaffold.of(context).showSnackBar(SnackBar(
                            content: Text('OK'),
                        ));
                    }
                },
            )
        ],
    ),
);
布局部件(Layout)
布局部件在 Flutter 中多达 30 个,个人对这种复杂繁多的设计并不是非常满意(或许它有自己的好处),但是对于开发人员来说非常不友好。在布局部件中 Flutter 分两大类:一类是单个子元素的布局部件;另一类是多个子元素的布局部件。我们简单介绍几个较为常用的部件:
- Single-child layout widgets
- Container:
- Padding:
- Center:
- Positioned:
- Multi-child layout widgets
- Column:
- Row:
- Stack:
- GridView:
Container
Container 类似于 Web 中的 Padding 可以用来给部件设置内边距,搞不懂 Flutter 的设计思想: What? Positioned 部件可以对它设置相对位置,让它位于屏幕的不同地方,不过它需要与 Stack 部件配合使用: Column 是纵向布局部件,可以让你对多个部件进行纵向布局,在它内部的子部件会沿屏幕的纵向一个一个显示出来: Row 刚好和 Column 相反,可以让你对多个部件进行横向布局,在它内部的子部件会沿屏幕的横向一个一个显示出来: Stack 堆叠布局,在 Stack 内部的子部件,会堆叠在一起,我们可以配合 Positioned 部件来设置堆叠于 Stack 内部的位置: GridView 珊格布局,它在 Web 的响应式设计中经常使用,他的好处在于,可以适应不同的屏幕: 提醒和弹出框部件,App 相比起 Web 更加的丰富多样,Web 原生提供的也比较少,我们看看 App 中比较常用的几个: AlertDialog 类似于浏览器中的 alert,只不过它可以自定义一些按钮来做不同的事情: SnackBar 是类似于很多 UI 框架中的提醒框,它属于非阻断性的提醒: BottomSheet 是从屏幕底部弹出来的页面,你可以通过它来做一些类似与 Select 部件的功能,当然它内部的内容是可以自定义的: Interaction Models、Animation and Motion、Painting and effects 这些都属于比较高级的部件,我们在未来文章中再做介绍。回顾 Flutter 如此繁多的部件,再加上它的有状态部件和无状态部件之分,学习成本相对来说比较高,每一种部件还有这不同的功能属性,这种设计的确讲究软件设计的职责单一,但是在复杂的 UI 场景会导致大量的代码嵌套,代码的维护成本也会随之上升,在 Web 的 Table 布局时代就出现过这样的灾难。作为 Web 工程师,可能对 Flutter 这样的设计非常抱怨,HTML 和 CSS 将组件和样式分离开来,从学习的角度上看所有组件有着它自己的功能,而样式只是组件的附加值,从某种角度上来说这是两个是解藕的,但是 Flutter 部件的学习过程中需要去了解各个部件自己的长相如何设置,在这一点 Web 学习的复杂成本会降低。另外将样式分离开来后,代码嵌套也会随之减少,同样是 DIV 我们可以给它赋予布局、边框、背景、阴影、边距、剪切等样式,但是 Flutter 部件要实现这些功能需要嵌套多个部件才能完成。个人认为 Flutter 在这方面需要继续改进,已迎合现在互联网工程师的口味,这样才能推广开来。 〖坚持的一俢〗height、width、padding、margin 等属性:
Container(
child: Text('Container'),
padding: EdgeInsets.all(10),
margin: EdgeInsets.all(30),
height: 250,
width: 200,
alignment: Alignment.center,
decoration: BoxDecoration(
color: Colors.red,
border: Border.all(
width: 3,
color: Colors.blue
),
borderRadius: BorderRadius.all(
Radius.circular(20)
),
image: DecorationImage(
image: NetworkImage('https://metaimg.baichanghui.com/appdownload.jpg')
)
),
transform: Matrix4.rotationZ(-0.1),
)
Padding
Padding(
padding: EdgeInsets.all(20),
child: Container(
child: Text('Padding'),
color: Colors.green,
),
)
Center
Center(
child: Text('Center'),
)
Positioned
Positioned(
left: 100,
top: 100,
child: Container(
color: Colors.green,
height: 80,
width: 80,
),
)
Column
Column(
children: Row
Row(
children: Stack
Stack(
children: GridView
GridView.count(
crossAxisCount: 2,
children: List.generate(20, (index) {
return Text(index.toString());
}),
)
提醒弹出框部件(Dialogs and Alerts)
AlertDialog
FlatButton(
child: Text('Show Dialog'),
onPressed: () {
showDialog(
context: context,
builder: (context) => AlertDialog(
title: Text('Title2'),
content: Text('Content2'),
actions: SnackBar
RaisedButton(
child: Text('Show SnackBar'),
color: Colors.black,
textColor: Colors.white,
onPressed: (){
Scaffold.of(context).showSnackBar(SnackBar(
content: Text('Hello!'),
));
},
)
BottomSheet
RaisedButton(
child: Text('Show Bottom Sheet'),
color: Colors.black,
textColor: Colors.white,
onPressed: () {
showBottomSheet(
context: context,
builder: (context){
return Container(
width: MediaQuery.of(context).size.width,
child: Text('BottomSheet'),
);
}
);
},
)
代码:
总结

