大数据同步工具Canal
目录
- 1 什么是canal
- 2 canal能做什么
- 3 如何搭建canal
-
- 3.1 首先有一个MySQL服务器
- 3.2 安装canal
- 4 Java客户端操作
- 5 总结
- 6 ClientAdapter
-
- 基本说明
- 环境版本
- 一、适配器整体结构
- 二、适配器配置介绍
-
- 2.1 总配置文件 application.yml
-
- adapter定义配置部分
- 2.2 使用远程配置(Mysql)
-
- 2.1.1 创建mysql schema
- 2.1.2 初始化数据
- 2.1.3 修改bootstrap.yml配置
- 三、适配器启动
-
- 3.1 启动canal-adapter示例
-
- 3.1.1 启动canal server (单机模式), 参考: [Canal QuickStart](https://github.com/alibaba/canal/wiki/QuickStart)
- 3.1.2 修改conf/application.yml为:
- 3.1.3 启动
- 3.2 adapter管理REST接口
-
- 3.2.1 查询所有订阅同步的canal instance或MQ topic
- 3.2.2 数据同步开关
- 3.2.3 数据同步开关状态
- 3.2.4 手动ETL(核心步骤)
- 3.2.5 查看相关库总数据
- 适配器列表
-
- logger适配器
- Hbase适配器
- Sync HBase
- 背景
- HBase适配器
-
- 1. 修改启动器配置: application.yml
- 2. HBase表映射文件
- 3. 启动HBase数据同步
-
- 3.1 创建HBase表
- 3.2 启动canal-adapter启动器
- 3.4 验证
- RDB适配器
- ES适配器
- Sync ES
- 背景
-
- ElasticSearch适配器
-
- 1 修改启动器配置: application.yml
- 2 适配器表映射文件
-
- 2.1.单表映射索引示例sql:
- 2.2.单表映射索引示例sql带函数或运算操作:
- 2.3.多表映射(一对一, 多对一)索引示例sql:
- 2.4.多表映射(一对多)索引示例sql:
- 2.5.其它类型的sql示例:
- 3 启动ES数据同步
-
- 启动canal-adapter启动器
- MongoDB适配器
- Redis适配器
1 什么是canal
我们都知道一个系统最重要的是数据,数据是保存在数据库里。但是很多时候不单止要保存在数据库中,还要同步保存到Elastic Search、HBase、Redis等等。
这时我注意到阿里开源的框架Canal,他可以很方便地同步数据库的增量数据到其他的存储应用。所以在这里总结一下,分享给各位读者参考~
我们先看官网的介绍
canal,译意为水道/管道/沟渠,主要用途是基于 MySQL 数据库增量日志解析,提供增量数据订阅和消费。
这句介绍有几个关键字:增量日志,增量数据订阅和消费。
这里我们可以简单地把canal理解为一个用来同步增量数据的一个工具。
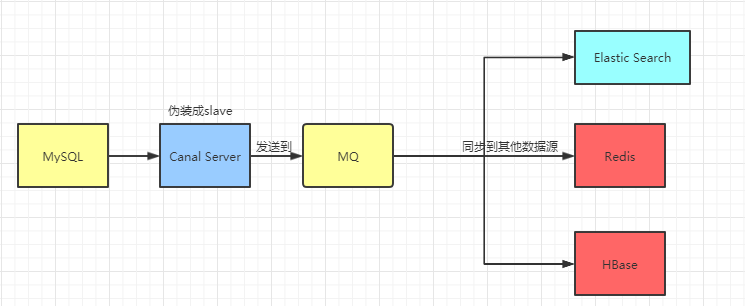
接下来我们看一张官网提供的示意图:

canal的工作原理就是把自己伪装成MySQL slave,模拟MySQL slave的交互协议向MySQL Mater发送 dump协议,MySQL mater收到canal发送过来的dump请求,开始推送binary log给canal,然后canal解析binary log,再发送到存储目的地,比如MySQL,Kafka,Elastic Search等等。
2 canal能做什么
以下参考canal官网。
与其问canal能做什么,不如说数据同步有什么作用。
但是canal的数据同步不是全量的,而是增量。基于binary log增量订阅和消费,canal可以做:
- 数据库镜像
- 数据库实时备份
- 索引构建和实时维护
- 业务cache(缓存)刷新
- 带业务逻辑的增量数据处理
3 如何搭建canal
3.1 首先有一个MySQL服务器
当前的 canal 支持源端 MySQL 版本包括 5.1.x , 5.5.x , 5.6.x , 5.7.x , 8.0.x
我的Linux服务器安装的MySQL服务器是5.7版本。
MySQL的安装这里就不演示了,比较简单,网上也有很多教程。
然后在MySQL中需要创建一个用户,并授权:
-- 使用命令登录:mysql -u root -p
-- 创建用户 用户名:canal 密码:Canal@123456
create user 'canal'@'%' identified by 'Canal@123456';
-- 授权 *.*表示所有库
grant SELECT, REPLICATION SLAVE, REPLICATION CLIENT on *.* to 'canal'@'%' identified by 'Canal@123456';
下一步在MySQL配置文件my.cnf设置如下信息:
[mysqld]
# 打开binlog
log-bin=mysql-bin
# 选择ROW(行)模式
binlog-format=ROW
# 配置MySQL replaction需要定义,不要和canal的slaveId重复
server_id=1
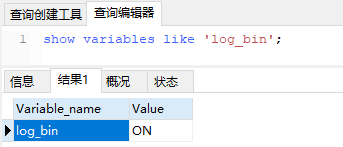
改了配置文件之后,重启MySQL,使用命令查看是否打开binlog模式:
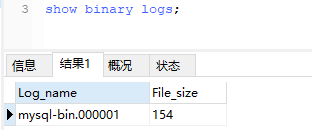
查看binlog日志文件列表:
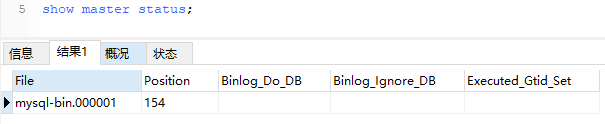
查看当前正在写入的binlog文件:
MySQL服务器这边就搞定了,很简单。
3.2 安装canal
去官网下载页面进行下载:https://github.com/alibaba/canal/releases
我这里下载的是1.1.4的版本:
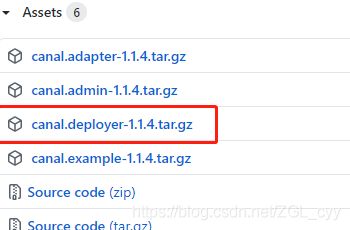
解压canal.deployer-1.1.4.tar.gz,我们可以看到里面有四个文件夹:
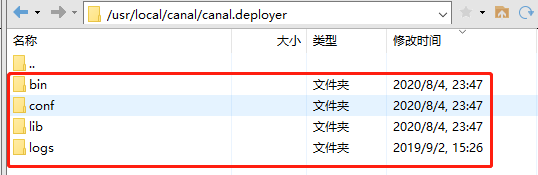
接着打开配置文件conf/example/instance.properties,配置信息如下:
## mysql serverId , v1.0.26+ will autoGen
## v1.0.26版本后会自动生成slaveId,所以可以不用配置
# canal.instance.mysql.slaveId=0

# 数据库地址
canal.instance.master.address=127.0.0.1:3306
# binlog日志名称
canal.instance.master.journal.name=mysql-bin.000001
# mysql主库链接时起始的binlog偏移量
canal.instance.master.position=154
# mysql主库链接时起始的binlog的时间戳
canal.instance.master.timestamp=
canal.instance.master.gtid=

# username/password
# 在MySQL服务器授权的账号密码
canal.instance.dbUsername=canal
canal.instance.dbPassword=Canal@123456
# 字符集
canal.instance.connectionCharset = UTF-8
# enable druid Decrypt database password
canal.instance.enableDruid=false

# table regex .*\\..*表示监听所有表 也可以写具体的表名,用,隔开
canal.instance.filter.regex=.*\\..*
# mysql 数据解析表的黑名单,多个表用,隔开
canal.instance.filter.black.regex=
我这里用的是win10系统,所以在bin目录下找到startup.bat启动:
启动就报错,坑呀:
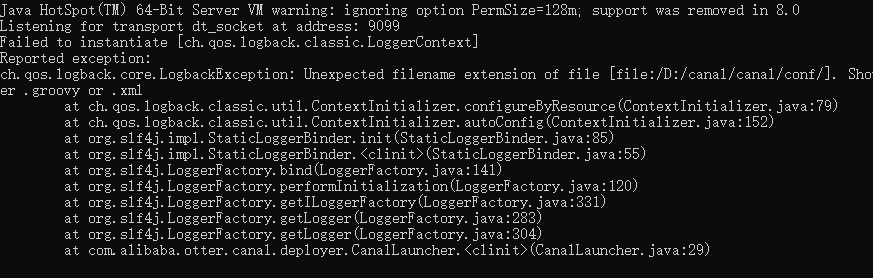
要修改一下启动的脚本startup.bat:
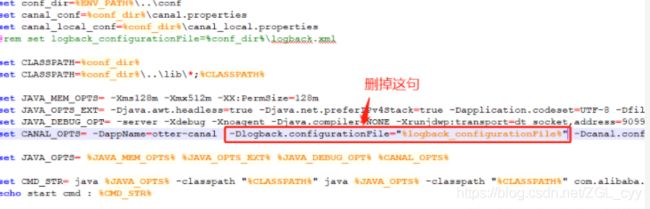
然后再启动脚本:
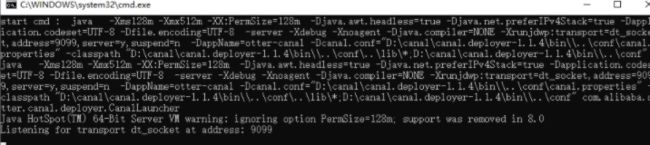
这就启动成功了。
4 Java客户端操作
首先引入maven依赖:
<dependency>
    <groupId>com.alibaba.ottergroupId>
    <artifactId>canal.clientartifactId>
    <version>1.1.4version>
dependency>
然后创建一个canal项目,使用SpringBoot构建,如图所示:
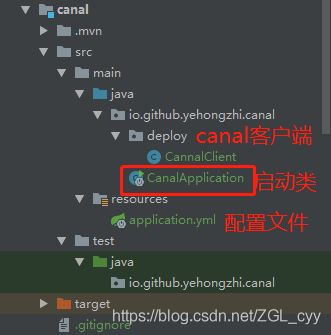
在CannalClient类使用Spring Bean的生命周期函数afterPropertiesSet():
@Component
public class CannalClient implements InitializingBean {

    private final static int BATCH_SIZE = 1000;

    @Override
    public void afterPropertiesSet() throws Exception {
        // 创建链接
        CanalConnector connector = CanalConnectors.newSingleConnector(new InetSocketAddress("127.0.0.1", 11111), "example", "", "");
        try {
            //打开连接
            connector.connect();
            //订阅数据库表,全部表
            connector.subscribe(".*\\..*");
            //回滚到未进行ack的地方,下次fetch的时候,可以从最后一个没有ack的地方开始拿
            connector.rollback();
            while (true) {
                // 获取指定数量的数据
                Message message = connector.getWithoutAck(BATCH_SIZE);
                //获取批量ID
                long batchId = message.getId();
                //获取批量的数量
                int size = message.getEntries().size();
                //如果没有数据
                if (batchId == -1 || size == 0) {
                    try {
                        //线程休眠2秒
                        Thread.sleep(2000);
                    } catch (InterruptedException e) {
                        e.printStackTrace();
                    }
                } else {
                    //如果有数据,处理数据
                    printEntry(message.getEntries());
                }
                //进行 batch id 的确认。确认之后,小于等于此 batchId 的 Message 都会被确认。
                connector.ack(batchId);
            }
        } catch (Exception e) {
            e.printStackTrace();
        } finally {
            connector.disconnect();
        }
    }

    /**
     * 打印canal server解析binlog获得的实体类信息
     */
    private static void printEntry(List<Entry> entrys) {
        for (Entry entry : entrys) {
            if (entry.getEntryType() == EntryType.TRANSACTIONBEGIN || entry.getEntryType() == EntryType.TRANSACTIONEND) {
                //开启/关闭事务的实体类型,跳过
                continue;
            }
            //RowChange对象,包含了一行数据变化的所有特征
            //比如isDdl 是否是ddl变更操作 sql 具体的ddl sql beforeColumns afterColumns 变更前后的数据字段等等
            RowChange rowChage;
            try {
                rowChage = RowChange.parseFrom(entry.getStoreValue());
            } catch (Exception e) {
                throw new RuntimeException("ERROR ## parser of eromanga-event has an error , data:" + entry.toString(), e);
            }
            //获取操作类型:insert/update/delete类型
            EventType eventType = rowChage.getEventType();
            //打印Header信息
            System.out.println(String.format("================》; binlog[%s:%s] , name[%s,%s] , eventType : %s",
                    entry.getHeader().getLogfileName(), entry.getHeader().getLogfileOffset(),
                    entry.getHeader().getSchemaName(), entry.getHeader().getTableName(),
                    eventType));
            //判断是否是DDL语句
            if (rowChage.getIsDdl()) {
                System.out.println("================》;isDdl: true,sql:" + rowChage.getSql());
            }
            //获取RowChange对象里的每一行数据,打印出来
            for (RowData rowData : rowChage.getRowDatasList()) {
                //如果是删除语句
                if (eventType == EventType.DELETE) {
                    printColumn(rowData.getBeforeColumnsList());
                    //如果是新增语句
                } else if (eventType == EventType.INSERT) {
                    printColumn(rowData.getAfterColumnsList());
                    //如果是更新的语句
                } else {
                    //变更前的数据
                    System.out.println("------->; before");
                    printColumn(rowData.getBeforeColumnsList());
                    //变更后的数据
                    System.out.println("------->; after");
                    printColumn(rowData.getAfterColumnsList());
                }
            }
        }
    }

    private static void printColumn(List<Column> columns) {
        for (Column column : columns) {
            System.out.println(column.getName() + " : " + column.getValue() + "    update=" + column.getUpdated());
        }
    }
}
以上就完成了Java客户端的代码。这里不做具体的处理,仅仅是打印,先有个直观的感受。
最后我们开始测试,首先启动MySQL、Canal Server,还有刚刚写的Spring Boot项目。然后创建表:
CREATE TABLE `tb_commodity_info` (
  `id` varchar(32) NOT NULL,
  `commodity_name` varchar(512) DEFAULT NULL COMMENT '商品名称',
  `commodity_price` varchar(36) DEFAULT '0' COMMENT '商品价格',
  `number` int(10) DEFAULT '0' COMMENT '商品数量',
  `description` varchar(2048) DEFAULT '' COMMENT '商品描述',
  PRIMARY KEY (`id`)
) ENGINE=InnoDB DEFAULT CHARSET=utf8mb4 COMMENT='商品信息表';
然后我们在控制台就可以看到如下信息:

如果新增一条数据到表中:
INSERT INTO tb_commodity_info VALUES('3e71a81fd80711eaaed600163e046cc3','叉烧包','3.99',3,'又大又香的叉烧包,老人小孩都喜欢');
控制台可以看到如下信息:

5 总结
canal的好处在于对业务代码没有侵入,因为是基于监听binlog日志去进行同步数据的。实时性也能做到准实时,其实是很多企业一种比较常见的数据同步的方案。
通过上面的学习之后,我们应该都明白canal是什么,它的原理,还有用法。实际上这仅仅只是入门,因为实际项目中我们不是这样玩的…
实际项目我们是配置MQ模式,配合RocketMQ或者Kafka,canal会把数据发送到MQ的topic中,然后通过消息队列的消费者进行处理。
Canal的部署也是支持集群的,需要配合ZooKeeper进行集群管理。
Canal还有一个简单的Web管理界面。
集群部署Canal,配合使用Kafka,同步数据到Redis。
参考资料:Canal官网
6 ClientAdapter
rewerma edited this page on 4 Apr 2019 · 21 revisions
基本说明
canal 1.1.1版本之后, 增加客户端数据落地的适配及启动功能, 目前支持功能:
- 客户端启动器
- 同步管理REST接口
- 日志适配器, 作为DEMO
- 关系型数据库的数据同步(表对表同步), ETL功能
- HBase的数据同步(表对表同步), ETL功能
- (后续支持) ElasticSearch多表数据同步,ETL功能
环境版本
- 操作系统:无要求
- java版本: jdk1.8 以上
- canal 版本: 请下载最新的安装包,本文以当前v1.1.1 的canal.deployer-1.1.1.tar.gz为例
- MySQL版本 :5.7.18
- HBase版本: Apache HBase 1.1.2, 若和服务端版本不一致可自行替换客户端HBase依赖
一、适配器整体结构
client-adapter分为适配器和启动器两部分, 适配器为多个fat jar, 每个适配器会将自己所需的依赖打成一个包, 以SPI的方式让启动器动态加载, 目前所有支持的适配器都放置在plugin目录下
启动器为 SpringBoot 项目, 支持canal-client启动的同时提供相关REST管理接口, 运行目录结构为:
- bin
    restart.sh
    startup.bat
    startup.sh
    stop.sh
- lib
   ...
- plugin
    client-adapter.logger-1.1.1-jar-with-dependencies.jar
    client-adapter.hbase-1.1.1-jar-with-dependencies.jar
    ...
- conf
    application.yml
    - hbase
        mytest_person2.yml
- logs
以上目录结构最终会打包成 canal-adapter-*.tar.gz 压缩包
二、适配器配置介绍
2.1 总配置文件 application.yml
adapter定义配置部分
canal.conf:
  canalServerHost: 127.0.0.1:11111          # 对应单机模式下的canal server的ip:port
  zookeeperHosts: slave1:2181               # 对应集群模式下的zk地址, 如果配置了canalServerHost, 则以canalServerHost为准
  mqServers: slave1:6667 #or rocketmq       # kafka或rocketMQ地址, 与canalServerHost不能并存
  flatMessage: true                         # 扁平message开关, 是否以json字符串形式投递数据, 仅在kafka/rocketMQ模式下有效
  batchSize: 50                             # 每次获取数据的批大小, 单位为K
  syncBatchSize: 1000                       # 每次同步的批数量
  retries: 0                                # 重试次数, -1为无限重试
  timeout:                                  # 同步超时时间, 单位毫秒
  mode: tcp # kafka rocketMQ                # canal client的模式: tcp kafka rocketMQ
  srcDataSources:                           # 源数据库
    defaultDS:                              # 自定义名称
      url: jdbc:mysql://127.0.0.1:3306/mytest?useUnicode=true   # jdbc url
      username: root                                            # jdbc 账号
      password: 121212                                          # jdbc 密码
  canalAdapters:                            # 适配器列表
  - instance: example                       # canal 实例名或者 MQ topic 名
    groups:                                 # 分组列表
    - groupId: g1                           # 分组id, 如果是MQ模式将用到该值
      outerAdapters:                        # 分组内适配器列表
      - name: logger                        # 日志打印适配器
......
说明:
- 一份数据可以被多个group同时消费, 多个group之间会是一个并行执行, 一个group内部是一个串行执行多个outerAdapters, 比如例子中logger和hbase
- 目前client adapter数据订阅的方式支持两种,直连canal server 或者 订阅kafka/RocketMQ的消息
2.2 使用远程配置(Mysql)
可以使用远程配置中心(Mysql,可扩展)作为统一配置管理
2.1.1 创建mysql schema
CREATE SCHEMA `canal_manager` DEFAULT CHARACTER SET utf8mb4 ;
2.1.2 初始化数据
使用manager_ddl.sql脚本建表并初始化Demo数据,其中canal_config表id=2的数据对应adapter下的application.yml文件,canal_adapter_config表对应每个adapter的子配置文件
2.1.3 修改bootstrap.yml配置
canal:
  manager:
    jdbc:
      url: jdbc:mysql://127.0.0.1:3306/canal_manager?useUnicode=true&characterEncoding=UTF-8
      username: root
      password: 121212
可以将本地application.yml文件和其他子配置文件删除或清空, 启动工程将自动从远程加载配置
修改mysql中的配置信息后会自动刷新到本地动态加载相应的实例或者应用
三、适配器启动
3.1 启动canal-adapter示例
3.1.1 启动canal server (单机模式), 参考: Canal QuickStart
3.1.2 修改conf/application.yml为:
server:
  port: 8081
logging:
  level:
    com.alibaba.otter.canal.client.adapter.hbase: DEBUG
spring:
  jackson:
    date-format: yyyy-MM-dd HH:mm:ss
    time-zone: GMT+8
    default-property-inclusion: non_null

canal.conf:
  canalServerHost: 127.0.0.1:11111
  batchSize: 500
  syncBatchSize: 1000
  retries: 0
  timeout:
  mode: tcp
  canalAdapters:
  - instance: example
    groups:
    - groupId: g1
      outerAdapters:
      - name: logger
3.1.3 启动
bin/startup.sh
3.2 adapter管理REST接口
3.2.1 查询所有订阅同步的canal instance或MQ topic
curl http://127.0.0.1:8081/destinations
3.2.2 数据同步开关
curl http://127.0.0.1:8081/syncSwitch/example/off -X PUT
针对 example 这个canal instance/MQ topic 进行开关操作. off代表关闭, instance/topic下的同步将阻塞或者断开连接不再接收数据, on代表开启
注: 如果在配置文件中配置了 zookeeperHosts 项, 则会使用分布式锁来控制HA中的数据同步开关, 如果是单机模式则使用本地锁来控制开关
3.2.3 数据同步开关状态
curl http://127.0.0.1:8081/syncSwitch/example
查看指定 canal instance/MQ topic 的数据同步开关状态
3.2.4 手动ETL(核心步骤)
curl http://127.0.0.1:8081/etl/hbase/mytest_person2.yml -X POST -d "params=2018-10-21 00:00:00"
导入数据到指定类型的库, 如果params参数为空则全表导入, 参数对应的查询条件在配置中的etlCondition指定
3.2.5 查看相关库总数据
curl http://127.0.0.1:8081/count/hbase/mytest_person2.yml
适配器列表
logger适配器
最简单的处理, 将受到的变更事件通过日志打印的方式进行输出, 如配置所示, 只需要定义name: logger即可
...
      outerAdapters:
      - name: logger
Hbase适配器
Sync HBase
rewerma edited this page on 1 Feb 2019 · 5 revisions
背景
canal 1.1.1版本之后, 内置增加客户端数据同步功能, Client适配器整体介绍: ClientAdapter
HBase适配器
1. 修改启动器配置: application.yml
canal.conf:
  canalServerHost: 127.0.0.1:11111
  batchSize: 500
  syncBatchSize: 1000
  retries: 0
  timeout:
  mode: tcp # kafka rocketMQ
  srcDataSources:
    defaultDS:
      url: jdbc:mysql://127.0.0.1:3306/mytest?useUnicode=true
      username: root
      password: 121212
  canalAdapters:
  - instance: example # canal instance Name or mq topic name
    groups:
    - groupId: g1
      outerAdapters:
      - name: hbase
        properties:
          hbase.zookeeper.quorum: 127.0.0.1
          hbase.zookeeper.property.clientPort: 2181
          zookeeper.znode.parent: /hbase
注意:adapter将会自动加载 conf/hbase 下的所有.yml结尾的配置文件
2. HBase表映射文件
修改 conf/hbase/mytest_person.yml文件:
dataSourceKey: defaultDS            # 对应application.yml中的datasourceConfigs下的配置
destination: example                # 对应tcp模式下的canal instance或者MQ模式下的topic
groupId:                            # 对应MQ模式下的groupId, 只会同步对应groupId的数据
hbaseMapping:                       # mysql--HBase的单表映射配置
  mode: STRING                      # HBase中的存储类型, 默认统一存为String, 可选: #PHOENIX  #NATIVE   #STRING
                                    # NATIVE: 以java类型为主, PHOENIX: 将类型转换为Phoenix对应的类型
  destination: example              # 对应 canal destination/MQ topic 名称
  database: mytest                  # 数据库名/schema名
  table: person                     # 表名
  hbaseTable: MYTEST.PERSON         # HBase表名
  family: CF                        # 默认统一Column Family名称
  uppercaseQualifier: true          # 字段名转大写, 默认为true
  commitBatch: 3000                 # 批量提交的大小, ETL中用到
  #rowKey: id,type                  # 复合字段rowKey不能和columns中的rowKey并存
                                    # 复合rowKey会以 '|' 分隔
  columns:                          # 字段映射, 如果不配置将自动映射所有字段,
                                    # 并取第一个字段为rowKey, HBase字段名以mysql字段名为主
    id: ROWKE
    name: CF:NAME
    email: EMAIL                    # 如果column family为默认CF, 则可以省略
    type:                           # 如果HBase字段和mysql字段名一致, 则可以省略
    c_time:
    birthday:
注意: 如果涉及到类型转换,可以如下形式:
...
  columns:
    id: ROWKE$STRING
    ...
    type: TYPE$BYTE
    ...
类型转换涉及到Java类型和Phoenix类型两种, 分别定义如下:
#Java 类型转换, 对应配置 mode: NATIVE
$DEFAULT
$STRING
$INTEGER
$LONG
$SHORT
$BOOLEAN
$FLOAT
$DOUBLE
$BIGDECIMAL
$DATE
$BYTE
$BYTES
#Phoenix 类型转换, 对应配置 mode: PHOENIX
$DEFAULT                  对应PHOENIX里的VARCHAR
$UNSIGNED_INT             对应PHOENIX里的UNSIGNED_INT           4字节
$UNSIGNED_LONG            对应PHOENIX里的UNSIGNED_LONG          8字节
$UNSIGNED_TINYINT         对应PHOENIX里的UNSIGNED_TINYINT       1字节
$UNSIGNED_SMALLINT        对应PHOENIX里的UNSIGNED_SMALLINT      2字节
$UNSIGNED_FLOAT           对应PHOENIX里的UNSIGNED_FLOAT         4字节
$UNSIGNED_DOUBLE          对应PHOENIX里的UNSIGNED_DOUBLE        8字节
$INTEGER                  对应PHOENIX里的INTEGER                4字节
$BIGINT                   对应PHOENIX里的BIGINT                 8字节
$TINYINT                  对应PHOENIX里的TINYINT                1字节
$SMALLINT                 对应PHOENIX里的SMALLINT               2字节
$FLOAT                    对应PHOENIX里的FLOAT                  4字节
$DOUBLE                   对应PHOENIX里的DOUBLE                 8字节
$BOOLEAN                  对应PHOENIX里的BOOLEAN                1字节
$TIME                     对应PHOENIX里的TIME                   8字节
$DATE                     对应PHOENIX里的DATE                   8字节
$TIMESTAMP                对应PHOENIX里的TIMESTAMP              12字节
$UNSIGNED_TIME            对应PHOENIX里的UNSIGNED_TIME          8字节
$UNSIGNED_DATE            对应PHOENIX里的UNSIGNED_DATE          8字节
$UNSIGNED_TIMESTAMP       对应PHOENIX里的UNSIGNED_TIMESTAMP     12字节
$VARCHAR                  对应PHOENIX里的VARCHAR                动态长度
$VARBINARY                对应PHOENIX里的VARBINARY              动态长度
$DECIMAL                  对应PHOENIX里的DECIMAL                动态长度
如果不配置将以java对象原生类型默认映射转换
3. 启动HBase数据同步
3.1 创建HBase表
在HBase shell中运行:
create 'MYTEST.PERSON', {NAME=>'CF'}
3.2 启动canal-adapter启动器
bin/startup.sh
3.4 验证
修改mysql mytest.person表的数据, 将会自动同步到HBase的MYTEST.PERSON表下面, 并会打出DML的log
RDB适配器
同步关系型数据库配置 : Sync-RDB
目前内置支持的数据库列表:
- MySQL
- Oracle
- PostgresSQL
- SQLServer
使用了JDBC driver,理论上支持绝大部分的关系型数据库
ES适配器
Sync ES
rewerma edited this page on 26 Sep 2019 · 16 revisions
背景
canal 1.1.1版本之后, 内置增加客户端数据同步功能, Client适配器整体介绍: ClientAdapter
canal adapter 的 Elastic Search 版本支持6.x.x以上, 如需其它版本的es可替换依赖重新编译client-adapter.elasticsearch模块
ElasticSearch适配器
1 修改启动器配置: application.yml
canal.conf:
  canalServerHost: 127.0.0.1:11111
  batchSize: 500
  syncBatchSize: 1000
  retries: 0
  timeout:
  mode: tcp
  srcDataSources:
    defaultDS:
      url: jdbc:mysql://127.0.0.1:3306/mytest?useUnicode=true
      username: root
      password: 121212
  canalAdapters:
  - instance: example
    groups:
    - groupId: g1
      outerAdapters:
      -
        key: exampleKey
        name: es6                           # or es7
        hosts: 127.0.0.1:9300               # es 集群地址, 逗号分隔
        properties:
          mode: transport # or rest         # 可指定transport模式或者rest模式
          # security.auth: test:123456      # only used for rest mode
          cluster.name: elasticsearch       # es cluster name
adapter将会自动加载 conf/es 下的所有.yml结尾的配置文件
2 适配器表映射文件
修改 conf/es/mytest_user.yml文件:
dataSourceKey: defaultDS        # 源数据源的key, 对应上面配置的srcDataSources中的值
outerAdapterKey: exampleKey     # 对应application.yml中es配置的key
destination: example            # cannal的instance或者MQ的topic
groupId:                        # 对应MQ模式下的groupId, 只会同步对应groupId的数据
esMapping:
  _index: mytest_user           # es 的索引名称
  _type: _doc                   # es 的type名称, es7下无需配置此项
  _id: _id                      # es 的_id, 如果不配置该项必须配置下面的pk项_id则会由es自动分配
#  pk: id                       # 如果不需要_id, 则需要指定一个属性为主键属性
  # sql映射
  sql: "select a.id as _id, a.name as _name, a.role_id as _role_id, b.role_name as _role_name,
        a.c_time as _c_time, c.labels as _labels from user a
        left join role b on b.id=a.role_id
        left join (select user_id, group_concat(label order by id desc separator ';') as labels from label
        group by user_id) c on c.user_id=a.id"
#  objFields:
#    _labels: array:;           # 数组或者对象属性, array:; 代表以;字段里面是以;分隔的
#    _obj: object               # json对象
  etlCondition: "where a.c_time>='{0}'"     # etl 的条件参数
  commitBatch: 3000                         # 提交批大小
sql映射说明:
sql支持多表关联自由组合, 但是有一定的限制:
- 主表不能为子查询语句
- 只能使用left outer join即最左表一定要是主表
- 关联从表如果是子查询不能有多张表
- 主sql中不能有where查询条件(从表子查询中可以有where条件但是不推荐, 可能会造成数据同步的不一致, 比如修改了where条件中的字段内容)
- 关联条件只允许主外键的’='操作不能出现其他常量判断比如: on a.role_id=b.id and b.statues=1
- 关联条件必须要有一个字段出现在主查询语句中比如: on a.role_id=b.id 其中的 a.role_id 或者 b.id 必须出现在主select语句中
Elastic Search的mapping 属性与sql的查询值将一一对应(不支持 select *), 比如: select a.id as _id, a.name, a.email as _email from user, 其中name将映射到es mapping的name field, _email将 映射到mapping的_email field, 这里以别名(如果有别名)作为最终的映射字段. 这里的_id可以填写到配置文件的 _id: _id映射.
2.1.单表映射索引示例sql:
select a.id as _id, a.name, a.role_id, a.c_time from user a
该sql对应的es mapping示例:
{
    "mytest_user": {
        "mappings": {
            "_doc": {
                "properties": {
                    "name": {
                        "type": "text"
                    },
                    "role_id": {
                        "type": "long"
                    },
                    "c_time": {
                        "type": "date"
                    }
                }
            }
        }
    }
}
2.2.单表映射索引示例sql带函数或运算操作:
select a.id as _id, concat(a.name,'_test') as name, a.role_id+10000 as role_id, a.c_time from user a
函数字段后必须跟上别名, 该sql对应的es mapping示例:
{
    "mytest_user": {
        "mappings": {
            "_doc": {
                "properties": {
                    "name": {
                        "type": "text"
                    },
                    "role_id": {
                        "type": "long"
                    },
                    "c_time": {
                        "type": "date"
                    }
                }
            }
        }
    }
}
2.3.多表映射(一对一, 多对一)索引示例sql:
select a.id as _id, a.name, a.role_id, b.role_name, a.c_time from user a
left join role b on b.id = a.role_id
注:这里join操作只能是left outer join, 第一张表必须为主表!!
该sql对应的es mapping示例:
{
    "mytest_user": {
        "mappings": {
            "_doc": {
                "properties": {
                    "name": {
                        "type": "text"
                    },
                    "role_id": {
                        "type": "long"
                    },
                    "role_name": {
                        "type": "text"
                    },
                    "c_time": {
                        "type": "date"
                    }
                }
            }
        }
    }
}
2.4.多表映射(一对多)索引示例sql:
select a.id as _id, a.name, a.role_id, c.labels, a.c_time from user a
left join (select user_id, group_concat(label order by id desc separator ';') as labels from label
        group by user_id) c on c.user_id=a.id
注:left join 后的子查询只允许一张表, 即子查询中不能再包含子查询或者关联!!
该sql对应的es mapping示例:
{
    "mytest_user": {
        "mappings": {
            "_doc": {
                "properties": {
                    "name": {
                        "type": "text"
                    },
                    "role_id": {
                        "type": "long"
                    },
                    "c_time": {
                        "type": "date"
                    },
                    "labels": {
                        "type": "text"
                    }
                }
            }
        }
    }
}
2.5.其它类型的sql示例:
- geo type
select ... concat(IFNULL(a.latitude, 0), ',', IFNULL(a.longitude, 0)) AS location, ...
- 复合主键
select concat(a.id,'_',b.type) as _id, ... from user a left join role b on b.id=a.role_id
- 数组字段
select a.id as _id, a.name, a.role_id, c.labels, a.c_time from user a
left join (select user_id, group_concat(label order by id desc separator ';') as labels from label
        group by user_id) c on c.user_id=a.id
配置中使用:
objFields:
  labels: array:;
- 对象字段
select a.id as _id, a.name, a.role_id, c.labels, a.c_time, a.description from user a
配置中使用:
objFields:
  description: object
其中a.description字段内容为json字符串
- 父子文档索引
es/customer.yml
......
esMapping:
  _index: customer
  _type: _doc
  _id: id
  relations:
    customer_order:
      name: customer
  sql: "select t.id, t.name, t.email from customer t"
es/order.yml
esMapping:
  _index: customer
  _type: _doc
  _id: _id
  relations:
    customer_order:
      name: order
      parent: customer_id
  sql: "select concat('oid_', t.id) as _id,
        t.customer_id,
        t.id as order_id,
        t.serial_code as order_serial,
        t.c_time as order_time
        from biz_order t"
  skips:
    - customer_id
mapping示例:
{
  "mappings":{
    "_doc":{
      "properties":{
        "id": {
          "type": "long"
        },
        "name": {
          "type": "text"
        },
        "email": {
          "type": "text"
        },
        "order_id": {
          "type": "long"
        },
        "order_serial": {
          "type": "text"
        },
        "order_time": {
          "type": "date"
        },
        "customer_order":{
          "type":"join",
          "relations":{
            "customer":"order"
          }
        }
      }
    }
  }
}
3 启动ES数据同步
启动canal-adapter启动器
bin/startup.sh